1. Уводзіны
The SPL 2Control is a compact and user-friendly stereo monitor controller designed to provide comprehensive control over your digital audio workstation's (DAW) monitoring functions. It ensures high-quality audio reproduction through both studio monitors and headphones, allowing you to hear every detail of your mix. Key features include a precise speaker volume potentiometer, active circuitry for sound integrity, and a unique Crossfeed control for accurate headphone monitoring that simulates a stereo speaker image.
2. Інструкцыі па тэхніцы бяспекі
- Уважліва прачытайце гэтыя інструкцыі перад эксплуатацыяй прылады.
- Захоўвайце гэта кіраўніцтва для выкарыстання ў будучыні.
- Не падвяргайце прыладу ўздзеянню дажджу або вільгаці, каб пазбегнуць пажару або паражэння электрычным токам.
- Забяспечце належную вентыляцыю; не закрывайце вентыляцыйныя адтуліны.
- Выкарыстоўвайце толькі насадкі/аксэсуары, указаныя вытворцам.
- Адключайце шнур сілкавання падчас навальніцы або калі прылада не выкарыстоўваецца працяглы час.
- Звяртайцеся да кваліфікаванага абслугоўваючага персаналу.
- Пазбягайце размяшчэння прылады побач з крыніцамі цяпла, такімі як радыятары, абагравальнікі, пліты або іншыя прыборы (у тым ліку ampLifiers), якія вырабляюць цяпло.
3. Змесціва ўпакоўкі
Пасля распакавання пераканайцеся, што ў камплекце ёсць наступныя прадметы:
- 1 x SPL 2Control Module
- 1 х Шнур харчавання
- Гэта кіраўніцтва карыстальніка
4. Прадукт скончыўсяview
4.1 Элементы кіравання і індыкатары на пярэдняй панэлі
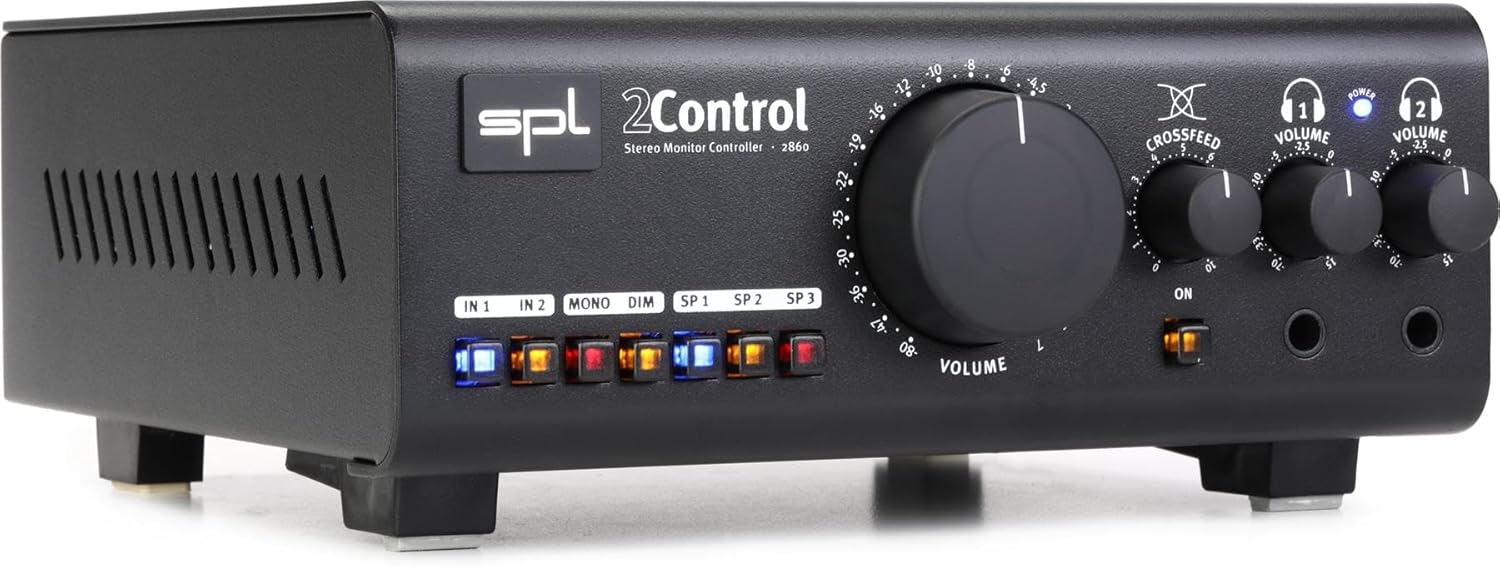
Малюнак 1: Front Panel of the SPL 2Control Stereo Monitor Controller.
This image displays the front panel of the SPL 2Control. From left to right, it features input selection buttons (IN 1, IN 2), function buttons (MONO, DIM), speaker output selection buttons (SP 1, SP 2, SP 3), a large central master VOLUME knob, a CROSSFEED knob, and two individual headphone VOLUME knobs with corresponding headphone output jacks. A power indicator LED is visible above the headphone controls.
- IN 1 / IN 2 Buttons: Selects the active stereo input source.
- Кнопка MONO: Sums the stereo signal to mono for compatibility checking.
- Кнопка DIM: Reduces the output volume by a fixed amount (e.g., -20dB) for temporary level reduction.
- SP 1 / SP 2 / SP 3 Buttons: Selects the active stereo speaker output pair.
- Ручка гучнасці: Master volume control for selected speaker outputs.
- CROSSFEED Knob: Adjusts the stereo panorama for headphone monitoring to simulate a speaker listening environment.
- HEADPHONE VOLUME 1 / 2 Knobs: Independent volume controls for the two headphone outputs.
- HEADPHONE 1 / 2 Jacks: 1/4-inch stereo headphone outputs.
- Святлодыёд харчавання: Паказвае, што прылада ўключана.
4.2 Rear Panel Connections (Inferred)
The rear panel typically houses the audio input and output connections, as well as the power input. Based on common audio equipment and product specifications, you can expect:
- Аналагавыя ўводзіны: Balanced XLR or TRS inputs for connecting your audio interface or mixer.
- Выходы для дынамікаў: Multiple sets of balanced XLR or TRS outputs for connecting up to three pairs of studio monitors.
- Спажываная магутнасць: Connector for the included power cord.
5. Настройка
- Размяшчэнне: Position the SPL 2Control on a stable, flat surface, ensuring adequate ventilation around the unit.
- Падключэнне сілкавання: Connect the provided power cord to the power input on the rear panel of the 2Control and then to a suitable AC power outlet.
- Уваходныя злучэнні: Connect the stereo outputs of your audio interface, mixer, or other audio source to the IN 1 and/or IN 2 inputs on the rear panel using balanced XLR or TRS cables.
- Падключэнне дынамікаў: Connect your studio monitors to the SP 1, SP 2, and/or SP 3 outputs on the rear panel using balanced XLR or TRS cables. Ensure correct left and right channel connections.
- Headphone Connections: Plug your headphones into the HEADPHONE 1 and/or HEADPHONE 2 jacks on the front panel.
- Першапачатковае ўключэнне: Ensure all volume controls are set to their minimum positions before powering on the unit. Then, connect the power cord to the wall outlet. The POWER LED on the front panel will illuminate.
6. Інструкцыя па эксплуатацыі
- Выбар уводу: Націсніце альбо У 1 or У 2 button to select your desired audio source. The active button will illuminate.
- Selecting Speaker Outputs: Націсніце SP 1, SP 2, або SP 3 button to route the audio to the corresponding pair of studio monitors. Only one speaker output can be active at a time.
- Adjusting Master Volume: Slowly turn the large АБ'ЁМ knob clockwise to increase the listening level for the selected speaker outputs. Turn counter-clockwise to decrease.
- Манасумаванне: Націсніце МОНА button to sum the stereo signal to mono. This is useful for checking phase compatibility and mix balance. Press again to return to stereo.
- Функцыя зацямнення: Націсніце ДЫМ button to temporarily reduce the output volume. This is useful for quick conversations or when you need to lower the volume without losing your main volume setting. Press again to restore the original volume.
- Маніторынг навушнікаў:
- Plug your headphones into the desired headphone jack (HEADPHONE 1 or 2).
- Адкарэктуйце асобу HEADPHONE VOLUME 1 or 2 knob to set the listening level for your headphones.
- Выкарыстоўвайце КРЫЖА knob to adjust the stereo image for headphone listening. Turning it clockwise increases the crossfeed, simulating a more natural speaker-like stereo field by blending the left and right channels slightly.
7. Тэхнічнае абслугоўванне
- Уборка: Для чысткі вонкавых паверхняў прылады выкарыстоўвайце мяккую сухую тканіну. Не выкарыстоўвайце вадкія ачышчальнікі або растваральнікі.
- Вентыляцыя: Ensure that the ventilation slots are kept clear of dust and debris to prevent overheating.
- захоўванне: Калі прылада захоўваецца працяглы час, адключыце яе ад электрасеткі і захоўвайце ў прахалодным, сухім месцы.
8. Выпраўленне непаладак
| праблема | Магчымая прычына | Рашэнне |
|---|---|---|
| Няма гуку з дынамікаў. |
|
|
| Няма гуку з навушнікаў. |
|
|
| Скажонае аўдыя. |
|
|
9. Тэхнічныя характарыстыкі
| Асаблівасць | Дэталь |
|---|---|
| Назва мадэлі | 2 Control (also known as 2860) |
| Марка | SPL |
| Тып дынаміка | Манітор |
| Рэкамендуемае выкарыстанне | Control, Volume for Monitors |
| Сумяшчальныя прылады | Monitors, Speakers |
| Канфігурацыя канала аб'ёмнага гуку | 2.0 |
| Колер | Чорны |
| Уключаныя кампаненты | 1 x SPL Control Module |
| Памеры прадукту (Д х Ш х У) | 8.66" x 8.46" x 3.15" |
| Вага прадмета | 7.06 фунта (прыблізна 3.2 кг) |
| Крыніца харчавання | Правадная электрычная |
| Тэхналогія падлучэння | TRS, XLR |
| Рэжым выхаду гуку | Стэрэа |
| Тып мацавання | Настольнае мацаванне |
| Вытворца | Sound Performance Lab |
10. Гарантыя і падтрымка
The SPL 2Control Monitor Controller comes with a limited warranty. For specific warranty terms, duration, and conditions, please refer to the documentation provided with your purchase or visit the official SPL website. For technical support, service, or inquiries, please contact the manufacturer, Sound Performance Lab, or your authorized dealer.
вытворца: Sound Performance Lab