1. Уводзіны
The Velleman DVM810 is a compact and economical 3 1/2 digit digital multimeter designed for measuring DC and AC voltages, DC currents, resistance, and for performing diode and transistor (hFE) tests. It features overload protection and automatic polarity indication, making it suitable for hobbyists, field use, and workshops. This manual provides essential information for the safe and effective operation of your DVM810 multimeter.
2. Асаблівасці прадукту
- Automatic polarity indication
- тtage measurements: AC 500V and DC 500V maximum
- Current measurements: DC 10A maximum (0.2A fused, 10A unfused)
- Resistance measurements: Up to 2MΩ
- Diode and transistor (hFE) test functions
- Абарона ад перагрузкі
- Compact design with 3 1/2 digit LCD display
3. Змесціва ўпакоўкі
Калі ласка, праверце змесціва пакета, каб пераканацца ў наяўнасці ўсіх прадметаў:
- Лічбавы мультиметр Velleman DVM810
- Вымяральныя кабелі (адзін чырвоны, адзін чорны)
- Кіраўніцтва па эксплуатацыі
4. Важная інфармацыя па бяспецы
Read all safety warnings and instructions carefully before using this product. Failure to follow these instructions may result in electric shock, fire, or serious injury.
- Always ensure the multimeter is set to the correct function and range before making any measurements.
- Never exceed the maximum input limits for any range. The maximum voltage for AC/DC is 500V.
- Do not attempt to measure current on circuits with voltagбольш за 250В.
- Inspect test leads for damaged insulation or exposed metal before each use. Replace damaged leads immediately.
- Не выкарыстоўвайце мультыметр, калі ён выглядае пашкоджаным або калі корпус адкрыты.
- Exercise extreme caution when working with live circuits. Use appropriate personal protective equipment.
- Заўсёды адключайце харчаванне ад ланцуга і разраджайце высокавольтныяtage capacitors before measuring resistance or performing diode/transistor tests.
- Replace the battery when the low battery indicator appears on the display to ensure accurate readings.
5. Прадукт скончыўсяview
Familiarize yourself with the components of your Velleman DVM810 multimeter:
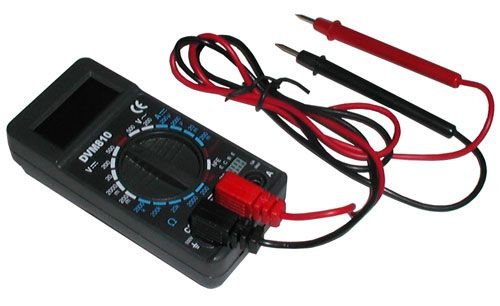
Figure 1: Velleman DVM810 Digital Multimeter. This image displays the front view of the compact multimeter, highlighting its liquid crystal display (LCD), the central rotary function switch, and the input jacks for test leads at the bottom.
- ВК-дысплей: Shows measurement readings, units, and polarity.
- Паваротны пераключальнік: Выкарыстоўваецца для выбару патрэбнай функцыі вымярэння і дыяпазону.
- Уваходныя гнязда:
- Гняздо COM: Common (negative) input for all measurements. Connect the black test lead here.
- Раз'ём VΩmA: Дадатны ўваход для аб'ёмуtage, resistance, and current measurements up to 200mA. Connect the red test lead here.
- Раз'ём 10А: Positive input for high current measurements (up to 10A). Connect the red test lead here for 10A measurements.
- Выпрабавальныя провады: Red and black leads used to connect the multimeter to the circuit under test.
6. Настройка
6.1 Устаноўка батарэі
The DVM810 multimeter requires a 9V battery (not always included). To install or replace the battery:
- Ensure the multimeter is turned OFF (rotary switch set to OFF).
- Знайдзіце вечка батарэйнага адсека на задняй панэлі прылады.
- Remove the screw(s) securing the cover and carefully lift it off.
- Connect a new 9V battery to the battery clip, observing correct polarity.
- Устаўце батарэйку ў адсек і зачыніце вечка, замацаваўшы яго шрубай (шрубамі).
6.2 Падключэнне вымяральных правадоў
Always connect the test leads correctly for accurate and safe measurements:
- Устаўце чорны тэставы провад у COM (звычайны) гняздо.
- Для большасці вымярэнняў (аб'ёмtage, resistance, diode, hFE, and current up to 200mA), insert the red test lead into the VΩmA дамкрат.
- Для вымярэнняў высокага току (да 10 А) устаўце чырвоны вымяральны кабель у 10А дамкрат.
7. Інструкцыя па эксплуатацыі
Before making any measurement, ensure the test leads are correctly connected and the rotary switch is set to the appropriate function and range.
7.1 Вымярэнне пастаяннага току Voltagе (V=)
- Устаўце чырвоны провад у VΩmA jack and the black lead into the COM дамкрат.
- Усталюйце паваротны перамыкач на патрэбны ўзровень гучнасці пастаяннага токуtage (V=) range. Start with the highest range if the voltagе невядома.
- Connect the test leads across the component or circuit to be measured (in parallel).
- Прачытайце тtage value on the LCD display. The display will show the correct polarity.
7.2 Вымярэнне AC Voltagе (V~)
- Устаўце чырвоны провад у VΩmA jack and the black lead into the COM дамкрат.
- Усталюйце паваротны перамыкач на патрэбны ўзровень гучнасці пераменнага токуtage (V~) range. Start with the highest range if the voltagе невядома.
- Connect the test leads across the component or circuit to be measured (in parallel).
- Прачытайце тtagзначэнне на ВК-дысплеі.
7.3 Measuring DC Current (A=)
Caution: Never connect the multimeter in parallel with a voltage source when measuring current, as this can blow the fuse or damage the meter.
- Determine the expected current. For currents up to 200mA, insert the red lead into the VΩmA jack. For currents up to 10A, insert the red lead into the 10А jack. Always insert the black lead into the COM дамкрат.
- Set the rotary switch to the appropriate DC Current (A=) range. Start with the highest range if the current is unknown.
- Turn off power to the circuit. Open the circuit where the current is to be measured.
- Падключыце мультыметр паслядоўна да ланцуга.
- Restore power to the circuit and read the current value on the LCD display.
7.4 Вымярэнне супраціўлення (Ом)
Caution: Ensure the circuit is completely de-energized and all capacitors are discharged before measuring resistance.
- Устаўце чырвоны провад у VΩmA jack and the black lead into the COM дамкрат.
- Set the rotary switch to the desired Resistance (Ω) range. Start with a higher range if the resistance is unknown.
- Падключыце вымяральныя дроты да кампанента, які трэба вымераць.
- Прачытайце значэнне супраціўлення на ВК-дысплеі.
7.5 Дыёдны тэст
Caution: Ensure the diode is disconnected from the circuit or the circuit is de-energized before testing.
- Устаўце чырвоны провад у VΩmA jack and the black lead into the COM дамкрат.
- Set the rotary switch to the Diode symbol (→|).
- Падключыце чырвоны провад да анода, а чорны — да катода дыёда. На дысплеі будзе адлюстроўвацца напружанне прамой напругі.tagпадзенне напружання (звычайна ад 0.5 В да 0.8 В для крэмніевых дыёдаў).
- Reverse the leads. The display should show 'OL' (Overload) for a good diode. If it shows a reading in both directions or 'OL' in both directions, the diode may be faulty.
7.6 Transistor (hFE) Test
Caution: Ensure the transistor is disconnected from the circuit before testing.
- Устаўце чырвоны провад у VΩmA jack and the black lead into the COM дамкрат.
- Усталюйце паваротны перамыкач у становішча hFE.
- Identify if the transistor is NPN or PNP. Insert the transistor's emitter, base, and collector leads into the corresponding holes in the hFE socket on the multimeter.
- Read the hFE (DC current gain) value on the LCD display.
8. Тэхнічныя характарыстыкі
| Параметр | Каштоўнасць |
|---|---|
| Марка | Веллеман |
| Нумар мадэлі | DVM810 |
| Тып вымярэння | Мультыметр |
| DC Voltagе далёкасць | Да 500В |
| Пераменнага токуtagе далёкасць | Да 500В |
| Дыяпазон пастаяннага току | Up to 10A (0.2A fused, 10A unfused) |
| Дыяпазон супраціву | Да 2 МОм |
| Дыёдны тэст | так |
| Тэст транзістара (hFE) | так |
| Дысплей | 3 1/2 Digit LCD |
| Крыніца харчавання | Батарэя 9V (не ўваходзіць у камплект) |
| Памеры | Прыблізна 3.70" x 1.81" x 1.03" |
| Вага прадмета | Прыблізна 3.2 унцыі (0.2 фунта) |
| UPC | 836479002272 |
9. Тэхнічнае абслугоўванне
9.1 Замена батарэі
When the low battery indicator appears on the LCD, replace the 9V battery as described in Section 6.1. A weak battery can lead to inaccurate readings.
9.2 Ачыстка
Каб ачысціць мультыметр, працярыце корпусamp тканінай і мяккім мыйным сродкам. Не выкарыстоўвайце абразіўныя рэчывы або растваральнікі. Перад выкарыстаннем пераканайцеся, што прылада цалкам сухая.
9.3 Праверка вымяральнага правадніка
Regularly inspect the test leads for any signs of damage, such as cracked insulation, exposed wires, or loose connections. Replace damaged leads immediately to prevent electric shock hazards.
10. Выпраўленне непаладак
- Няма дысплея або цьмянае адлюстраванне: Праверце батарэю. Пры неабходнасці заменіце яе.
- Няправільныя паказанні:
- Ensure the rotary switch is set to the correct function and range.
- Праверце аб'ём батарэіtage; replace if low.
- Пераканайцеся, што вымяральныя шпулькі падключаны правільна і не пашкоджаныя.
- For resistance measurements, ensure the circuit is de-energized.
- Адлюстраванне «OL» (перагрузка): The measured value exceeds the selected range. Select a higher range or ensure the circuit is within the meter's capabilities.
- Fuse blown (during current measurement): If the meter stops measuring current, the internal fuse may have blown. Refer to a qualified technician for fuse replacement.
11. Гарантыя і падтрымка
Warranty information for the Velleman DVM810 Digital Multimeter is typically provided with your purchase documentation or can be found on the official Velleman website. For technical support, service, or further inquiries, please refer to the contact information provided by your retailer or the manufacturer's official support channels.