1. Уводзіны
Thank you for choosing the Voltcraft VC-11 Digital Multimeter. This portable, Category III, 250V multimeter with a 2000-count display is designed for accurate electrical measurements in various applications. This manual provides essential information for safe operation, proper use, and maintenance of your device. Please read it thoroughly before use and keep it for future reference.
2. Інфармацыя па бяспецы
WARNING: Electrical shock hazard. Improper use of this meter can cause damage, shock, injury, or death. Read and understand this manual before operating the meter.
- Always ensure the meter is in good working condition and the test leads are not damaged.
- Не наносіце больш за намінальны аб'ёмtagе., як пазначана на лічыльніку, паміж клемамі або паміж любой клеммай і зямлёй.
- Будзьце вельмі асцярожныя пры працы з voltages above 25V AC RMS or 35V DC. These voltagуяўляюць небяспеку паражэння.
- Заўсёды адключайце вымяральныя дроты ад ланцуга перад зменай функцый або дыяпазонаў.
- Do not operate the meter with the battery cover removed or loosened.
- Adhere to local and national safety codes. Use personal protective equipment (PPE) such as approved safety glasses and electrically insulated gloves.
3. Прадукт скончыўсяview
The Voltcraft VC-11 is a compact digital multimeter featuring a clear LCD display, a rotary function switch, and input jacks for test leads. It is designed for measuring DC/AC voltage, DC current, resistance, and includes diode and continuity test functions.
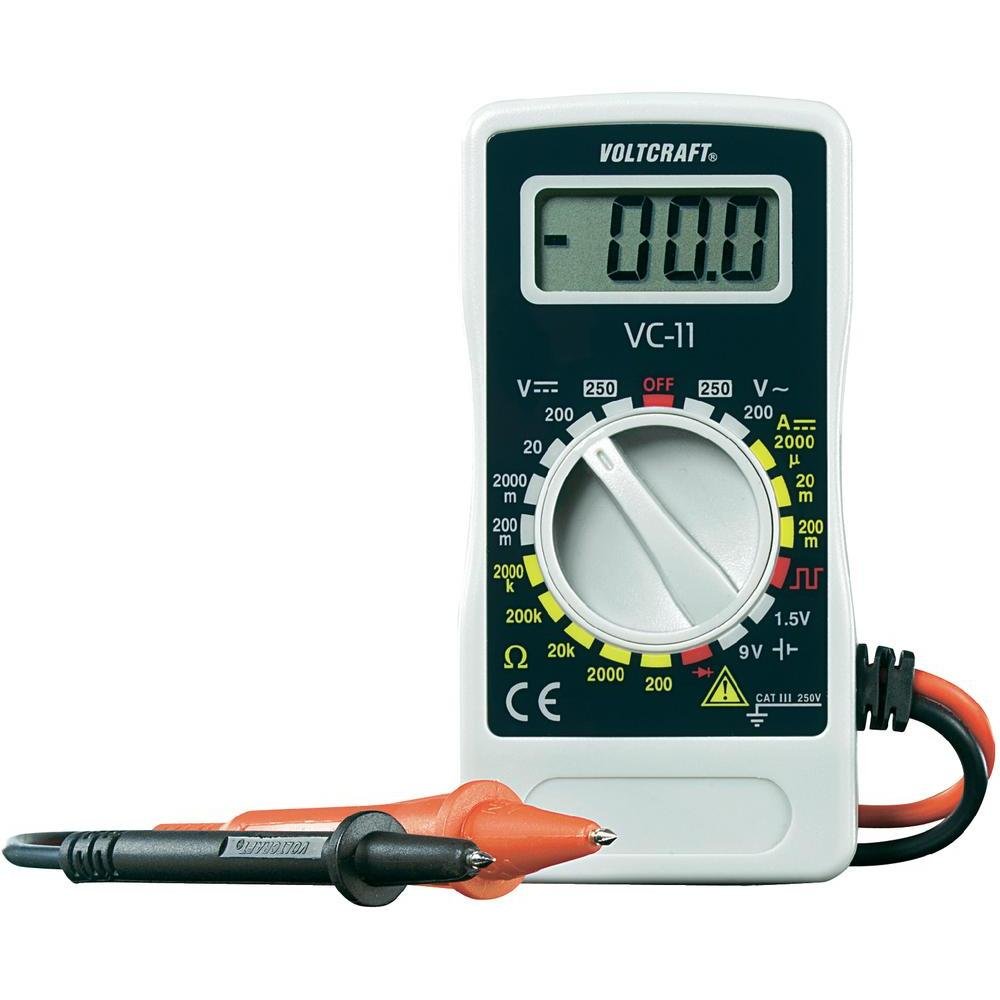
Малюнак 1: Спераду view of the Voltcraft VC-11 Digital Multimeter with test leads connected. This image shows the LCD display, rotary switch, and input terminals.

Малюнак 2: Пад вуглом view of the Voltcraft VC-11 Digital Multimeter, highlighting the compact design and the CE marking.

Figure 3: The Voltcraft VC-11 Digital Multimeter shown with its test leads detached, illustrating the input ports.
3.1 Кампаненты
- ВК-дысплей: Паказвае паказанні вымярэнняў, адзінкі вымярэння і індыкатары функцый.
- Паваротны пераключальнік: Used to select measurement functions and ranges.
- Уваходныя гнязда: Ports for connecting the test leads (COM, VΩmA).
- Выпрабавальныя провады: Red and black leads for connecting to the circuit under test.
4. Настройка
4.1 Устаноўка батарэі
The Voltcraft VC-11 requires a 9V battery for operation (not included). To install or replace the battery:
- Пераканайцеся, што мультыметр выключаны, і адключыце ўсе вымяральныя правады.
- Знайдзіце вечка батарэйнага адсека на задняй панэлі глюкометра.
- Use a screwdriver to remove the screw securing the battery cover.
- Акуратна зніміце вечка.
- Connect a new 9V battery to the battery clip, observing correct polarity.
- Place the battery into the compartment and replace the cover, securing it with the screw.
4.2 Падключэнне вымяральных правадоў
Always connect the black test lead to the 'COM' (common) jack. Connect the red test lead to the appropriate input jack based on the desired measurement:
- Для тtage (V), Resistance (Ω), Diode, and Continuity measurements, connect the red lead to the 'VΩmA' jack.
- For Current (A) measurements, connect the red lead to the 'VΩmA' jack (for mA range).
5. Інструкцыя па эксплуатацыі
Before taking any measurement, ensure the test leads are correctly connected and the rotary switch is set to the desired function and range.
5.1 Вымярэнне пастаяннага току Voltagе (V=)
- Усталюйце паваротны перамыкач на патрэбны ўзровень гучнасці пастаяннага токуtage (V=) range (e.g., 200mV, 2V, 20V, 200V, 250V). If the voltagКалі e невядома, пачніце з найбольшага дыяпазону і памяншайце яго па меры неабходнасці.
- Connect the black test lead to the 'COM' jack and the red test lead to the 'VΩmA' jack.
- Падключыце вымяральныя зонды паралельна да кампанента або ланцуга, які трэба вымераць.
- Прачытайце тtagзначэнне на ВК-дысплеі.
5.2 Вымярэнне AC Voltagе (V~)
- Усталюйце паваротны перамыкач на патрэбны ўзровень гучнасці пераменнага токуtage (V~) range (e.g., 200V, 250V).
- Connect the black test lead to the 'COM' jack and the red test lead to the 'VΩmA' jack.
- Connect the test probes in parallel across the AC source or component.
- Прачытайце тtagзначэнне на ВК-дысплеі.
5.3 Measuring DC Current (A=)
- Set the rotary switch to the desired DC Current (A=) range (e.g., 2000µA, 20mA, 200mA).
- Connect the black test lead to the 'COM' jack and the red test lead to the 'VΩmA' jack.
- ПАПЯРЭДЖАННЕ: To measure current, the meter must be connected in series with the circuit. Break the circuit and insert the meter.
- Падключыце вымяральныя зонды паслядоўна да ланцуга.
- Прачытайце бягучае значэнне на ВК-дысплеі.
5.4 Вымярэнне супраціўлення (Ом)
- Перад вымярэннем супраціўлення пераканайцеся, што ланцуг абясточаны.
- Set the rotary switch to the desired Resistance (Ω) range (e.g., 200Ω, 2kΩ, 20kΩ, 200kΩ, 2000kΩ).
- Connect the black test lead to the 'COM' jack and the red test lead to the 'VΩmA' jack.
- Падключыце вымяральныя зонды да кампанента, які трэба вымераць.
- Прачытайце значэнне супраціўлення на ВК-дысплеі.
5.5 Дыёдны тэст
- Пераканайцеся, што ланцуг абясточаны.
- Set the rotary switch to the Diode symbol (usually next to resistance).
- Connect the black test lead to the 'COM' jack and the red test lead to the 'VΩmA' jack.
- Падключыце чырвоны зонд да анода, а чорны зонд да катода дыёда. На дысплеі будзе адлюстроўвацца прамая напруга.tagэлектронная кропля.
- Reverse the probes. The display should show 'OL' (Overload) for a good diode.
5.6 Тэст бесперапыннасці
- Пераканайцеся, што ланцуг абясточаны.
- Set the rotary switch to the Continuity symbol (usually next to diode/resistance).
- Connect the black test lead to the 'COM' jack and the red test lead to the 'VΩmA' jack.
- Падключыце вымяральныя зонды да ланцуга або кампанента.
- If the resistance is below a certain threshold (typically 30-50Ω), the meter will emit an audible beep, indicating continuity.
6. Тэхнічнае абслугоўванне
6.1 Ачыстка
Працярыце лічыльнік рэкламайamp тканінай і мяккім мыйным сродкам. Не выкарыстоўвайце абразіўныя рэчывы або растваральнікі. Перад выкарыстаннем пераканайцеся, што глюкометр цалкам сухі.
6.2 Замена батарэі
When the battery symbol appears on the LCD display, the 9V battery needs to be replaced. Refer to section 4.1 for battery installation instructions.
7. Выпраўленне непаладак
| праблема | Магчымая прычына | Рашэнне |
|---|---|---|
| Няма дысплея або дысплей цьмяны | Разраджаны або нізкі акумулятар | Заменіце батарэю 9 В. |
| Няправільныя паказанні | Incorrect function/range selected Poor test lead connection Damaged test leads | Select the correct function and range. Ensure test leads are firmly connected. Inspect and replace damaged test leads. |
| Адлюстравана "OL" (перагрузка) | Вымярэнне перавышае выбраны дыяпазон Open circuit (for resistance/current) | Select a higher range. Check for breaks in the circuit. |
8. Тэхнічныя характарыстыкі
- Марка: ВАЛТКРАФТ
- Нумар мадэлі: VC11
- вытворца: ВАЛТКРАФТ
- Вага прадукту: Approximately 9.07 g (without packaging)
- Памеры ўпакоўкі: 14.8 х 8 х 3.6 см
- Рэйтынг катэгорыі: CAT III 250В
- Дысплей: 2000 графаў
- Крыніца харчавання: Батарэя 9V (не ўваходзіць у камплект)
9. Інфармацыя аб гарантыі
This product is covered by a standard manufacturer's warranty. Please refer to the warranty card included with your purchase or contact your retailer for specific terms and conditions. The warranty typically covers defects in materials and workmanship under normal use.
10. Падтрымка кліентаў
For technical assistance, troubleshooting, or service inquiries, please contact Voltcraft customer support or your local distributor. Contact information can usually be found on the manufacturer's webсайце або на ўпакоўцы прадукту.