1. Уводзіны
This manual provides detailed instructions for the installation, operation, and maintenance of your Soundstream VL-11A Single DIN Digital Media Receiver. Please read this manual thoroughly before using the product to ensure proper operation and to prevent damage.
The Soundstream VL-11A is designed to provide high-quality audio playback from various digital sources, including USB drives, SD cards, and auxiliary input devices. It features a compact single DIN chassis for easy integration into most vehicle dashboards.
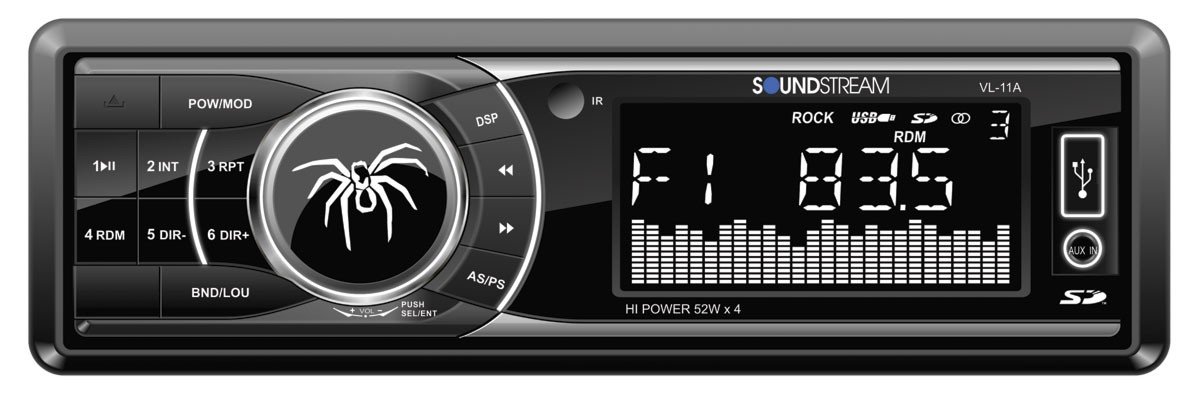
Малюнак 1.1: Фронт view of the Soundstream VL-11A Digital Media Receiver. This image displays the main unit with its control buttons and display panel.
2. Інфармацыя па бяспецы
Observe the following safety precautions to prevent injury or damage to the unit:
- Не карыстайцеся прыладай такім чынам, каб гэта адцягвала вас ад кіравання. Заўсёды надавайце прыярытэт бяспецы дарожнага руху.
- Ensure proper wiring connections. Incorrect wiring can cause fire or damage to the vehicle's electrical system.
- Пазбягайце ўздзеяння вільгаці або экстрэмальных тэмператур на прыладу.
- Не спрабуйце разбіраць або мадыфікаваць прыладу. Звяртайцеся да кваліфікаванага персаналу па любыя паслугі па абслугоўванні.
- Падтрымлівайце гучнасць на ўзроўні, каб вы маглі чуць гукі звонку.
3. Змесціва ўпакоўкі
Праверце наяўнасць усіх прадметаў у камплекце:
- Soundstream VL-11A Digital Media Receiver
- Электраправодка
- Мантажныя прыналежнасці (шрубы, мантажная ўтулка)
- Пульт дыстанцыйнага кіравання
- Кіраўніцтва карыстальніка (гэты дакумент)
4. Прадукт скончыўсяview
4.1 Элементы кіравання пярэдняй панэлі
The front panel provides access to primary functions and media inputs.
Малюнак 4.1: Illustrative diagram of the VL-11A front panel. This image highlights the display, volume knob, mode button, track controls, USB port, SD card slot, and auxiliary input.
- Кнопка харчавання / рэжыму: Press to turn on/off. Short press to cycle through audio sources (Radio, USB, SD, AUX).
- Рэгулятар гучнасці: Павярніце, каб адрэгуляваць гучнасць. Націсніце, каб атрымаць доступ да налад гуку (басы, высокія частоты, баланс, фейдэр, эквалайзер).
- Дысплей: Паказвае бягучы стан, інфармацыю пра трэк і налады.
- Порт USB: Падключыце USB-назапашвальнікі для прайгравання медыяфайлаў.
- Слот для SD-карты: Устаўце SD-карты для прайгравання медыяфайлаў.
- Уваход AUX: Падключыце знешнія аўдыёпрылады праз раз'ём 3.5 мм.
- Кнопкі трэка/налады: Navigate tracks or tune radio frequencies.
4.2 Заднія падключэнні
The rear of the unit contains the main wiring harness and preamp выхады.
Малюнак 4.2: Illustrative diagram of the VL-11A rear connections. This image shows the main wiring harness connector and the RCA preamp выхады.
- Main Wiring Harness: Connects to vehicle power, ground, accessory, and speaker wires.
- RCA Preamp Выхады: Two sets of 2V outputs for connecting external ampасаднікі.
5. Настройка
5.1 Ўстаноўка
Professional installation is recommended. If installing yourself, ensure the vehicle's battery is disconnected before beginning.
- Мантаж: Insert the metal mounting sleeve into the vehicle's dashboard opening. Bend the tabs to secure it.
- Праводка: Connect the supplied wiring harness to the vehicle's wiring. Match wire colors and functions carefully.
- Падключэнне дынамікаў: Connect the speaker wires from the harness to your vehicle's speakers. Ensure correct polarity.
- Падключэнне да электрасілкавання: Connect the yellow wire (constant 12V), red wire (switched 12V), and black wire (ground) to the appropriate vehicle circuits.
- Антэна: Падключыце кабель антэны аўтамабіля да ўваходу антэны прылады.
- Бяспечны блок: Slide the VL-11A into the mounting sleeve until it clicks into place.
Warning: Incorrect wiring can cause severe damage to the unit or vehicle. Consult a professional if unsure.
5.2 Першапачатковае ўключэнне
After installation, reconnect the vehicle's battery. Press the power button on the unit or remote control to turn it on. The display should illuminate.
6. Інструкцыя па эксплуатацыі
6.1 Асноўныя элементы кіравання
- Уключэнне/выключэнне харчавання: Націсніце PWR/MODE кнопка.
- Рэгуляванне гучнасці: Павярнуць АБ'ЁМ ручка.
- Выбар крыніцы: Кароткае націсканне PWR/MODE button to cycle through Radio, USB, SD, and AUX.
6.2 Налады гуку
Націсніце АБ'ЁМ knob to enter the audio menu. Rotate the knob to navigate options and press to select.
- БАСЫ/ВЫСОКІЯ: Адрэгулюйце ўзровень басоў і высокіх частот.
- БАЛАНС: Adjust audio balance between left and right speakers.
- ФАДЭР: Adjust audio balance between front and rear speakers.
- Эквалайзер (эквалайзер): Select from preset EQ curves (e.g., Pop, Rock, Classic) or a custom setting.
6.3 Прайграванне з USB/SD-карты
Insert a USB drive into the USB port or an SD card into the SD card slot. The unit will automatically switch to the respective source and begin playback.
- Прайграванне/Паўза: Націсніце ПРАЙГРАЦЬ/Паўза кнопка.
- Наступны/Папярэдні трэк: Націсніце ДАЛЕЙ/ПАПЕР кнопкі.
- Навігацыя па папках: Выкарыстоўвайце FOLDER UP/DOWN buttons (if available on remote or unit).
6.4 Дапаможны ўваход (AUX)
Connect an external audio device (e.g., smartphone, MP3 player) to the 3.5mm AUX input on the front panel using an audio cable. Select AUX as the source using the РЭЖЫМ кнопка.
6.5 Radio Tuner
Select Radio as the source. The unit supports AM/FM bands.
- Выбар групы: Націсніце ГУРТ button to switch between FM1, FM2, FM3, and AM.
- Ручная настройка: Кароткае націсканне НАЛАДЗІЦЬ УВЕРХ/УНІЗ buttons to adjust frequency step-by-step.
- Шукайце цюнінг: Доўгі націск НАЛАДЗІЦЬ УВЕРХ/УНІЗ кнопкі для аўтаматычнага пошуку наступнай станцыі з моцным сігналам.
- Запраграмаваныя станцыі: Press and hold a numbered preset button (1-6) to save the current station. Short press to recall a saved station.
6.6 Пульт дыстанцыйнага кіравання
The included remote control provides convenient access to most functions. Point the remote control towards the unit's front panel sensor.
Малюнак 6.1: Illustrative diagram of the VL-11A remote control. This image shows the various buttons for power, mode, volume, track control, and numeric presets.
7. Тэхнічнае абслугоўванне
7.1 Чыстка прылады
- Выкарыстоўвайце мяккую сухую тканіну для працірання пярэдняй панэлі і дысплея.
- Не выкарыстоўвайце абразіўныя ачышчальнікі, воск або растваральнікі.
- Пазбягайце распылення ачышчальных раствораў непасрэдна на прыладу.
7.2 Агульны догляд
- Забяспечце належную вентыляцыю вакол прылады, каб прадухіліць перагрэў.
- Пазбягайце размяшчэння цяжкіх прадметаў на прыладзе.
- If the unit is exposed to extreme cold, allow it to warm up before operation to prevent condensation.
8. Выпраўленне непаладак
Калі ў вас узнікнуць праблемы, перад зваротам у службу падтрымкі звярніцеся да наступнай табліцы:
| праблема | Магчымая прычына | Рашэнне |
|---|---|---|
| Няма ўлады | Blown fuse; Incorrect wiring; Disconnected battery. | Check vehicle fuses and unit fuse. Verify wiring connections. Ensure battery is connected. |
| Няма гуку | Занадта нізкі гук; уключаны гук без гуку; няправільнае падключэнне дынамікаў; не выбрана крыніца. | Increase volume. Deactivate mute. Check speaker connections and polarity. Select correct audio source. |
| USB/SD не прайграваецца | Не падтрымліваецца file format; Corrupt media; Incorrectly inserted device. | Пераканайцеся, што медыяфайлы ўтрымліваюць падтрымоўванае аўдыё files (e.g., WMA). Try a different USB/SD. Reinsert device. |
| Слабы прыём радыё | Антэна не падключана; зона слабага сігналу. | Праверце падключэнне антэны. Паспрабуйце наладзіцца на больш моцную станцыю. |
| Пульт дыстанцыйнага кіравання не працуе | Dead battery; Obstruction; Not pointing at sensor. | Replace remote battery. Remove obstructions. Ensure direct line of sight to unit's IR sensor. |
9. Тэхнічныя характарыстыкі
Technical specifications for the Soundstream VL-11A Digital Media Receiver:
- мадэль: VL-11A
- Марка: Гукавы струмень
- вытворца: Гукавы струмень
- Памеры прадукту: 22.35 х 20.32 х 9.65 см
- Вага прадмета: 771.11 г (1.7 фунта)
- Аўдыё Wattage: 52 Вт (макс.)
- Колькасць каналаў: 4
- прэamp Выхады: 2 Sets of 2V
- Фармат медыя: WMA (and other common digital audio formats)
- Асаблівасці: SD Card Input, USB Input, Auxiliary Input
- Тып раздыма: Auxiliary, USB, 3.5mm Jack
- Сумяшчальныя прылады: Дакладчык
- Метад кантролю: Дыстанцыйнае
10. Гарантыя і падтрымка
Soundstream products are designed and manufactured to the highest quality standards. For specific warranty information, please refer to the warranty card included with your product or visit the official Soundstream webсайт.
For technical support or service inquiries, please contact Soundstream customer service through their official channels. Keep your purchase receipt and product model number (VL-11A) handy when contacting support.