1. Уводзіны
This manual provides comprehensive instructions for the installation, operation, and maintenance of the Supermicro X10SLM+-LN4F motherboard. Designed for server applications, this motherboard features an LGA1150 socket, Intel C224 PCH, DDR3 memory support, and multiple Gigabit Ethernet ports. Please read this manual thoroughly before proceeding with installation to ensure proper setup and optimal performance.
2. Прадукт скончыўсяview
The Supermicro X10SLM+-LN4F is a microATX server motherboard built for reliability and performance. Key features include:
- LGA1150 Socket for Intel Xeon E3-1200 v3/v4 and 4th Gen Core i3 processors.
- Intel C224 PCH chipset.
- Four DDR3 DIMM slots supporting up to 64GB ECC/non-ECC UDIMM.
- Multiple SATA3 (6Gbps) ports.
- Integrated quad Gigabit Ethernet ports.
- USB 3.0 and USB 2.0 support.
- VGA output for integrated graphics.
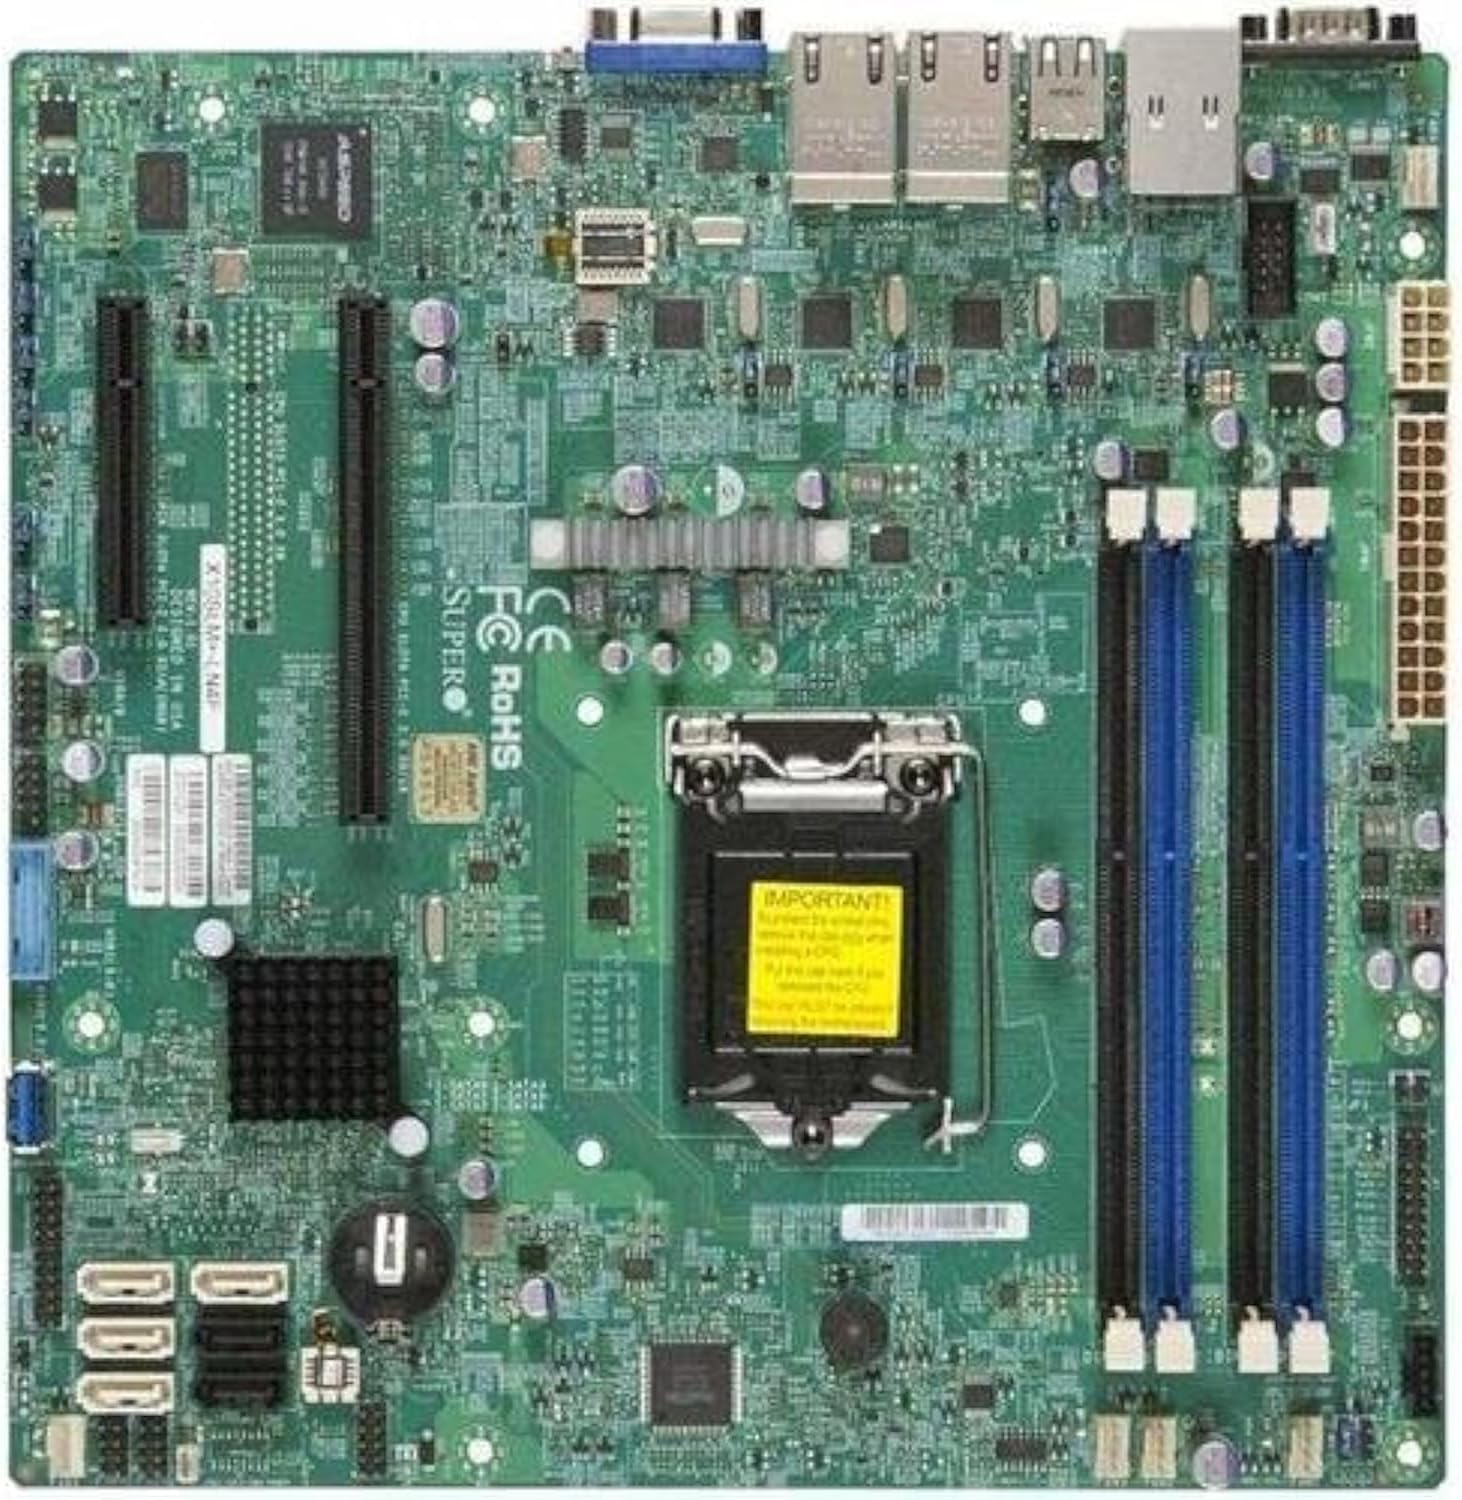
Малюнак 2.1: Зверху ўніз view of the Supermicro X10SLM+-LN4F motherboard, showing the CPU socket, DIMM slots, PCIe slots, and various connectors.

Малюнак 2.2: Вуглавы view of the motherboard, highlighting the layout of components and expansion slots.
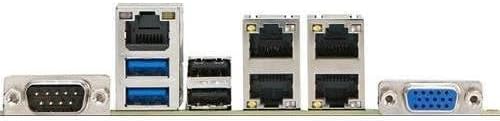
Малюнак 2.3: Rear I/O panel of the Supermicro X10SLM+-LN4F motherboard, featuring multiple LAN ports, USB ports, and serial ports.
3. Настройка і ўстаноўка
Перад пачаткам усталёўкі пераканайцеся, што сістэма выключана і адключана ад крыніцы сілкавання. Надзеньце антыстатычны бранзалет, каб прадухіліць пашкоджанне кампанентаў электрастатычным разрадам (ESD).
3.1. Усталёўка працэсара
- Знайдзіце раз'ём працэсара LGA1150 на матчынай плаце.
- Акуратна націсніце на рычаг нагрузкі ўніз і пацягніце яго ўбок, каб адкрыць рамку фіксацыі раздыма працэсара.
- Carefully align the triangular mark on the CPU with the corresponding mark on the socket.
- Place the CPU into the socket without forcing it.
- Зачыніце фіксуючую раму і зафіксуйце яе рычагом нагрузкі.
- Нанёс тонкі, роўны пласт цеплапасты на інтэграваны размеркавальнік цяпла (IHS) працэсара.
- Усталюйце кулер працэсара ў адпаведнасці з інструкцыямі вытворцы.
3.2. Усталёўка памяці (RAM)
- Locate the four DDR3 DIMM slots. For optimal performance, refer to the motherboard's specific memory population guidelines, typically starting with slots closest to the CPU or specific colored slots for dual-channel configurations.
- Адкрыйце фіксатары з абодвух канцоў слота DIMM.
- Сумясціце выемку на модулі памяці DDR3 з ключом у слоце DIMM.
- Шчыльна ўстаўце модуль памяці ў слот, пакуль фіксатары не зашчоўкнуцца.
- Ensure both clips are fully closed and the module is seated correctly.
3.3. Усталёўка прылады захоўвання дадзеных
Connect SATA storage devices (HDDs/SSDs) to the SATA ports on the motherboard using SATA data cables. Connect the power cables from your power supply unit (PSU) to the storage devices.
3.4. Усталёўка платы пашырэння
This motherboard features PCI Express (PCIe) slots. To install an expansion card:
- Remove the corresponding slot cover from your chassis.
- Сумясціце плату пашырэння са слотам PCIe.
- Press down firmly until the card is fully seated in the slot.
- Secure the card with a screw or retention clip from your chassis.
3.5. Падключэння харчавання
- 24-кантактны раз'ём харчавання ATX: Connect the main 24-pin power cable from your PSU to the ATX power connector on the motherboard.
- 8-pin EPS/CPU Power Connector: Connect the 8-pin (or 4+4 pin) CPU power cable from your PSU to the EPS connector near the CPU socket.
3.6. Падключэнні ўводу/вываду на пярэдняй панэлі і задняй панэлі
- Раздымы на пярэдняй панэлі: Connect the power switch, reset switch, power LED, and HDD activity LED cables from your chassis to the corresponding pins on the motherboard's front panel header. Refer to the motherboard's silkscreen labels for correct orientation.
- Загалоўкі USB: Connect front panel USB ports to the onboard USB headers.
- Аўдыёзагалоўкі: Connect front panel audio jacks to the onboard audio header.
- Задняя панэль уводу/вываду: Connect peripherals such as keyboard, mouse, monitor (via VGA), and network cables (to the Gigabit Ethernet ports) to the rear I/O panel.
4. Інструкцыя па эксплуатацыі
4.1. Initial Power On and BIOS/UEFI Setup
- After all components are installed and connected, connect the power cord to the PSU and turn on the power switch on the PSU.
- Націсніце кнопку харчавання на корпусе.
- During the Power-On Self-Test (POST), repeatedly press the DEL or F2 клавішу (або як паказана на экране), каб увайсці ў ўтыліту налады BIOS/UEFI.
- In the BIOS/UEFI, configure essential settings such as date and time, boot order, and enable/disable specific features as required for your operating system and hardware.
- Захавайце змены і выйдзіце з BIOS/UEFI. Сістэма перазагрузіцца.
4.2. Усталёўка аперацыйнай сістэмы
To install an operating system (e.g., Windows, Linux, VMware ESXi):
- Insert the operating system installation media (USB drive or DVD) into the system.
- Boot from the installation media (you may need to adjust the boot order in BIOS/UEFI).
- Follow the on-screen prompts to install the operating system on your chosen storage device.
- After installation, install all necessary drivers for the motherboard components (chipset, LAN, VGA, etc.) from the Supermicro website or the provided driver disc.
5. Тэхнічнае абслугоўванне
Рэгулярнае тэхнічнае абслугоўванне дапамагае забяспечыць даўгавечнасць і стабільную працу вашай матчынай платы і сістэмы.
5.1. Уборка
- Перыядычна чысціце мацярынскую плату і кампаненты сістэмы ад пылу з дапамогай сціснутага паветра. Перад чысткай пераканайцеся, што сістэма выключана і адключана ад сеткі.
- Пазбягайце выкарыстання вадкіх ачышчальнікаў непасрэдна на кампанентах.
- Ensure proper airflow within the chassis by keeping fan vents clear.
5.2. Абнаўленні прашыўкі і драйвераў
- Праверце Supermicro website periodically for updated BIOS/UEFI firmware and drivers for your motherboard model.
- Follow the provided instructions carefully when updating firmware to avoid system instability.
5.3. Экалагічныя меркаванні
- Каб пазбегнуць пашкоджанняў, выкарыстоўвайце матчыну плату ў рэкамендаваных дыяпазонах тэмпературы і вільготнасці.
- Забяспечце дастатковую вентыляцыю ў корпусе сервера.
6. Выпраўленне непаладак
У гэтым раздзеле прадстаўлены рашэнні распаўсюджаных праблем, з якімі вы можаце сутыкнуцца.
6.1. Няма харчавання / няма POST (самаправеркі пры ўключэнні)
- Verify that the power supply unit (PSU) is connected correctly to the motherboard (24-pin ATX and 8-pin EPS connectors).
- Ensure the PSU is switched on and receiving power from the wall outlet.
- Праверце, ці правільна падключаны кабель выключальніка харчавання на пярэдняй панэлі да раздыма матчынай платы.
- Reseat the CPU, RAM modules, and any expansion cards.
- Паспрабуйце загрузіцца толькі з неабходнымі кампанентамі (працэсар, адна планка аператыўнай памяці, кулер працэсара), каб вызначыць прычыну праблемы.
- Listen for beep codes from the system speaker, which can indicate specific hardware failures. Refer to the Supermicro website for beep code interpretations.
6.2. Праблемы з дысплеем
- Ensure the monitor is properly connected to the motherboard's VGA port.
- Пераканайцеся, што манітор уключаны і настроены на правільную крыніцу ўваходнага сігналу.
- If using a discrete graphics card, ensure it is properly seated and connected to power (if required).
6.3. Аперацыйная сістэма не загружаецца
- Check the boot order in the BIOS/UEFI to ensure the correct storage device is prioritized.
- Verify that the operating system is installed correctly on the storage device.
- Ensure SATA data and power cables are securely connected to the storage device and motherboard.
7. Тэхнічныя характарыстыкі
Below are the technical specifications for the Supermicro X10SLM+-LN4F motherboard:
| Асаблівасць | Дэталь |
|---|---|
| Марка | Супермікра |
| Назва мадэлі | X10SLM+-LN4F-B |
| Гняздо працэсара | LGA1150 |
| Тып чыпсэта | Intel C224 |
| Тэхналогія аператыўнай памяці | DDR3 SDRAM |
| Хуткасць памяці | 1600 МГц |
| Ёмістасць памяці | Да 64 ГБ |
| Колькасць партоў USB 2.0 | 2 (заднія ўваходы/выхады) |
| Інтэрфейс відэакарты | Integrated, PCI |
| Сумяшчальныя прылады | Сервер |
| Платформа | Windows 10 |
| Вага прадмета | 5.8 фунта |
| Памеры прадукту (ДxШxВ) | 10 х 10 х 2 цалі |
| Дата першай даступнасці | 4 чэрвеня 2013 г |
Note: Specifications are subject to change without notice. For the most current information, please refer to the official Supermicro product page.
8. Гарантыя і падтрымка
For detailed warranty information, please refer to the warranty card included with your product or visit the official Supermicro website. Technical support is available through Supermicro's customer service channels, including their support portal, email, and phone. Please have your product model number (X10SLM+-LN4F) and serial number ready when contacting support.
For the latest drivers, BIOS updates, and additional documentation, please visit: www.supermicro.com