1. Уводзіны
This manual provides instructions for the Vivitek D555 XGA DLP Portable Projector. The D555 is designed for clear and vivid image projection, featuring XGA resolution, 3000 lumens brightness, and 3D readiness via DLP Link. It incorporates DLP and Brilliant Color technologies for enhanced visual performance and offers various connectivity options including HDMI v1.4.
2. Інфармацыя па бяспецы
- Не блакуйце вентыляцыйныя адтуліны. Забяспечце дастатковую прастору вакол праектара для належнай цыркуляцыі паветра.
- Не глядзіце непасрэдна ў аб'ектыў праектара, калі ён уключаны.amp уключаны. Яркае святло можа пашкодзіць вочы.
- Пазбягайце размяшчэння праектара пад прамымі сонечнымі прамянямі, побач з крыніцамі цяпла або ў месцах з высокай вільготнасцю або пылам.
- Выкарыстоўвайце толькі шнур сілкавання, які пастаўляецца з праектарам.
- Не спрабуйце самастойна абслугоўваць гэты прадукт. Звярніцеся да ўсіх абслугоўванняў кваліфікаванага абслуговага персаналу.
- Трымайце праектар далей ад вады або іншых вадкасцей.
- Адключайце праектар ад электрычнай разеткі перад чысткай або калі ён не выкарыстоўваецца працяглы час.
3. Змесціва ўпакоўкі
Праверце, ці ўсе пералічаныя ніжэй прадметы ўваходзяць у вашу ўпакоўку:
- Vivitek D555 Projector
- Шнур сілкавання
- Кабель VGA
- Пульт дыстанцыйнага кіравання
- Batteries for Remote (AA x 2)
- User's Manual (on CD)
4. Прадукт скончыўсяview
4.1 Пярэдняя і верхняя часткі View
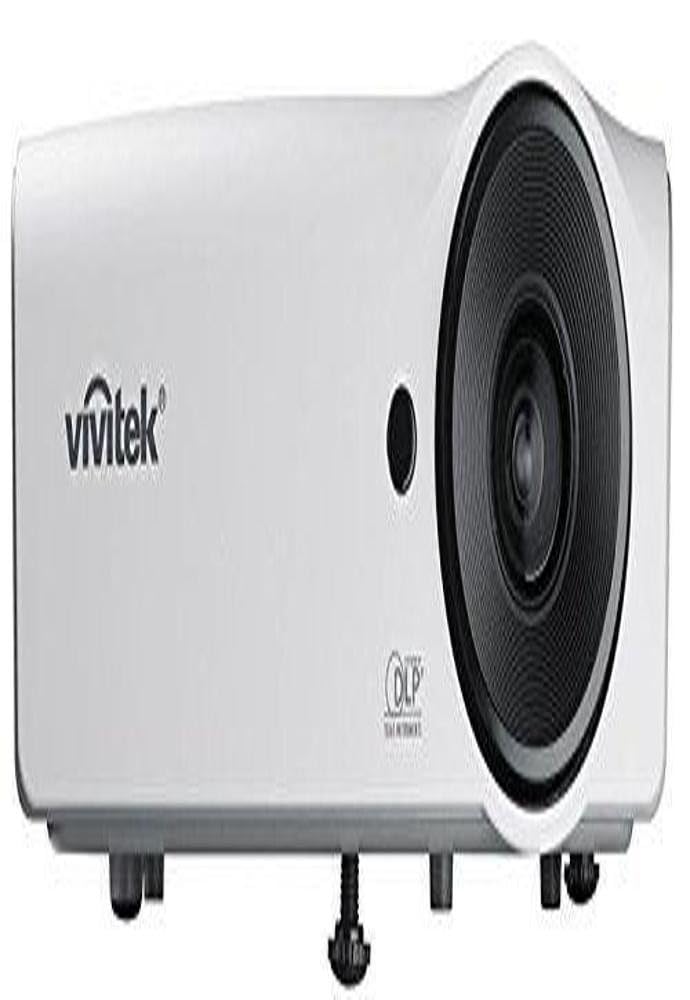
Малюнак 4.1: Спераду і зверху view of the Vivitek D555 projector. This image shows the projector's lens, control panel on top, and the Vivitek logo.
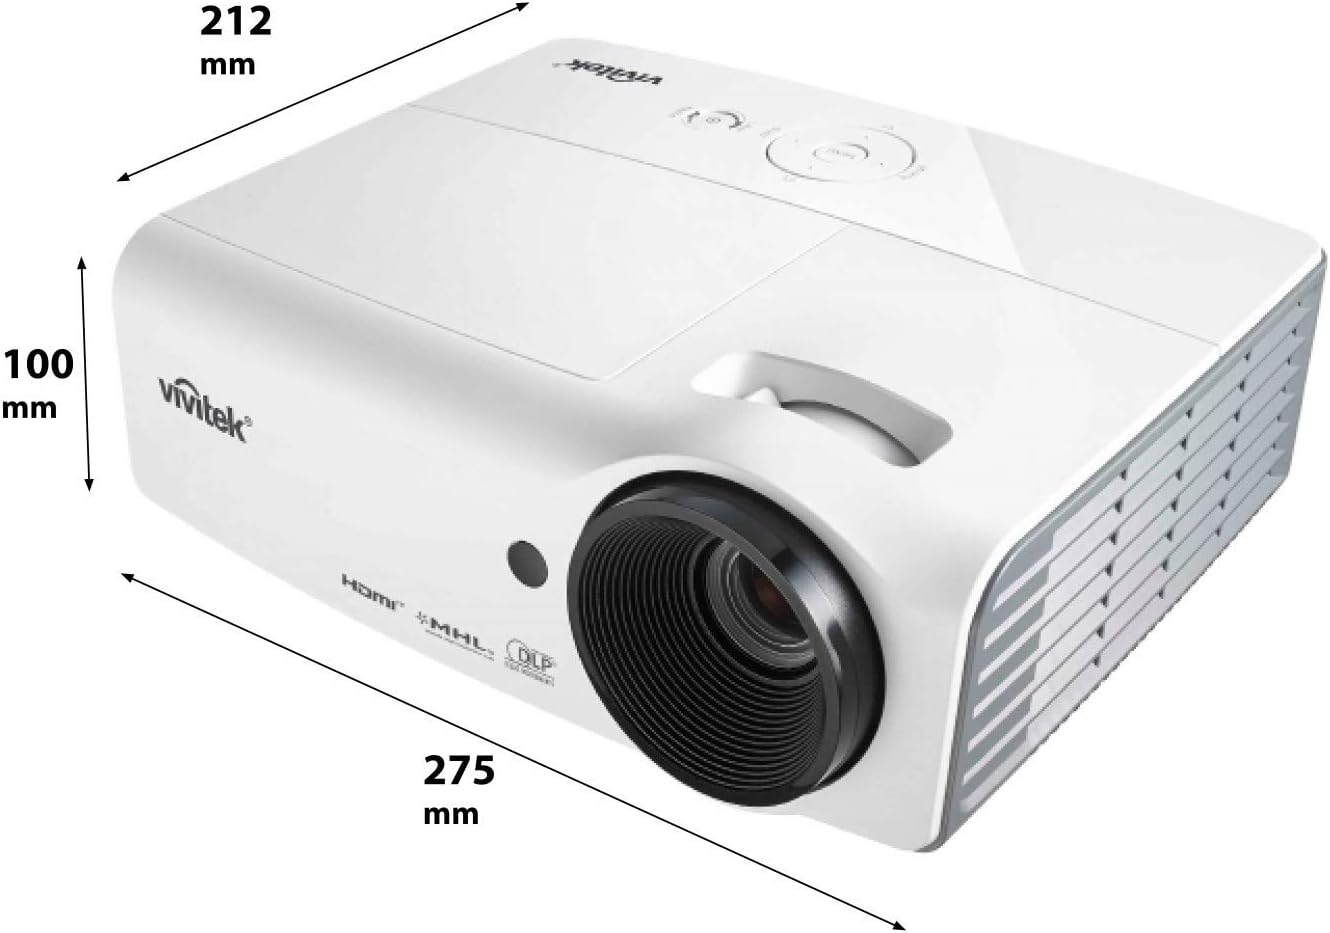
Малюнак 4.2: Dimensions of the Vivitek D555 projector. The image indicates a width of 275 mm, a depth of 212 mm, and a height of 100 mm.
The front of the projector features the projection lens. The top panel includes the control buttons for power, menu navigation, source selection, and focus/zoom adjustments. The Vivitek logo is prominently displayed.
4.2 Злучэнні задняй панэлі

Малюнак 4.3: Rear panel of the Vivitek D555 projector showing various input and output ports. These include HDMI, dual VGA inputs, VGA output, S-Video, Composite Video, audio input/output, and a USB port.
The rear panel provides all necessary connection ports for video and audio sources. These include:
- HDMI версіі 1.4: For digital video and audio input.
- Камп'ютарны ўваход 1 (VGA): D-Sub 15-pin input for computer connection.
- Камп'ютарны ўваход 2 (VGA): Second D-Sub 15-pin input for computer connection.
- Computer Out (VGA): D-Sub 15-pin output for monitor loop-through.
- S-відэа: For S-Video input.
- Відэа (кампазітны): RCA jack for composite video input.
- Аўдыя ўваход: 3.5mm stereo mini-jack for audio input.
- Аўдыёвыхад: 3.5mm stereo mini-jack for audio output.
- USB (тып B): For service or firmware updates.
- Уваход для харчавання пераменнага току: Для падлучэння шнура харчавання.
5. Настройка
5.1 Размяшчэнне праектара
Place the projector on a stable, flat surface or mount it securely. Ensure the projector is positioned at an appropriate distance from the screen to achieve the desired image size. The lens should be perpendicular to the screen for optimal image geometry.
5.2 Падключэнне да крыніцы харчавання
- Connect the AC power cord to the projector's AC power inlet.
- Падключыце другі канец шнура сілкавання да заземленай электрычнай разеткі.
5.3 Падключэнне відэакрыніц
Choose the appropriate cable for your video source and connect it to the corresponding port on the projector's rear panel.
- HDMI: For high-definition digital sources like Blu-ray players, gaming consoles, or laptops.
- VGA (Computer In 1/2): For computers or other devices with VGA output.
- S-Video/кампазітны відэа: For standard definition video sources like DVD players or VCRs.
For audio, connect an audio cable from your source to the projector's Audio In port, or use the HDMI connection which carries both video and audio.
6. Кіраванне праектарам
6.1 Уключэнне/выключэнне
- Каб уключыць: Press the Power button on the projector's control panel or the remote control. The power indicator light will turn blue.
- Каб выключыць: Press the Power button twice. The projector will enter a cooling down cycle, and the power indicator will flash. Do not unplug the projector until the cooling cycle is complete and the power indicator light stops flashing.
6.2 Карэкцыя выявы
- Фокус: Паварочвайце кольца факусоўкі на аб'ектыве праектара, пакуль выява не стане рэзкай і выразнай.
- Маштаб: Rotate the zoom ring on the projector lens to adjust the image size.
- Карэкцыя трапецеідальных скажэнняў: If the image appears trapezoidal, use the Keystone Correction function in the projector's OSD (On-Screen Display) menu to square the image.
6.3 Выбар крыніцы ўваходнага сігналу
Press the "Source" button on the projector or remote control to cycle through available input sources (HDMI, VGA1, VGA2, S-Video, Video).
6.4 Функцыянальнасць 3D
The Vivitek D555 is 3D-ready via DLP Link. To view 3D-кантэнт:
- Connect a 3D-compatible source (e.g., 3D Blu-Ray player) to the projector via HDMI.
- Пераканайцеся, што ваш 3D-кантэнт прайграваецца.
- Wear active DLP Link 3D glasses (sold separately). The projector will automatically detect the 3D signal and enable 3D mode.
7. Тэхнічнае абслугоўванне
7.1 Чыстка праектара
- Знешні выгляд: Выкарыстоўвайце мяккую тканіну без ворса dampened with a mild cleaning solution to wipe the projector's casinг. Не выкарыстоўвайце абразіўныя ачышчальнікі або растваральнікі.
- Аб'ектыў: Use a lens cleaning cloth and lens cleaning solution specifically designed for optical surfaces. Avoid touching the lens with your fingers.
- Вентыляцыйныя адтуліны: Regularly check and clean the air vents to prevent dust buildup, which can affect cooling and performance. Use a soft brush or compressed air.
7.2 лamp Замена
Праектар лamp has a lifespan of up to 6,000 hours in Eco-mode. When the lamp reaches the end of its life, a warning message will appear, or the lamp indicator light will illuminate. Refer to the detailed instructions in the full user manual (on CD) for safe lamp працэдуры замены. Заўсёды дайце праектару цалкам астыць, перш чым спрабавацьamp замена.
8. Выпраўленне непаладак
| праблема | Магчымая прычына | Рашэнне |
|---|---|---|
| Няма выявы на экране |
|
|
| Відарыс размыты |
|
|
| Выява мае трапецападобную форму |
|
|
| Няма гуку |
|
|
9. Тэхнічныя характарыстыкі
| Нумар мадэлі | DP535-264VVUP (D555) |
| Марка | Вівітэк |
| Тэхналогія адлюстравання | DLP |
| Роднае дазвол | XGA (1024 x 768) |
| Максімальны дазвол | WUXGA (1920 x 1200) |
| Яркасць | 3000 люмен |
| Каэфіцыент кантраснасці | 15000:1 |
| Lamp жыццё | Up to 6,000 hours (Eco-mode) |
| Сувязь | HDMI v1.4, Dual VGA In, VGA Out, S-Video, Composite Video, Audio In/Out, USB |
| Асаблівасці | 3D-Ready (DLP Link), Brilliant Color Technology |
| Памеры прадукту | 10.8 х 8.35 х 3.66 цалі (275 х 212 х 100 мм) |
| Вага прадмета | 5.1 фунта |
| Вытворца | Vivitek Corp. |
| Батарэйкі (для пульта) | 2 батарэйкі АА (у камплекце) |
10. Гарантыя і падтрымка
For warranty information and technical support, please refer to the official Vivitek website or the warranty card included with your product. Do not attempt to repair the projector yourself, as this may void your warranty. Contact Vivitek customer service for assistance with any issues not covered in the troubleshooting section.