1. Уводзіны
This manual provides comprehensive instructions for the installation, operation, and programming of the Elektrobock PT712 digital thermostat. Designed for precise control of underfloor heating systems, the PT712 offers advanced features to optimize comfort and energy efficiency in your home or office.
Please read this manual carefully before installation and use to ensure proper function and to prevent any damage to the device or heating system. Keep this manual for future reference.

Малюнак 1: Спераду view of the Elektrobock PT712 Digital Thermostat, highlighting its clear display and European manufacturing origin.
2. Асноўныя магчымасці
The Elektrobock PT712 thermostat is equipped with several features designed for user convenience and efficient heating control:
- Вялікі ВК-дысплей з падсветкай: Provides clear visibility of temperature, time, and program settings.
- Праграмуемы тыднёвы расклад: Allows for 2 weekly programs with up to 6 temperature changes per day, offering flexible heating control.
- Adjustable Hysteresis: Customizable temperature differential from 0.1°C to 5°C for precise temperature management.
- Рэжымы працы: Includes Auto, Manual, Off, and Holiday modes to suit various needs.
- Maximum Floor Temperature Limit: Prevents overheating of the floor.
- Хуткая рэгуляванне тэмпературы: Easily modify the desired temperature temporarily.
- Operating Hours Information: Tracks the total time the heating system has been active.
- Child Lock / Key Lock: Прадухіляе несанкцыянаваную змену налад.
- Запас магутнасці: Integrated NiMH battery provides over 100 hours of power reserve during outages, maintaining settings.
- Easy Plug-in Installation: Designed for straightforward setup.
- Элегантны дызайн: Integrates seamlessly with modern interiors.
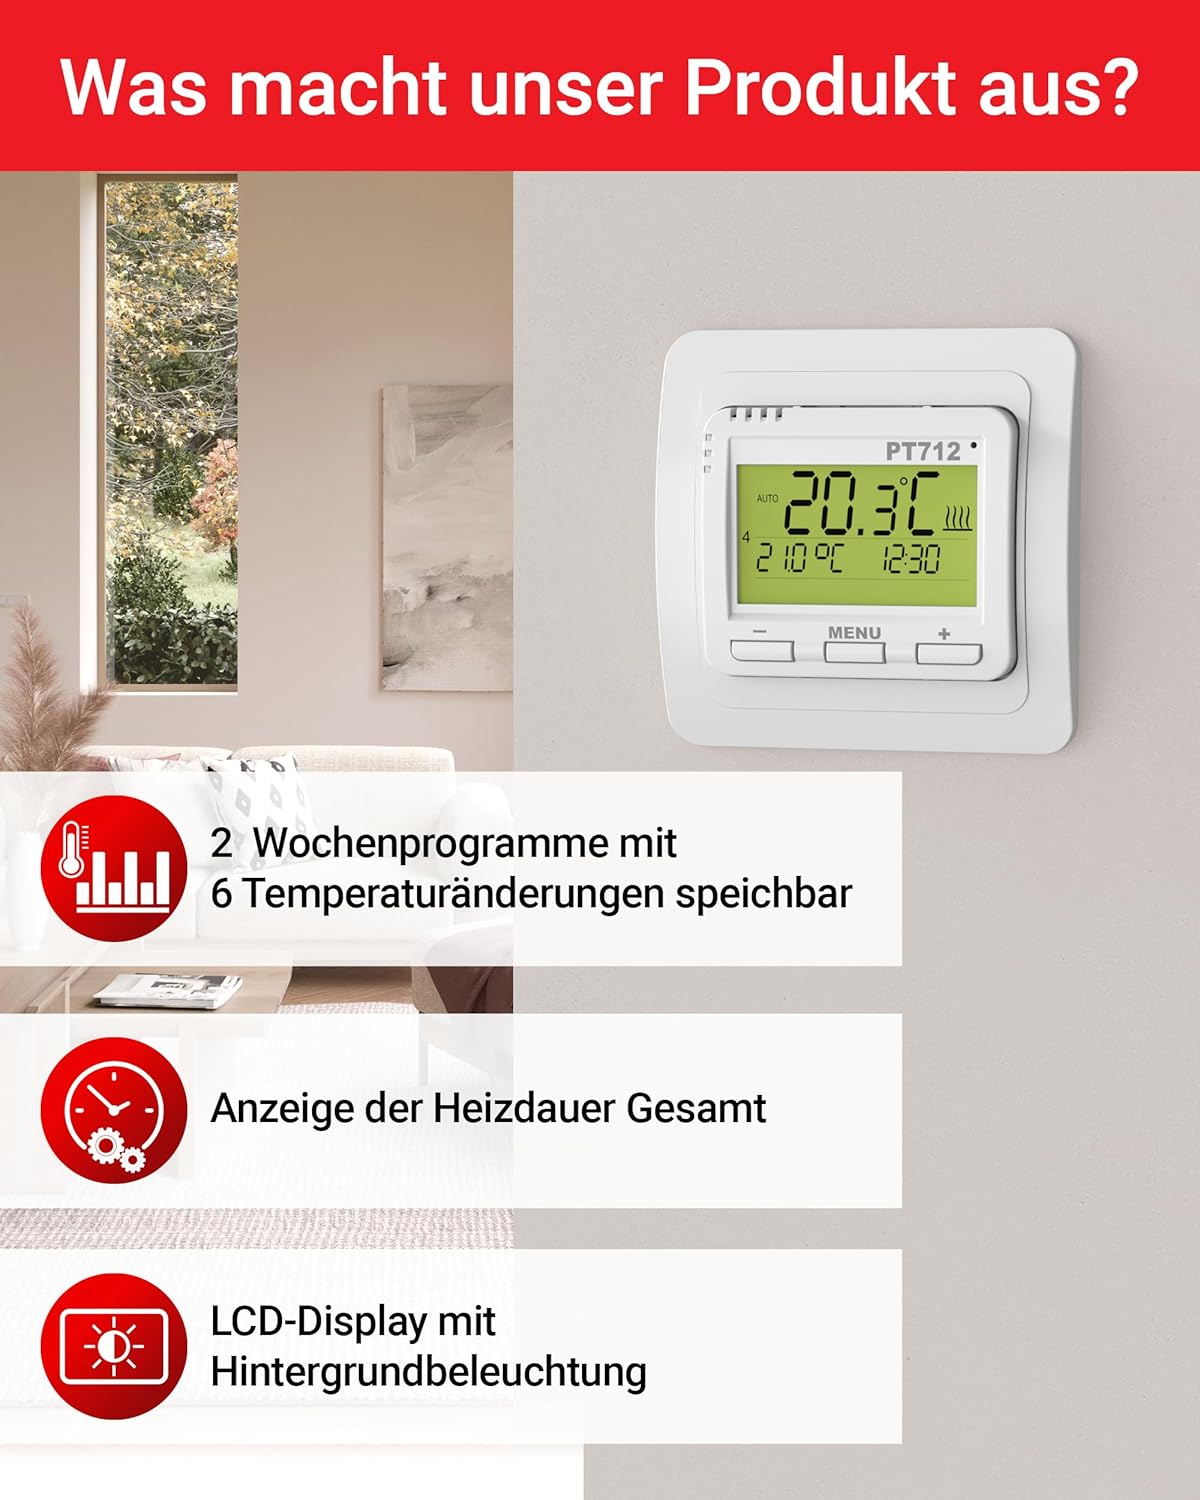
Figure 2: Visual representation of key features including programmable schedules and display characteristics.

Figure 3: Additional features such as external sensor compatibility, child lock, and hysteresis adjustment.
3. Тэхнічныя характарыстыкі
| Параметр | Каштоўнасць |
|---|---|
| Электразабеспячэнне | 230 В / 50 Гц |
| Number of Settable Temperatures | 6 у дзень |
| Гістэрэзіс | Ад 0.1 °C да 5 °C |
| Minimum Programming Time | 10 хвілін |
| Дыяпазон рэгулявання тэмпературы | Ад 3 °C да 99.5 °C |
| Temperature Setting Step | 0.5 °C |
| Minimum Indication | 0.1 °C |
| Дакладнасць | ± 0.5 °C |
| Power Reserve (NiMH) | Больш за 100 XNUMX гадзін |
| Клас абароны | IP20 (free contacts) |
| Максімальная нагрузка | 12 А, 2760 Вт |
| Працоўная тэмпература | Ад 0 °C да 40 °C |
| Памеры (Д х Ш х У) | 14 х 9 х 25 см |
| Вага | 160 грамаў |
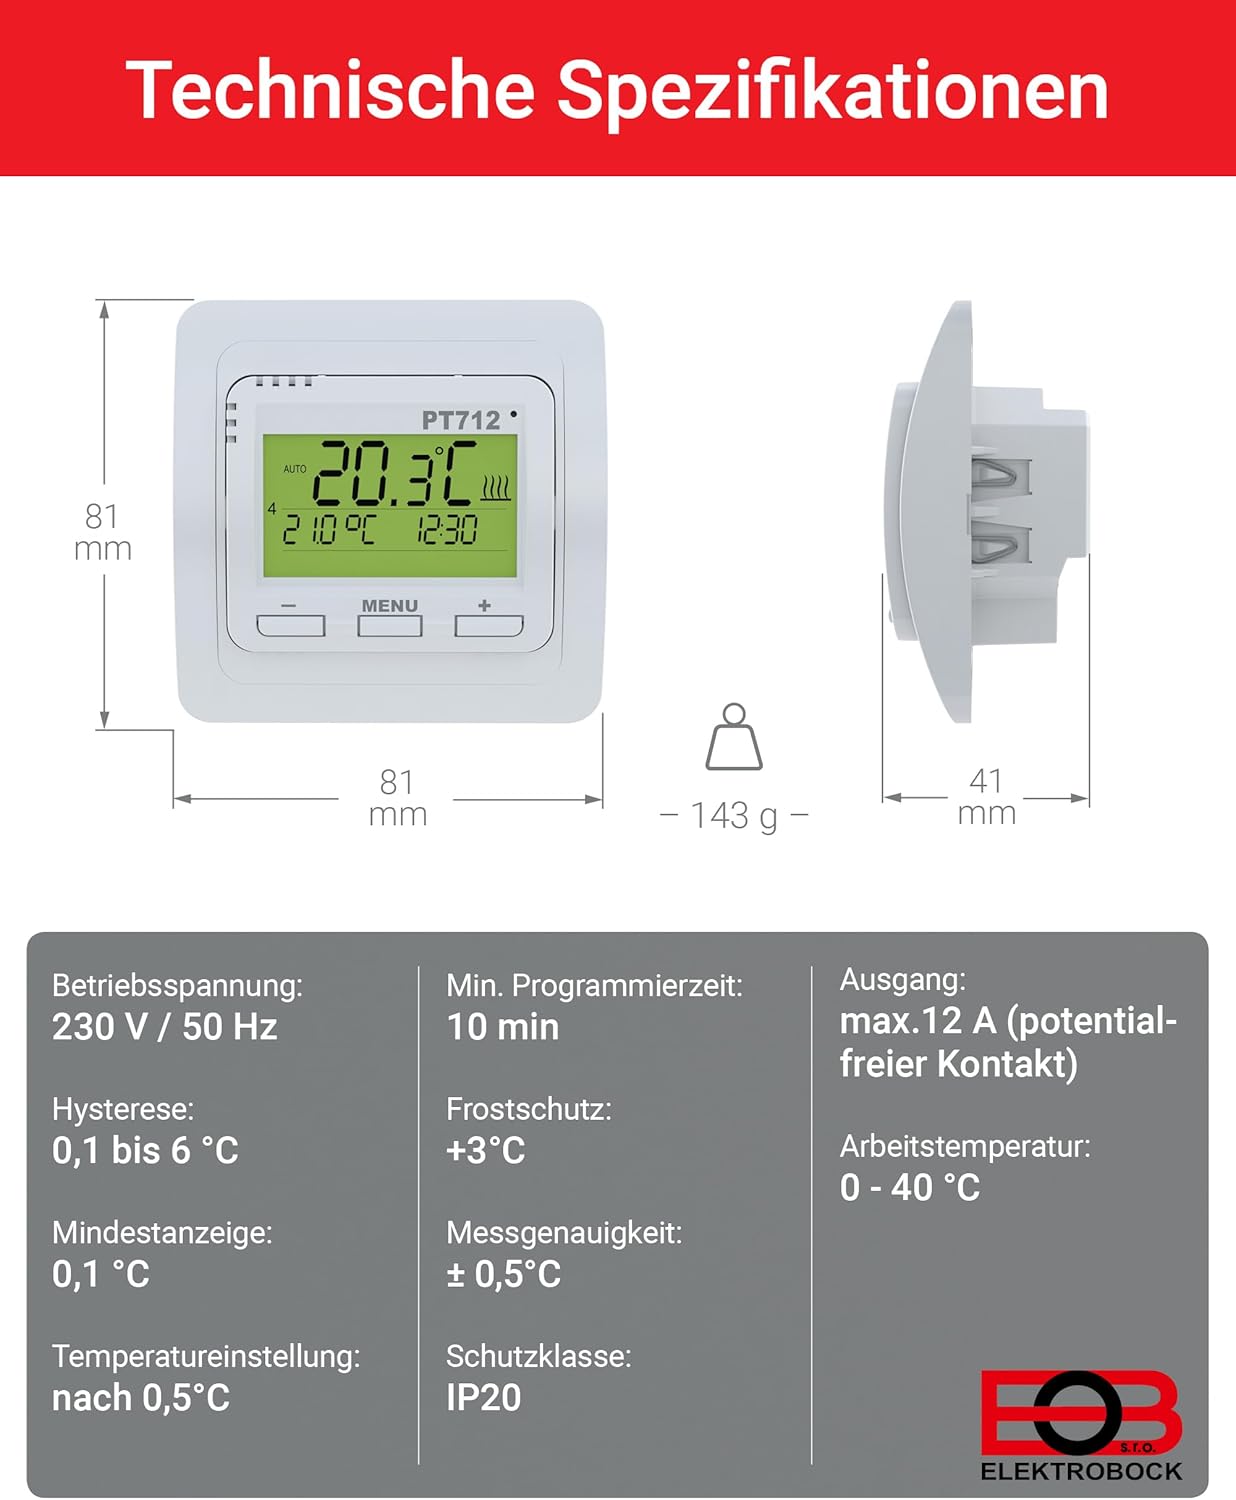
Figure 4: Detailed technical specifications and physical dimensions of the PT712 thermostat.
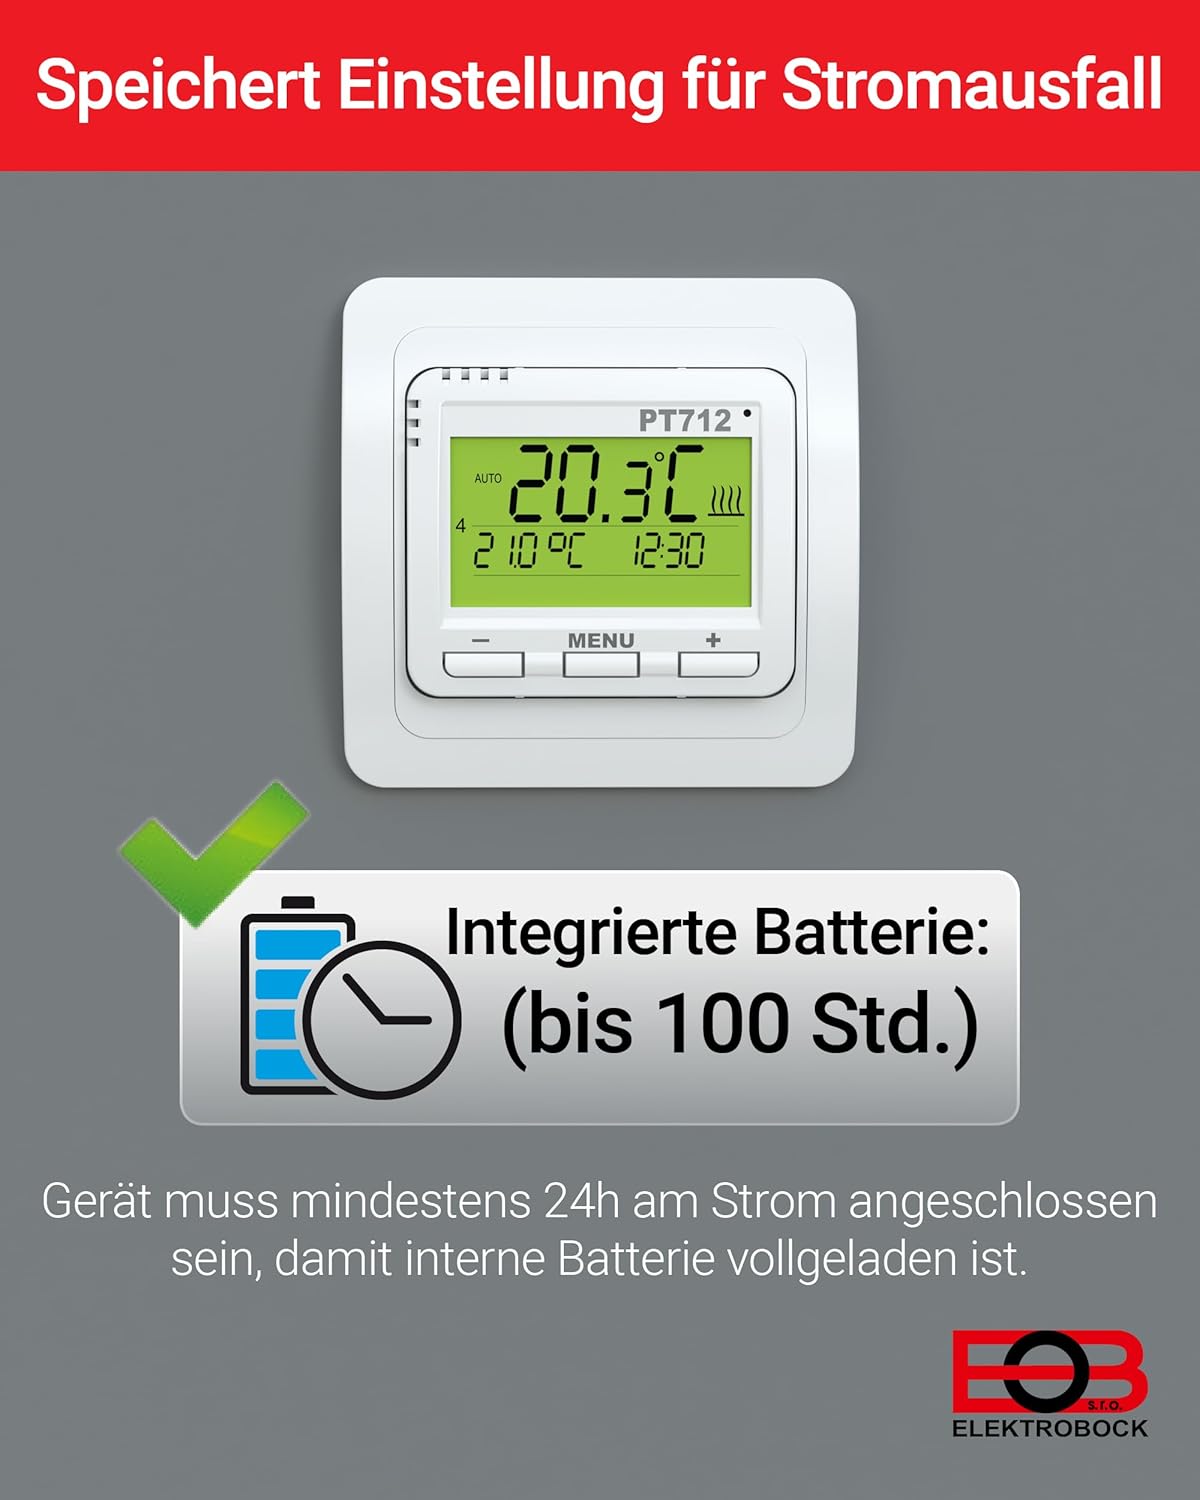
Figure 5: The thermostat features an integrated battery for power reserve, ensuring settings are retained during power outages. The device must be connected to power for at least 24 hours for the internal battery to be fully charged.
4. Ўстаноўка
The Elektrobock PT712 thermostat is designed for easy plug-in installation, typically as a flush-mount unit. Professional installation by a qualified electrician is recommended to ensure safety and compliance with local electrical codes.
4.1 Меры бяспекі
- Always disconnect power to the heating circuit at the main breaker before beginning any installation work.
- Ensure the wiring matches the specifications of the thermostat (230V/50Hz).
- The device has a protection class of IP20, meaning it is protected against solid objects larger than 12.5mm but has no protection against water. Install in a dry location.
4.2 Мантаж
The PT712 is suitable for flush-mount installation in a standard wall box with a diameter of 68mm or greater.
- Prepare the wall box and ensure all necessary wiring (power supply, heating element connection, and optional external sensor) is accessible.
- Connect the electrical wires to the appropriate terminals on the back of the thermostat according to the wiring diagram provided in the full product documentation (not included in this manual).
- Carefully insert the thermostat into the wall box and secure it using the mounting screws.
- Attach the front cover or frame of the thermostat.
- Restore power to the heating circuit.

Figure 6: Illustration of the flush-mount installation process for the PT712 thermostat, suitable for standard wall boxes.
4.3 Сумяшчальнасць
The Elektrobock PT712 thermostat is designed for use with various electric heating systems, including:
- Электрычны цёплы падлогу
- Інфрачырвоныя ацяпляльныя панэлі
- Электрычныя радыятары

Figure 7: The PT712 thermostat is compatible with various electric heating solutions.
5. Аперацыя
The PT712 thermostat features a user-friendly interface with a clear LCD display and intuitive buttons for navigation and setting adjustments.
5.1 Дысплей скончыўсяview
The LCD display shows the current room temperature, set temperature, time, active program mode, and heating status indicators. Refer to the full product manual for a detailed diagram of all display icons.

Figure 8: A close-up of the thermostat's display, showing essential information at a glance.
5.2 Кнопкі
- Кнопка МЕНЮ: Used to access and navigate through the thermostat's settings and programming menus.
- Кнопка «+»: Increases values, navigates forward in menus, or increases the set temperature.
- Кнопка «-»: Decreases values, navigates backward in menus, or decreases the set temperature.
Рэжымы працы 5.3
The PT712 offers several operating modes:
- Аўтаматычны рэжым: Выконвае запраграмаваны тыднёвы графік.
- Ручной рэжым: Maintains a constant user-defined temperature.
- Рэжым выключэння: Turns off the heating. Frost protection may still be active depending on settings.
- Рэжым адпачынку: Sets a specific temperature for a defined period, ideal for when you are away.
Switch between modes using the MENU button and following the on-screen prompts. Detailed instructions for each mode are available in the comprehensive user manual.
6. Праграмаванне
The PT712 allows for advanced programming to optimize your heating schedule. You can set 2 weekly programs, each with up to 6 temperature changes per day.
6.1 Устаноўка часу і даты
Before programming, ensure the correct time and date are set on the thermostat. Access this setting via the MENU button and navigate to the time/date options. Use the '+' and '-' buttons to adjust values.
6.2 Creating a Weekly Program
- Націсніце кнопку MENU, каб увайсці ў галоўнае меню.
- Navigate to the "Program" or "Schedule" option.
- Select one of the two available weekly programs (e.g., Program 1 or Program 2).
- For each day of the week, you can define up to 6 time intervals and their corresponding desired temperatures.
- Use the '+' and '-' buttons to adjust the start time and temperature for each interval.
- Пацвердзіце кожную наладу, перш чым перайсці да наступнай.
- Repeat for all desired days and intervals.
Refer to the detailed programming section in the full user manual for specific menu navigation and advanced programming options, such as copying programs between days or weeks.
6.3 Child Lock / Key Lock
To prevent accidental or unauthorized changes, activate the child lock feature. This typically involves a combination of button presses or a menu option. Consult the full manual for activation and deactivation procedures.
7. Тэхнічнае абслугоўванне
The Elektrobock PT712 thermostat requires minimal maintenance to ensure long-term reliable operation.
7.1 Ачыстка
- Wipe the thermostat's surface with a soft, dry, or slightly damp тканіна.
- Не выкарыстоўвайце абразіўныя ачышчальнікі, растваральнікі або хімічныя спрэі, бо яны могуць пашкодзіць пластыкавыя і электронныя кампаненты.
- Сачыце за тым, каб у прыладу не трапляла вадкасць.
7.2 Абслугоўванне акумулятара
The integrated NiMH battery provides power reserve. For optimal performance, ensure the thermostat is connected to power for at least 24 hours after initial installation or extended power outages to fully charge the internal battery.
7.3 Абслугоўванне
The PT712 thermostat contains no user-serviceable parts. Do not attempt to open or repair the device yourself. Contact qualified service personnel for any repairs.
8. Выпраўленне непаладак
This section addresses common issues you might encounter with your Elektrobock PT712 thermostat. For more complex problems, consult the full user manual or contact customer support.
| праблема | Магчымая прычына | Рашэнне |
|---|---|---|
| Дысплей пусты. | Няма харчавання; унутраная батарэя разраджана. | Check main power breaker. Ensure thermostat is properly wired. Allow 24 hours for internal battery to charge after power connection. |
| Ацяпленне не ўключаецца. | Thermostat in Off mode; set temperature too low; program not active; wiring issue. | Check operating mode (ensure it's Auto or Manual). Increase set temperature above current room temperature. Verify program schedule. Consult an electrician to check wiring. |
| Тэмпература недакладная. | Sensor obstructed; thermostat located near heat source/draft. | Ensure the thermostat's sensor is not covered. Relocate the thermostat if it's in an unsuitable position. Calibrate if an external sensor is used and calibration option is available (refer to full manual). |
| Налады губляюцца пасля адключэння харчаванняtage. | Internal battery not fully charged or faulty. | Ensure the thermostat has been connected to power for at least 24 hours to charge the internal battery. If the issue persists, the battery may need replacement by a qualified technician. |
| Buttons unresponsive (Child Lock). | Child lock feature is active. | Deactivate the child lock as per instructions in the full user manual. |
9. Інфармацыя па бяспецы
- Гэта прылада прызначана толькі для выкарыстання ў памяшканні.
- Do not expose the thermostat to water, high humidity, or extreme temperatures.
- Забяспечце належную вентыляцыю вакол прылады.
- Installation and electrical connections must be performed by a qualified electrician in accordance with all local and national electrical codes.
- Адключыце электрычнасць перад чысткай або любым тэхнічным абслугоўваннем.
- Захоўваць у месцах, недаступных дзецям.
10. Гарантыя і падтрымка
Specific warranty information for the Elektrobock PT712 thermostat is not provided in the available product data. Please refer to the documentation included with your purchase or contact Elektrobock customer support for details regarding warranty terms and conditions.
For technical support or inquiries, please visit the official Elektrobock webсайт або звярніцеся ў службу падтрымкі кліентаў. Кантактную інфармацыю звычайна можна знайсці на ўпакоўцы прадукту або на сайце вытворцы webсайт.