Mastech MS8260A
Кіраўніцтва карыстальніка лічбавага мультыметра Mastech MS8260A
1. Уводзіны
This manual provides detailed instructions for the safe and effective operation of the Mastech MS8260A Digital Multimeter. The MS8260A is a versatile instrument designed for various electrical measurements, including AC/DC voltage, AC/DC current, resistance, diode check, continuity test, and transistor check. It also features a non-contact voltagе функцыя выяўлення.
Key features of the MS8260A include:
- Бескантактавы выпtagэлектроннае выяўленне
- Automatic power-off function to conserve battery life
- Індыкацыя разраду батарэі
2. Інфармацыя па бяспецы
To ensure safe operation and service of the meter, please read all instructions carefully before use. Failure to observe safety warnings can result in electric shock, fire, or damage to the meter.
- Always disconnect test leads from the circuit before changing functions.
- Не наносіце больш за намінальны аб'ёмtage, як пазначана на лічыльніку, паміж клемамі або паміж любой клемай і зазямленнем.
- Будзьце асцярожныя пры працы з voltagвышэй за 30 В пераменнага току (RMS), 42 В пікавага або 60 В пастаяннага току. Гэтыя аб'ёмыtagуяўляюць небяспеку паражэння.
- Before measuring current, ensure the meter's fuses are intact and the test leads are connected correctly.
- Неадкладна замяніце батарэйку, калі з'явіцца індыкатар нізкага зараду батарэі, каб забяспечыць дакладныя паказанні.
- Не выкарыстоўвайце глюкометр, калі ён выглядае пашкоджаным або калі корпус адкрыты.
- Прытрымвайцеся мясцовых і нацыянальных кодэксаў бяспекі.
3. Кампаненты прадукту
The Mastech MS8260A Digital Multimeter consists of the main unit and essential accessories.
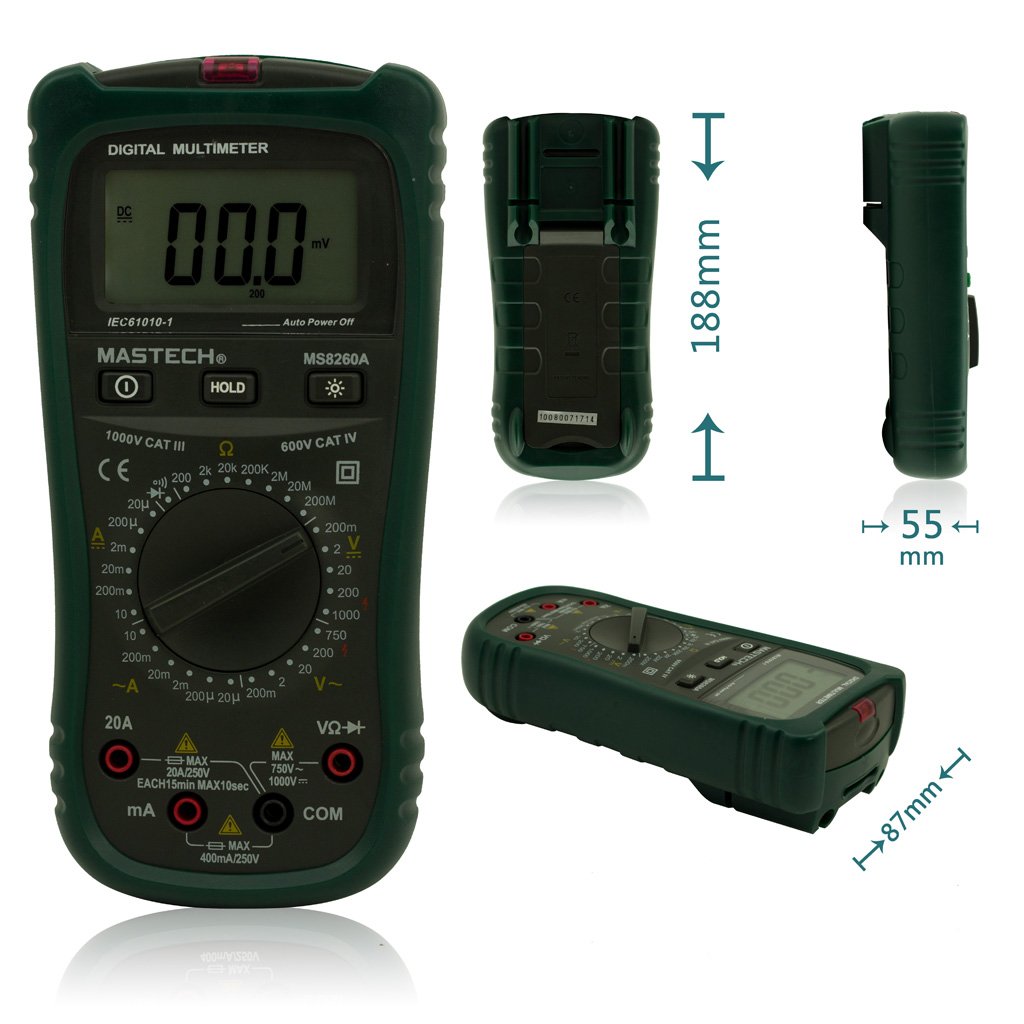
Малюнак 1: Спераду View of Mastech MS8260A Digital Multimeter with Dimensions
This image displays the Mastech MS8260A Digital Multimeter from the front, highlighting its LCD screen, rotary function switch, and input terminals. Key dimensions are indicated: 188mm height, 87mm depth, and 55mm width. The display shows '00.0 mV' and 'Auto Power Off' text. The rotary switch is set to 'mV' range. The input jacks are labeled 'VΩHz', 'mA', and 'COM'.
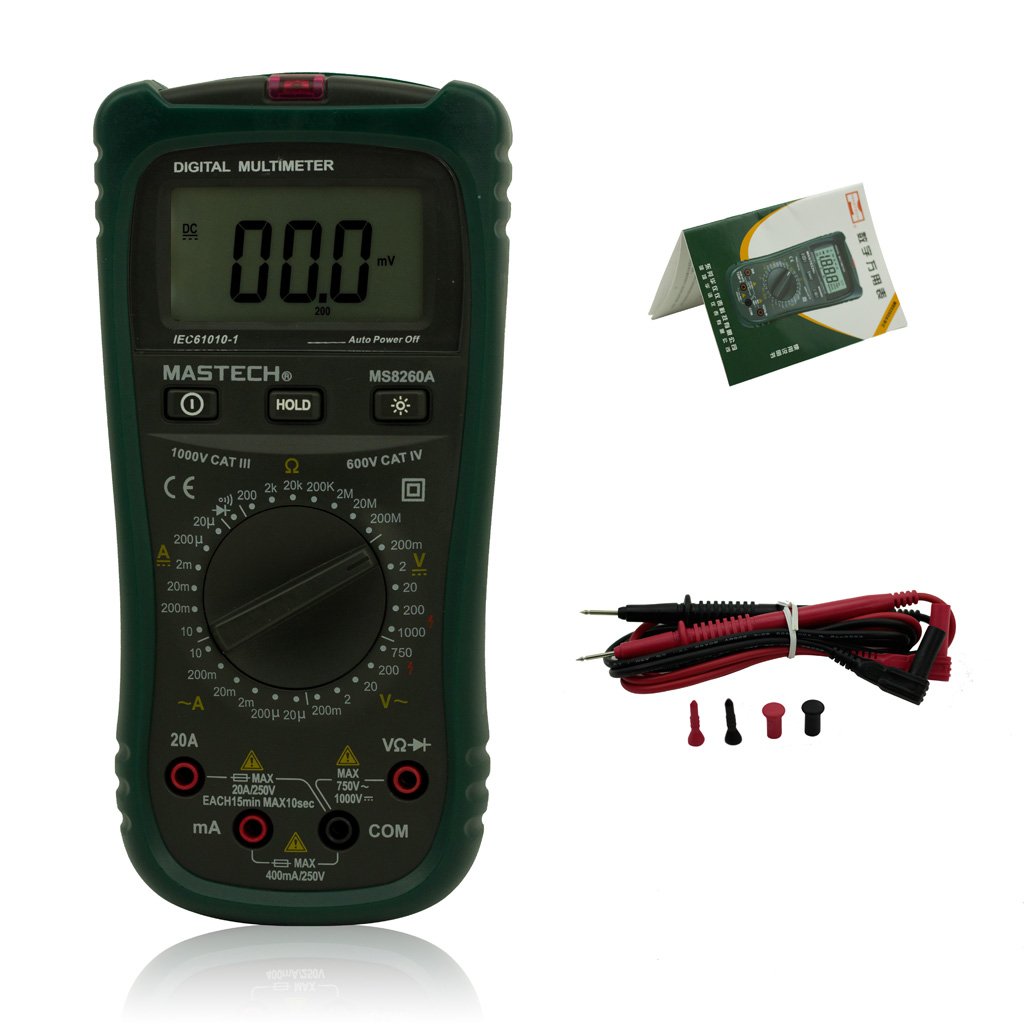
Figure 2: Mastech MS8260A Digital Multimeter and Accessories
This image shows the Mastech MS8260A Digital Multimeter accompanied by its standard accessories. These include a pair of red and black test leads with protective caps, and a printed user manual. The multimeter itself is shown from the front, similar to the main product view.
3.1 Асаблівасці асноўнага блока
- ВК-дысплей: Паказвае паказанні вымярэнняў, адзінкі вымярэння і індыкатары функцый.
- Паваротны пераключальнік: Selects the desired measurement function and range.
- Уваходныя гнязда: Terminals for connecting test leads (VΩHz, mA, COM).
- Кнопка HOLD: Зафіксуе бягучыя паказанні на дысплеі.
- Кнопка падсвятлення: Уключае падсветку дысплея для паляпшэння бачнасці пры слабым асвятленні.
- Бескантактавы выпtage (NCV) Sensor: Выяўляе AC voltage без прамога кантакту.
3.2 У камплекце аксэсуары
- Вымяральныя дроты (чырвоны і чорны)
- Кіраўніцтва карыстальніка
4. Пачатковая налада
4.1 Устаноўка батарэі
The Mastech MS8260A Digital Multimeter requires one 9V 6F22 battery for operation. Batteries are not included with the product.
- Ensure the multimeter is turned off and disconnect any test leads.
- Знайдзіце вечка батарэйнага адсека на задняй панэлі прылады.
- Use a screwdriver to remove the screw securing the battery cover.
- Акуратна зніміце вечка.
- Connect a new 9V 6F22 battery to the battery clips, observing correct polarity.
- Змесціце батарэю ў адсек.
- Замяніце крышку батарэйнага адсека і замацуеце яе шрубай.
5. Інструкцыя па эксплуатацыі
Before taking any measurements, ensure the test leads are properly connected to the meter and the circuit under test.
5.1 Падключэнне вымяральных правадоў
- Заўсёды падключайце чорны тэставы кабель да COM (агульны) уваходны раз'ём.
- Для выпtage, resistance, diode, continuity, and transistor measurements, connect the чырвоны тэставы кабель да ВΩГц ўваходны гняздо.
- For current measurements (mA or 20A), connect the чырвоны test lead to the appropriate current input jack (mA or 20А).
5.2 Выбар функцыі
Turn the rotary switch to the desired measurement function and range. The meter will display the reading on the LCD.
5.2.1 DC Voltage Measurement (V–)
- Усталюйце паваротны перамыкач на патрэбны ўзровень гучнасці пастаяннага токуtagдыяпазон (напрыклад, 200 мВ, 2 В, 20 В, 200 В, 1000 В).
- Падключыце вымяральныя шпулькі паралельна да ланцуга або кампанента, які трэба вымераць.
- Прачытайце тtage значэнне на дысплеі.
5.2.2 AC VoltagВымярэнне (V∼)
- Усталюйце паваротны перамыкач на патрэбны ўзровень гучнасці пераменнага токуtage range (e.g., 2V, 20V, 200V, 750V).
- Connect the test leads in parallel to the AC voltagэлектронная крыніца.
- Прачытайце тtage значэнне на дысплеі.
5.2.3 DC Current Measurement (A–)
- Set the rotary switch to the desired DC Current range (e.g., 20µA, 200µA, 2mA, 20mA, 200mA, 20A).
- Важна: Disconnect power to the circuit. Break the circuit and connect the meter in series with the load.
- Падайце харчаванне ў ланцуг.
- Прачытайце бягучае значэнне на дысплеі.
5.2.4 AC Current Measurement (A∼)
- Set the rotary switch to the desired AC Current range (e.g., 20µA, 200µA, 2mA, 20mA, 200mA, 20A).
- Важна: Disconnect power to the circuit. Break the circuit and connect the meter in series with the load.
- Падайце харчаванне ў ланцуг.
- Прачытайце бягучае значэнне на дысплеі.
5.2.5 Вымярэнне супраціву (Ом)
- Усталюйце паваротны перамыкач у патрэбны дыяпазон супраціву (напрыклад, 200 Ом, 2 кОм, 20 кОм, 200 кОм, 2 МОм, 20 МОм).
- Перад вымярэннем супраціўлення пераканайцеся, што ланцуг абясточаны.
- Падключыце вымяральныя дроты да кампанента, які трэба вымераць.
- Прачытайце значэнне супраціву на дысплеі.
5.2.6 Diode Test (→|)
- Усталюйце паваротны перамыкач у становішча «Праверка дыёдаў».
- Падключыце чырвоны вымяральны провад да анода, а чорны — да катода дыёда.
- На дысплеі будзе адлюстроўвацца гучнасць прамой перадачыtage drop. Reverse the leads; the display should show 'OL' (Open Loop) for a good diode.
5.2.7 Continuity Test (♫)
- Усталюйце паваротны перамыкач у становішча «Праверка цэласнасці».
- Падключыце вымяральныя дроты да ланцуга або кампанента.
- Калі супраціўленне ніжэй за прыблізна 50 Ом, прагучыць зумер, які сведчыць пра адсутнасць цеплаправоднасці.
5.2.8 Тэст транзістара (hFE)
- Усталюйце паваротны перамыкач у становішча hFE.
- Insert the transistor's emitter, base, and collector leads into the appropriate sockets on the meter's hFE test socket.
- The display will show the hFE value (DC current gain).
5.2.9 Бескантактны выпtage (NCV) Выяўленне
- Set the rotary switch to the NCV position.
- Move the top front part of the meter (where the NCV sensor is located) close to the conductor suspected of having AC voltage.
- Калі AC абtage greater than 110V is detected, the meter will emit an audible beep and the NCV indicator light will illuminate.
6. Тэхнічнае абслугоўванне
6.1 Ачыстка
Працярыце корпус рэкламайamp тканінай і мяккім мыйным сродкам. Не выкарыстоўвайце абразіўныя рэчывы або растваральнікі. Перад выкарыстаннем пераканайцеся, што глюкометр цалкам сухі.
6.2 Замена батарэі
When the low battery indicator appears on the display, replace the 9V 6F22 battery as described in Section 4.1. Prompt battery replacement ensures accurate measurements and proper meter function.
6.3 Замена засцерагальніка
If the meter fails to measure current, the fuse may be blown. Refer to the specifications for the correct fuse type and rating. Fuse replacement should only be performed by qualified personnel.
7. Выпраўленне непаладак
- Няма дысплея або цьмянае адлюстраванне: Праверце ўстаноўку батарэі і пры неабходнасці заменіце яе.
- Няправільныя паказанні: Ensure test leads are properly connected, the correct function/range is selected, and the battery is not low.
- Няма вымярэння току: Check the fuse. Ensure the meter is connected in series with the circuit.
- Адлюстраванне «OL» (перагрузка): The measured value exceeds the selected range. Select a higher range.
8. Тэхнічныя характарыстыкі
| Спецыфікацыя | Каштоўнасць |
|---|---|
| Марка | Мастэк |
| Нумар мадэлі | MS8260A |
| Тып вымярэння | Лічбавы мультиметр |
| Крыніца харчавання | 9V 6F22 Battery |
| Вага прадмета | 454 г |
| Атэстацыя | CE |
| Батарэі ўваходзяць у камплект | няма |
9. Інфармацыя аб гарантыі
Please refer to the warranty card included with your product or contact Mastech customer support for detailed warranty terms and conditions. Warranty coverage typically applies to defects in materials and workmanship under normal use.
10. Падтрымка кліентаў
For technical assistance, troubleshooting, or service inquiries, please contact Mastech customer support. Refer to the official Mastech webна сайце або на ўпакоўцы прадукту, каб знайсці найноўшую кантактную інфармацыю.
Вы можаце наведаць Крама Mastech на Amazon для атрымання дадатковай інфармацыі аб прадукце.
Ask a question about this manual
Ask about setup, troubleshooting, compatibility, parts, safety, or missing instructions. Manuals+ will review the question and use this page’s manual context to help answer it.