Уводзіны
This manual provides essential instructions for the setup, operation, and maintenance of your Gigaset Handset and Charging Station. This product is compatible with various Gigaset phone systems, including models S2, S44, S200, S440, S445, S645, SX440, and SX445. Please read this manual carefully to ensure proper use and to maximize the lifespan of your device.
1. Настройка
1.1 Распакоўка і першапачатковы агляд
Carefully unpack all components. Ensure that the handset, charging station, and power adapter are present and undamaged. If any items are missing or damaged, contact your retailer.
1.2 Падключэнне зараднай станцыі
- Connect the power adapter cable to the charging station.
- Падключыце адаптар сілкавання да стандартнай электрычнай разеткі.
- Place the charging station on a flat, stable surface, away from heat sources and direct sunlight.

Малюнак 1.1: Верх view of the Gigaset charging station. This image shows the compact design of the charging station, ready to receive the handset.
1.3 Inserting the Battery and Charging the Handset
- Адкрыйце крышку батарэйнага адсека на задняй панэлі трубкі.
- Устаўце акумулятарную батарэю, сачыце за правільнай палярнасцю.
- Зачыніце крышку батарэйнага адсека.
- Place the handset into the charging station. Ensure it is seated correctly and the charging indicator (if present) illuminates.
- Allow the handset to charge for at least 6-8 hours before initial use to ensure full battery capacity.
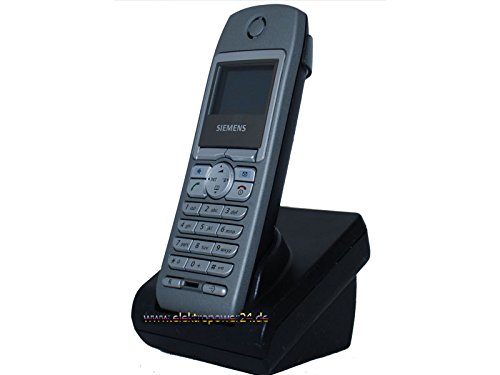
Выява 1.2: Спераду view of the Gigaset handset securely placed in its charging station. The display shows "Wahlvorbereitung" (dialing preparation) and a phone number, indicating it's powered on and ready.
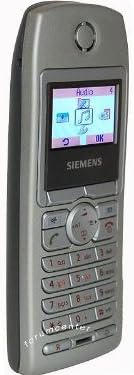
Малюнак 1.3: Збоку view of the Gigaset handset, highlighting its ergonomic design and button layout. The display shows menu options like "Audio" and "OK".

Малюнак 1.4: Спіна view of the Gigaset handset, showing the smooth casing and the location of the battery compartment cover.
1.4 Registering the Handset to a Base Station
This handset is designed to be compatible with various Gigaset base stations. The registration process may vary slightly depending on your specific base station model. Refer to your base station's manual for detailed instructions. Generally, the steps involve:
- Activate registration mode on your Gigaset base station (usually by pressing and holding a registration button).
- On the handset, navigate to the "Settings" or "Registration" menu.
- Select "Register Handset" and follow the on-screen prompts. You may need to enter a PIN (default is usually 0000).
- Once registered, the handset display will confirm successful connection to the base station.
2. Інструкцыя па эксплуатацыі
2.1 Асноўныя функцыі
- Здзяйсненне званка: Увядзіце нумар тэлефона і націсніце зялёную клавішу выкліку.
- Адказ на званок: Націсніце зялёную клавішу выкліку, калі тэлефон зазваніць.
- Завяршэнне выкліку: Націсніце чырвоную клавішу адбою.
- Гучная сувязь: During a call, press the dedicated hands-free key (often backlit) to activate the speakerphone.
2.2 Phonebook (Directory)
The handset features a directory capable of storing up to 200 phone numbers and names.
- Даданне запісу: Navigate to the "Directory" or "Phonebook" menu, select "New Entry," and enter the name and number.
- Званок з даведніка: Open the directory, scroll to the desired entry, and press the green call key.
2.3 Дысплей і індыкатары
The handset features a 5-line illuminated graphic display. Key indicators include:
- Адлюстраванне даты/часу: Always visible on the idle screen.
- CLIP Function (Call Display): Shows the caller's number or name (if stored in the directory) for incoming calls.
- Індыкатар батарэі: Паказвае бягучы ўзровень зарада батарэі.
- Індыкатар магутнасці сігналу: Displays the connection quality to the base station.
3. Тэхнічнае абслугоўванне
3.1 Ачыстка
- Wipe the handset and charging station with a soft, damp тканіна.
- Не выкарыстоўвайце абразіўныя ачышчальнікі або растваральнікі.
- Сачыце за тым, каб вадкасць не трапляла ў адтуліны прылады.
3.2 Сыход за акумулятарам
- Always use the original or approved replacement rechargeable batteries.
- Пазбягайце ўздзеяння на батарэю экстрэмальных тэмператур.
- If the handset will not be used for an extended period, remove the battery.
4. Выпраўленне непаладак
| праблема | Магчымая прычына | Рашэнне |
|---|---|---|
| Тэлефонная трубка не ўключаецца. | Батарэя ўстаўлена няправільна або разраджана. | Check battery insertion. Place handset in charging station for several hours. |
| Няма нумара набору. | Handset not registered to base station or out of range. | Ensure handset is registered. Move closer to the base station. Check base station power. |
| Дрэнная якасць званка. | Interference or handset too far from base station. | Move away from other electronic devices. Move closer to the base station. |
| Нельга рабіць або прымаць званкі. | Line issue or base station problem. | Check your telephone line connection. Restart the base station by unplugging and replugging its power. |
5. Тэхнічныя характарыстыкі
- Марка: Gigaset
- Сумяшчальныя мадэлі: Gigaset S2, S44, S200, S440, S445, S645, SX440, SX445
- Ёмістасць тэлефоннай кнігі: Up to 200 entries (names and numbers)
- Дысплей: 5-line illuminated graphic display
- Асаблівасці: Backlit hands-free key, Date/Time display, CLIP function (Call Display)
- вытворца: Gigaset
- ASIN: B0102FULTW
Note: Information regarding spare parts availability and guaranteed software updates is not provided. This product is currently not listed as discontinued by the manufacturer.
6. Гарантыя і падтрымка
Specific warranty details for this Gigaset Handset and Charging Station are not provided within the available product information. For warranty claims, technical support, or service inquiries, please refer to the documentation included with your original purchase or visit the official Gigaset webсайт для вашага рэгіёну.
You may also contact your retailer for assistance.


