1. Уводзіны
This manual provides detailed instructions for the safe and effective operation of the Meco 2250-HZ Auto Digital Clamp Meter. This device is designed for measuring various electrical parameters, including AC/DC voltage, AC current, frequency, continuity, and diode testing. Please read this manual thoroughly before use and retain it for future reference.
2. Інфармацыя па бяспецы
Always observe standard safety precautions when working with electrical circuits. Failure to do so may result in injury or damage to the meter. This meter is designed with over-voltage protection up to 200V DC and AC Peak. However, exercise caution.
- Не спрабуйце вымераць аб'ёмtagтокі або напружанні, якія перавышаюць зададзеныя максімальныя межы.
- Ensure the test leads are in good condition and properly connected before making measurements.
- Do not operate the meter if it appears damaged or if the battery cover is not securely closed.
- Пазбягайце выкарыстання вымяральніка ў вільготных умовах або ў прысутнасці выбухованебяспечных газаў ці пылу.
- Always disconnect power to the circuit before connecting or disconnecting test leads, especially for current measurements.
3. Прадукт скончыўсяview
The Meco 2250-HZ Auto Digital Clamp Meter features a robust design for reliable performance. Familiarize yourself with the components shown below.
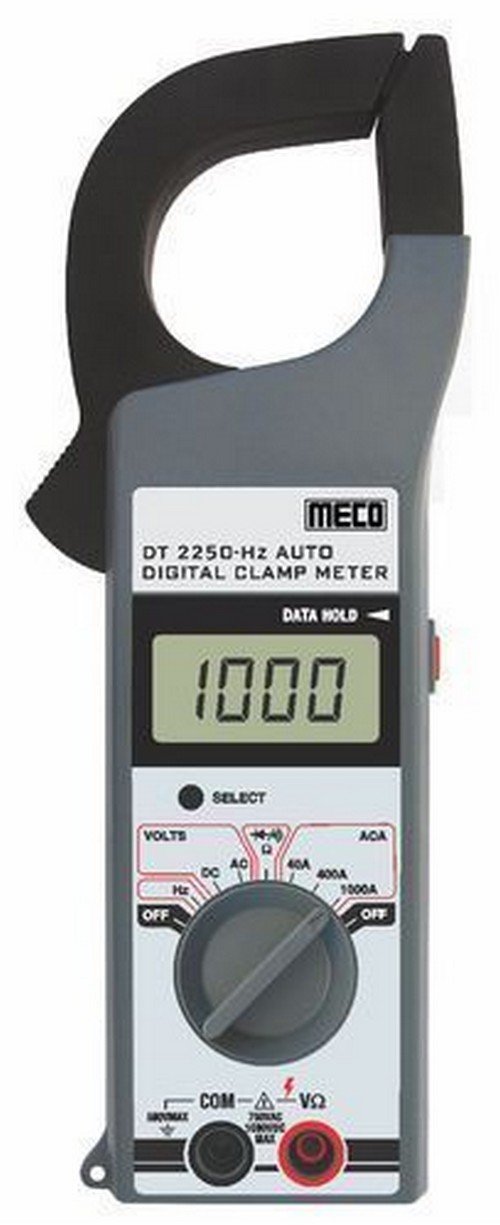
Малюнак 1: Фронт view of the Meco 2250-HZ Auto Digital Clamp Meter. This image displays the clamp jaw at the top, the LCD screen showing '1000', the function dial, and the input terminals at the bottom. The 'SELECT' and 'DATA HOLD' buttons are visible next to the display.
Ключавыя кампаненты:
- Clamp Сківіцы: Выкарыстоўваецца для бескантактавага вымярэння пераменнага току.
- ВК-дысплей: 3¾ digit liquid crystal display with a maximum reading of 3999. Shows measurement values, polarity, overrange indication (OL or -OL), and low battery indication.
- Функцыянальны цыферблат: Rotary switch to select measurement functions (OFF, Volts DC/AC, Hz, ACA 40A/400A/1000A).
- Кнопка ВЫБАР: Used to switch between DC and AC voltage modes, or other sub-functions within a dial setting.
- DATA HOLD Button: Зафіксуе бягучае паказанне на дысплеі. Націсніце яшчэ раз, каб адпусціць.
- Input Terminals (COM, VΩ): Для падлучэння вымяральных кабеляў для аб'ёмуtagвымярэнні супраціву, праверкі цеплаправоднасці і дыёдаў.
4. Настройка
4.1 Устаноўка батарэі
The Meco 2250-HZ Auto Digital Clamp Meter requires batteries for operation. Batteries are not included with the product. To install or replace batteries:
- Пераканайцеся, што лічыльнік выключаны.
- Знайдзіце батарэйны адсек на задняй панэлі глюкометра.
- Выкарыстоўвайце адвёртку, каб адкрыць вечка батарэйнага адсека.
- Insert the required batteries, observing correct polarity (+ and -).
- Замяніце крышку батарэйнага адсека і замацуеце яе шрубай.
A low battery indication will appear on the display when the battery voltage is low, signaling the need for replacement.
5. Інструкцыя па эксплуатацыі
5.1 Агульныя дзеянні
- Turn the function dial to the desired measurement setting.
- Connect test leads to the appropriate input terminals (COM and VΩ) for voltage, resistance, continuity, or diode tests.
- For current measurements, use the clamp сківіца вакол аднаго правадніка.
- Націсніце ВЫБРАЦЬ button to toggle between AC/DC modes or other sub-functions if available for the selected range.
- Націсніце УДЗЕННЕ ДАНЫХ кнопку, каб зафіксаваць бягучае паказанне на дысплеі. Націсніце яшчэ раз, каб адпусціць.
5.2 AC/DC Voltagе Вымярэнне
- Set the function dial to the "VOLTS" position.
- Connect the black test lead to the COM terminal and the red test lead to the VΩ terminal.
- Націсніце ВЫБРАЦЬ button to choose between AC or DC voltage measurement. The display will indicate "AC" or "DC".
- Падключыце вымяральныя шпулькі паралельна да ланцуга або кампанента, які правяраецца.
- Прачытайце тtagзначэнне на ВК-дысплеі.
5.3 Вымярэнне пераменнага току (Clamp)
- Set the function dial to the desired AC current range (40A, 400A, or 1000A).
- Адкрыйце склamp сківіцу, націснуўшы на курок.
- Унутры CL павінен быць толькі адзін праваднік ланцуга.amp сківіцу. Пераканайцеся, што сківіца цалкам стуленая.
- Прачытайце значэнне пераменнага току на ВК-дысплеі.
5.4 Frequency (Hz) Measurement
- Set the function dial to the "Hz" position.
- Connect the black test lead to the COM terminal and the red test lead to the VΩ terminal.
- Connect the test leads in parallel to the circuit where frequency needs to be measured.
- Read the frequency value in Hertz (Hz) on the LCD display.
5.5 Audible Continuity Check
- Set the function dial to the continuity/diode symbol (often shared with resistance).
- Connect the black test lead to the COM terminal and the red test lead to the VΩ terminal.
- Touch the test probes across the component or circuit to be tested.
- If continuity exists (low resistance), the meter will emit an audible beep.
5.6 Дыёдны тэст
- Set the function dial to the continuity/diode symbol.
- Connect the black test lead to the COM terminal and the red test lead to the VΩ terminal.
- Падключыце чырвоны вымяральны провад да анода дыёда, а чорны — да катода. На дысплеі будзе адлюстроўвацца напружанне прамога току.tagэлектронная кропля.
- Reverse the test leads. The display should show "OL" (overload) for a good diode.
6. Тэхнічнае абслугоўванне
6.1 Ачыстка
Працярыце лямпу глюкометраasing з аб'явайamp cloth and a mild detergent. Do not use abrasives or solvents. Keep the display clean and dry.
6.2 Замена батарэі
Refer to Section 4.1 for battery installation and replacement instructions. Replace batteries promptly when the low battery indicator appears to ensure accurate readings.
7. Выпраўленне непаладак
| праблема | Магчымая прычына | Рашэнне |
|---|---|---|
| Лічыльнік не ўключаецца. | Разраджаныя або няправільна ўсталяваныя батарэйкі. | Check battery polarity and replace batteries if necessary. |
| "OL" or "-OL" displayed. | Overrange condition; measurement exceeds meter's range. | Выберыце больш высокі дыяпазон або пераканайцеся, што вымеранае значэнне знаходзіцца ў межах магчымасцей вымяральніка. |
| Няправільныя паказанні. | Low battery, poor test lead connection, or incorrect function selection. | Replace batteries, ensure secure connections, verify function dial setting. |
| No audible beep during continuity test. | Разрыў ланцуга або высокі супраціў. | Verify the circuit is closed and resistance is low enough for continuity. |
8. Тэхнічныя характарыстыкі
| Асаблівасць | Дэталь |
|---|---|
| Дысплей | 3¾ digit LCD, max reading 3999 |
| Палярнасць | Automatic, negative polarity indication |
| Індыкацыя перавышэння дыяпазону | "OL" or "-OL" displayed |
| Нулявая карэкціроўка | Аўтаматычны |
| Тэрмін службы батарэі | Тыповыя 200 гадзін |
| Над Voltagе Абарона | 200V DC and AC Peak |
| Audible Continuity Check | так |
| Дыёдны тэст | так |
| Індыкацыя разраду батарэі | так |
| Вага прадмета | 600 г (1.32 фунта) |
| Памеры прадукту | 21 х 13 х 6 см |
| Матэрыял | Пластыкавыя |
| Вытворца | Meco Instruments |
9. Гарантыя і падтрымка
For warranty information or technical support, please contact the retailer or the manufacturer, Meco Instruments, directly. Keep your purchase receipt as proof of purchase.