1. Уводзіны
This manual provides detailed instructions for the installation, operation, and maintenance of your SMONET Wireless Security Camera System. This system is designed to provide reliable surveillance with easy setup and remote access capabilities.
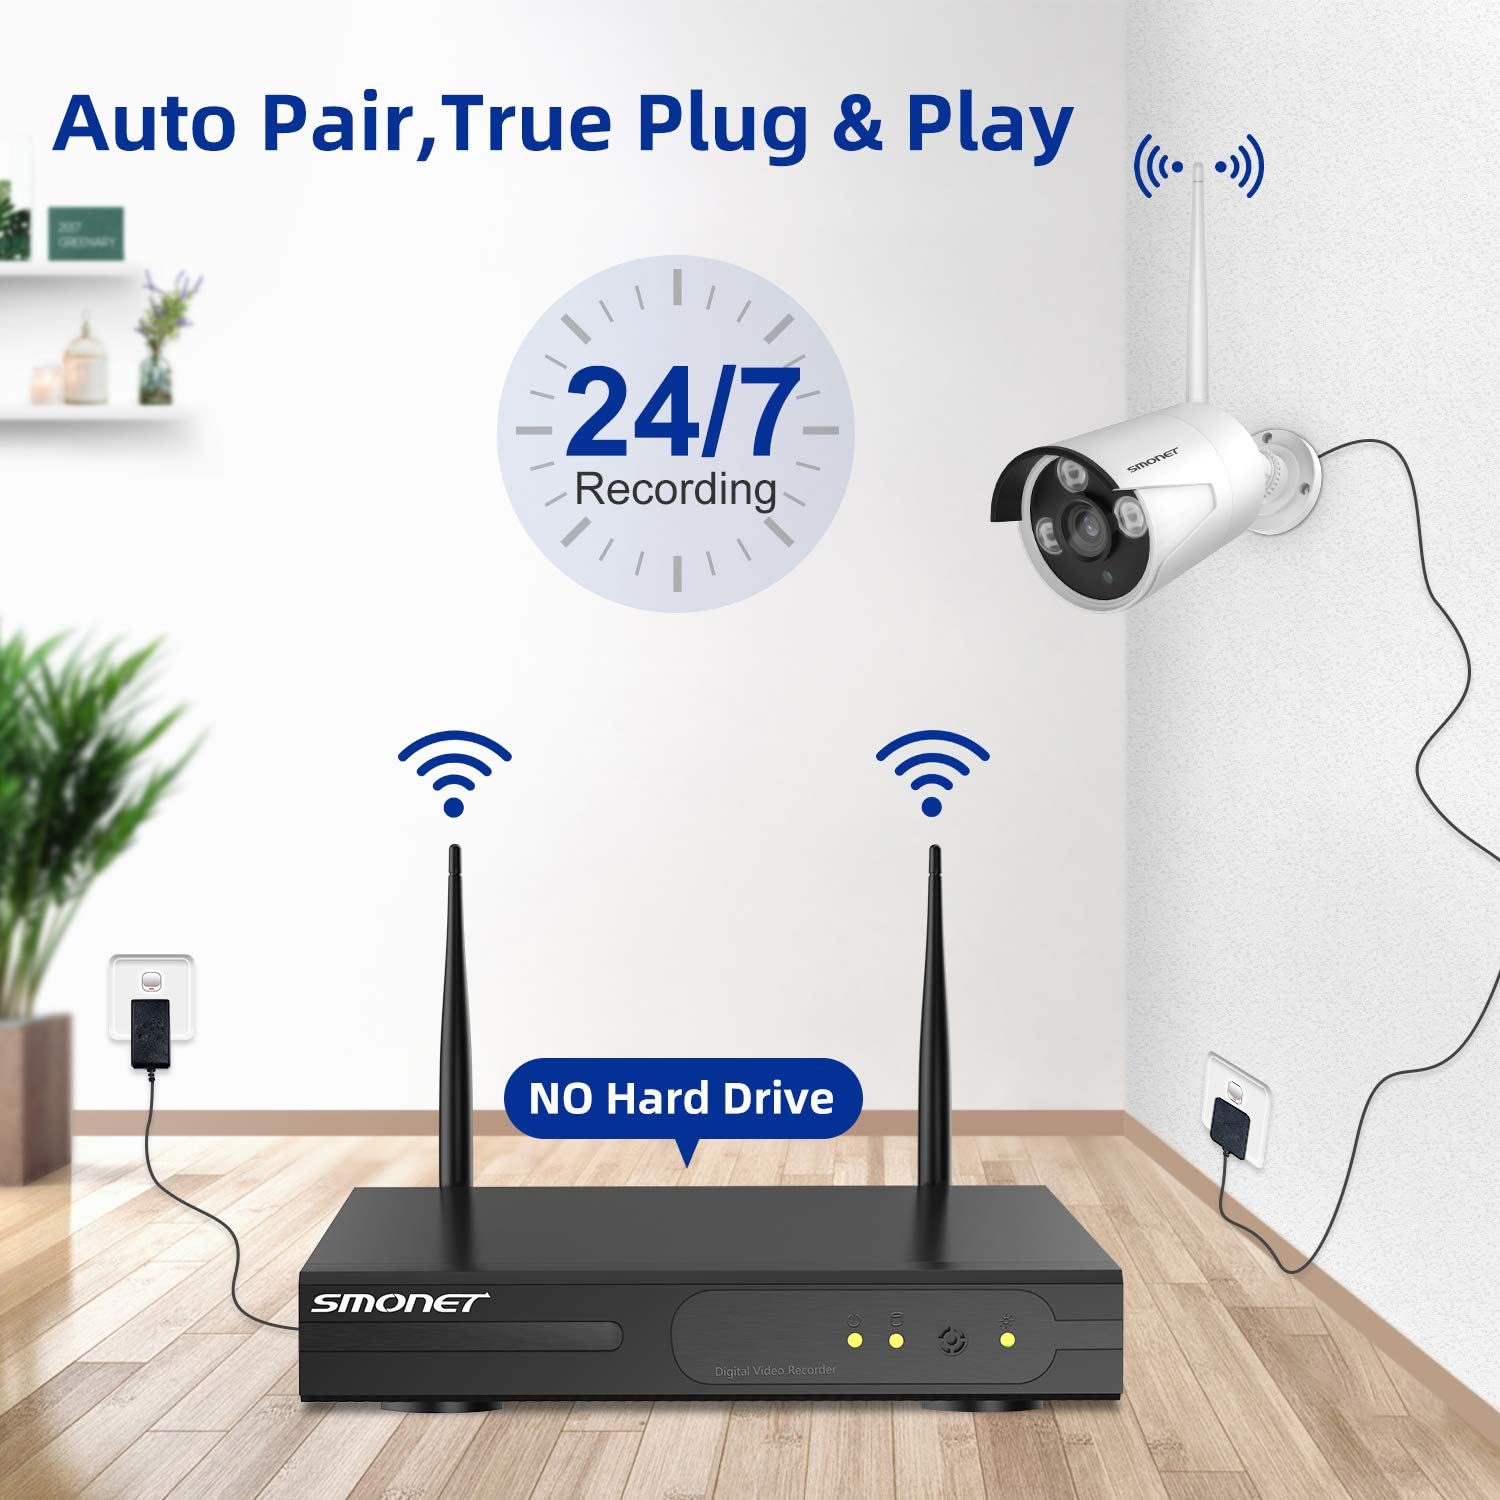
Выява 1: Канецview of the SMONET Wireless Security Camera System, showing the NVR unit and four bullet-style cameras with antennas, indicating wireless connectivity and 24/7 recording capability.
2. Змесціва ўпакоўкі
Праверце, ці ўсе пералічаныя ніжэй прадметы ўваходзяць у вашу ўпакоўку:
- 1 x 4CH 1080p WiFi NVR (Network Video Recorder)
- 4 x Wireless IP Cameras
- 1 х адаптар харчавання пастаяннага току 12 В/2 А (для відэарэгістратара)
- 4 адаптары харчавання пастаяннага току 12 В/1 А (для камер)
- 1 х USB-мыш
- 1 х 3.3-футавы сеткавы кабель
- Мантажныя шрубы і дзюбелі
- 1 х Кіраўніцтва карыстальніка
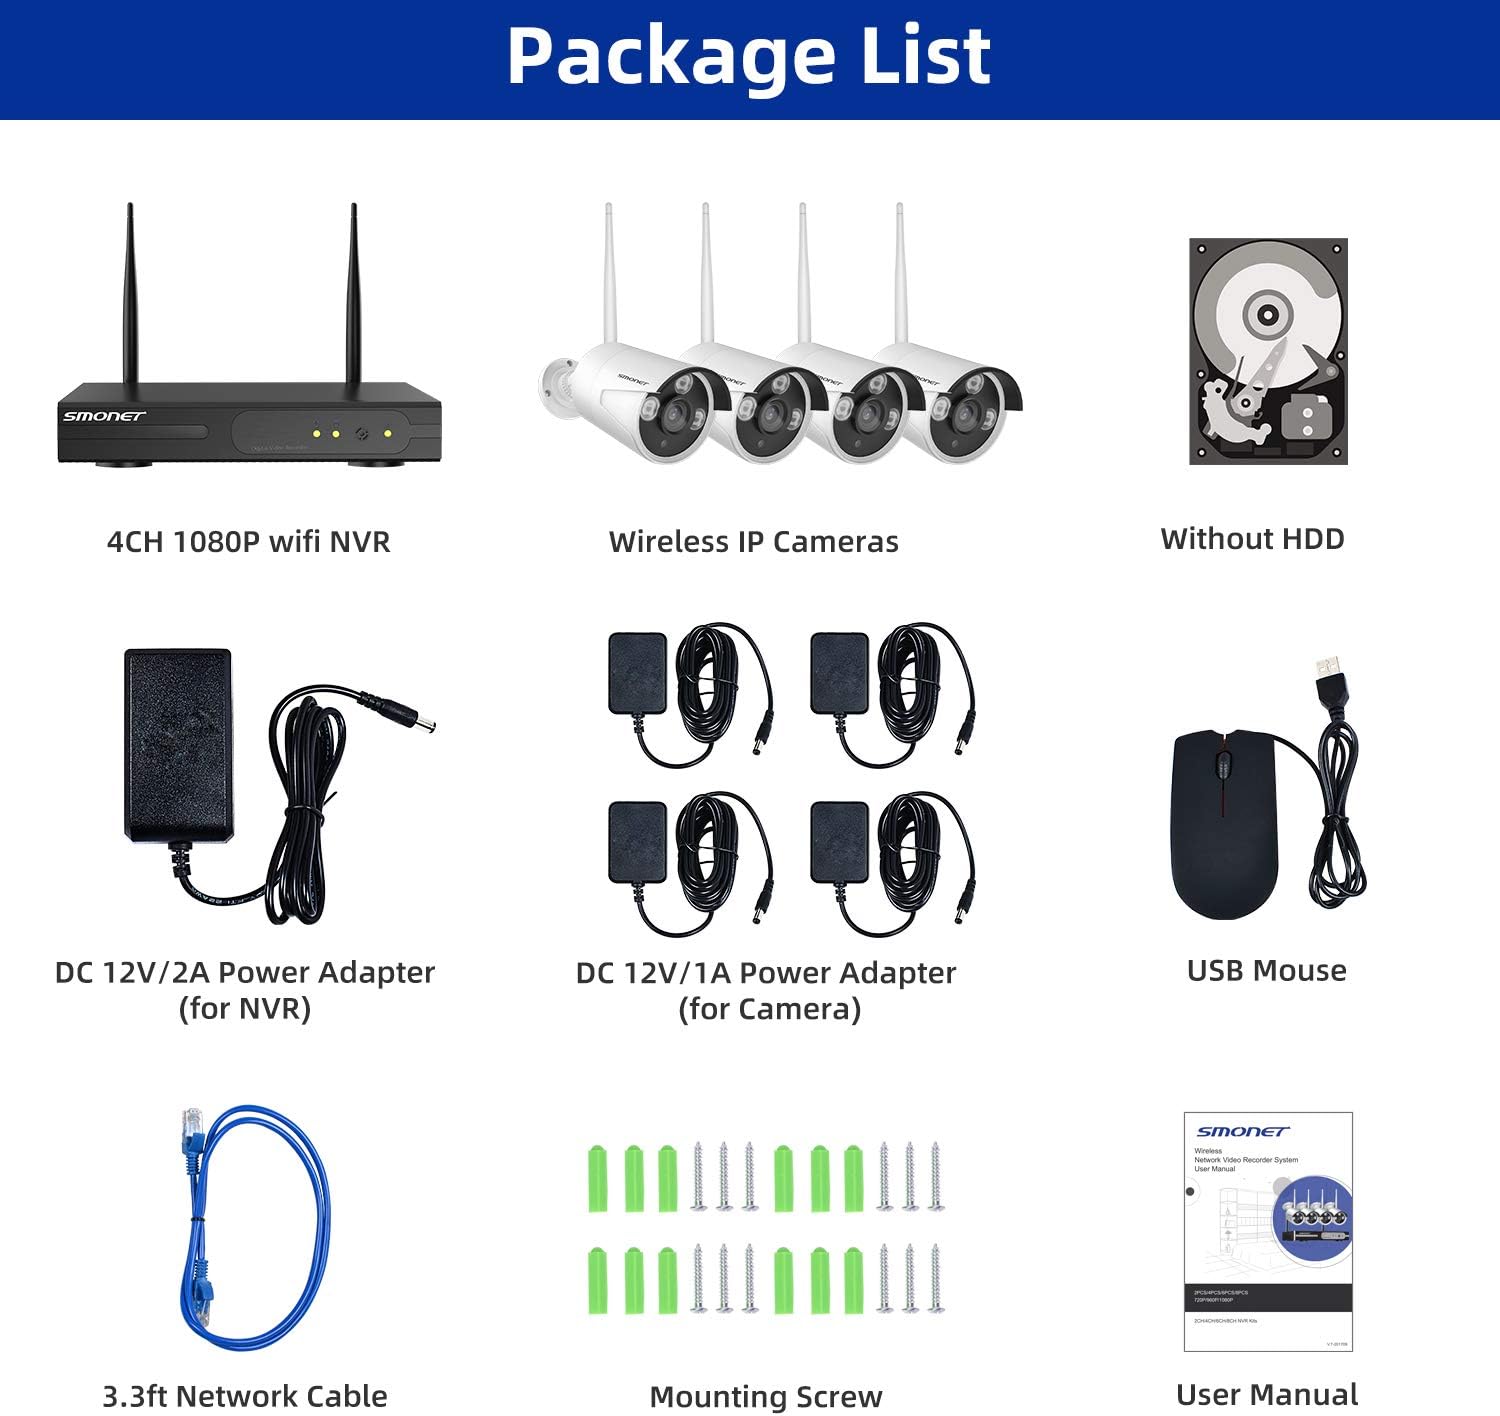
Image 2: Visual representation of the package contents, including the NVR, four cameras, power adapters, USB mouse, network cable, mounting hardware, and user manual.
3. Прадукт скончыўсяview
3.1 Асаблівасці камеры
- 5DB Wi-Fi Antenna: For enhanced wireless signal reception.
- IP66 Metal Housing: Provides weather resistance for outdoor use.
- 3 pcs LEDs: For night vision illumination.
- Датчык святла: Automatically adjusts between day and night modes.
- Аб'ектыў 3.6 мм: Прапануе шырокае поле view.
3.2 NVR Ports
- Порт VGA: Connect to a monitor.
- Порт HDMI: Connect to a TV or monitor for high-definition output.
- WAN порт: Connect to your router for internet access.
- Порт USB: For mouse and external storage.
- Адаптар сілкавання: For NVR power supply.
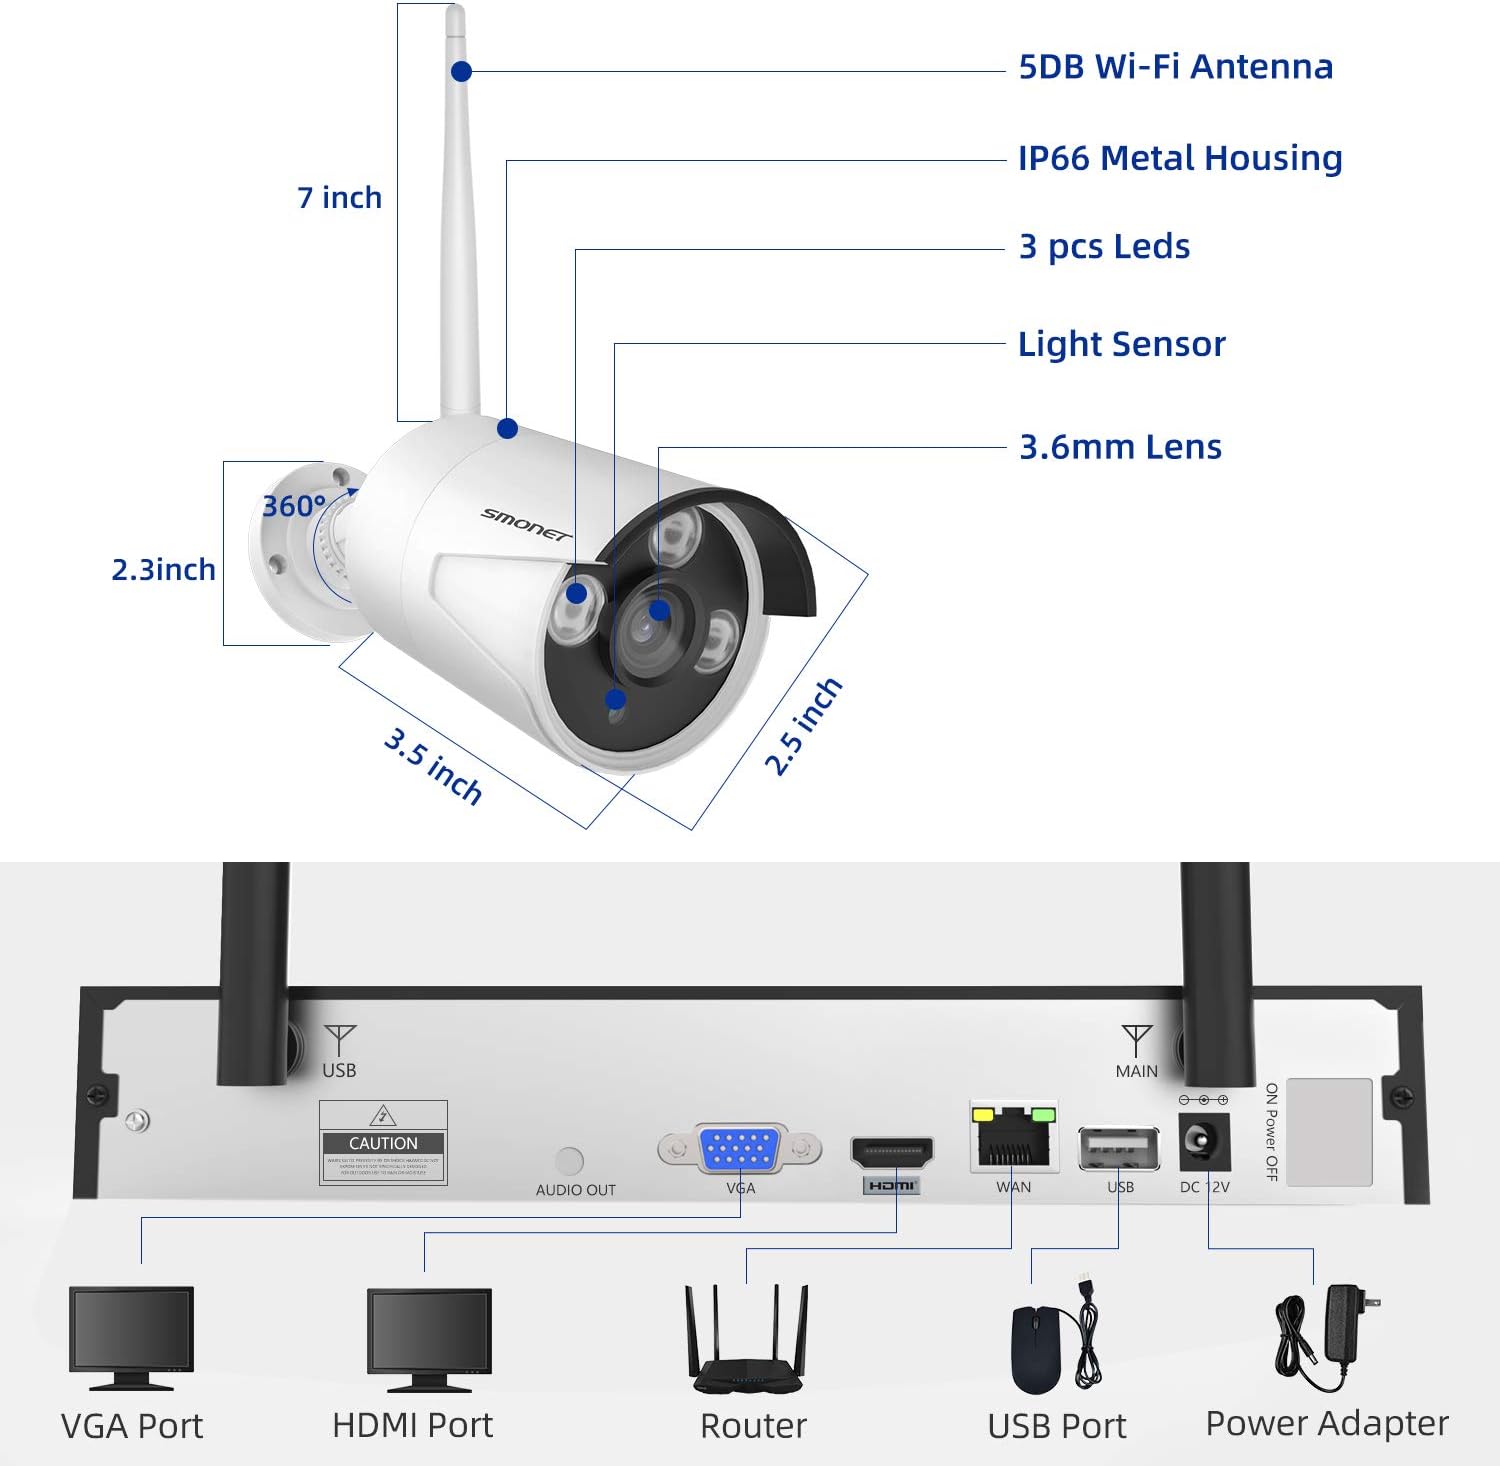
Image 3: Detailed diagram showing the dimensions of a SMONET camera and the various input/output ports on the back of the NVR unit.
4. Настройка
4.1 Усталёўка камеры
- Choose desired locations for your cameras. Ensure they are within range of the NVR's wireless signal.
- Mount the cameras using the provided screws and wall plugs.
- Connect each camera to its dedicated DC 12V/1A power adapter and plug it into a power outlet.
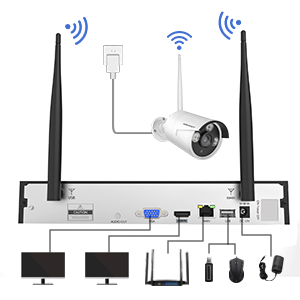
Image 4: Illustration depicting the simple setup process for the SMONET cameras, highlighting the 'Auto Pair, True Plug & Play' feature.
4.2 Падключэнне відэарэгістратара
- Connect the NVR to a monitor or TV using either the VGA or HDMI port.
- Connect the NVR to your home router using the provided network cable (WAN port).
- Plug in the NVR's DC 12V/2A power adapter and power on the system.
- The cameras should automatically pair with the NVR. If not, refer to the troubleshooting section.
Video 1: A brief introduction to the SMONET Wireless Camera System, demonstrating the ease of setup and key features.
4.3 Усталёўка жорсткага дыска (неабавязкова)
This system does not include a hard drive. For continuous recording and video storage, a surveillance-grade hard drive (up to 4TB) must be installed. Refer to the detailed instructions in the full user manual for hard drive installation steps.
5. Кіраванне сістэмай
5.1 Аддалены Viewing via Mobile App
The SMONET system supports remote viewing via a dedicated mobile application. This allows you to monitor your cameras from anywhere using your smartphone or tablet.
- Download the 'IP PRO' app from your device's app store (iOS or Android).
- Register a new account within the app.
- Add your NVR device by inputting its Cloud ID and the admin password. The Cloud ID can be found in the NVR's system settings (Main Menu > Advanced > Version > Serial Number).
- Пасля падключэння вы можаце view жывыя трансляцыі з усіх падлучаных камер.

Image 5: Demonstrates remote access capabilities, showing live camera feeds on a smartphone, tablet, and laptop, accessible anytime, anywhere via the 'IP PRO' app.
5.2 Аддалены Viewing via PC Software
Вы таксама можаце view your camera feeds on a computer using the VMS software.
- Download the VMS software to your computer.
- Log in using the default username 'admin' and password (leave blank if not set).
- In 'Device Manager', click 'Cloud Add' and enter your NVR's Cloud ID and password.
- Once connected, navigate to 'Live View' to see your camera feeds.
Video 2: A tutorial demonstrating how to view video from the SMONET system on a PC using the VMS software.
5.3 Дэтэктар руху
The system features real-time motion detection. When motion is detected, cameras can send email alerts or mobile notifications to you, enhancing your property's security.

Image 6: Illustrates the real-time motion detection capability, showing an alert being sent to a smartphone when movement is detected in a monitored area.
5.4 Дзённае і начное бачанне
The cameras provide clear vision both day and night. During the day, you get colorful images, and at night, the infrared LEDs enable clear black and white night vision.

Image 7: A side-by-side comparison demonstrating the system's ability to capture colorful images during the day and clear black-and-white images at night using infrared technology.
5.5 Пашырэнне сістэмы
The 4-channel NVR can support up to 8 cameras. You can add additional SMONET 1080P IP cameras (ASINB01IR4TXA8) для пашырэння зоны назірання.

Image 8: Illustrates the wireless signal repeater function between cameras and the NVR, and shows how the system can be expanded to include up to 8 cameras.
6. Тэхнічнае абслугоўванне
- Рэгулярная ўборка: Перыядычна чысціце аб'ектывы камеры мяккай сурвэткайamp тканіна, каб забяспечыць выразную якасць выявы.
- Абнаўленні прашыўкі: Праверце вытворцы webсайт для абнаўленняў прашыўкі, каб забяспечыць аптымальную прадукцыйнасць і бяспеку.
- Праверка крыніцы харчавання: Ensure all power adapters are securely connected and free from damage.
- Стан жорсткага дыска: If a hard drive is installed, regularly check its health status through the NVR interface to prevent data loss.
7. Выпраўленне непаладак
- Няма выявы на маніторы: Check VGA/HDMI cable connections. Ensure NVR and monitor are powered on and input source is correct.
- Камеры не падключаюцца: Verify cameras are powered on. Ensure they are within wireless range of the NVR. If issues persist, try re-pairing cameras manually (refer to full manual for specific steps).
- No Remote View: Check NVR's network status (should be 'Healthy Network'). Ensure your mobile device has internet access and the Cloud ID/password are correctly entered in the app.
- Праблемы з запісам: Confirm a hard drive is installed and properly formatted. Check recording settings in the NVR menu.
8. Тэхнічныя характарыстыкі
| Асаблівасць | Спецыфікацыя |
|---|---|
| Марка | СМОНЕТ |
| Тэхналогія падлучэння | Бесправадная сувязь |
| Колькасць каналаў | 4 |
| Ёмістасць памяці | 4 TB (Max, HDD not included) |
| Крыніца харчавання | Battery Powered (Cameras via adapter) |
| Аперацыйная сістэма | Android, iOS (for app) |
| Фармат сігналу | Лічбавы |
| Начное бачанне | Night color (IR) |
| Частата кадраў | 30 кадраў у секунду |
| Рэжым запісу | Дэтэктар руху |
| Тэхналогія аптычнага датчыка | CMOS |
| Абсталяванне інтэрфейсу | 802.11 ac/b/g/n |
| Тып аб'ектыва | Фіксаваны (3.6 мм) |
| Відэа ўваход | RJ45 (NVR) |
| Нумар мадэлі | SN-WNK 002 |
| Вага прадмета | 7 Pounds (System) |
| Памеры прадмета | 12.5 х 10.5 х 6.5 цалі (упакоўка) |
9. Гарантыя і падтрымка
For warranty information and technical support, please refer to the official SMONET webсайт або звярніцеся непасрэдна ў службу падтрымкі кліентаў. Захоўвайце чэк аб куплі для прэтэнзій па гарантыі.