
1. Прадукт скончыўсяview
The Excelvan Wireless Weather Station (Model AOK-5061A) is designed to provide accurate indoor and outdoor temperature and humidity readings, along with weather forecasts and an alarm clock function. It features a large, colorful LCD display with LED backlight for easy readability.
Асноўныя характарыстыкі:
- Indoor/Outdoor Temperature and Humidity Measurement
- Weather Forecast with 5 Icons (Sunny, Partially Sunny, Cloudy, Rain, Heavy Rain)
- DCF Radio-Controlled Clock with Manual Setting
- Alarm with Snooze Function
- Large Color LCD Display with LED Backlight
- DST (Daylight Saving Time) Automatic Update
- Wireless Outdoor Sensor with up to 50m range

Малюнак 1: Спераду view of the Excelvan Wireless Weather Station main unit, displaying weather forecast, outdoor/indoor temperature and humidity, and time.
2. Кіраўніцтва па наладцы
2.1 Змест пакета
Before proceeding with the setup, ensure all items are present in the package:
- 1 х асноўны блок метэастанцыі
- 1 х бесправадны датчык дыстанцыйнага кіравання
- 1 х сеткавы адаптар
- 1 х Кіраўніцтва карыстальніка

Figure 2: The complete package contents, including the main weather station unit, wireless remote sensor, power adapter, and user manual.
2.2 Падключэнне галоўнага блока
- Battery Installation (Optional): Open the battery compartment on the back of the main unit. Insert 3 x 1.5V AA batteries (not included), ensuring correct polarity. The LED backlight will stay on for 5 minutes when powered by batteries.
- AC Power Adapter (Recommended): For continuous backlight, connect the provided AC power adapter (4.5V, 150mA) to the main unit's power input and then plug it into a wall outlet.

Малюнак 3: Задняя частка view of the main unit showing the battery compartment with the cover removed, ready for battery insertion.

Малюнак 4: Задняя частка view of the main unit with the AC power adapter connected, illustrating the power input port.
2.3 Powering the Wireless Remote Sensor
- Open the battery compartment of the wireless remote sensor.
- Insert 2 x 1.5V AAA batteries (not included), ensuring correct polarity.
- Надзейна зачыніце батарэйны адсек.

Figure 5: The wireless remote sensor, showing its display and the battery compartment on the back.
2.4 Размяшчэнне датчыка
- The main unit is intended for indoor use only.
- Place the wireless remote sensor outdoors in a sheltered area, away from direct sunlight and rain, to ensure accurate readings.
- Ensure the sensor is within 50 meters (open space) of the main unit for optimal signal reception.
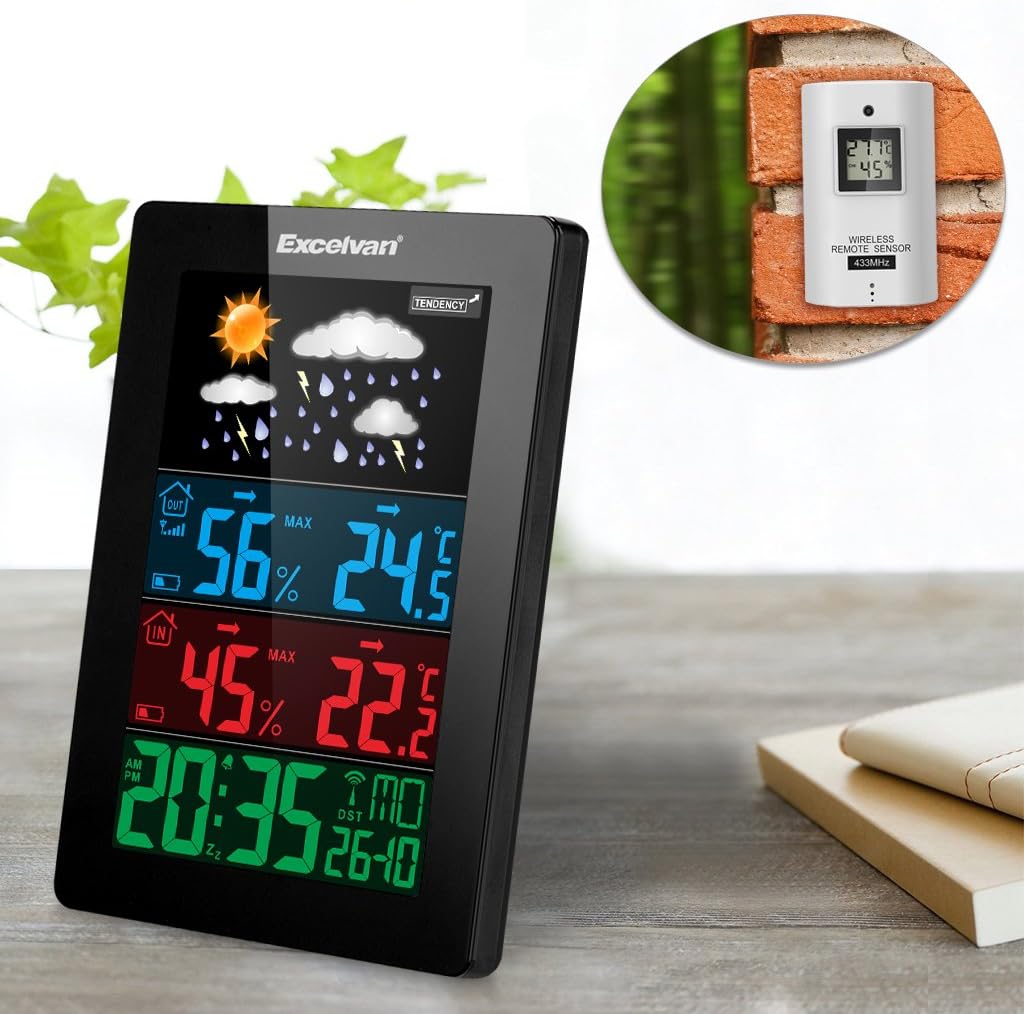
Figure 6: An illustration showing the main weather station unit indoors and the wireless remote sensor mounted on an outdoor wall.

Figure 7: A diagram highlighting the effective wireless transmission distance of 50 meters between the main unit and the remote sensor.
3. Інструкцыя па эксплуатацыі
3.1 Пачатковая сінхранізацыя
After powering both units, the main unit will automatically attempt to synchronize with the remote sensor and receive the DCF radio-controlled time signal. This process may take a few minutes.
3.2 Дысплей скончыўсяview
Вялікі ВК-дысплей адлюстроўвае розную інфармацыю:
- Верхні раздзел: Weather forecast icons (sunny, cloudy, rainy, etc.) and weather tendency indicator.
- Middle-Top Section (Blue): Outdoor humidity and temperature.
- Middle-Bottom Section (Red): Indoor humidity and temperature.
- Bottom Section (Green): Current time (12/24 hour format), day of the week, and date.
Figure 8: Close-up of the main unit's display, illustrating the different data sections for weather, outdoor/indoor conditions, and time.
3.3 Ручная ўстаноўка часу і даты
While the unit is radio-controlled, manual adjustments can be made:
- Націсніце РЭЖЫМ button to cycle through display modes.
- Трымай РЭЖЫМ button for a few seconds to enter time setting mode.
- Выкарыстоўвайце + і - кнопкі для рэгулявання значэнняў.
- Прэса РЭЖЫМ again to confirm and move to the next setting (e.g., hour, minute, year, month, day, language for day of week).
3.4 Функцыя будзільніка і паўтору
- Націсніце ТРЫВОГА кнопка для view or set the alarm time.
- Трымай ТРЫВОГА кнопку для ўваходу ў рэжым налады будзільніка. Выкарыстоўвайце + і - наладжваць.
- Каб уключыць/выключыць будзільнік, націсніце кнопку ТРЫВОГА коратка націсніце кнопку. На дысплеі з'явіцца/знікне значок сігналізацыі.
- Калі прагучыць будзільнік, дакраніцеся да SNOOZE / LIGHT button on top of the unit to activate the snooze function. The alarm will sound again after a few minutes.
- To stop the alarm completely, press any other button.

Figure 9: Top edge of the main unit, highlighting the "SNOOZE/LIGHT" touch-sensitive button for alarm snooze and backlight activation.
3.5 Выбар адзінкі вымярэння тэмпературы
Націсніце - button to switch between Celsius (°C) and Fahrenheit (°F) temperature units.
3.6 Прагноз надвор'я
The weather station predicts weather conditions based on atmospheric pressure changes. The icons (sunny, partially sunny, cloudy, rain, heavy rain) indicate the forecast for the next 12-24 hours, not the current weather.
4. Тэхнічнае абслугоўванне
- Уборка: Працярыце асноўны блок і датчык мяккай губкайamp тканіна. Не выкарыстоўвайце абразіўныя ачышчальнікі або растваральнікі.
- Замена батарэі: Replace batteries in both the main unit and the remote sensor when the low battery indicator appears on the display. Ensure correct polarity.
- Размяшчэнне датчыка: Periodically check the outdoor sensor's placement to ensure it remains sheltered and within range.
- захоўванне: If storing the unit for an extended period, remove all batteries to prevent leakage.
5. Выпраўленне непаладак
| праблема | Магчымая прычына | Рашэнне |
|---|---|---|
| Няма паказанняў тэмпературы/вільготнасці на вуліцы. |
|
|
| Няправільнае адлюстраванне часу. |
|
|
| Дысплей цьмяны або пусты. |
|
|
6. Тэхнічныя характарыстыкі
| Асаблівасць | Дэталь |
|---|---|
| Гадзіннік з радыёкіраваннем | DCF77 |
| Дыяпазон тэмператур у памяшканні | Ад 0 °C да +50 °C (ад 32 °F да 122 °F) |
| Дыяпазон вонкавай тэмпературы | -20 °C да +60 °C (ад -4 °F да 140 °F) |
| Дакладнасць вымярэння тэмпературы | ±2 °C |
| Дыяпазон вільготнасці ў памяшканні/на вуліцы | 20-90% RH |
| Дазвол вільготнасці | 1 % |
| Wireless Sensor Frequency | 433 МГц |
| Далёкасць бесправаднога сігналу | Да 50 метраў (адкрытая прастора) |
| Probe Cable Length (for external probe, if applicable) | 1 м |
| Waterproof Level of Sensor | IPX3 |
| Main Station Power | 3 x 1.5V AA batteries (not included) or 4.5V, 150mA AC adapter (included) |
| Харчаванне дыстанцыйнага датчыка | 2 батарэйкі 1.5 В ААА (не ўключаны) |
| Main Station Dimensions | 148 × 110 × 30 мм |
| Main Station Weight (without batteries) | 242 г |
| Remote Sensor Dimensions | 60 × 100 × 20 мм |
| Remote Sensor Weight (without batteries) | 50 г |
| Day of Week Languages | German, English, Italian, French, Dutch, Spanish, Danish |
7. Гарантыя і падтрымка
For warranty information or technical support, please refer to the documentation provided with your purchase or contact Excelvan customer service through their official webсайт або ваш прадавец.
Note: This manual is for informational purposes only. Specifications are subject to change without notice.