
UNIC UC30 (IDSP-004)
Кіраўніцтва карыстальніка міні-праектара UNIC UC30 LED
Model: UC30 (IDSP-004)
1. Уводзіны
The UNIC UC30 LED Mini Projector is a compact and versatile multimedia device designed for home theater projection. It supports a wide range of input sources and file formats, making it suitable for various entertainment and presentation needs.
Асноўныя функцыі ўключаюць у сябе:
- Multiple Input Interfaces: AV, VGA, HDMI, USB, SD, and TV input.
- Шырокі File Format Support: Compatible with various video, audio, image, and e-book formats.
- Keystone Correction: Adjusts image distortion for optimal viewінж.
- Integrated Speaker: Built-in 2.0W *2 stereo speakers for audio output.
- Flexible Projection: Supports front and rear projection models.

Малюнак 1: Спераду view of the UNIC UC30 LED Mini Projector, showcasinдзякуючы кампактнаму дызайну і аб'ектыву.
2. Настройка
2.1 Распакоўка і размяшчэнне
Carefully remove the projector and all accessories from the packaging. Place the projector on a stable, flat surface. Ensure adequate ventilation around the unit to prevent overheating.
2.2 Падключэнне харчавання
- Падключыце адаптар сілкавання да ўваходнага порта сілкавання праектара.
- Падключыце адаптар сілкавання да адпаведнай электрычнай разеткі.
2.3 Падключэнне ўваходных прылад
The UC30 projector offers multiple input options. Connect your desired source device (e.g., laptop, DVD player, game console, USB drive) to the corresponding port on the projector.

Малюнак 2: Задняя частка view of the white UNIC UC30 projector, showing various input ports including AV, VGA, HDMI, and USB.
- HDMI: Для лічбавага відэа і аўдыё высокай выразнасці.
- VGA: Для падключэння кампутараў або ноўтбукаў.
- АВ: For standard definition video and stereo audio (using the included 3-in-1 AV cable).
- USB: Для прайгравання мультымедыя files непасрэдна з флэшкі USB.
- SD-карта: Для прайгравання мультымедыя files directly from an SD memory card.
- тэлевізар: For connecting to a TV signal source (if applicable to your region/model).
2.4 Фокус і карэкцыя трапецападобнага скажэння
After powering on the projector, adjust the focus ring around the lens until the projected image is clear. Use the keystone correction feature (usually a dial or button on the projector) to correct any trapezoidal distortion in the image, ensuring a rectangular projection.
3. Інструкцыя па эксплуатацыі
3.1 Уключэнне/выключэнне сілкавання
Націсніце кнопку харчавання на праектары або пульце дыстанцыйнага кіравання, каб уключыць або выключыць прыладу. Дайце праектару разагрэцца або астыць некалькі секунд.
3.2 Выбар крыніцы ўваходнага сігналу
Use the "Source" button on the projector or remote control to cycle through the available input options (HDMI, VGA, AV, USB, SD, TV) until your desired source is displayed.
3.3 Прайграванне медыяфайлаў (USB/SD)
When a USB drive or SD card is inserted, the projector's media player interface will typically appear. Navigate through the menus using the directional buttons on the projector or remote to select and play your desired files.
- Падтрымліваюцца фарматы відэа: AVI, MOV, VOB, DAT, MPEG, MPG, RM, RMVB (encoding: MPEG1/MPEG2/MPEG4/DivX/Xvid).
- Падтрымліваюцца аўдыяфарматы: MP3, WMA, WAV.
- Падтрымліваюцца фарматы малюнкаў: JPEG, BMP, GIF, PNG.
- Supported E-book Format: TXT.

Figure 3: The UNIC UC30 projector displaying a video of a man in a soccer jersey, demonstrating its video playback capability.
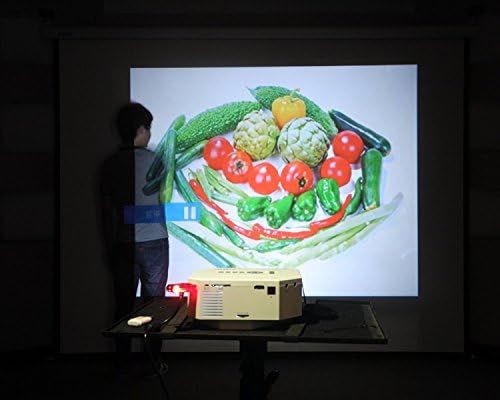
Figure 4: The UNIC UC30 projector displaying a vibrant image of vegetables, showcasing its image display quality.
3.4 Аўдыёвыхад
The projector has built-in stereo speakers. For private listening or connecting to external audio systems, use the stereo earphone output terminal.
3.5 Projection Model
The projector supports both front and rear projection. This setting can typically be adjusted in the projector's menu to suit your setup (e.g., projecting from behind a translucent screen).
4. Тэхнічнае абслугоўванне
4.1 Ачыстка аб'ектыва
Выкарыстоўвайце мяккую тканіну без ворса, спецыяльна распрацаваную для аптычных лінзаў, каб акуратна працерці аб'ектыў праектара. Пазбягайце выкарыстання абразіўных ачышчальнікаў або празмернага прымянення сілы, якія могуць падрапаць аб'ектыў.
4.2 Ачыстка корпуса праектара
Працярыце знешнія паверхні праектара мяккай сухой тканінай. Для выдалення ўстойлівых плям злёгкуamp cloth can be used, but ensure no liquid enters the ventilation openings.
4.3 Вентыляцыя
Ensure the projector's ventilation ports are clear of dust and obstructions. Proper airflow is crucial for maintaining optimal operating temperature and extending the lifespan of the LED lamp.
5. Выпраўленне непаладак
5.1 Паведамленне «Няма выявы» або «Няма сігналу»
- Check if the projector is powered on and the power indicator light is active.
- Verify that the input cable (HDMI, VGA, AV) is securely connected to both the projector and the source device.
- Ensure the correct input source is selected on the projector (use the "Source" button).
- If using a computer, ensure its display output is enabled (e.g., press Fn + F8 or similar key combination).
5.2 Размытае выява
- Adjust the focus ring around the projector lens until the image is sharp.
- Ensure the projection distance is within the recommended range (1-3.5 meters).
- Clean the projector lens if it appears dirty.
5.3 Няма гуку
- Праверце ўзровень гучнасці як на праектары, так і на прыладзе-крыніцы.
- If using HDMI, ensure the source device is sending audio through HDMI.
- If using AV, ensure the red and white audio cables are correctly connected.
- If external speakers are connected, ensure they are powered on and functioning correctly.
5.4 Image Distortion (Trapezoid Shape)
- Adjust the keystone correction feature on the projector to square the image.
- Ensure the projector is placed on a level surface and is as perpendicular to the screen as possible.
6. Тэхнічныя характарыстыкі
Below are the detailed technical specifications for the UNIC UC30 LED Mini Projector:
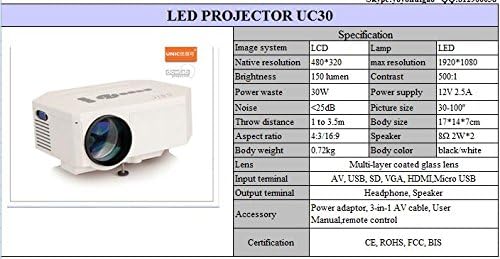
Figure 5: Official specification table for the UNIC UC30 LED Mini Projector, detailing its technical characteristics.
| Асаблівасць | Дэталь |
|---|---|
| Выява сістэмы | ВК |
| Роднае дазвол | 480 x 320 пікселяў |
| Падтрымка максімальнага дазволу | 1920 x 1080 (Full HD) |
| Яркасць | 150 LUX (150 lumen) |
| Каэфіцыент кантраснасці | 500:1 |
| Энергаспажыванне | 30 Вт |
| Электразабеспячэнне | 12В 2.5А |
| Узровень шуму | <25 дБ |
| Дыстанцыя кідка | 1-3.5 метраў |
| Памер выявы | 30-120 цаляў |
| Суадносіны бакоў | 4:3 / 16:9 |
| Маса цела | 0.72 кг |
| Памер цела | 17 х 14 х 7 см |
| Дакладчык | 2.0W *2 Stereo |
| Аб'ектыў | Multi-layer coated glass lens |
| Уваходныя тэрміналы | AV, USB, SD, VGA, HDMI, Micro USB |
| Выходныя тэрміналы | Stereo Earphone, Speaker |
| Аксэсуары ў камплекце | Power adapter, 3-in-1 AV cable, User Manual, Remote control |
| Сертыфікаты | CE, ROHS, FCC, BIS |
7. Гарантыя і падтрымка
For information regarding warranty coverage, technical support, or service, please refer to the warranty card included with your product or contact the retailer or manufacturer directly. Keep your purchase receipt as proof of purchase.
Ask a question about this manual
Ask about setup, troubleshooting, compatibility, parts, safety, or missing instructions. Manuals+ will review the question and use this page’s manual context to help answer it.