
LINQ A-S050C
Кіраўніцтва карыстальніка відэакамеры LinQ PRO GO (A-S050C)
Model: A-S050C
1. Уводзіны
Thank you for choosing the LinQ PRO GO (A-S050C) Videocamera. This manual provides essential information for setting up, operating, and maintaining your device. Please read it carefully before use to ensure optimal performance and longevity of your camera.
The LinQ PRO GO (A-S050C) is a versatile action camera designed to capture high-definition videos and photos. It features a 2-inch HD LCD display, a 170-degree wide-angle fisheye lens, and a robust waterproof casing allowing submersion up to 30 meters. With its 12-megapixel sensor and Full HD 1080p video recording at 30fps, it is suitable for various outdoor activities and sports.
2. Змесціва ўпакоўкі
Калі ласка, пераканайцеся, што ўсе пералічаныя ніжэй прадметы ўваходзяць у ваш пакет:
- LinQ PRO GO (A-S050C) Videocamera with Waterproof Housing
- USB-кабель для зарадкі
- Адаптар сілкавання
- Акумулятарная літыевая батарэя (900 мАг)
- Various Mounting Accessories (e.g., helmet mounts, bicycle mounts, clips, straps)
- Анучка для чысткі

Малюнак 2.1: LinQ PRO GO (A-S050C) Videocamera in its protective waterproof housing.
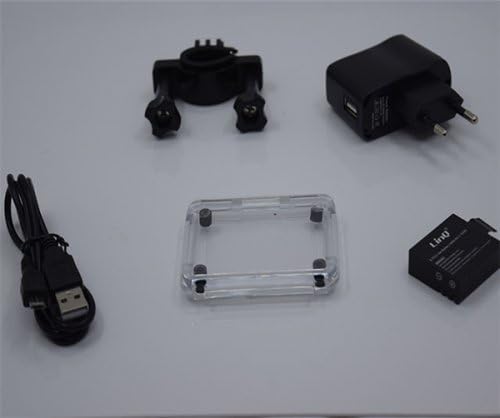
Малюнак 2.2: Essential accessories including the USB cable, power adapter, rechargeable battery, and an additional frame for the waterproof housing.
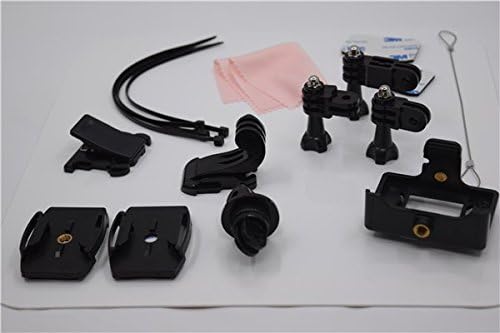
Малюнак 2.3: A selection of mounting accessories, including clips, adhesive mounts, and straps, for attaching the camera to various surfaces and gear.
3. Настройка
3.1. Зарадка акумулятара
- Insert the provided 900mAh lithium battery into the camera's battery compartment.
- Connect the camera to the power adapter using the USB cable.
- Plug the power adapter into a wall outlet. The charging indicator light will illuminate.
- Allow approximately 3 hours for a full charge. The indicator light will change or turn off once charging is complete. A fully charged battery provides approximately 90 minutes of recording at 1080p@30fps.
3.2. Устаўка карты Micro SD
The camera supports Micro SD cards up to 32GB. A Class 10 or higher speed rating is recommended for optimal video recording performance.
- Open the Micro SD card slot cover on the side of the camera.
- Insert the Micro SD card with the gold contacts facing the back of the camera until it clicks into place.
- Шчыльна зачыніце вечка слота для карты.
- It is recommended to format the Micro SD card using the camera's settings menu before first use.
3.3. Уключэнне / выключэнне харчавання
- To power on: Press and hold the Power/Mode button (usually on the front or top) for a few seconds until the screen illuminates.
- To power off: Press and hold the Power/Mode button again until the screen turns off.
4. Інструкцыя па эксплуатацыі
4.1. Асноўная аперацыя
- Пераключэнне рэжымаў: Press the Power/Mode button briefly to cycle through different modes (Video, Photo, Playback, Settings).
- Кнопка спуску затвора/ОК: Press the Shutter/OK button (usually on top) to start/stop recording video or to take a photo. In menu mode, this button confirms selections.
- Кнопкі навігацыі: Use the Up/Down buttons (if available, often on the side) to navigate through menu options or zoom in/out.
4.2. Запіс відэа
In Video mode, the camera can record at various resolutions:
- 1920x1080 (1080p) at 30fps
- 1280x720 (720p) at 60fps
- 848x480 (WVGA) at 30fps
- 640x480 (VGA) at 30fps
Press the Shutter/OK button once to start recording. A red indicator light or on-screen icon will typically flash. Press it again to stop recording.
4.3. Фотаздымка
In Photo mode, the camera supports image resolutions up to 12 megapixels:
- 12М
- 10М
- 8M
- 5M
Press the Shutter/OK button once to take a photo.
4.4. Пашыраныя налады
Access the settings menu to adjust various parameters:
- Налады відэа: Loop recording, time-lapse, motion detection.
- Налады фота: Single shot, self-timer (5s/10s/20s), continuous shooting.
- Уздзеянне: Adjust EV compensation for brighter or darker images.
- Баланс белага: Select appropriate white balance for different lighting conditions (Auto, Daylight, Cloudy, Tungsten, Fluorescent).
- ISO: Adjust light sensitivity.
- Рэзкасць: Control image sharpness.
- Дата/час: Усталюйце правільную дату і час.
- мова: Выберыце жаданую мову.
- Фарматаваць SD-карту: Erase all data on the Micro SD card.
4.5. Прайграванне
In Playback mode, you can review your captured videos and photos on the 1.5-inch LCD screen. Use the navigation buttons to scroll through files. Press the Shutter/OK button to play videos. Fast forward and rewind functions are supported for videos.
4.6. Connecting to a Computer/TV
- USB-злучэнне: Падключыце камеру да камп'ютара з дапамогай USB-кабеля. Камера будзе адлюстроўвацца як здымны дыск, што дазволіць вам перадаваць files. It can also function as a webкулачок.
- Падключэнне HDMI: Connect the camera to an HDMI-compatible display (e.g., TV) using an HDMI cable (not included) to view ваш кантэнт на большым экране.
5. Тэхнічнае абслугоўванне
- Уборка: Use the provided cleaning cloth or a soft, lint-free cloth to clean the camera lens and LCD screen. Do not use harsh chemicals or abrasive materials.
- Воданепранікальны корпус: Regularly inspect the waterproof housing for any cracks, damage, or debris on the O-ring seal. Ensure the O-ring is clean and properly seated before each use in water. Rinse the housing with fresh water after saltwater use and allow it to air dry.
- захоўванне: Захоўвайце камеру ў прахалодным, сухім месцы, удалечыні ад прамых сонечных прамянёў і экстрэмальных тэмператур. Выміце акумулятар, калі камера не будзе выкарыстоўвацца працяглы час.
- Сыход за батарэяй: Avoid fully discharging the battery frequently. Recharge the battery periodically even if not in use to maintain its health.
6. Выпраўленне непаладак
- Камера не ўключаецца: Пераканайцеся, што акумулятар цалкам зараджаны. Устаўце акумулятар назад.
- Немагчыма запісваць відэа/рабіць фота: Check if a Micro SD card is inserted and properly formatted. Ensure there is sufficient space on the card.
- Дрэнная якасць відэа/малюнкаў: Ensure the lens is clean. Check the selected resolution settings. Ensure adequate lighting.
- Water leakage in housing: Immediately remove the camera from water. Inspect the waterproof housing for damage, ensure the O-ring is clean and correctly seated, and that all latches are securely closed.
- Камера завісае: Press and hold the Power/Mode button for 10-15 seconds to force a shutdown. If the issue persists, remove and reinsert the battery.
7. Тэхнічныя характарыстыкі
| Асаблівасць | Спецыфікацыя |
|---|---|
| Нумар мадэлі | A-S050C (6970334022037) |
| Дысплей | 2-цалевы HD LCD-дысплей |
| Аб'ектыў | 170-degree Wide-Angle Fisheye, 6-glass lens |
| Набор мікрасхем | Novatek 96650 + AR0330 |
| Дазвол відэа | 1920x1080 (30fps), 1280x720 (60fps), 848x480 (30fps), 640x480 (30fps) |
| Фармат відэа | MOV (H.264 compression) |
| Дазвол выявы | 12M/10M/8M/5M |
| Фармат выявы | JPG |
| Фотарэжымы | Single Shot, Self-timer (5s/10s/20s), Continuous |
| Спецыяльныя функцыі | Loop Recording, Time-lapse, Motion Detection, Dashcam/Webфункцыя кулачка |
| Воданепранікальная глыбіня | Up to 30 meters (with waterproof housing) |
| Захоўванне | Micro SD card, up to 32GB (Class 10 recommended) |
| акумулятар | Літыевая акумулятарная батарэя ёмістасцю 900 мАг |
| Тэрмін службы батарэі | Approx. 90 minutes (1080p@30fps) |
| Сувязь | USB 2.0, HDMI |
| Памеры | 59.2 мм х 41 мм х 29.8 мм |
| Вага | 60 г |
8. Прававая інфармацыя
This product is accompanied by a regular fiscal receipt for the cost of the product. If you require an invoice, please submit a request indicating all your details by sending a message through the 'Contact Seller' option. Warranty information should be obtained directly from your point of purchase or the seller.
Ask a question about this manual
Ask about setup, troubleshooting, compatibility, parts, safety, or missing instructions. Manuals+ will review the question and use this page’s manual context to help answer it.