Уводзіны
This manual provides detailed instructions for the setup, operation, and maintenance of your Digoo DG-C3 Wireless Weather Station. This device integrates a hygrometer, thermometer, weather forecast station, and alarm clock functions, offering comprehensive environmental monitoring and timekeeping capabilities. Please read this manual thoroughly before using the product to ensure correct operation and to maximize its features.
Змест пакета
- Digoo DG-C3 Wireless Weather Station Unit
- USB кабель харчавання
- Кіраўніцтва карыстальніка (гэты дакумент)
Note: Batteries (3x AAA) are not included and must be purchased separately.
Прадукт скончаныview
Familiarize yourself with the various components of your Digoo DG-C3 weather station.
Пярэдні дысплей
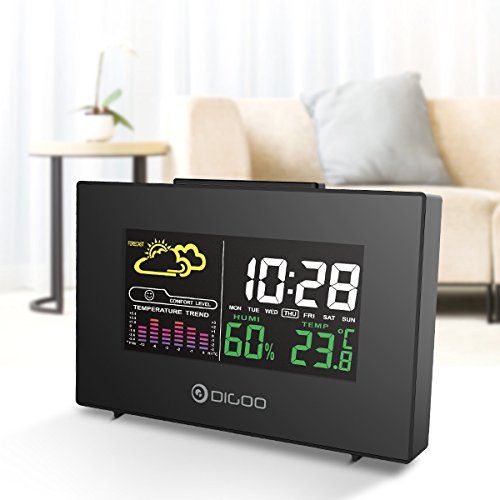
The front display features a color backlit screen showing the current time, day of the week, indoor humidity, indoor temperature, and a weather forecast icon. It also includes a comfort level indicator and a temperature trend graph.
- Час і дата: Digital display of current time and day.
- Прагноз надвор'я: Значкі, якія паказваюць прагназаваныя ўмовы надвор'я (напрыклад, сонечна, воблачна, дажджліва).
- Узровень камфорту: Indicates indoor comfort based on temperature and humidity.
- Temperature Trend: Bar graph showing recent temperature changes.
- Вільготнасць: Працэнтtage display of indoor humidity.
- тэмпература: Digital display of indoor temperature (Celsius or Fahrenheit).
задняя панэль
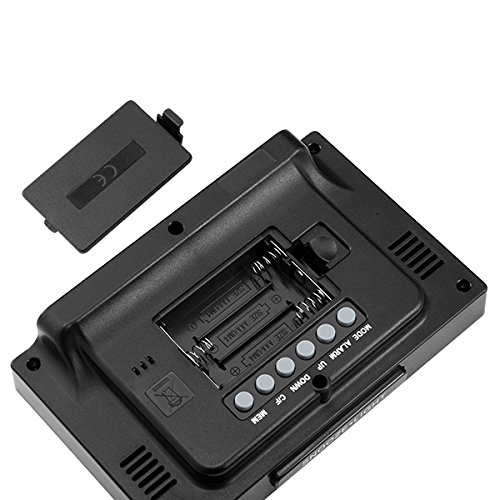
The back of the unit houses the battery compartment and various control buttons for setting the device.
- Батарэйны адсек: Holds 3x AAA batteries for power backup.
- Кнопка MODE: Used to switch between display modes and enter setting mode.
- Кнопка ALARM: Used to set and activate/deactivate the alarm.
- Кнопка UP: Used to increase values during settings or view maximum records.
- Кнопка ўніз: Used to decrease values during settings or view minimum records.
- Кнопка °C/°F: Пераключаецца паміж адзінкамі вымярэння тэмпературы па Цэльсію і Фарэнгейту.
- Кнопка MEM: Прывыклі view memory records for temperature and humidity.
Верхняя панэль
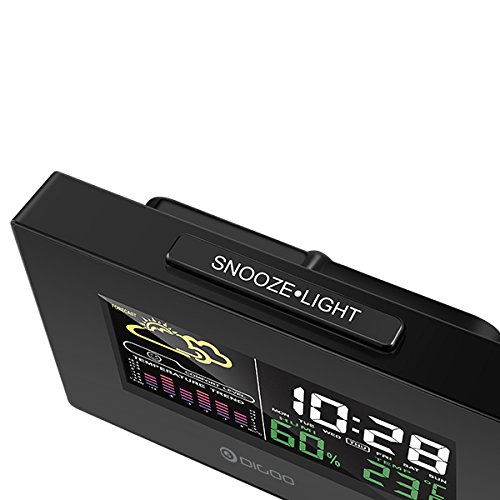
The top of the unit features a single button for snooze and backlight functions.
- SNOOZE·LIGHT Button: Press to activate the backlight or snooze the alarm.
Настройка
1. Уключэнне
- Ўстаноўка батарэі: Open the battery compartment cover on the back of the unit. Insert 3x AAA batteries, ensuring correct polarity (+/-). Close the cover. Batteries provide backup power and allow for portability.
- USB Power Connection: For continuous power and backlight, connect the provided USB cable to the USB port on the unit and to a compatible USB power adapter (not included) or a computer USB port.
- The display will light up and show default settings.
2. Initial Settings (Time, Date, Unit)
- Настройка часу:
- Націсніце і ўтрымлівайце РЭЖЫМ прыблізна 3 секунды, каб увайсці ў рэжым усталёўкі часу. Лічба гадзіны будзе міргаць.
- Выкарыстоўвайце UP or УНІЗ кнопкі для рэгулявання гадзіны.
- Прэса РЭЖЫМ again to confirm the hour and move to minute setting. The minute digit will flash.
- Выкарыстоўвайце UP or УНІЗ кнопкі для налады хвілін.
- Прэса РЭЖЫМ again to confirm and move to 12/24 hour format selection.
- Выкарыстоўвайце UP or УНІЗ buttons to select 12-hour or 24-hour format.
- Прэса РЭЖЫМ каб пацвердзіць і выйсці з налады часу.
- Налада даты:
- Пасля ўстаноўкі часу націсніце РЭЖЫМ again to enter date setting mode. The year will flash.
- Выкарыстоўвайце UP or УНІЗ кнопкі для налады года.
- Прэса РЭЖЫМ to confirm and move to month setting.
- Выкарыстоўвайце UP or УНІЗ кнопкі для налады месяца.
- Прэса РЭЖЫМ to confirm and move to day setting.
- Выкарыстоўвайце UP or УНІЗ кнопкі для налады дня.
- Прэса РЭЖЫМ to confirm and exit date setting.
- Выбар адзінак вымярэння тэмпературы:
- Націсніце ° C / ° F button on the back of the unit to switch between Celsius (°C) and Fahrenheit (°F) temperature display.
Інструкцыя па эксплуатацыі
1. Функцыя будзільніка
- Ўстаноўка будзільніка:
- Націсніце ТРЫВОГА адзін раз націсніце кнопку, каб адлюстраваць бягучы час будзільніка.
- Націсніце і ўтрымлівайце ТРЫВОГА button for approximately 3 seconds. The hour digit will flash.
- Выкарыстоўвайце UP or УНІЗ кнопкі для налады гадзін будзільніка.
- Прэса ТРЫВОГА again to confirm the hour and move to minute setting. The minute digit will flash.
- Выкарыстоўвайце UP or УНІЗ кнопкі для наладжвання хвілін будзільніка.
- Прэса ТРЫВОГА каб пацвердзіць і выйсці з налад будзільніка.
- Уключэнне/выключэнне будзільніка:
- У звычайным рэжыме адлюстравання часу націсніце кнопку ТРЫВОГА button repeatedly to toggle the alarm ON or OFF. An alarm icon will appear on the display when the alarm is active.
- Функцыя затрымкі:
- Калі прагучыць сігнал трывогі, націсніце ДРЫМАЦЬ·СВЯТЛО button on the top of the unit to activate the snooze function. The alarm will temporarily stop and sound again after a few minutes (typically 5-10 minutes).
- To stop the alarm completely, press any other button on the back panel.
2. Прагноз надвор'я
The weather station provides a weather forecast based on internal atmospheric pressure changes. The forecast icons (e.g., sunny, cloudy, rainy) are predictions for the next 12-24 hours and may not always match local weather services, which use more comprehensive data.
- The forecast icon is displayed on the upper left of the screen.
- The device requires a period of stable operation (typically 24 hours) to calibrate and provide accurate forecasts.
3. Адлюстраванне тэмпературы і вільготнасці
- The current indoor temperature and humidity are continuously displayed on the screen.
- Viewing Min/Max Records:
- Націсніце МЕМ адзін раз націсніце кнопку, каб адлюстраваць максімальную зафіксаваную тэмпературу і вільготнасць.
- Прэса МЕМ again to display the minimum recorded temperature and humidity.
- Прэса МЕМ a third time to return to current readings.
- To clear the min/max records, press and hold the МЕМ кнопку на працягу 3 секунд viewзапісы.
4. Кіраванне падсветкай
- When powered by USB, the backlight will remain on.
- When powered by batteries only, press the ДРЫМАЦЬ·СВЯТЛО button to temporarily activate the backlight for a few seconds.
Тэхнічнае абслугоўванне
- Уборка: Wipe the unit with a soft, dry cloth. Do not use abrasive cleaners or solvents. Avoid getting moisture into the unit.
- Замена батарэі: When the display becomes dim or functions irregularly, replace the 3x AAA batteries in the back compartment. Ensure correct polarity.
- захоўванне: If not using the device for an extended period, remove the batteries to prevent leakage. Store in a cool, dry place.
Ліквідацыю непаладак
| праблема | Магчымая прычына | Рашэнне |
|---|---|---|
| Дысплей пусты або цьмяны. | Low batteries or no power connection. | Replace batteries or connect the USB power cable. |
| Няправільны час/дата. | Time/date not set correctly after power loss or initial setup. | Follow the "Initial Settings" section to reset time and date. |
| Прагноз надвор'я здаецца недакладным. | Device needs calibration time; local conditions may differ from pressure-based forecast. | Allow 24 hours for calibration. Understand that the forecast is based on internal pressure changes. |
| Сігналізацыя не гучыць. | Alarm is not activated or volume is too low (if adjustable). | Ensure the alarm icon is displayed. Check alarm settings. |
Тэхнічныя характарыстыкі
| мадэль: | DG-C3 |
| Падключэнне: | USB (для харчавання) |
| Крыніца харчавання: | 3x AAA Batteries (not included) or USB Power |
| Асаблівасці: | Hygrometer, Thermometer, Weather Forecast, Alarm Clock, Color Backlight, Portable |
| Дысплей: | Color Backlit LCD |
| Адзінка вымярэння тэмпературы: | °C / °F выбар |
Гарантыя і падтрымка
For warranty information or technical support, please refer to the documentation provided at the time of purchase or contact your retailer. Keep your purchase receipt as proof of purchase.