1. Уводзіны
Дзякуй за пакупкуasing the CAIWEI A8AB-NEW Video Projector. This manual provides essential information for the safe and efficient operation of your device. Please read it thoroughly before use and retain it for future reference.
2. Інструкцыі па тэхніцы бяспекі
- Не глядзіце непасрэдна ў аб'ектыў праектара, калі ён уключаны.amp уключаны.
- Забяспечце належную вентыляцыю вакол праектара, каб прадухіліць перагрэў.
- Не падвяргайце праектар уздзеянню дажджу або вільгаці.
- Выкарыстоўвайце толькі адаптар сілкавання, які пастаўляецца з праектарам.
- Keep the projector away from flammable materials.
- Адключайце праектар ад сеткі падчас навальніцы або калі ён не выкарыстоўваецца працяглы час.
- Не спрабуйце рамантаваць праектар самастойна. Звяртайцеся па любыя паслугі па абслугоўванні да кваліфікаванага персаналу.
3. Змесціва ўпакоўкі
Калі ласка, пераканайцеся, што ўсе прадметы наяўныя пры распакаванні:
- CAIWEI A8AB-NEW Video Projector
- Сілавы кабель
- Пульт дыстанцыйнага кіравання
- Кабель HDMI
- Кабель VGA
- AV-кабель
- Кіраўніцтва карыстальніка
4. Прадукт скончыўсяview
Familiarize yourself with the projector's components:
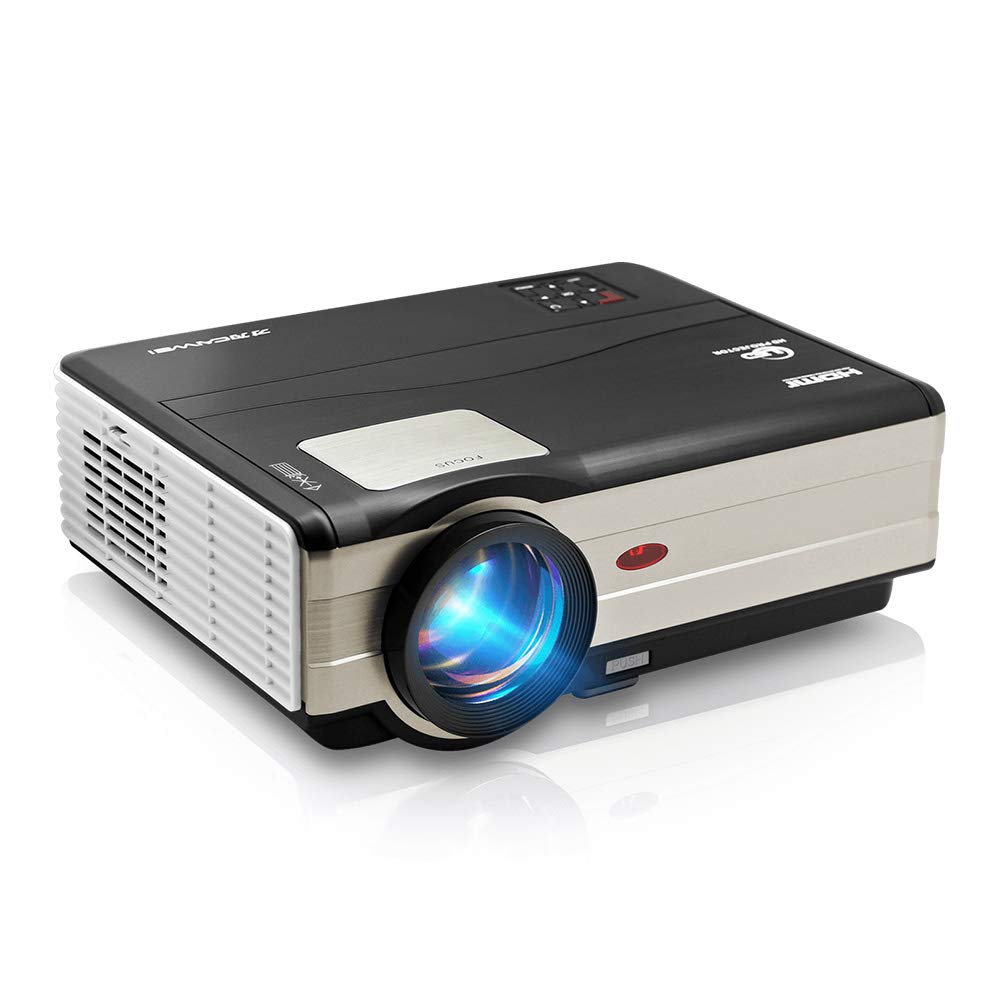
Малюнак 1: Фронт view of the CAIWEI A8AB-NEW Video Projector, showing the lens and ventilation.
Пярэдняя панэль
- Праекцыйны аб'ектыў: Выпраменьвае выяву.
- Кольца факусіроўкі: Рэгулюе выразнасць выявы.
- Карэкцыя трапецеідальных скажэнняў: Выпраўляе трапецападобнае скажэнне выявы.
Задняя панэль
- Порт харчавання: Падключаецца да кабеля харчавання.
- Парты HDMI (2): Connects to HDMI-enabled devices (e.g., Blu-ray player, game console).
- USB-парты (x2): Connects to USB storage devices or other USB peripherals.
- Порт VGA: Connects to computers or laptops with VGA output.
- AV-порт: Connects to older devices using composite video and stereo audio.
- Аўдыёвыхад (3.5 мм): Падключаецца да знешніх дынамікаў або навушнікаў.
5. Настройка
5.1 Размяшчэнне
Place the projector on a stable, flat surface or mount it to a ceiling. Ensure the projector is perpendicular to the projection screen or wall. The optimal projection distance varies, but generally, a larger distance yields a larger image.
5.2 Падключэнне харчавання
- Connect the power cable to the projector's power port.
- Устаўце другі канец кабеля сілкавання ў разетку.
- Загарыцца індыкатар харчавання.
5.3 Падключэнне ўваходных прылад
Праектар падтрымлівае розныя крыніцы ўваходнага сігналу:
- HDMI: Connect an HDMI cable from your device (e.g., laptop, game console, streaming stick) to one of the projector's HDMI ports.
- USB: Устаўце флэш-назапашвальнік USB у порт USB, каб прайграваць медыяфайлы files непасрэдна.
- VGA: Падключыце кабель VGA ад кампутара да порта VGA праектара.
- АВ: Use the provided AV cable to connect to devices with composite video output.
- Бесправадная сувязь (Wi-Fi): For screen mirroring from smartphones or tablets, navigate to the 'Wireless Display' or 'Screen Mirroring' option in the projector's menu and follow the on-screen instructions. Ensure your device and the projector are on the same Wi-Fi network.
- Bluetooth: To connect external Bluetooth speakers, go to the Bluetooth settings in the projector's menu, enable Bluetooth, and pair with your desired audio device.
5.4 Рэгуляванне фокусу і трапецападобнага скажэння
- Уключыце праектар і пакажыце малюнак.
- Павярнуць Кольца факусіроўкі on the lens until the image appears sharp and clear.
- If the image is trapezoidal (wider at the top or bottom), adjust the Карэкцыя Keystone dial or setting until the image is rectangular.
6. Інструкцыя па эксплуатацыі
6.1 Уключэнне/выключэнне сілкавання
- Уключэнне: Націсніце кнопку харчавання на праектары або пульце дыстанцыйнага кіравання.
- Выключэнне: Зноў націсніце кнопку харчавання. Пацвердзіце выключэнне, калі будзе запытана.
6.2 Навігацыя па меню
Use the navigation buttons (Up, Down, Left, Right, OK) on the projector or remote control to browse the on-screen menu. The 'Menu' button typically opens the main settings, and 'Exit' or 'Back' closes sub-menus.
6.3 Выбар крыніцы ўваходнага сігналу
Press the 'Source' or 'Input' button on the remote control or projector. A list of available input sources (HDMI1, HDMI2, USB1, USB2, VGA, AV, Wireless Display) will appear. Select the desired source using the navigation buttons and press 'OK'.
6.4 Налады гуку
Access the audio settings through the main menu to adjust volume, select audio output (internal speaker, external via 3.5mm jack, or Bluetooth), and modify sound modes.
6.5 Wireless/Bluetooth Connection
Refer to section 5.3 for detailed instructions on connecting via Wi-Fi for screen mirroring or Bluetooth for audio output.
7. Тэхнічнае абслугоўванне
7.1 Ачыстка аб'ектыва
Use a soft, lint-free cloth specifically designed for optical lenses. Gently wipe the lens surface. Avoid using abrasive cleaners or excessive force, which can scratch the lens.
7.2 Cleaning the Air Filter/Vents
Regularly check the air intake and exhaust vents for dust accumulation. Use a soft brush or a can of compressed air to gently clean the vents. This helps maintain proper airflow and prevents overheating.
7.3 Захоўванне
When not in use, store the projector in a cool, dry, and dust-free environment. Use the original packaging or a protective case to prevent damage.
8. Выпраўленне непаладак
| праблема | Магчымая прычына | Рашэнне |
|---|---|---|
| Няма выявы на экране | Харчаванне не падключана; няправільная крыніца ўваходнага сігналу; прылада не ўключана. | Check power cable; Select correct input source; Ensure connected device is on. |
| Відарыс размыты | Фокус не адрэгуляваны; праектар занадта далёка/блізка. | Адрэгулюйце кольца факусоўкі; перамясціце праектар. |
| Выява мае трапецападобную форму | Трапецыяпадобны камень не адрэгуляваны. | Адрэгулюйце карэкцыю трапецеідальных скажэнняў. |
| Няма гуку | Volume too low; Muted; Incorrect audio output; Cable issue. | Increase volume; Unmute; Check audio settings; Verify cable connections. |
| Пульт дыстанцыйнага кіравання не працуе | Batteries dead; Obstruction; Out of range. | Replace batteries; Remove obstructions; Ensure line of sight to IR receiver. |
| Папярэджанне аб перагрэве | Blocked vents; Poor ventilation. | Clear vents; Ensure adequate space around projector. |
9. Тэхнічныя характарыстыкі
- мадэль: A8AB-NEW
- Марка: КАЙВЕЙ
- Раздзяленне дысплея: 1280 х 800
- Тэхналогія падключэння: Bluetooth, HDMI, USB, VGA, Wireless
- Асаблівасці: Built-In Wi-Fi, Portable, Wireless
- Рэкамендуемае выкарыстанне: Gaming, Home Theater
- Вага прадмета: 6.1 фунта
- Памеры прадукту: 11.2 х 14.7 х 5 цалі
10. Гарантыя і падтрымка
CAIWEI products are designed for reliability and performance. For specific warranty details, please refer to the warranty card included with your purchase or contact CAIWEI customer support. If you encounter any issues not covered in this manual, please reach out to our support team for assistance.
Падтрымка кліентаў: Please visit the official CAIWEI website or contact your retailer for support information.