1. Важныя інструкцыі па бяспецы
To reduce the risk of fire, electric shock, or injury, always follow these basic safety precautions when using your Arctic-Pro Portable Digital Ice Maker Machine:
- Прачытайце ўсе інструкцыі перад выкарыстаннем.
- Не дакранайцеся да гарачых паверхняў. Выкарыстоўвайце ручкі або ручкі.
- To protect against electrical hazards, do not immerse cord, plug, or any part of the appliance in water or other liquids.
- Неабходны пільны нагляд, калі любы прыбор выкарыстоўваецца дзецьмі або побач з імі.
- Адключайце вілку ад разеткі, калі яна не выкарыстоўваецца і перад чысткай. Дайце астыць, перш чым надзяваць або здымаць дэталі, а таксама перад чысткай прыбора.
- Не выкарыстоўвайце прыборы з пашкоджаным шнуром або вілкай, а таксама пасля таго, як прыбор выйшаў з ладу або быў пашкоджаны якім-небудзь чынам. Звярніцеся ў службу падтрымкі кліентаў для праверкі, рамонту або рэгулявання.
- Выкарыстанне аксесуараў, не рэкамендаваных вытворцам прыбора, можа выклікаць небяспеку.
- Не выкарыстоўвайце на адкрытым паветры.
- Не дазваляйце шнуру звісаць з краю стала або прылаўка і не дакранайцеся да гарачых паверхняў.
- Не стаўце на або побач з гарачай газавай або электрычнай гарэлкай або ў нагрэтай духоўцы.
- Заўсёды спачатку падключайце вілку да прыбора, а потым да разеткі. Каб адключыць прыладу, выключыце любы з рэгулятараў, а затым выміце вілку з разеткі.
- Не выкарыстоўвайце прыладу не па прызначэнні ў хатніх умовах.
- Гэты прыбор прызначаны толькі для хатняга выкарыстання.
- Не выкарыстоўвайце ў гэтым прыладзе агрэсіўныя хімікаты або пары.
- This ice maker must be grounded.
- Забараняецца праколваць трубы хладагента.
2. Прадукт скончыўсяview
The Arctic-Pro Portable Digital Ice Maker Machine is designed to produce ice quickly and efficiently. It features a compact design suitable for various settings.
2.1 Кампаненты
- Блок лёду
- Здымны кошык для лёду
- Ледзяны савок
- Шнур харчавання (3-кантактны раз'ём)
2.2 Асаблівасці
- Лічбавы экран: An easy-to-read LCD control panel for selecting ice size, setting timers, and controlling cleaning functions.
- Ясна View Window Lid: Allows observation of the ice making process.
- Fill Sensor: Detects water level to ensure proper operation.
- Інтэлектуальныя датчыкі: Prevents the ice basket from overfilling.
- Два памеры кубікаў лёду: Choose between small (0.75 x 0.75 inches) and large (1 x 0.75 inches) ice cubes.
- Вытворчасць хуткага лёду: Produces first batch of ice in 6-8 minutes.
- Штодзённая прапускная здольнасць: Здольны вырабляць да 26 фунтаў лёду ў дзень.
- Enhanced Cooling System: Features a fan for efficient heat dissipation.

Figure 1: Key features and components of the ice maker.
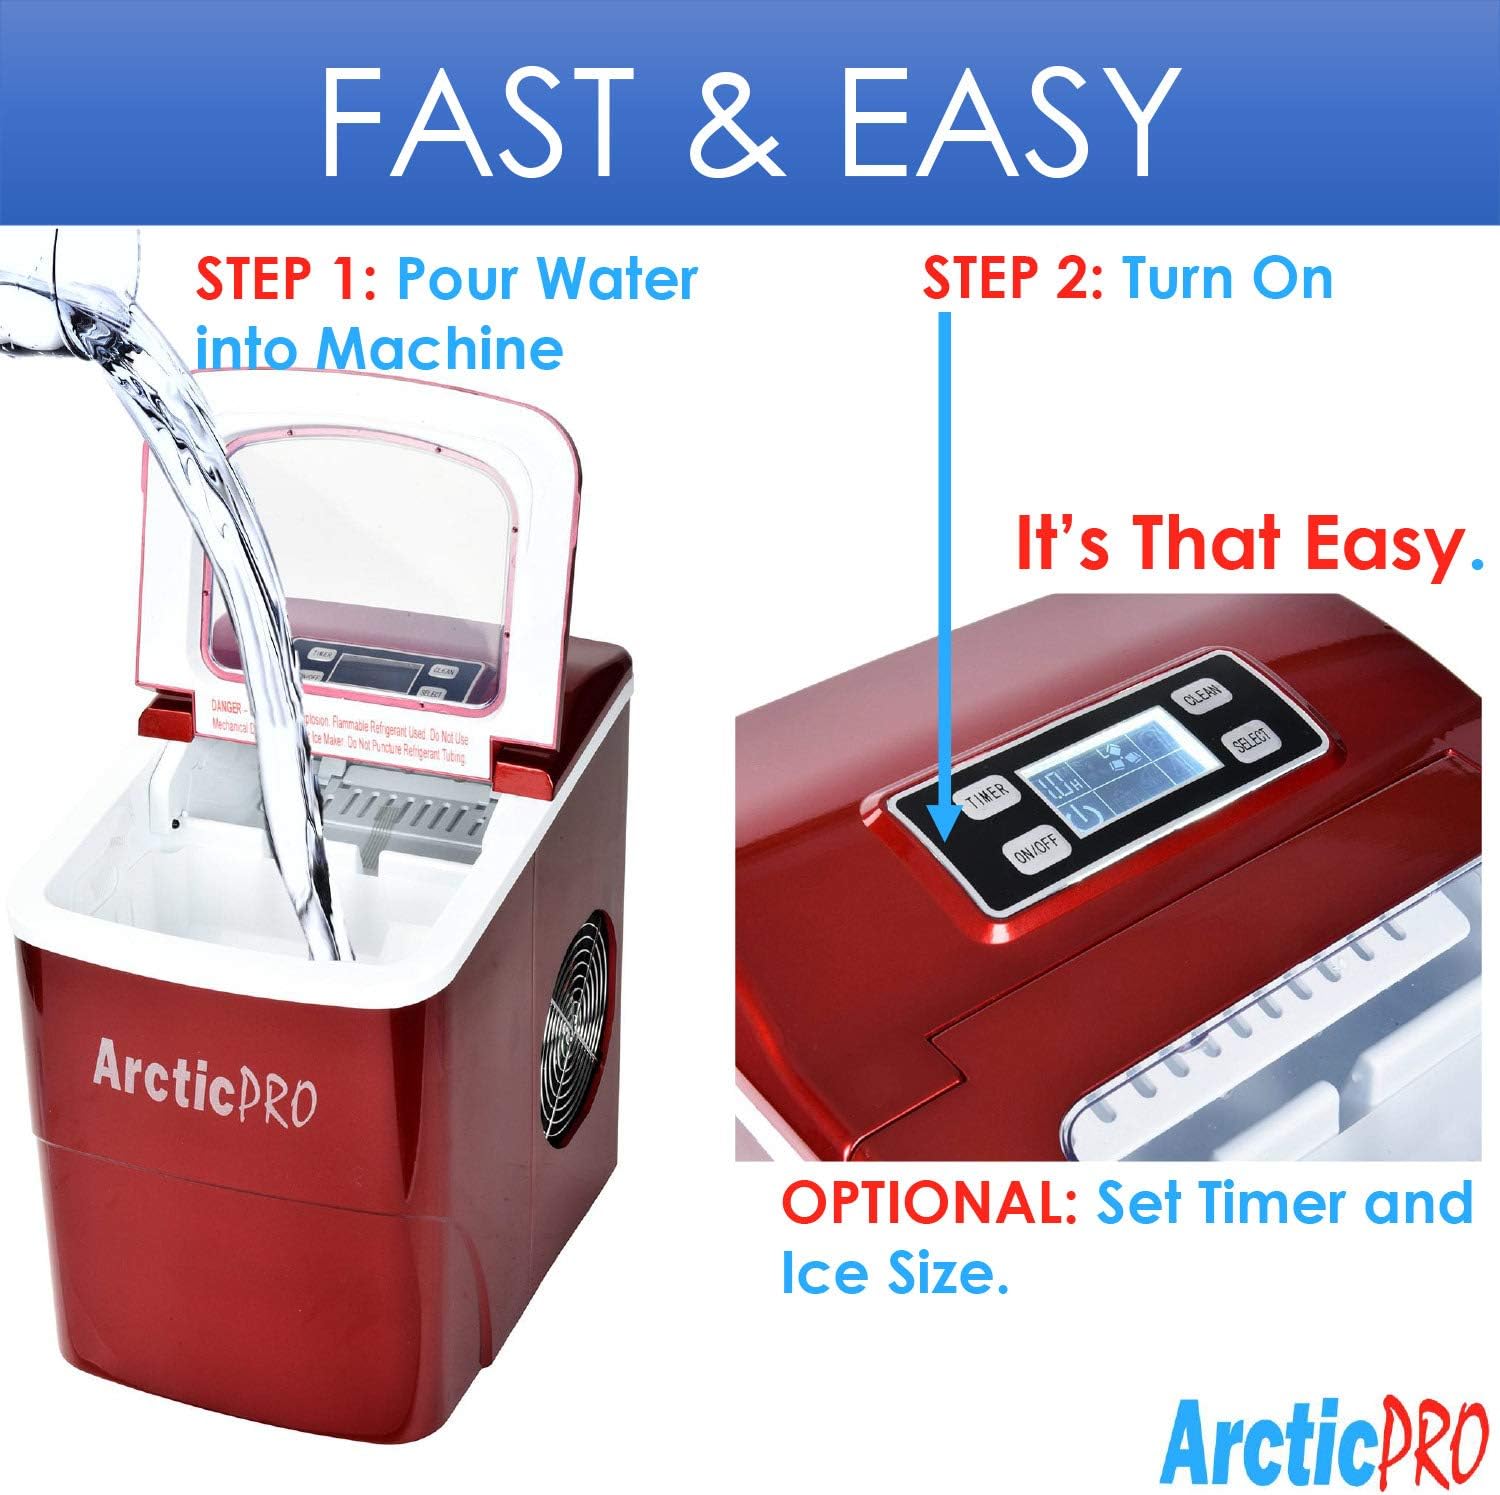
Figure 2: Ice production capabilities.
3. Інструкцыі па ўсталёўцы
3.1 Распакаванне
- Зніміце з прылады ўсе ўпаковачныя матэрыялы.
- Праверце льдагенератар на наяўнасць пашкоджанняў. Калі ён пашкоджаны, не выкарыстоўвайце яго і звярніцеся ў службу падтрымкі кліентаў.
- Выміце кошык для лёду і лыжку для лёду з прылады.
3.2 Першасная ўборка
Before first use, clean the interior of the ice maker:
- Wash the ice basket and ice scoop with warm water and mild detergent. Rinse thoroughly.
- Ачысціце ўнутраную частку льдагенератара мяккай тканінай dampened with warm water and a small amount of vinegar or mild detergent. Rinse with clean water and drain.
- Перад паўторнай зборкай пераканайцеся, што ўсе дэталі сухія.
3.3 Размяшчэнне
- Place the ice maker on a stable, level surface away from direct sunlight and heat sources.
- Ensure there is adequate ventilation around the unit, especially at the back and sides where the cooling fan is located.
- Забяспечце не менш за 4 цаляў прасторы вакол прылады для належнай цыркуляцыі паветра.
3.4 Падключэнне харчавання
- Plug the 3-prong power cord into a grounded electrical outlet (115V, 60Hz).
- Allow the unit to rest for at least one hour before adding water and operating, especially if it was tilted during transport.
4. Інструкцыя па эксплуатацыі
Operating your Arctic-Pro ice maker is a simple two-step process:

Figure 3: Simple operating steps.
4.1 Даданне вады
- Адкрыйце вечка льдагенератара.
- Pour potable water into the water reservoir. Do not exceed the 'MAX FILL LINE' indicated inside the reservoir.
- Зачыніце вечкам.

Video 1: Demonstrates adding water to the ice maker. Note: This video is a customer-generated preview and may not represent official instructions.
4.2 Пачатак вытворчасці лёду
- Націсніце ВКЛ/ВЫКЛ button on the digital control panel to turn on the unit.
- Выкарыстоўвайце ВЫБРАЦЬ button to choose your desired ice cube size: Small (S) or Large (L). The selected size will be indicated on the digital screen.
- The ice maker will begin its cycle. The first batch of ice cubes will typically be ready in 6-8 minutes.
4.3 Паказчыкі
- лёд поўны: An indicator light or message on the digital screen will illuminate when the ice basket is full. The unit will automatically pause ice production. Remove ice from the basket to resume production.
- ДАДАЦЬ ВАДУ: An indicator light or message will illuminate when the water reservoir is low. Add water to the reservoir to resume ice production.
4.4 Timer Function (Optional)
The digital screen allows you to set a timer for operation. Refer to the specific instructions in your product packaging for detailed timer setup.
5. Тэхнічнае абслугоўванне і ачыстка
Рэгулярная чыстка і абслугоўванне забяспечваюць аптымальную прадукцыйнасць і даўгавечнасць вашага льдагенератара.
5.1 Штодзённая ўборка
- After each use, unplug the unit.
- Выміце кошык з лёдам і ачысціце яго ад рэштак лёду.
- Зліце рэшткі вады з рэзервуара, выкарыстоўваючы зліўную адтуліну, размешчаную ў ніжняй частцы прылады.
- Працярыце ўнутраную частку мяккай тканінай.
5.2 Штотыднёвая ўборка
- Perform the daily cleaning steps.
- Prepare a solution of warm water and a small amount of white vinegar or a food-grade ice maker cleaner.
- Pour the solution into the water reservoir and allow it to sit for 10-15 minutes.
- Цалкам зліце раствор.
- Rinse the reservoir thoroughly with clean water multiple times to remove any residue.
- Працярыце знешні выгляд мяккай, damp тканіна.
5.3 Захоўванне
If storing the ice maker for an extended period:
- Ensure the unit is thoroughly cleaned and completely dry.
- Leave the lid slightly ajar to prevent mold and mildew growth.
- Захоўваць у прахалодным, сухім месцы.
6. Выпраўленне непаладак
Review перад зваротам у службу падтрымкі кліентаў азнаёмцеся з наступнымі распаўсюджанымі праблемамі і рашэннямі.
| праблема | Магчымая прычына | Рашэнне |
|---|---|---|
| Льдагенератар не ўключаецца | Няма крыніцы харчавання | Check if the power cord is securely plugged into a grounded outlet. Test the outlet with another appliance. |
| Няма вытворчасці лёду | Lack of water in reservoir | Add water to the reservoir up to the MAX FILL LINE. |
| Занадта высокая тэмпература навакольнага асяроддзя | Ensure the ice maker is in a cool environment and not exposed to direct sunlight or heat sources. | |
| Air circulation blocked | Ensure adequate space around the unit for ventilation. Clean any dust from the fan vents. | |
| Ice cubes are too small or cloudy | Тэмпература вады занадта высокая | Use colder water when filling the reservoir. |
| Назапашванне мінералаў | Perform a thorough cleaning and descaling as per maintenance instructions. Use filtered water. | |
| Індыкатар "ICE FULL" уключаны, але кошык не поўны | Ice blocking sensor | Rearrange ice in the basket or remove some ice to clear the sensor path. |
| Незвычайны шум падчас працы | Гучыць звычайная праца | Some gurgling or fan noise is normal. If the noise is excessive or unusual, contact customer service. |
7. Тэхнічныя характарыстыкі
| Асаблівасць | Спецыфікацыя |
|---|---|
| Назва мадэлі | Партатыўны ледогенератор |
| Нумар мадэлі | 21738 |
| Памеры (Д x Ш x В) | 11.5" x 8.75" x 12.5" |
| Штодзённая магутнасць па вытворчасці лёду | Да 26 фунтаў |
| First Ice Production Time | 6-8 хвілін |
| Памеры кубікаў лёду | Small (0.75"x0.75"), Large (1"x0.75") |
| Ватtage | 100 ват |
| тtage | 115 вольт |
| Узровень шуму | 45 дэцыбел |
| Матэрыял | Пластыкавыя |
| Уключаныя кампаненты | Ice Maker, Ice Basket, Small Ice Scoop |

Малюнак 4: Памеры вырабу.
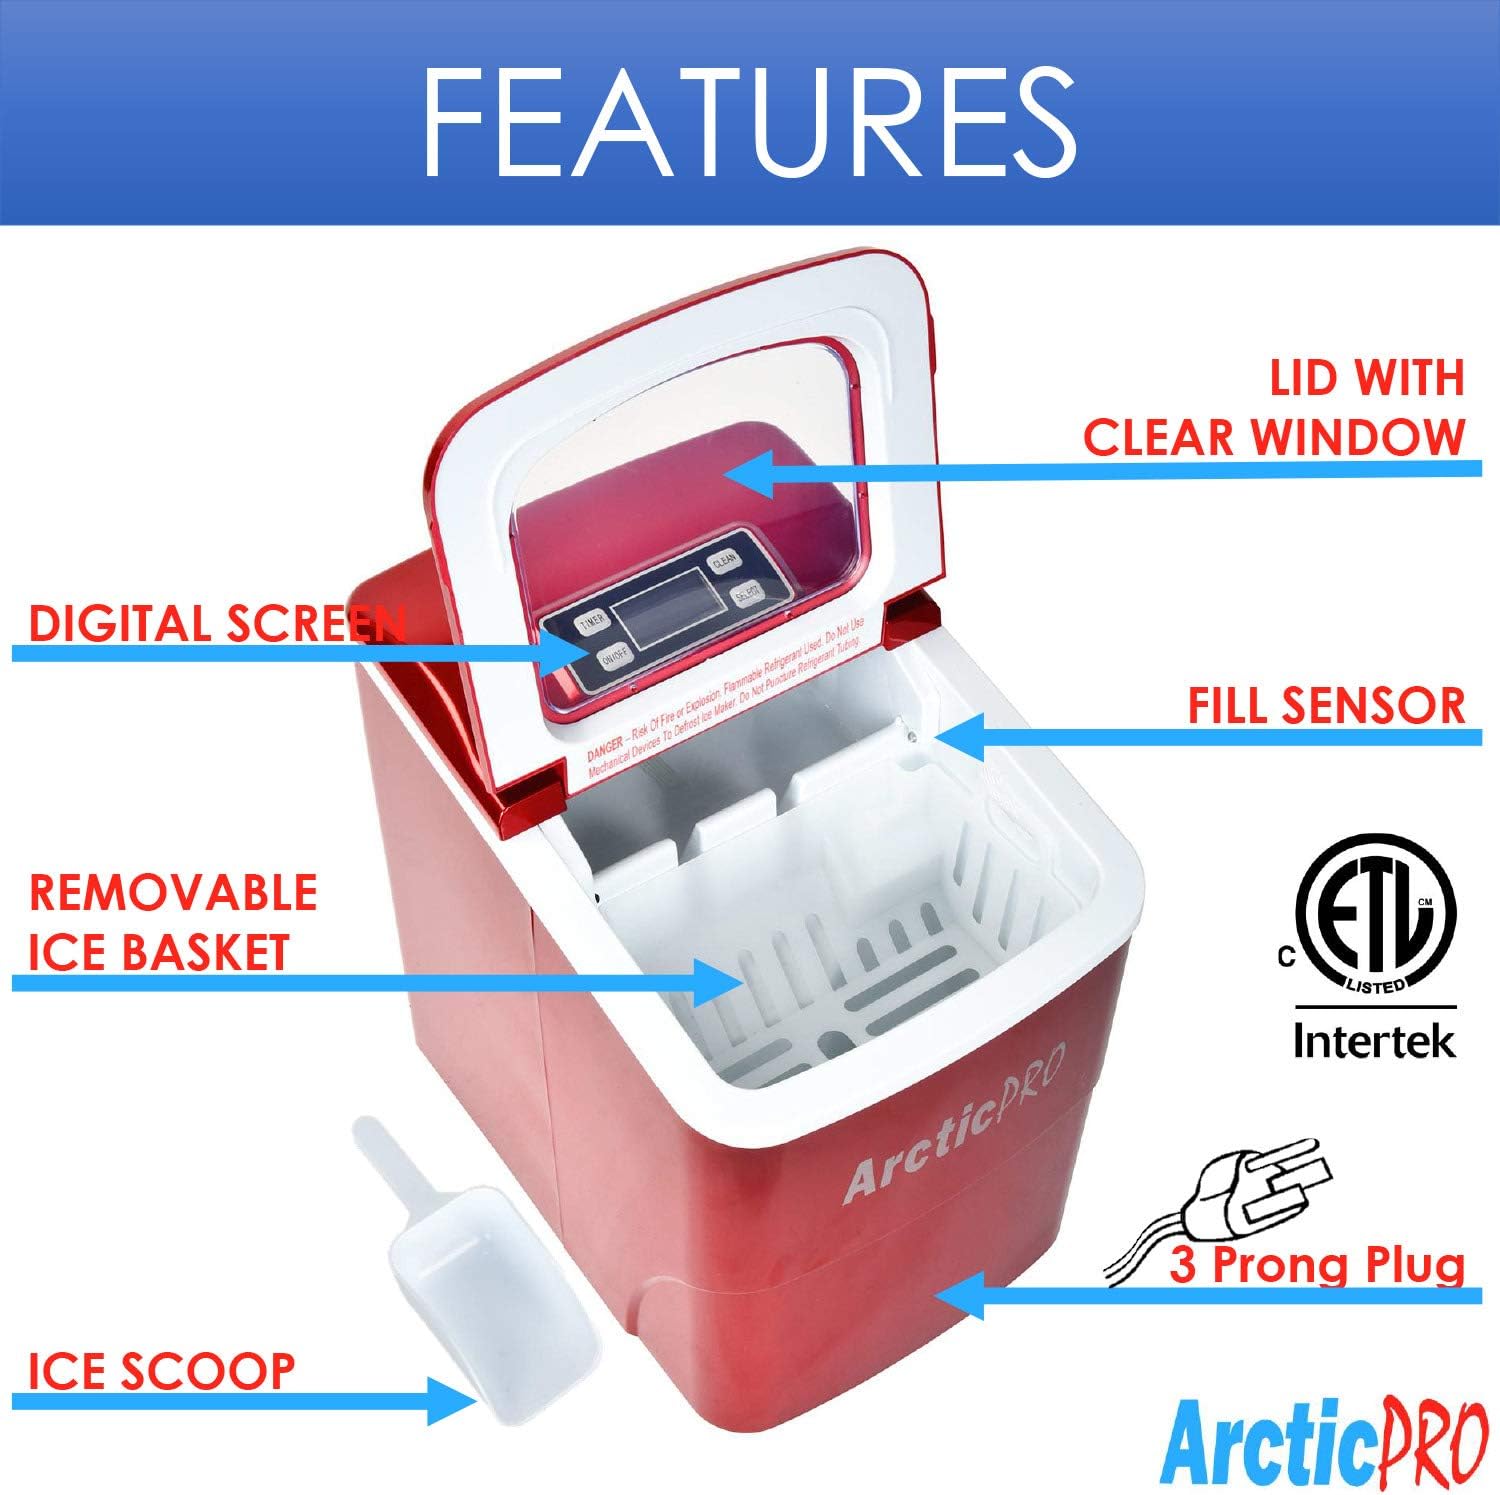
Figure 5: Ice cube size comparison.
8. Гарантыя і падтрымка кліентаў
Arctic-Pro products are manufactured to high-quality standards. For warranty information, product registration, or technical assistance, please refer to the warranty card included with your purchase or visit the official Arctic-Pro webсайт.
If you encounter any issues not covered in this manual, please contact Arctic-Pro customer support for further assistance.