1. Уводзіны
This manual provides essential instructions for the setup, operation, and maintenance of your SUNMI T2 Smart POS Terminal. The T2 is an integrated point-of-sale device featuring a 15.6-inch Full HD touch screen and a built-in thermal printer, designed for various commercial applications.
2. Прадукт скончыўсяview
2.1 Кампаненты прылады
The SUNMI T2 terminal integrates a high-resolution display, a powerful processor, and a thermal printer into a single unit. Key components include:
- 15.6-inch Full HD Touch Screen (1920x1080)
- Integrated Thermal Printer (80mm paper width, 200mm/s print speed)
- Base Unit with connectivity ports
- Увод магутнасці
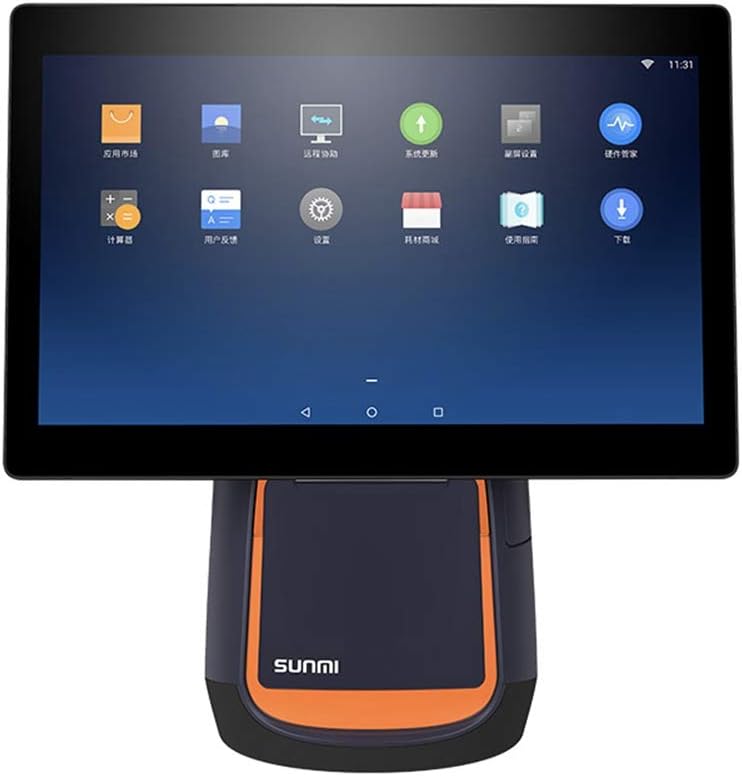
Малюнак 2.1: Спераду view of the SUNMI T2 Smart POS Terminal. The 15.6-inch touch screen is visible, displaying various application icons, indicating its Android operating system interface.

Малюнак 2.2: бок view of the SUNMI T2 terminal, illustrating the design of the stand and the adjustable angle of the main display unit.
2.2 Змест пакета
Пасля распакавання пераканайцеся, што ўсе прадметы наяўныя:
- SUNMI T2 Printer (T2 model)
- Сілавы кабель
- Кіраўніцтва карыстальніка (гэты дакумент)
3. Інструкцыі па ўсталёўцы
3.1 Распакоўка і размяшчэнне
- Carefully remove the SUNMI T2 terminal from its packaging.
- Place the device on a stable, flat surface, ensuring adequate ventilation around the unit.
- Avoid placing the device near heat sources, direct sunlight, or in areas with high humidity or dust.
3.2 Падключэнне харчавання
- Connect the provided power cable to the power input port located at the rear of the device base.
- Падключыце другі канец кабеля харчавання да звычайнай электрычнай разеткі.
- The device will typically power on automatically or can be powered on using the power button.
3.3 Пачатковае ўключэнне і канфігурацыя
- Press and hold the power button (refer to Section 5.1 for button location) until the screen illuminates.
- Выконвайце падказкі на экране, каб завяршыць пачатковую наладу, у тым ліку выбар мовы, падключэнне да Wi-Fi і налады гадзіннага пояса.
- Connect to your local network via Wi-Fi or Ethernet (if available) to ensure proper functionality and updates.
4. Інструкцыя па эксплуатацыі
4.1 Праца сэнсарнага экрана
The SUNMI T2 features a capacitive multi-touch screen. Operate the device using standard touch gestures:
- Націсніце: Выберыце элементы або актывуйце функцыі.
- Правядзіце пальцам: Навігацыя па меню або пракрутка змесціва.
- Звядзенне пальцамі для павелічэння: Adjust the size of on-screen content.
4.2 Integrated Printer Operation
The T2 includes an 80mm thermal printer for receipts and order tickets.
4.2.1 Загрузка паперы для друкаркі
- Locate the printer cover on the front of the device base.
- Press the release button or latch to open the printer cover.
- Insert a new roll of 80mm thermal paper, ensuring the paper feeds from the bottom and the leading edge extends slightly out of the printer slot.
- Шчыльна зачыніце вечка прынтара, пакуль яно не зафіксуецца на месцы.
- Адарвіце лішнюю паперу.
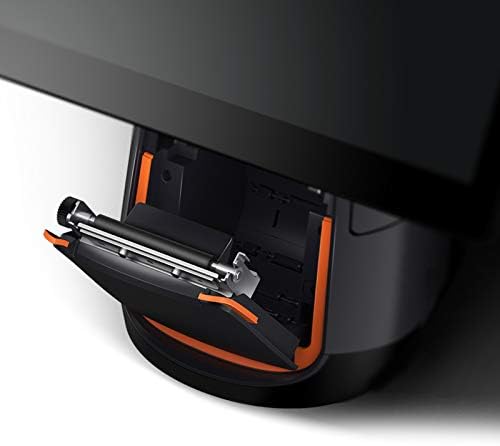
Малюнак 4.1: падрабязна view of the integrated thermal printer compartment with the cover open, illustrating the correct method for inserting a new 80mm thermal paper roll.

Малюнак 4.2: Унутраны view of the SUNMI T2's thermal printer mechanism, highlighting its design for efficient paper handling and high-speed printing up to 200mm/s.
4.2.2 Друк чэкаў
Once paper is loaded, the printer will automatically activate when a print command is issued from your POS software application. Ensure your application is correctly configured to use the integrated printer.
4.3 Падключэнне
The SUNMI T2 supports various connectivity options:
- Wi-Fi: 2.4G/5G (IEEE 802.11 a/b/g/n) for wireless network access.
- Bluetooth: Supports Bluetooth 2.1/3.0/4.0 (BLE) for connecting peripherals.
- Парты USB: USB Type A port x1, USB 3.1 Type C x1, USB 2.0 x2 (total 3 USB ports).
- RJ11: Cash drawer port x1.
- RJ45: LAN port x1 for wired network connection.
- Раз'ём для навушнікаў: 3.5 мм аўдыявыхад.
- Micro-USB: Debug port x1.
Connect external devices such as barcode scanners, external keyboards, or cash drawers to the appropriate ports as needed.
5. Тэхнічнае абслугоўванне
5.1 Ачыстка прылады
- Power off the device and disconnect the power cable before cleaning.
- Выкарыстоўвайце мяккую безворсовую тканіну, злёгку dampened with water or a mild, non-abrasive cleaner to wipe the screen and exterior surfaces.
- Do not use harsh chemicals, abrasive pads, or excessive moisture.
- For the thermal printer head, use a specialized thermal printer cleaning pen or card to ensure optimal print quality.
5.2 Абнаўленне праграмнага забеспячэння
Regularly check for and install software updates for the SUNMI OS and your POS application to ensure optimal performance, security, and access to new features. Updates can typically be found in the device's settings menu or through your POS software provider.
6. Выпраўленне непаладак
6.1 Агульныя праблемы і рашэнні
- Прылада не ўключаецца:
- Ensure the power cable is securely connected to both the device and a working electrical outlet.
- Пераканайцеся, што разетка працуе.
- Try pressing and holding the power button for 10-15 seconds.
- Экран не рэагуе:
- Перазапусціце прыладу.
- Пераканайцеся, што экран чысты і без смецця.
- Прынтар не друкуе:
- Check if thermal paper is loaded correctly and not jammed.
- Ensure the printer cover is securely closed.
- Verify that the POS application is sending print commands and is configured for the integrated printer.
- Перазапусціце прыладу.
- Няма падключэння да сеткі (Wi-Fi/Ethernet):
- Check Wi-Fi settings and ensure you are connected to the correct network.
- For Ethernet, ensure the cable is securely connected to the RJ45 port and your router/switch.
- Restart your network equipment (router/modem).
If issues persist, refer to the support section or contact your vendor.
7. Тэхнічныя характарыстыкі
The following table details the technical specifications of the SUNMI T2 Smart POS Terminal:

Малюнак 7.1: Закончанаview of SUNMI T2 Technical Specifications, detailing hardware and software components.
| Асаблівасць | Дэталь |
|---|---|
| мадэль | T2 |
| Галоўны дысплей | 15.6" FHD, 1920x1080 |
| Працэсар | Qualcomm Snapdragon Octa-core processor |
| Аперацыйная сістэма | Android 7.1, SUNMI OS |
| Памяць | 2 Гб аператыўнай памяці, 16 Гб ПЗУ |
| Сэнсарны экран | G+G capacitive multi-touch screen |
| Прынтэр | Built-in high speed 80mm thermal printer with automatic cutter, print speed 200mm/s |
| Wi-Fi | 2.4G/5G (IEEE 802.11 a/b/g/n) |
| Bluetooth | Supports Bluetooth 2.1/3.0/4.0 (BLE) |
| Знешнія парты | USB Type A x1, RJ11 cash drawer x1, RJ45 LAN x1, Headphone jack x1, Power port x1, Micro-USB debug x1 |
| Парты USB | USB 3.1 Type C x1, USB 2.0 x2 |
| Знешняя памяць | Supports MicroSD (TF) up to 64GB |
| Адаптар сілкавання | Уваход: AC100-240V/1.7A, Выхад: DC24V/2.5A |
| Памеры | 37.4см х 33.8см х 22.4см |
| Вага прадмета | 17.6 фунта (прыблізна 7.98 кг) |
| Працоўнае асяроддзе | Temp: 0°C - 40°C |
| Асяроддзе захоўвання | Temp: -20°C - 60°C |
8. Гарантыя і падтрымка
For warranty information and technical support, please refer to the documentation provided with your purchase or contact the vendor/manufacturer directly. Keep your purchase receipt as proof of purchase.
Manufacturer: Kunxilin Electronic CO. (Brand: SUNMI)