
УНІК UC68
Unic UC68 Multimedia Home Theatre LED Projector User Manual
Мадэль: UC68
1. Уводзіны
Дзякуй за пакупкуasing the Unic UC68 Multimedia Home Theatre LED Projector. This manual provides essential information for setting up, operating, and maintaining your projector to ensure optimal performance and longevity. Please read this manual thoroughly before using the product and keep it for future reference.
2. Інфармацыя па бяспецы
Каб забяспечыць бяспечную працу і пазбегнуць пашкоджанняў, калі ласка, выконвайце наступныя меры бяспекі:
- Не глядзіце непасрэдна ў аб'ектыў праектара, калі ён уключаны.amp is on, as the strong light can cause eye damage.
- Ensure adequate ventilation around the projector. Do not block any ventilation openings.
- Размясціце праектар на ўстойлівай роўнай паверхні, каб прадухіліць яго падзенне.
- Use only the power adapter supplied with the projector. Using an incorrect adapter may cause damage or fire.
- Keep the projector away from water, moisture, and other liquids. Do not operate in wet environments.
- Do not attempt to open or repair the projector yourself. Refer all servicing to qualified service personnel.
- Адключайце праектар ад разеткі падчас навальніцы або калі ён не выкарыстоўваецца працяглы час.
3. Змесціва ўпакоўкі
Калі ласка, праверце, ці ўсе пералічаныя ніжэй прадметы ўваходзяць у ваш пакет:
- Unic UC68 Projector Host
- Пульт дыстанцыйнага кіравання
- Сілавы кабель
- AV-кабель
- Кіраўніцтва па эксплуатацыі
- Cap аб'ектыў
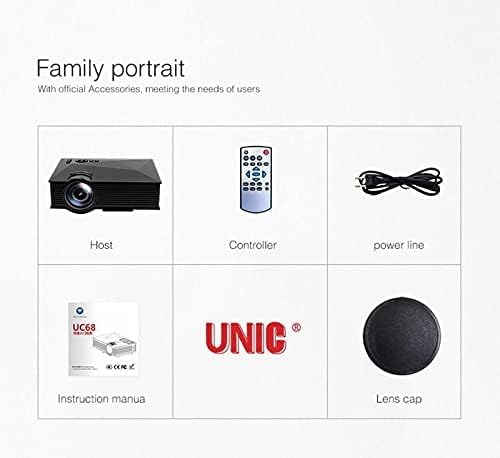
Image: The Unic UC68 projector package contents, showing the main unit, remote control, power cord, instruction manual, and lens cap.
4. Прадукт скончыўсяview
Familiarize yourself with the various parts and ports of your Unic UC68 projector.

Выява: Падрабязны view of the Unic UC68 projector, highlighting its lens, control buttons on top, and various input/output ports on the side.
Парты ўводу/вываду

Image: A visual representation of the Unic UC68 projector's rear and side panels, indicating ports for HDMI, USB, SD card, AV, VGA, and audio out, along with exampменш прылад, якія можна падключыць.
| Порт | Апісанне |
|---|---|
| HDMI | Connect to devices like laptops, Blu-ray players, game consoles. |
| USB 2.0 (x2) | Connect USB flash drives for media playback or power external devices (5Vout-500mA). |
| Слот для SD-карты | Insert SD cards for direct media playback. |
| VGA | Connect to older computers or laptops. |
| AV | Connect to devices with composite video and stereo audio output (e.g., DVD players). |
| Headphone Port (3.5mm) | Падключыце знешнія дынамікі або навушнікі. |
5. Настройка
Follow these steps for initial setup of your projector:
- Размяшчэнне: Place the projector on a stable, flat surface. Ensure there is enough space around the projector for proper ventilation. The ideal projection distance is between 1.07m and 3.8m.
- Падключэнне сілкавання: Connect the power cable to the projector's power input and then plug it into a wall outlet.
- Падключыць крыніцу ўваходу: Connect your desired input device (e.g., laptop, game console, USB drive) to the appropriate port on the projector (HDMI, VGA, USB, AV, SD card).
- Уключэнне: Press the power button on the projector or the remote control to turn on the projector. The LED indicator will light up.
- Рэгуляванне фокусу: Once an image is displayed, rotate the focus ring on the projector lens until the image appears clear and sharp.
- Карэкцыя трапецеідальных скажэнняў: If the projected image appears trapezoidal, adjust the keystone correction (if available on your model, typically a manual slider near the lens) to square the image.
6. Інструкцыя па эксплуатацыі
Уключэнне/выключэнне харчавання
- Каб уключыць: Націсніце кнопку харчавання на праектары або пульце дыстанцыйнага кіравання.
- Каб выключыць: Press the power button again. Wait for the fan to stop completely before unplugging the power cable.
Выбар крыніцы ўводу
Use the 'Source' button on the remote control or the projector's control panel to cycle through available input sources (HDMI, VGA, AV, USB, SD).
Навігацыя па меню
Use the arrow keys on the remote or projector to navigate through the on-screen menu. Press 'OK' or 'Enter' to confirm selections. Adjust settings such as picture mode, aspect ratio, and sound.
Media Playback (USB/SD)
Insert a USB flash drive or SD card into the respective port. The projector will typically prompt you to select the media type (Movie, Music, Photo, Text). Navigate to your desired file і націсніце «ОК», каб прайграць.
7. Тэхнічнае абслугоўванне
Правільнае абслугоўванне забяспечвае даўгавечнасць і прадукцыйнасць вашага праектара:
- Ачыстка аб'ектыва: Выкарыстоўвайце мяккую тканіну без ворса, спецыяльна прызначаную для аптычных лінзаў. Не выкарыстоўвайце абразіўныя ачышчальнікі і не прыкладвайце празмерных намаганняў.
- Ачыстка пылавога фільтра: Regularly check and clean the dust filter (if accessible) to maintain proper airflow and prevent overheating. Refer to the specific location in your manual if applicable.
- Знешняя ачыстка: Працярыце знешнія паверхні праектара мяккай сухой тканінай. Для выдалення ўстойлівых плям злёгкуamp можна выкарыстоўваць тканіну, але сачыце за тым, каб вільгаць не трапляла ўнутр прылады.
- захоўванне: When not in use for extended periods, store the projector in a cool, dry, dust-free environment. Use the lens cap to protect the lens.
8. Выпраўленне непаладак
Калі ў вас узніклі праблемы з праектарам, звярніцеся да наступных распаўсюджаных праблем і рашэнняў:
| праблема | Магчымая прычына | Рашэнне |
|---|---|---|
| Няма сілы | Power cable not connected; Power outlet faulty; Projector in standby mode. | Check power cable connection; Try a different outlet; Press power button. |
| Няма выявы | Incorrect input source selected; Input device not connected properly; Lens cap on. | Select correct input source; Reconnect input cable; Remove lens cap. |
| Выява размытая | Focus not adjusted; Projection distance too far/close. | Adjust focus ring; Adjust projection distance. |
| Без гуку | Volume too low; Muted; External speakers not connected/configured. | Increase volume; Unmute; Check external speaker connection. |
| Пульт дыстанцыйнага кіравання не працуе | Батарэйкі разраджаныя/няправільна ўстаўленыя; Перашкода паміж пультам дыстанцыйнага кіравання і праектарам. | Замяніце батарэйкі; Забяспечце прамую бачнасць ІЧ-прыёмніка. |
| Перагрэў праектара | Ventilation blocked; Dusty filters. | Ensure clear ventilation; Clean dust filters. |
9. Тэхнічныя характарыстыкі
| Асаблівасць | Спецыфікацыя |
|---|---|
| Нумар мадэлі | UC68 |
| Яркасць | 1800 люмен (80 ANSI) |
| Роднае дазвол | 800 х 480 RGB |
| Падтрымка дазволу | Up to 1920 x 1080 pixels (1080p) |
| Суадносіны бакоў | 4:3 / 16:9 |
| Каэфіцыент кантраснасці ВК-экрана | 800:1 |
| Святлодыёд Lamp жыццё | Больш за 20,000 гадзіны |
| Аб'ектыў | F=125 |
| Viewing Адлегласць | 1.07 - 3.8 метраў |
| Памер праекцыі | 34 - 130 цалі |
| Кіраванне | Дапаможнік |
| Энергаспажыванне | 55 Вт Макс |
| USB выхад | 5 Vout-500 mA |
| Электразабеспячэнне | 100 V - 240 V / 0.9A (50/60Hz) |
| Парты ўводу/вываду | 1 AV, 1 Headphone (3.5mm), 2 USB 2.0, 1 SD Card Slot, 1 HDMI, 1 VGA |
| Колер | Чорны |
| Вага прадмета | 1.34 кілаграма |
| Памеры ўпакоўкі | 30 х 19.3 х 10.6 см |
10. Гарантыя і падтрымка
This product comes with a standard manufacturer's warranty. For warranty claims, technical support, or service inquiries, please refer to the contact information provided with your purchase documentation or visit the official UNIC website. Do not attempt to repair the device yourself, as this may void your warranty.
Ask a question about this manual
Ask about setup, troubleshooting, compatibility, parts, safety, or missing instructions. Manuals+ will review the question and use this page’s manual context to help answer it.