1. Уводзіны
This manual provides comprehensive instructions for the setup, operation, and maintenance of your Lorex N841A81 Series 8 Channel 4K Ultra HD Network Video Recorder (NVR). This NVR is designed to record and manage video surveillance from compatible cameras, offering advanced features for enhanced security monitoring.
2. Змесціва ўпакоўкі
Пераканайцеся, што ўсе пералічаныя ніжэй прадметы прысутнічаюць у вашай упакоўцы:
- Lorex N841A81 NVR Unit
- Адаптар пераменнага току
- USB мыш
- Кабель Ethernet
- Кабель HDMI
- Quick Start Guide / Instruction Manual (this document)
3. Настройка
3.1 NVR Overview
Familiarize yourself with the front and rear panels of your NVR unit.

Figure 1: Front panel of the Lorex N841A81 NVR, showing the 4K Ultra HD NVR label and a front USB port.
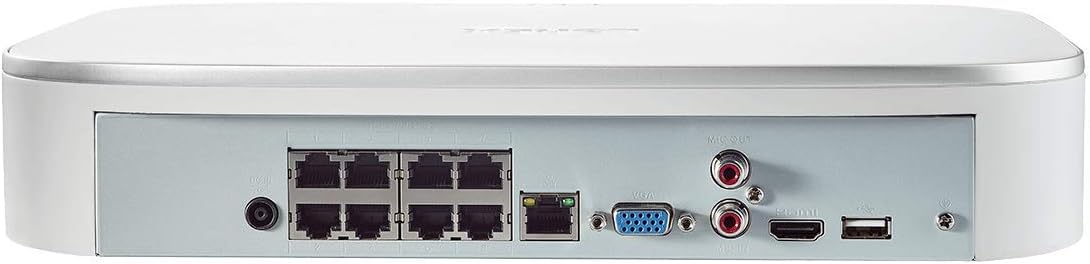
Figure 2: Rear panel of the Lorex N841A81 NVR, displaying multiple PoE ports, HDMI, VGA, USB, LAN, and audio output connections.
3.2 Пачатковае падключэнне
- Падключэнне да дысплея: Connect the NVR to a monitor or TV using the provided HDMI cable. Alternatively, use a VGA cable (not included).
- Падключэнне USB-мышы: Plug the USB mouse into one of the NVR's USB ports (front or rear).
- Падключэнне да сеткі: Connect the NVR to your router using the provided Ethernet cable. This enables remote viewing and network features.
- Падключэнне камер: Connect your compatible IP cameras to the PoE ports on the rear of the NVR. The NVR provides power and data connection through these ports.
- Уключэнне: Connect the AC power adapter to the NVR's power input and then plug it into a power outlet. The NVR will power on automatically.
3.3 Майстар першапачатковай налады
Upon initial power-on, the NVR will guide you through a setup wizard to configure basic settings such as language, time zone, and password creation. Follow the on-screen prompts to complete the setup.
4. Інструкцыя па эксплуатацыі
4.1 Lorex Home Mobile App
The Lorex Home app allows you to remotely view your security system from your smartphone or tablet. It also provides control over active deterrence features and allows you to receive motion-activated push notifications and email alerts.
- Спампаваць прыкладанне: Download the free Lorex Home app from your device's app store.
- Дадаць прыладу: Scan the QR code located on your NVR to add it to your account.
- Дыстанцыйнае ViewING: Пасля дадання вы можаце view live or recorded video streams from your cameras.
- Апавяшчэнні: Configure push notifications and email alerts for motion detection events.
4.2 Разумнае выяўленне руху
The NVR features advanced smart motion detection to reduce false alarms. It can differentiate between motion caused by people or vehicles, sending only the most relevant alerts.
- Канфігурацыя: Access the NVR's menu via a connected display to configure motion detection zones and sensitivity for each camera.
- Абвесткі: Receive push notifications or email alerts when people or vehicles are detected in configured zones.
4.3 Разумны пошук
Use the Smart Search feature to quickly review фуtage by filtering motion events based on area, time/date, and the type of detection (person or vehicle).
- Доступ: Navigate to the playback or search menu on your NVR.
- Фільтр: Apply filters for specific events to efficiently locate relevant recordings.
4.4 Voice Control & Smart Home Compatibility
The NVR is compatible with Amazon Alexa, Google Assistant, Apple TV, and Chromecast, allowing for hands-free control and viewінж.
- Інтэграцыя: Follow the instructions provided by your smart home assistant or streaming device to link your Lorex account.
- Галасавыя каманды: Use simple voice commands to activate camera features or view live/recorded footage on your smart TV.
5. Тэхнічнае абслугоўванне
5.1 Кіраванне жорсткімі дыскамі
The NVR includes a local built-in security-grade 1TB hard drive, expandable up to 10TB. Regular maintenance ensures optimal recording performance.
- Ёмістасць захоўвання: Monitor the remaining storage space through the NVR's system settings.
- Перазапіс: Відэарэгістратар настроены на перазапіс самых старых файлаўtage when the hard drive is full, ensuring continuous recording.
- Рэзервовае капіраванне: Рэгулярна рабіце рэзервовыя копіі важных файлаўtagна знешні USB-назапашвальнік або сеткавае сховішча.
5.2 Агульны догляд
- Трымайце відэарэгістратар у добра вентыляваным памяшканні, каб пазбегнуць перагрэву.
- Clean the exterior of the NVR with a soft, dry cloth. Avoid using harsh chemicals.
- Пераканайцеся, што ўсе кабельныя злучэнні надзейныя.
6. Выпраўленне непаладак
If you encounter issues with your Lorex NVR, consider the following:
- Няма відэадысплея: Check HDMI/VGA cable connections and ensure the display is set to the correct input source.
- Няма падключэння да сеткі: Verify the Ethernet cable is securely connected to both the NVR and your router. Check your router's internet connection.
- No Camera Footage: Ensure cameras are properly connected to the PoE ports and powered on. Check camera compatibility with the NVR.
- Праблемы з выяўленнем руху: Review motion detection zone settings and sensitivity levels in the NVR menu or Lorex Home app.
- System Freezing/Unresponsive: Try rebooting the NVR. If the issue persists, consult the Lorex support website for firmware updates or further assistance.
7. Тэхнічныя характарыстыкі
| Асаблівасць | Спецыфікацыя |
|---|---|
| Нумар мадэлі | N841A81 |
| Дазвол відэа | Up to 4K (8MP) Ultra HD |
| Каналы | 8 IP Channels with built-in PoE ports |
| Памер жорсткага дыска | 1 TB (Preinstalled) |
| Ёмістасць памяці (макс.) | 10 ТБ |
| Тэхналогія падлучэння | Правадная |
| Сумяшчальныя прылады | Smartphone, Tablet, Television, Smart Home Assistants |
| Памеры ўпакоўкі | 15.7 х 13.1 х 5.5 цалі |
| Вага прадмета | 6.93 фунта |
8. Гарантыя і падтрымка
For warranty information, technical support, or to access the latest firmware and documentation, please visit the official Lorex website or contact Lorex customer service. Keep your product's model number and serial number handy when seeking support.