1. Уводзіны
This manual provides detailed instructions for the installation, operation, and maintenance of your Anlapus 1080p HD-TVI Surveillance Camera. Please read this manual thoroughly before using the product to ensure proper function and safety.
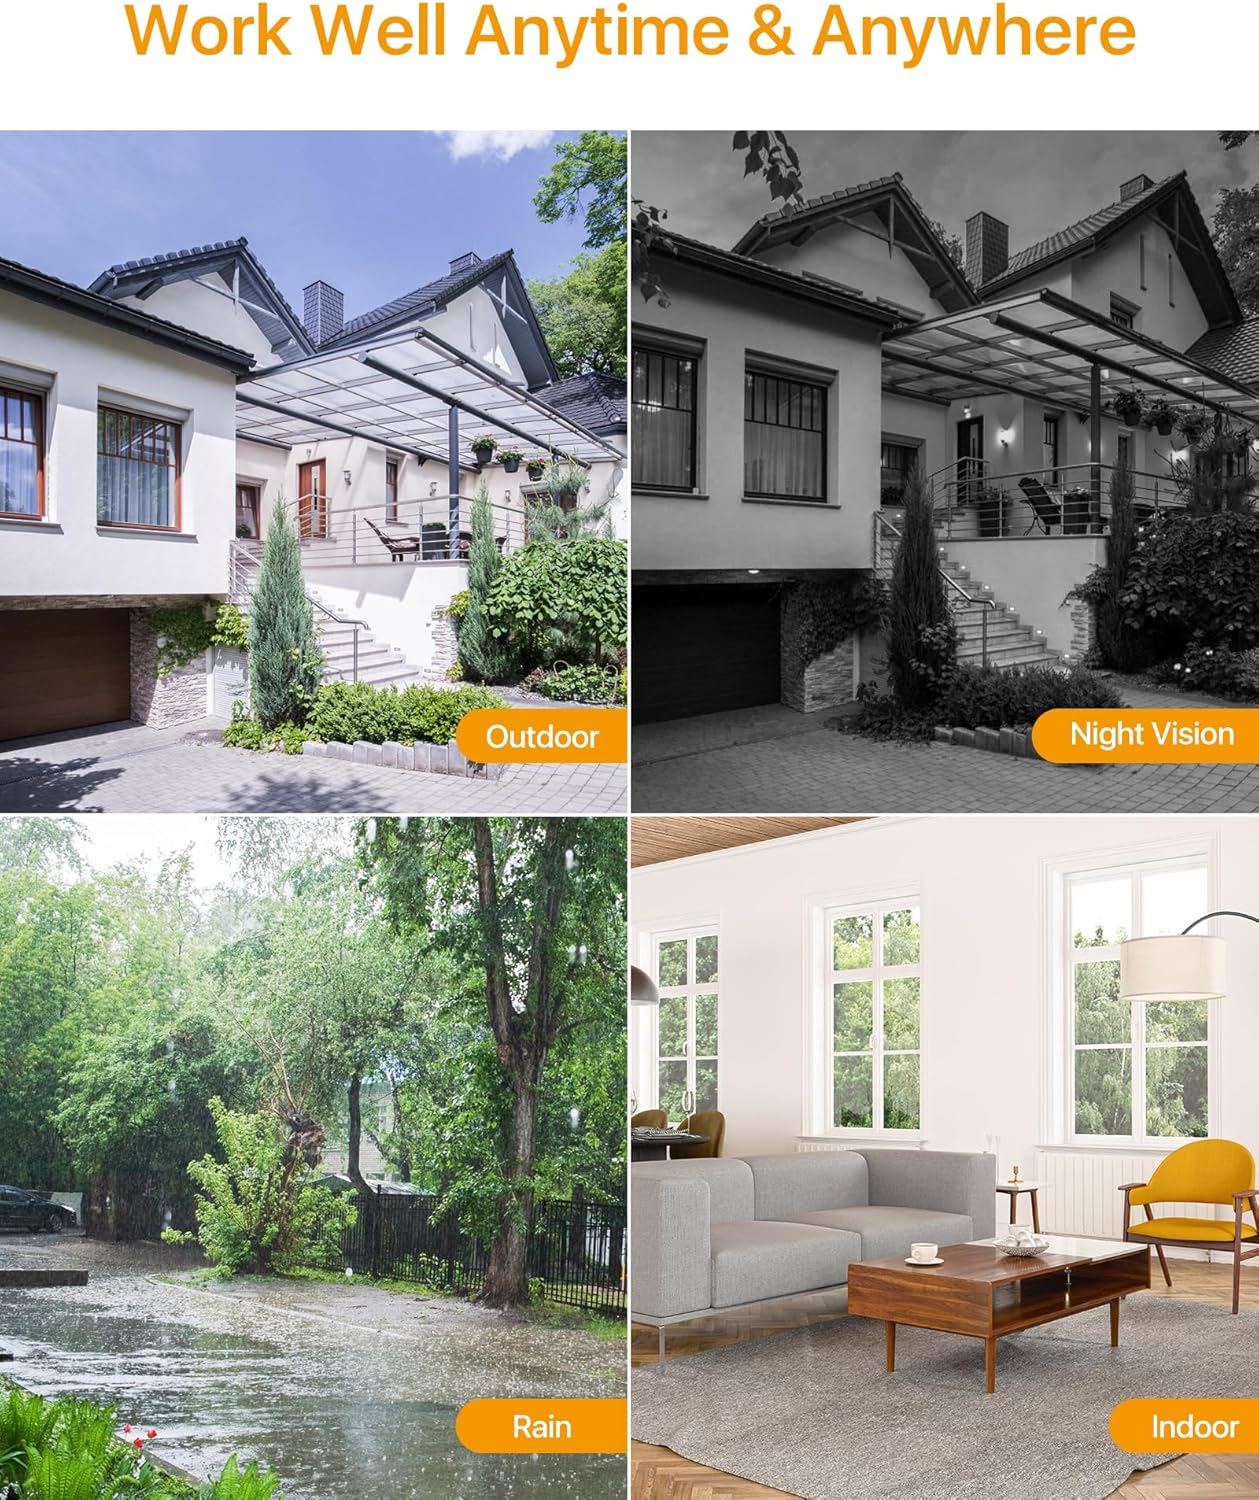
The Anlapus HD-TVI camera is designed for both indoor and outdoor surveillance, offering high-definition video quality and robust performance in various environmental conditions.
2. Змесціва ўпакоўкі
Праверце, ці ўсе пералічаныя ніжэй прадметы ўваходзяць у камплект. Калі якія-небудзь прадметы адсутнічаюць або пашкоджаныя, звярніцеся ў службу падтрымкі кліентаў.
- 4 x Anlapus 1080p HD-TVI Cameras
- 4 x BNC Video Cables
- 1 х блок харчавання
- 1 x 1-to-4 Power Splitter Cable
- 4 х папераджальныя налепкі
- 4 x Mounting Screw Bags (including screws and wall plugs)
- 4 x Mounting Hole Templates
- 1 х Кароткае кіраўніцтва
3. Асаблівасці прадукту
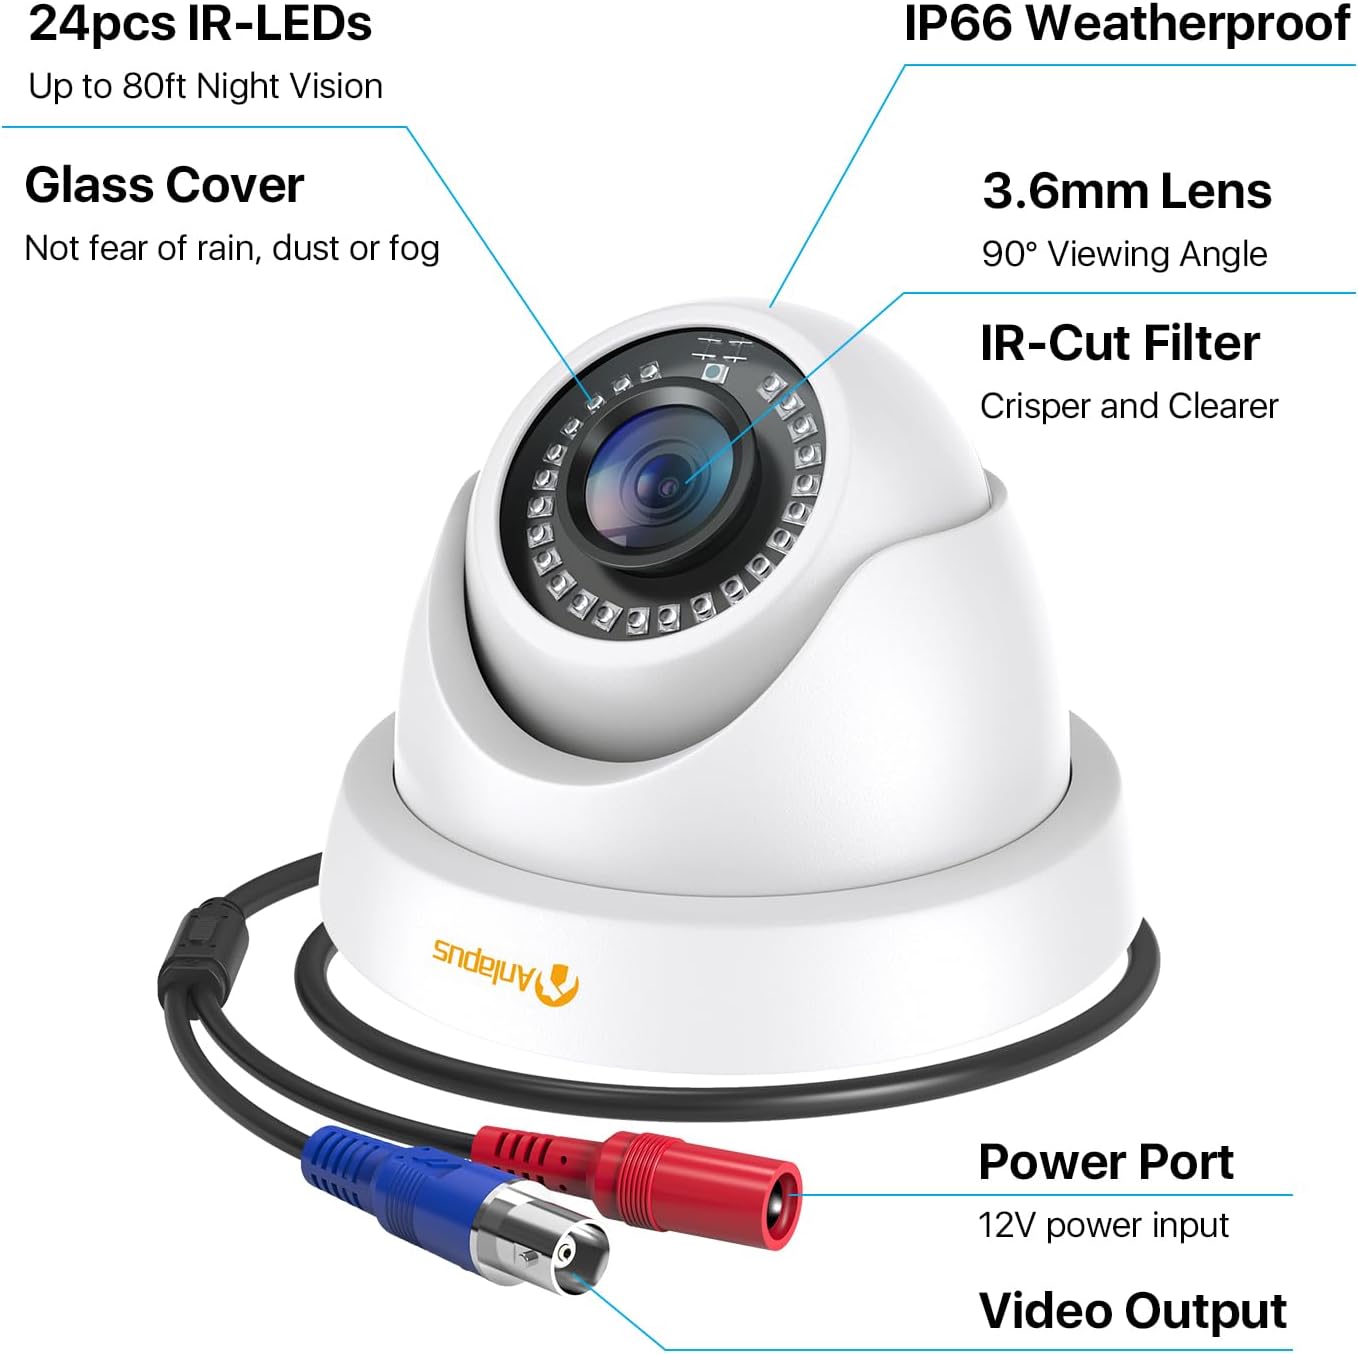
- Раздзяленне HD 1080p: Забяспечвае выразнае і падрабязнае відэа footage (1920x1080 pixels).
- Шырокі Viewкут нахілу: Equipped with a 3.6mm lens, offering a 90-degree field of view.
- HD-TVI Compatibility: Designed to work with HD-TVI DVRs. Ensure your DVR supports HD-TVI technology.
- Пашыранае начное бачанне: Features 24 IR-Cut LEDs for up to 24 meters (80 feet) of clear black and white night vision.
- Клас абароны ад надвор'я IP66: Robust metal housing ensures protection against dust and water, suitable for both indoor and outdoor use in various weather conditions.
- Гнуткі мантаж: Features a 3-axis adjustable bracket for ceiling or wall mounting, allowing 360-degree horizontal and 180-degree vertical adjustment.


4. Настройка і ўстаноўка
4.1 Кантрольны спіс перад устаноўкай
- Ensure your DVR is compatible with HD-TVI cameras.
- Plan the camera placement to cover desired surveillance areas.
- Ensure power outlets are accessible for the camera power supply.
- Gather necessary tools: drill, screwdriver, ladder (if mounting high).
4.2 Мантаж камеры
- Select a suitable mounting location (wall or ceiling) that provides the desired viewing angle and is within reach of the BNC cable and power supply.
- Use the provided mounting hole template to mark the drill points on the surface.
- Прасвідруйце накіравальныя адтуліны ў адзначаных месцах.
- Insert the wall plugs into the drilled holes (if mounting on masonry or drywall).
- Secure the camera base to the surface using the provided screws.
- Adjust the camera angle using the 3-axis bracket. The bracket allows for 360-degree horizontal rotation and 180-degree vertical tilt. Tighten the adjustment screws once the desired angle is achieved.
4.3 Падключэнне камеры
Глядзіце схему падключэння ніжэй для правільнага падключэння.
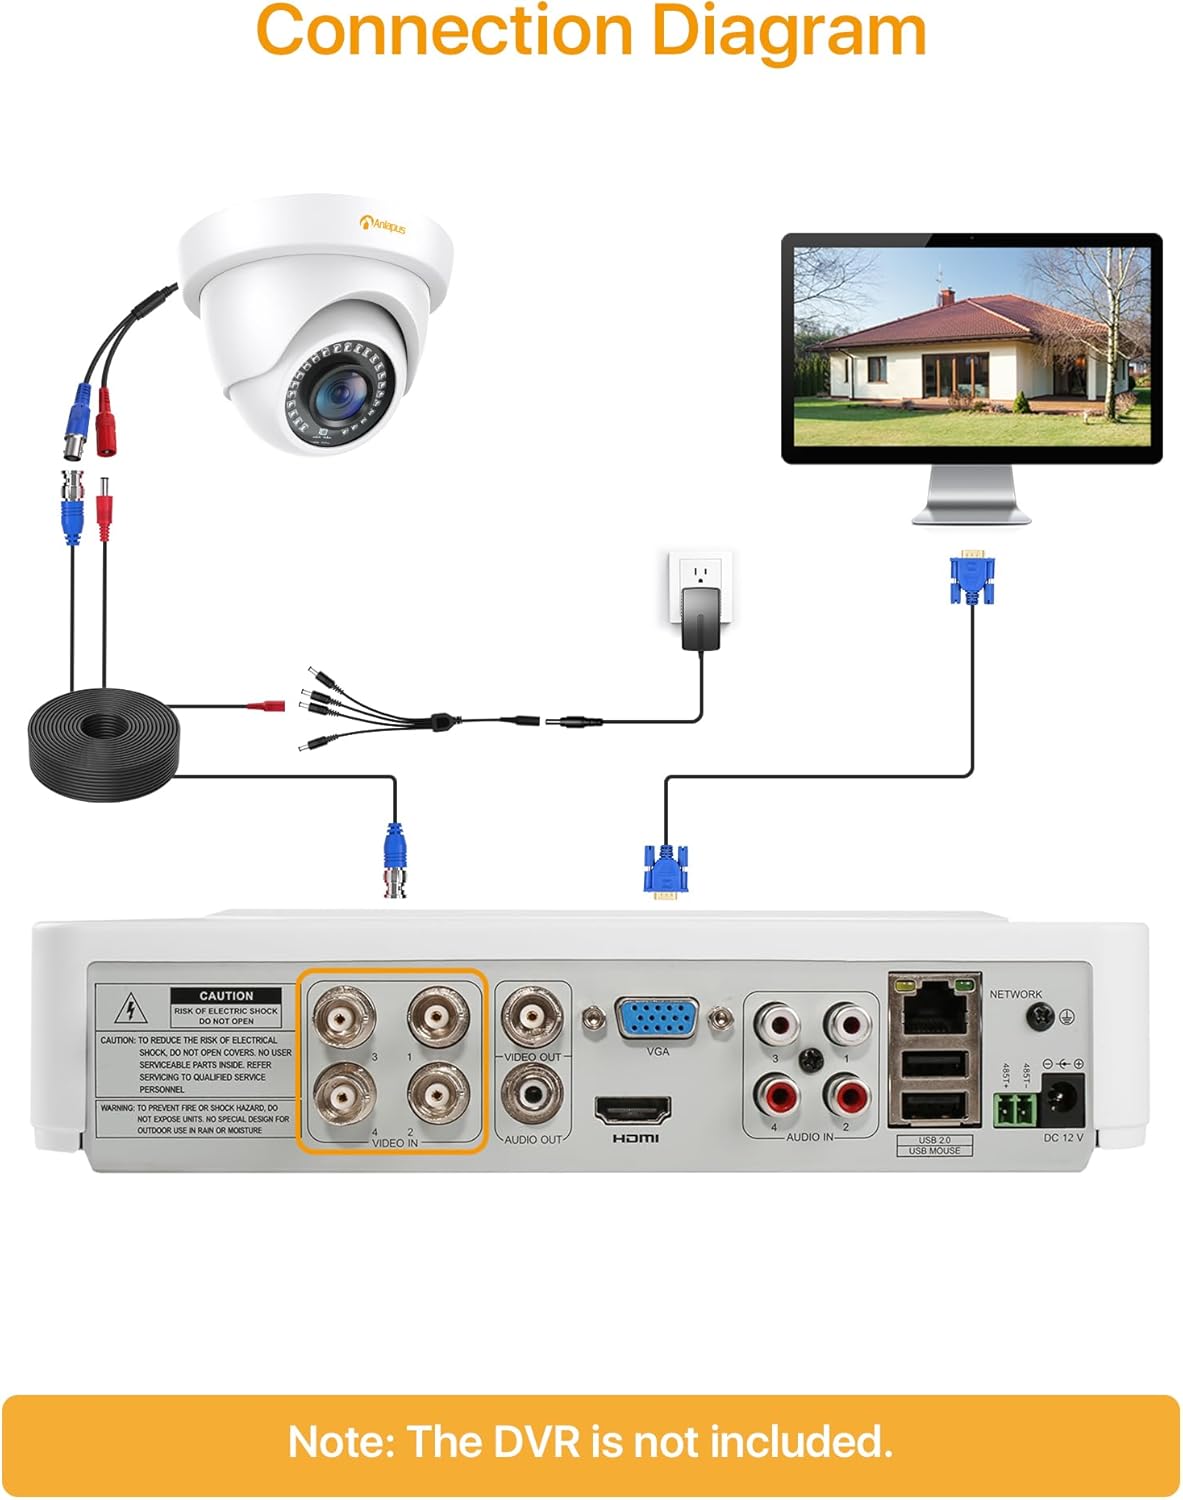
- Connect one end of the BNC video cable to the video output port of the camera.
- Connect the other end of the BNC video cable to a "VIDEO IN" port on your HD-TVI DVR.
- Connect the camera's power input to one of the outputs on the 1-to-4 power splitter cable.
- Connect the power supply to the 1-to-4 power splitter cable.
- Падключыце блок харчавання да звычайнай электрычнай разеткі.
- Repeat these steps for all cameras.
Важна: Перад уключэннем сістэмы пераканайцеся, што ўсе злучэнні надзейныя.
5. Інструкцыя па эксплуатацыі
Once the cameras are properly installed and connected to your HD-TVI DVR, refer to your DVR's instruction manual for specific operating procedures, including:
- ViewING жыць Footagе ад камер.
- Recording and playback of video.
- Configuring motion detection and alerts.
- Accessing the system remotely via mobile app or web інтэрфейс.
- Adjusting camera settings (if supported by your DVR).
The Anlapus camera provides a continuous video feed to the DVR. Its night vision capabilities activate automatically in low-light conditions.
6. Тэхнічнае абслугоўванне
- Уборка: Перыядычна чысціце аб'ектыў і корпус камеры мяккай губкайamp тканінай. Пазбягайце абразіўных ачышчальнікаў або растваральнікаў.
- Праверка кабеля: Regularly check all cables for signs of wear, damage, or loose connections.
- Абнаўленні прашыўкі: While the camera itself does not typically require firmware updates, ensure your DVR's firmware is up-to-date for optimal performance and compatibility.
- Ахова навакольнага асяроддзя: Although the camera is IP66 weatherproof, extreme weather conditions (e.g., heavy snow, ice) may temporarily affect performance. Ensure the camera is securely mounted to withstand strong winds.
7. Выпраўленне непаладак
| праблема | Магчымая прычына | Рашэнне |
|---|---|---|
| No image on DVR screen |
|
|
| Дрэнная якасць выявы / размытае відэа |
|
|
| Начное бачанне не працуе |
|
|
If you encounter issues not covered here, please contact Anlapus customer support.
8. Тэхнічныя характарыстыкі
| Нумар мадэлі | AJ-A4K-202T4-WPES |
| Дазвол відэа | 1080p (1920 x 1080 пікселяў) |
| Аб'ектыў | 3.6 мм |
| Viewing кут | 90 градусаў |
| Дыяпазон начнога бачання | Да 24 метраў (80 футаў) |
| ВК-святлодыёды | 24 pcs IR-Cut LEDs |
| Ацэнка ўстойлівасці да надвор'я | IP66 |
| Матэрыял | Метал |
| Тэхналогія падлучэння | Правадны (BNC) |
| Увод магутнасці | 12 вольт |
| Энергаспажыванне | 12 ват |
| Памеры (Д х Ш х У) | 42.9 х 27 х 8.71 см |
| Вага | 2.61 kilograms (for the package) |
| Рэкамендуемае выкарыстанне | Назіранне |
| Сумяшчальныя прылады | Лічбавы відэамагнітафон (DVR) |
9. Гарантыя і падтрымка
Anlapus products are designed for reliability and performance. For warranty information and technical support, please refer to the warranty card included in your package or visit the official Anlapus webсайт.
If you require assistance with installation, troubleshooting, or have any questions regarding your Anlapus surveillance camera, please contact our customer support team. Contact details can typically be found on the Anlapus brand store page or in the quick start guide.