1. Уводзіны
Дзякуй за пакупкуasing the Gravity Audio G12BD1 12-inch 1000W Powered Subwoofer Enclosure. This manual provides essential information for the proper installation, operation, and maintenance of your new subwoofer. To ensure optimal performance and safety, please read this manual thoroughly before attempting to install or use the product. Keep this manual for future reference.
2. Інфармацыя па бяспецы
Выконвайце наступныя меры бяспекі, каб пазбегнуць траўмаў або пашкоджання прадукту і транспартнага сродку:
- Электрабяспека: Always disconnect the vehicle's negative battery terminal before beginning any electrical work. Ensure all wiring is correctly routed and secured to prevent pinching or damage. Use appropriate gauge wiring for power and ground connections.
- Асяроддзе ўстаноўкі: Install the subwoofer in a dry, well-ventilated area, away from direct sunlight, heat sources, and moisture. Ensure the enclosure is securely mounted to prevent movement during vehicle operation.
- Абарона слыху: Prolonged exposure to high sound pressure levels can cause permanent hearing damage. Operate the subwoofer at comfortable listening levels.
- Прафесійная ўстаноўка: If you are unsure about any aspect of the installation, it is recommended to seek assistance from a qualified professional car audio installer.
3. Змесціва ўпакоўкі
Праверце наяўнасць усіх прадметаў у камплекце:
- 1 x Gravity Audio G12BD1 Powered Subwoofer Enclosure
4. Настройка і ўстаноўка
Proper installation is crucial for the performance and longevity of your subwoofer. The G12BD1 is designed for universal fit in vehicles, typically in the trunk or a large cargo area.
4.1. Меркаванні па размяшчэнні
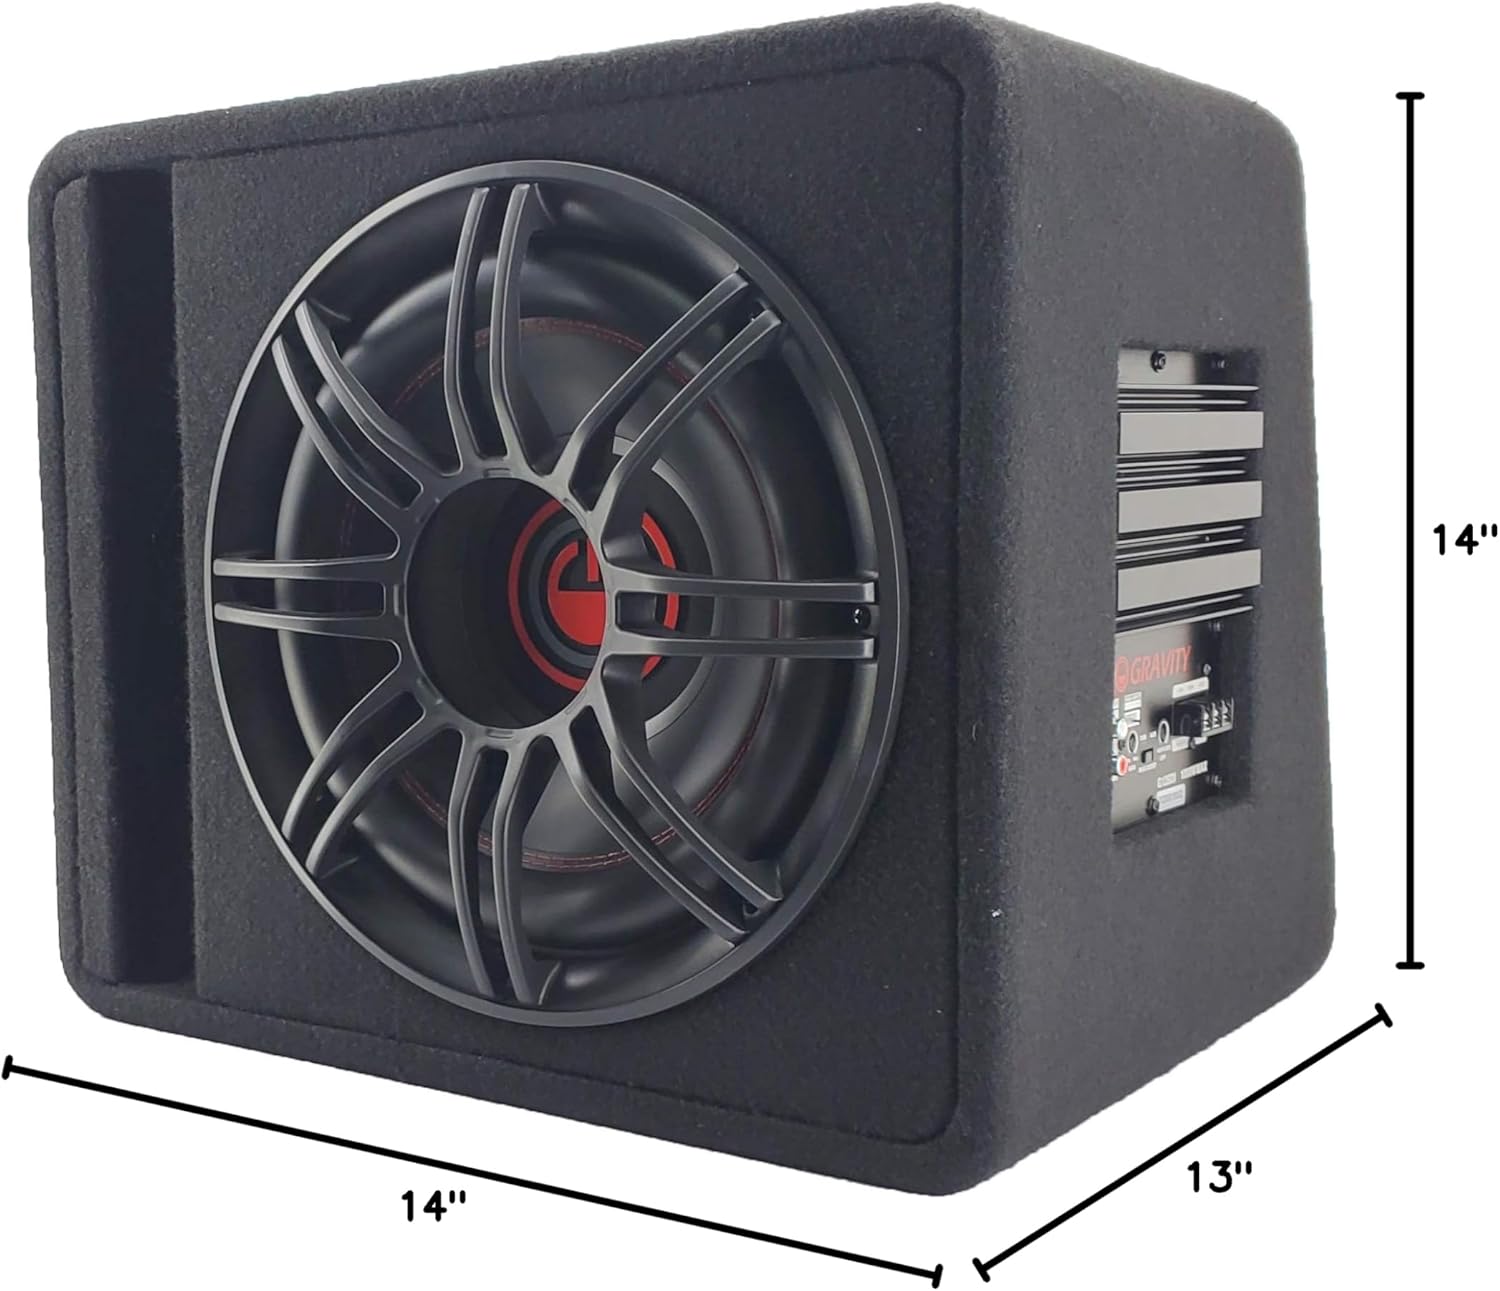
Consider the available space in your vehicle. The dimensions of the enclosure are approximately 13"D x 14"W x 14"H. Ensure there is adequate clearance for air circulation around the ampраздзел абцяжарвальніка.
4.2. Падключэнне правадоў
The G12BD1 features an integrated amplifier, simplifying the wiring process. You will need to connect power, ground, a remote turn-on signal, and an audio input signal.

- Падключэнне сілкавання (+12 В): Connect a heavy-gauge power cable (e.g., 8-gauge or 4-gauge, depending on total system power) directly from the vehicle's positive battery terminal to the +12V terminal on the subwoofer's amplifier. Install an in-line fuse holder (with an appropriately rated fuse) within 18 inches of the battery.
- Зазямленне (GND): Падключыце тоўсты кабель зазямлення да клеммы GND на ampПрымацуйце запальвальнік да чыстай неафарбаванай металічнай паверхні шасі аўтамабіля. Забяспечце трывалае злучэнне з нізкім супраціўленнем.
- Дыстанцыйнае ўключэнне (REM): Connect a remote turn-on wire from your head unit's remote output (typically a blue/white wire) to the REM terminal on the amplifier. This signal turns the ampуключэнне і выключэнне ліхтарыка з дапамогай галаўной прылады.
- Аўдыё ўваход:
- RCA Low-Level Input: If your head unit has RCA pre-outs, connect RCA cables from the head unit's subwoofer or rear pre-outs to the RCA input jacks on the G12BD1 ampзадымнік.
- High-Level Speaker Input: If your head unit does not have RCA pre-outs, use the high-level speaker inputs. Connect the speaker wires from your head unit's rear speaker outputs to the high-level input terminals on the ampзадымнік.
After all connections are made, double-check them for polarity and security before reconnecting the vehicle's negative battery terminal.

5. Інструкцыя па эксплуатацыі
Once installed, you can adjust the subwoofer's settings for optimal sound performance.
5.1. Control Panel Adjustments
Refer to Figure 2 for the location of these controls:
- УЗБЕГАЦЬ: This control matches the output level of your head unit to the input sensitivity of the subwoofer amplifier. Start with the gain set to minimum. Gradually increase it until you hear distortion, then back it off slightly. Do not use the gain control as a volume knob.
- УЗмацненне баса: This control allows you to increase the bass output at a specific frequency. Use sparingly to avoid distortion and potential damage to the subwoofer.
- ФНЧ (фільтр нізкіх частот): This control sets the upper frequency limit for the subwoofer. Frequencies above this setting will be filtered out. A common starting point is between 80Hz and 120Hz. Adjust to blend smoothly with your main speakers.
5.2. Пачатковае ўключэнне
After all connections are secure and settings are initially adjusted:
- Turn on your vehicle's ignition and head unit.
- The power indicator on the subwoofer ampЗапальнік павінен загарэцца.
- Play some music with a good bass range.
- Carefully adjust the GAIN, BASS BOOST, and LPF controls to achieve balanced and clear bass output without distortion.
6. Тэхнічнае абслугоўванне
Regular maintenance ensures the longevity and performance of your subwoofer.
- Уборка: Use a soft, dry cloth to wipe down the enclosure and ampвыратавальнік. Пазбягайце выкарыстання агрэсіўных хімікатаў або абразіўных ачышчальнікаў.
- агляд: Periodically check all wiring connections for tightness and signs of wear or corrosion. Ensure the enclosure remains securely mounted.
- Вентыляцыя: Забяспечце amplifier's heat sink is not obstructed to allow for proper cooling.
7. Выпраўленне непаладак
If you experience issues with your G12BD1 subwoofer, consult the following table before contacting support.
| праблема | Магчымая прычына | Рашэнне |
|---|---|---|
| Няма сілы / AmpLifier не ўключаецца |
|
|
| Няма гуку з сабвуфера |
|
|
| Скажоны гук |
|
|
| Шум або гул |
|
|
8. Тэхнічныя характарыстыкі
| Асаблівасць | Спецыфікацыя |
|---|---|
| Назва мадэлі | Powered Car Subwoofer |
| Тып дынаміка | Сабвуфер, НЧ-дынамік |
| Дыяметр сабвуфера | 12 цалі |
| Імпеданс | 4 Ом |
| Максімальная выхадная магутнасць дынаміка | 1000 ват |
| Памеры прадукту (Д х Ш х У) | 13" Г x 14" Ш x 14" У |
| Вага прадмета | 37 фунта |
| Тэхналогія падлучэння | Правадная |
| Тып гарантыі | 1 год |
9. Гарантыя і падтрымка
The Gravity Audio G12BD1 comes with a 1-year warranty. For warranty claims or technical support, please contact the retailer where the product was purchased or the manufacturer directly. Keep your proof of purchase for warranty validation.