Уводзіны
This manual provides detailed instructions for the ZEXMTE 6-in-1 USB C Hub with M.2 SATA SSD Enclosure. This versatile docking station expands the connectivity of your USB-C enabled devices, offering multiple ports for data transfer, video output, network connection, power delivery, and integrated M.2 SATA SSD storage.
Асаблівасці прадукту
The ZEXMTE 6-in-1 USB C Hub integrates the following functionalities:
- M.2 SATA NGFF SSD Enclosure: Supports B-Key and B+M Key SATA-based M.2 SSDs (2230, 2242, 2260, 2280 sizes) with USB 3.1 Gen 1 (5Gbps) speeds.
- Выхад HDMI: Supports up to 4K resolution at 30Hz for external displays.
- USB-C Power Delivery (PD): Up to 100W for charging your host device.
- 3 парты USB 3.0: SuperSpeed 5Gbps data transfer for peripherals like thumb drives, keyboards, mice, and external hard drives.
- Гігабітны Ethernet: Provides stable and fast 10/100/1000Mbps wired network connection.

Малюнак 1: Закончанаview of the ZEXMTE 6-in-1 USB C Hub, highlighting its HDMI, USB 3.0, USB-C PD, Ethernet, and M.2 SSD Enclosure features.
Тэхнічныя характарыстыкі
| Асаблівасць | Спецыфікацыя |
|---|---|
| Памеры прадукту | 5.91 х 3.15 х 0.39 цалі |
| Вага прадмета | 3.98 унцыі |
| Абсталяванне інтэрфейсу | Ethernet, HDMI, USB, USB Type C |
| Усяго партоў USB | 6 (3 x USB 3.0, 1 x USB-C PD, 1 x USB-C Host, 1 x M.2 SATA) |
| Дазвол HDMI | Да 4K @ 30 Гц |
| Хуткасць перадачы дадзеных праз USB 3.0 | Да 5 Гбіт/с |
| Хуткасць Ethernet | 10/100/1000 Мбіт/с |
| Уваход USB-C PD | Да 100 Вт |
| M.2 SSD Compatibility | SATA-based NGFF M.2 SSD (B-Key / B+M Key) only. Sizes: 2230, 2242, 2260, 2280. |
Кіраўніцтва па ўстаноўцы
1. M.2 SATA SSD Installation
The hub features an integrated M.2 SATA SSD enclosure. Follow these steps to install your compatible M.2 SATA SSD:
- Check SSD Compatibility: Ensure your M.2 SSD is SATA-based (B-Key or B+M Key). NVMe (M-Key) SSDs are не supported. Refer to Figure 2 for visual guidance.
- Адкрыйце корпус: Gently press the back cover of the hub and slide it back to open the M.2 enclosure.
- Устаўце SSD: Align the M.2 SATA SSD with the slot inside the enclosure and insert it firmly.
- Бяспечны SSD-дыск: Align the circular notch on the SSD with the fastener and press the fastener down to secure the SSD in place.
- Зачыніць корпус: Align the three slots on the cover with the hub and press down to close the enclosure securely.

Figure 2: M.2 SSD compatibility. Only SATA-based (B-Key or B+M Key) M.2 SSDs are supported. NVMe (M-Key) SSDs are not compatible.
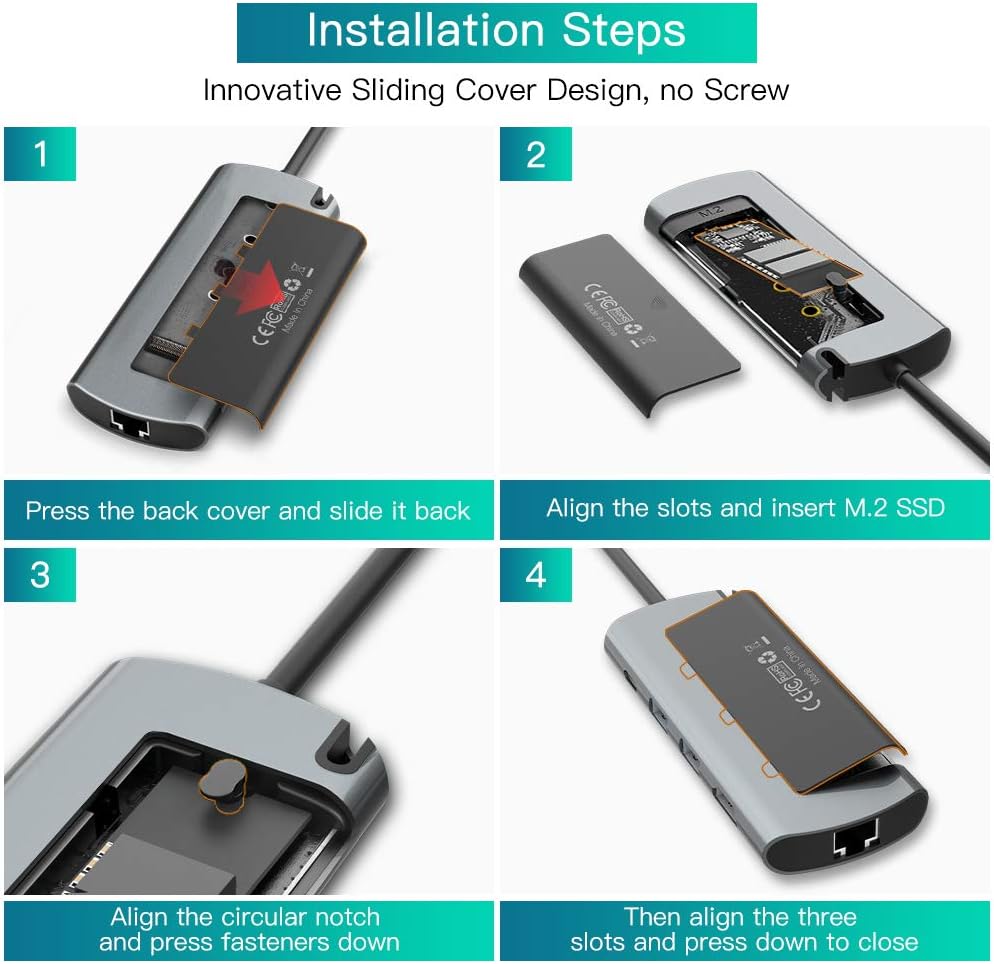
Figure 3: Step-by-step guide for installing an M.2 SATA SSD into the enclosure. Ensure proper alignment and secure fastening.
2. Connecting the Hub to Your Device
Connect the integrated USB-C cable of the ZEXMTE hub to a USB-C port on your host device (e.g., laptop, tablet, smartphone). The hub is plug-and-play and typically requires no additional drivers.
Інструкцыя па эксплуатацыі
1. Using USB 3.0 Ports
The hub provides three USB 3.0 ports for connecting various USB peripherals. These ports support data transfer speeds up to 5Gbps.
- Connect USB devices such as external hard drives, USB flash drives, keyboards, mice, or printers to any of the three USB 3.0 ports.
- Ensure your device drivers are up-to-date for optimal performance.

Figure 4: Illustration of USB 3.0 ports supporting SuperSpeed data transfer for various peripherals.
2. Відэавыхад HDMI
Connect an HDMI cable from the hub's HDMI port to an external display (monitor, TV, projector) to extend or mirror your device's screen.
- Supports resolutions up to 4K (3840x2160) at 30Hz.
- Пераканайцеся, што порт USB-C вашай прылады падтрымлівае альтэрнатыўны рэжым DisplayPort (альтэрнатыўны рэжым) для вываду відэа.
- Adjust display settings on your host device as needed (e.g., extend, duplicate, resolution).
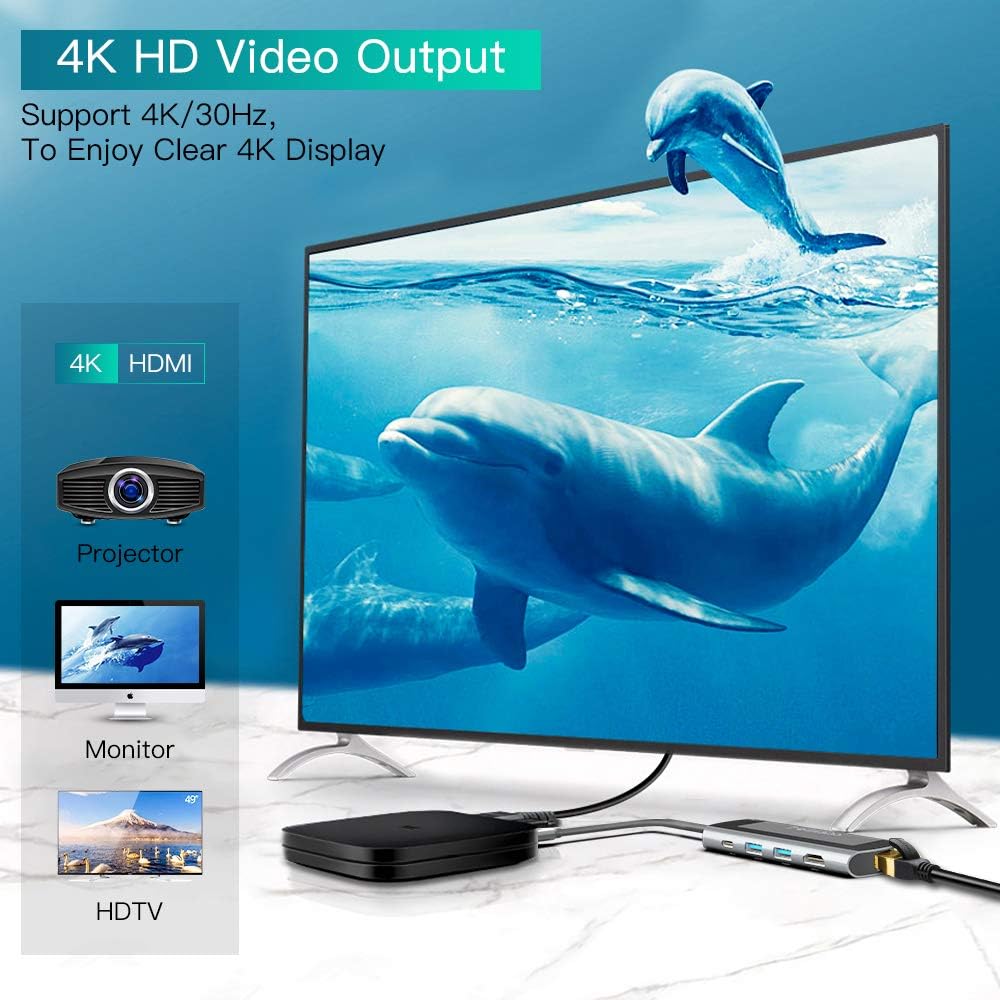
Figure 5: Connecting the hub to a 4K display via HDMI for clear video output.
3. Gigabit Ethernet Connection
For a stable and high-speed internet connection, use the Gigabit Ethernet port.
- Connect an Ethernet cable from your router or modem to the hub's RJ45 port.
- The hub supports 10/100/1000Mbps network speeds.
- Your host device should automatically detect the wired connection.

Figure 6: The Gigabit Ethernet port provides a fast and stable wired network connection.
4. USB-C Power Delivery (PD)
The USB-C PD port allows you to charge your host device while using the hub.
- Connect your original USB-C power adapter to the hub's USB-C PD port.
- The hub supports up to 100W power input, delivering power to your host device and connected peripherals.
Ліквідацыю непаладак
- Няма вываду дысплея праз HDMI:
- Пераканайцеся, што порт USB-C вашай прылады падтрымлівае альтэрнатыўны рэжым DisplayPort.
- Паспрабуйце іншы кабель HDMI або манітор.
- Check display settings on your host device.
- Ensure the hub is receiving sufficient power, especially if multiple devices are connected.
- M.2 SSD Not Recognized or Disconnecting:
- Verify that your M.2 SSD is SATA-based (B-Key or B+M Key), not NVMe (M-Key).
- Ensure the SSD is correctly installed and secured within the enclosure (refer to Setup Guide).
- Check if the SSD is properly formatted for your operating system.
- Ensure the hub is connected directly to your host device's USB-C port.
- If using a high-power SSD, ensure the hub is connected to a power source via the PD port.
- USB-прылады не працуюць:
- Try connecting the USB device directly to your host device to confirm it's functional.
- Пераканайцеся, што хаб надзейна падключаны да вашай галоўнай прылады.
- If multiple high-power USB devices are connected, ensure the hub is receiving power via the PD port.
- Перагрэў:
- It is normal for the hub to generate some heat during operation, especially when the M.2 SSD is actively reading/writing large files or when multiple ports are in use.
- If the hub becomes excessively hot, disconnect it and allow it to cool down. Reduce the number of connected high-power devices or ensure adequate ventilation.
- Праблемы з падключэннем да Ethernet:
- Check the Ethernet cable connection to both the hub and your router/modem.
- Verify that your network settings on the host device are configured correctly.
- Паспрабуйце іншы кабель Ethernet.
Тэхнічнае абслугоўванне
- Падтрымлівайце чысціню ступіцы, праціраючы яе мяккай сухой тканінай.
- Пазбягайце ўздзеяння экстрэмальных тэмператур, вільготнасці або прамых сонечных прамянёў на канцэнтратар.
- Do not attempt to disassemble or repair the hub yourself, as this will void the warranty.
- Store the hub in a safe place when not in use to prevent damage.
Гарантыя і падтрымка
ZEXMTE products are designed for reliability and performance. For warranty information or technical support, please refer to the product packaging or contact ZEXMTE customer service through their official channels. Keep your purchase receipt for warranty claims.