Sorand AC 230V Floor Heating Thermostat
Sorand AC 230V Digital Programmable Floor Heating Thermostat User Manual
Model: AC 230V Floor Heating Thermostat
Уводзіны
This manual provides comprehensive instructions for the installation, operation, and maintenance of your Sorand AC 230V Digital Programmable Floor Heating Thermostat. Please read this manual carefully before installation and use to ensure proper function and safety.
The thermostat is designed for electronic floor heating systems and other electrical heating elements. It features a large LCD with backlight, programmable temperature settings, and internal/external temperature sensing capabilities.
Інфармацыя па бяспецы
- Мантаж павінен выконвацца кваліфікаваным электрыкам.
- Перад устаноўкай або абслугоўваннем пераканайцеся, што электрычнасць адключана.
- Не падвяргайце тэрмастат уздзеянню вады або празмернай вільготнасці.
- Дзейнічаць у межах названага абtagе і ліміты току.
Змест пакета
Праверце наяўнасць усіх прадметаў у камплекце:
- 1 x Sorand AC 230V Digital Programmable Floor Heating Thermostat
- 1 x External Temperature Sensor Cable (approx. 3 meters)
- 2 х крапежных шруб
- 1 х Кіраўніцтва карыстальніка (гэты дакумент)

Image: Contents of the Sorand thermostat package, showing the main unit, external sensor cable, mounting screws, and the instruction manual.
Настройка і ўстаноўка
Важна: Installation should only be carried out by a qualified electrician. Ensure the main power supply is turned off before commencing any wiring work.
Электрасхема
Refer to the wiring diagram on the back of the thermostat unit for correct connections. The terminals are typically labeled as follows:
- L1, N1: Power input (AC 230V)
- LOAD (1, 2): Connection to the heating element
- NTC (5, 6): Connection for the external floor temperature sensor

Выява: Задняя частка view of the Sorand thermostat, displaying the wiring terminals and a simplified diagram for electrical connections.
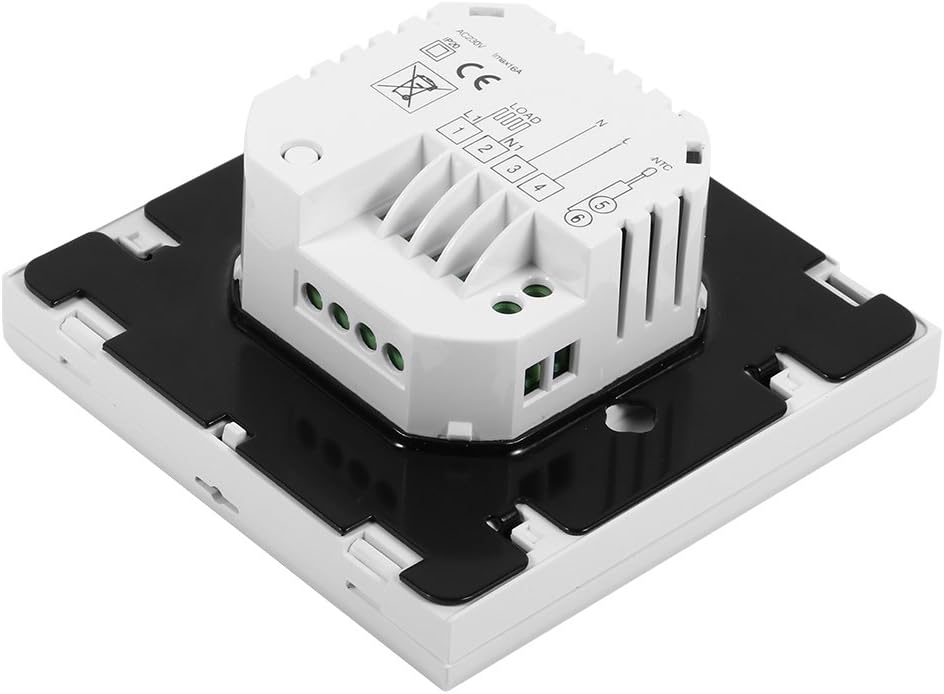
Выява: Збоку view of the Sorand thermostat, illustrating the internal components and ports for wiring connections.
Мантаж
- Prepare a standard electrical wall box (86x86mm recommended).
- Connect the power supply, heating load, and external sensor wires according to the wiring diagram.
- Carefully push the wired thermostat into the wall box.
- Замацуйце тэрмастат да насценнай скрынкі з дапамогай прадугледжаных шруб.
- Прымацуеце пярэднюю панэль тэрмастата.
Інструкцыя па эксплуатацыі
The thermostat features a large LCD and touch-sensitive buttons for easy operation.
Функцыі кнопак
- ⏻ (Магутнасць): Уключае/выключае тэрмастат.
- ↻ (Mode/Cycle): Пераключаецца паміж ручным рэжымам і праграмуемым рэжымам.
- ⏱ (Clock/Time): Sets the time and enters programming mode.
- ▲ (Up Arrow): Increases temperature setting or adjusts values.
- ▼ (Down Arrow): Decreases temperature setting or adjusts values.

Выява: спераду view of the Sorand thermostat, highlighting the LCD screen and the five touch-sensitive control buttons below it.
Ўстаноўка часу і дня
- Націсніце і ўтрымлівайце ⏱ кнопку на працягу 3 секунд, каб увайсці ў рэжым налады часу.
- Выкарыстоўвайце ▲ і ▼ кнопкі, каб наладзіць гадзіну, затым націсніце ⏱ to confirm and move to minutes, then day of the week.
- Прэса ⏱ again to exit, or wait for 10 seconds for automatic exit.
Праца ў ручным рэжыме
In manual mode, the thermostat maintains a constant temperature set by the user.
- Націсніце ↻ button to switch to manual mode (indicated by a hand icon or similar on the display).
- Выкарыстоўвайце ▲ і ▼ кнопкі для ўстаноўкі жаданай тэмпературы.
- The thermostat will now maintain this temperature.
Programmable Mode Operation (6 Periods)
The thermostat allows for 6 programmable periods per day, enabling different temperature settings at different times.
- Націсніце ↻ button to switch to programmable mode (indicated by a clock icon or similar).
- Націсніце і ўтрымлівайце ⏱ кнопку на працягу 3 секунд, каб увайсці ў рэжым праграмавання.
- The display will show the first period (e.g., "Period 1"). Use ▲ і ▼ to set the start time and desired temperature for this period.
- Прэса ⏱ to move to the next period and repeat the process for all 6 periods.
- After setting all periods, press ⏱ again or wait for automatic exit to save settings.
The thermostat will automatically follow the programmed schedule.
Sensor Selection (Internal/External)
The thermostat can use its internal sensor or the external floor sensor. The selection method is typically found in advanced settings or by a specific button combination. Refer to the on-screen indicators for the active sensor.
Тэхнічнае абслугоўванне
- Ачысціце дысплей тэрмастата іasinПрацярыце мяккай сухой тканінай. Не выкарыстоўвайце абразіўныя ачышчальнікі або растваральнікі.
- Для падтрымання аптымальнай прадукцыйнасці пераканайцеся, што тэрмастат чысты ад пылу і смецця.
- No user-serviceable parts inside. Do not attempt to open or repair the unit.
Ліквідацыю непаладак
| праблема | Магчымая прычына | Рашэнне |
|---|---|---|
| Тэрмастат не ўключаецца. | Няма электразабеспячэння; няправільная праводка. | Check circuit breaker. Verify wiring connections (consult a qualified electrician). |
| Ацяпленне не ўключаецца/не выключаецца. | Incorrect temperature setting; thermostat in OFF mode; wiring issue. | Adjust set temperature. Ensure thermostat is ON. Check heating element wiring. |
| Няправільныя паказчыкі тэмпературы. | Sensor malfunction; incorrect sensor selected. | Verify sensor connection. Check if internal or external sensor is active. |
| Дысплей пусты або мігціць. | Ваганні магутнасці; унутраная няспраўнасць. | Reset power to the thermostat. If issue persists, contact support. |
Тэхнічныя характарыстыкі
| Асаблівасць | Дэталь |
|---|---|
| Марка | Sorand |
| мадэль | AC 230V Floor Heating Thermostat |
| Рабочы выпtage | Пераменны ток 230 В, 50/60 Гц |
| Ток нагрузкі | 12/16A (Electric Heating) |
| Дакладнасць | ±0.5 ℃ |
| Set-point Temperature Range | 5℃ - 35℃ |
| Limit Temperature Range | 5℃ - 99℃ |
| Энергаспажыванне | <0.3 Вт |
| Датчык тэмпературы | NTC (Internal and External) |
| Surface Size | Прыблізна 86 x 86 x 40 мм (3.4 x 3.4 x 1.6 цалі) |
| External Sensor Cable Length | Прыблізна 3 метраў (9.8 футы) |
| Матэрыял | ПК+АБС |
| Тып дысплея | Лічбавы ВК-дысплей з падсветкай |
| Метад кантролю | Упраўленне сэнсарнай панэллю |
Гарантыя і падтрымка
This product is covered by the manufacturer's standard warranty. Please refer to the product packaging or your point of purchase for specific warranty terms and conditions.
For technical support, troubleshooting assistance, or warranty claims, please contact your retailer or the manufacturer directly. Keep your purchase receipt as proof of purchase.
Ask a question about this manual
Ask about setup, troubleshooting, compatibility, parts, safety, or missing instructions. Manuals+ will review the question and use this page’s manual context to help answer it.