Прадукт скончаныview
The Mr. Coffee 10-Cup Programmable Coffee Maker is designed to deliver a rich and flavorful coffee experience. It features Optimal Brew technology for hotter and faster brewing, ensuring maximum flavor extraction. The insulated thermal carafe keeps coffee hot for extended periods, and the programmable settings allow for convenient brewing at your desired time.
Асноўныя характарыстыкі:
- Optimal Brew: Brews coffee 20% faster at a higher temperature (up to 205 degrees) for richer taste.
- Strong Brew Selector: Offers an option for a bolder cup of coffee.
- Тэрмальны графін: Double-walled stainless steel thermal carafe keeps coffee hot for hours.
- Здымны рэзервуар для вады: Designed for easy filling and cleaning.
- Brew Later Feature: Allows programming the coffee maker to brew at a set time.
- Аўтаматычная паўза Grab-a-Cup: Temporarily stops brewing to allow pouring a cup mid-cycle.
- Freshness Timer: Monitors how fresh the coffee is from the time it was brewed.
- Цыкл аўтаматычнай ачысткі: Simplifies maintenance by removing calcium and mineral deposits.
- Сістэма фільтрацыі вады: Includes a water filtration disk to improve coffee taste by removing up to 97% of chlorine.
Настройка
- Распакаванне: Carefully remove all packaging materials and ensure all components are present: coffee maker unit, thermal carafe, water filtration disk, and user manual.
- Першапачатковая ўборка: Before first use, it is recommended to run a cleaning cycle.
- Fill the removable water reservoir with 2 cups of white vinegar.
- Пастаўце пусты тэрмас-графін на награвальную пласціну.
- Press the "Clean" button to initiate the cleaning cycle. This cycle typically takes about 45 minutes.
- After the vinegar cycle, run two full pots of fresh, filtered water through the coffee maker to rinse thoroughly.
- Усталёўка вадзянога фільтра: Install the included water filtration disk into the filter basket. This helps improve water taste.

Figure 1: Mr. Coffee 10-Cup Programmable Coffee Maker with thermal carafe.
- Размяшчэнне: Place the coffee maker on a flat, stable surface near an electrical outlet. Ensure adequate clearance for the lid and water reservoir.
Інструкцыя па эксплуатацыі
- Напоўніце рэзервуар для вады: Open the lid of the removable water reservoir and fill it with fresh, filtered water to your desired level, not exceeding the "10 Max" line.

Малюнак 2: Запаўненне здымнага рэзервуара для вады.
- Дадаць кававую гушчу: Pull out the filter basket from the side of the unit. Insert a standard 10-12 cup paper filter or a reusable filter (if using) and add your desired amount of coffee grounds. Ensure the filter is properly seated and not tilted. Slide the filter basket back into place.

Figure 3: The filter basket is easily accessible for adding coffee grounds.
- Place Thermal Carafe: Ensure the thermal carafe is empty and properly seated on the warming plate.

Figure 4: The thermal carafe keeps coffee hot for hours.
- Выберыце крэпасць напою (неабавязкова): Press the "Strong" button on the control panel if you desire a bolder cup of coffee.

Figure 5: Use the 'Strong' brew selector for a bolder taste.
- Set Brew Time (Optional - Brew Later): To program a delayed brew, press the "Brew Later" button. Use the "Hour" and "Minute" buttons to set your desired brew time.
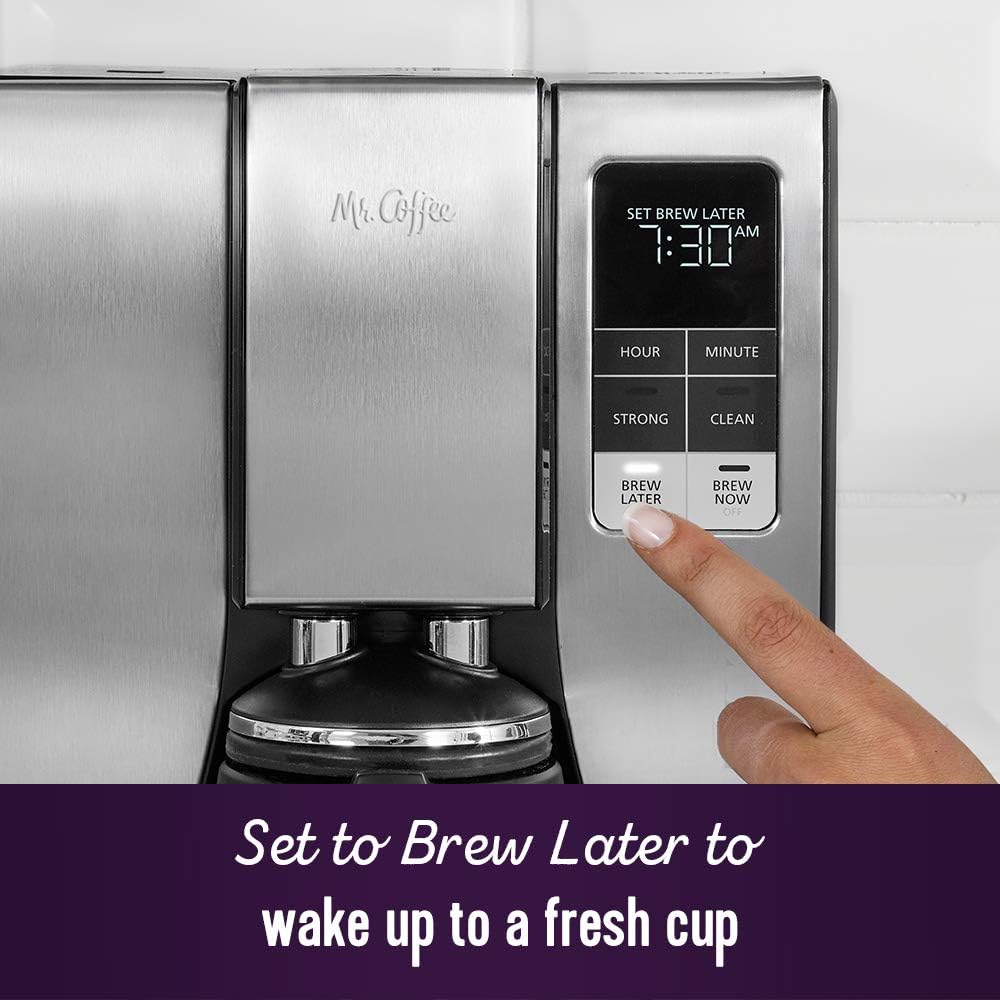
Figure 6: Set the 'Brew Later' function to wake up to fresh coffee.
- Пачатак варэння: Press the "Brew Now" button to start brewing immediately. If "Brew Later" was set, the machine will start at the programmed time. The brewing process will begin, and coffee will dispense into the thermal carafe.
- The "Grab-a-Cup Auto Pause" feature allows you to temporarily remove the carafe to pour a cup before the brewing cycle is complete. Replace the carafe within 20 seconds to prevent overflow.
- Падача: Once brewing is complete, carefully remove the thermal carafe. Press the button on the carafe handle to pour coffee.
Тэхнічнае абслугоўванне
Regular cleaning and maintenance will ensure optimal performance and longevity of your Mr. Coffee maker.
- Штодзённая ўборка:
- Адключыце кававарку ад сеткі і дайце ёй астыць.
- Remove the filter basket and thermal carafe. Wash them in warm, soapy water or place them on the top rack of a dishwasher.
- Працярыце вонкавы бок кававаркі рэкламайamp тканіна. Не апускайце прыладу ў ваду.
- Automatic Cleaning Cycle (Descaling): The "Clean" indicator light will illuminate after approximately 90 brew cycles, signaling that descaling is needed.
- Empty the thermal carafe and water reservoir.
- Fill the water reservoir with 4 cups of undiluted white household vinegar.
- Пастаўце пусты тэрмас-графін на награвальную пласціну.
- Press the "Clean" button. The cleaning cycle will run for about 45 minutes.
- Пасля завяршэння цыклу выліце раствор воцату.
- Run two to three full cycles with fresh, clean water to rinse out any remaining vinegar residue.
- Замена фільтра для вады: The water filtration disk should be replaced periodically, typically every month or after 30-40 uses, to maintain optimal coffee taste.
- Remove the old filter disk from the filter basket.
- Insert a new Mr. Coffee water filtration disk.
Ліквідацыю непаладак
Калі ў вас узніклі праблемы з кававаркай, звярніцеся да наступных распаўсюджаных праблем і рашэнняў:
| праблема | Магчымая прычына | Рашэнне |
|---|---|---|
| Кава не заварваецца. |
|
|
| Кава пераліваецца з фільтравага кошыка. |
|
|
| Кава мае слабы або занадта моцны смак. |
|
|
| "Clean" light remains on. |
|
|
Тэхнічныя характарыстыкі
| Асаблівасць | Дэталь |
|---|---|
| Марка | Містэр Кава |
| Назва мадэлі | 10 Cup Thermal Programmable Coffeemaker |
| Нумар мадэлі | 2150023 |
| Колер | Нержавеючая сталь |
| Памеры прадукту (Д х Ш х У) | 10.79" Г x 12.36" Ш x 15.98" У |
| Вага прадмета | 11.1 фунта |
| Тып кававаркі | Кропельная кава-машына |
| Тып фільтра | Reusable (compatible with paper filters) |
| Рэжым працы | Цалкам аўтаматычны |
| Увод чалавечага інтэрфейсу | Гузікі |
| Краіна паходжання | Кітай |
| UPC | 053891157995 |

Малюнак 7: Памеры вырабу для правільнага размяшчэння.
Гарантыя і падтрымка
For warranty information, product support, or to purchase replacement parts and accessories, please visit the official Mr. Coffee webсайт або звярніцеся ў службу падтрымкі кліентаў. Захоўвайце чэк аб куплі як пацвярджэнне пакупкі для прэтэнзій па гарантыі.
Больш падрабязную інфармацыю і кантактныя дадзеныя можна знайсці, наведаўшы Mr. Coffee Store on Amazon.