1. Уводзіны
Дзякуй за пакупкуasing the XTUGA ES602 Professional DJ Mixer. This manual provides essential information for the safe and efficient operation of your mixer. Please read it thoroughly before use and retain it for future reference.
The XTUGA ES602 is a versatile 7-channel mixing console designed for stage audio, DJ applications, and music production. It features XLR and LINE inputs, +48V phantom power, a built-in digital effect processor, USB/MP3 playback, and Bluetooth connectivity.
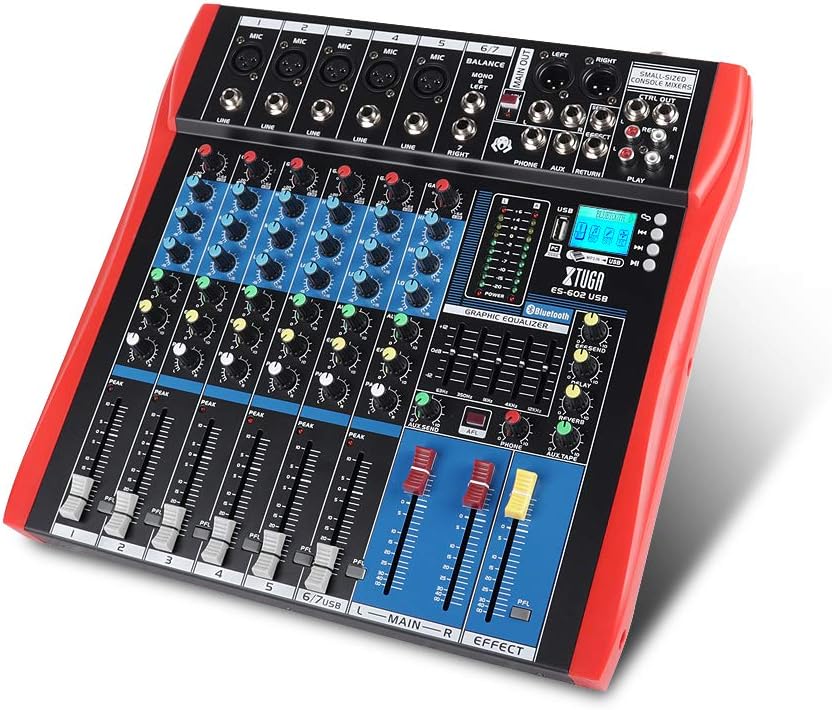
Figure 1: XTUGA ES602 Professional DJ Mixer overview. This image displays the top panel of the mixer, showing all input channels, control knobs, faders, and the master section with the USB/MP3/Bluetooth module.
2. Інструкцыі па тэхніцы бяспекі
- крыніца харчавання: Выкарыстоўвайце толькі пазначаны адаптар сілкавання. Пераканайцеся, што гучнасцьtage адпавядае вашай мясцовай крыніцы харчавання.
- Вада і вільгаць: Не падвяргайце прыладу ўздзеянню дажджу або вільгаці. Не стаўце на прыладу прадметы, напоўненыя вадкасцямі.
- Вентыляцыя: Забяспечце належную вентыляцыю. Не блакуйце вентыляцыйныя адтуліны.
- Крыніцы цяпла: Трымайце прыладу далей ад крыніц цяпла, такіх як радыятары, абагравальнікі, пліты або іншыя прыборы, якія выпрацоўваюць цяпло.
- Уборка: Clean only with a dry cloth. Avoid liquid cleaners.
- Абслугоўванне: Не спрабуйце абслугоўваць гэту прыладу самастойна. Звяртайцеся па любыя паслугі па абслугоўванні да кваліфікаванага персаналу.
- Фантомная магутнасць: When using condenser microphones, ensure +48V phantom power is activated only after connecting the microphone and before connecting to other devices to prevent damage.
3. Асаблівасці
The XTUGA ES602 mixer offers a range of features for professional audio mixing:
- 7-канальны мікшерный пульт: Equipped with XLR and LINE inputs for versatile connectivity.
- +48 В фантомнага харчавання: Даступныя для кандэнсатарных мікрафонаў.
- Індывідуальныя элементы кіравання каналам: Each channel features GAIN, 3-band EQ (HIGH, MID, LOW), AUX, EFFECT, PAN control knobs, and a volume fader.
- PFL (Pre-Fader Listen) Switch: Allows monitoring of individual channels via headphones.
- Built-in Digital Effect Processor: Includes REPEAT, EFF SEND, DELAY, SEND, and RETURN controls for integrated effects.
- USB/MP3 Playback and Recording: Direct USB input for MP3 playback from U-disk and recording capabilities.
- Злучэнне Bluetooth: Seamlessly connect mobile phones, tablets, and other Bluetooth-enabled devices for audio playback.
- Асноўныя выхады: XLR (L/R) and 1/4" (L/R) stereo output jacks.
- Выхад REC: Dedicated REC (L/R) output for external recording devices.
- Інтэрфейс гарнітуры: For monitoring audio.
- Святлодыёдныя індыкатары: Power and output level indicator lights for easy monitoring.
- Трывалы дызайн: Ultra-thin, all-metal chassis for high density dust resistance and durability.
4. Элементы кіравання і функцыі
This section details the various controls and connections on your XTUGA ES602 mixer.
4.1 Input Channels (Channels 1-7)
- Мікрафонны ўваход (XLR): Connects balanced microphones.
- LINE Input (1/4" Jack): Connects line-level instruments or devices.
- +48V PHANTOM Power Switch: Activates phantom power for condenser microphones on XLR inputs.
- Ручка GAIN: Рэгулюе ўваходную адчувальнасць для кожнага канала.
- HIGH, MID, LOW EQ Knobs: 3-band equalizer for adjusting the treble, midrange, and bass frequencies of each channel.
- Ручка AUX: Controls the send level to the auxiliary output.
- Ручка EFFECT: Controls the send level to the internal effect processor.
- Ручка PAN: Adjusts the stereo position (left/right) of the channel.
- PFL Switch: Engages Pre-Fader Listen for monitoring the channel's signal before the fader.
- Пікавы святлодыёд: Загараецца, калі ўваходны сігнал занадта высокі, што сведчыць аб патэнцыйным зрэзе сігналу.
- Фэйдэр каналаў: Adjusts the output volume of the individual channel.
4.2 Галоўная секцыя
- MAIN OUT (XLR & 1/4" Jacks): Balanced stereo main outputs for connecting to ampліфёры або дынамікі з харчаваннем.
- REC OUT (RCA Jacks): Stereo output for connecting to recording devices.
- PHONES Jack (1/4"): Выхад для стэрэа навушнікаў для маніторынгу.
- AUX SEND/RETURN Jacks: For connecting external effects processors or monitoring systems.
- MAIN Faders (L/R): Controls the overall output volume of the mixer.
- EFFECT Level Knob: Adjusts the overall level of the internal effects.
- REPEAT, DELAY Knobs: Controls parameters of the digital effect processor.
- LEVEL Meter: LED display showing the main output level.

Малюнак 2: падрабязна view of the XTUGA ES602 mixer's channel controls and LED level meters. This image highlights the individual channel knobs for GAIN, EQ, AUX, EFFECT, PAN, and the main output level indicators.
4.3 USB/MP3/Bluetooth Module
- Порт USB: For connecting a USB flash drive for MP3 playback or connecting to a computer for recording/playback.
- ВК-дысплей: Shows current mode, track information, and Bluetooth status.
- Кнопкі кіравання: Play/Pause, Stop, Previous/Next Track, Mode selection (USB/Bluetooth/PC).
- Індыкатар Bluetooth: Паказвае стан падключэння Bluetooth.

Figure 3: Close-up of the Bluetooth and MP3 connection section on the XTUGA ES602 mixer. This image shows the USB port, LCD display, and control buttons for media playback and Bluetooth pairing.
5. Настройка
Follow these steps to set up your XTUGA ES602 mixer.
5.1 Падключэнне харчавання
- Пераканайцеся, што выключальнік харчавання міксера знаходзіцца ў становішчы ВЫКЛ.
- Connect the provided power adapter to the mixer's power input.
- Падключыце адаптар сілкавання да адпаведнай разеткі пераменнага току.
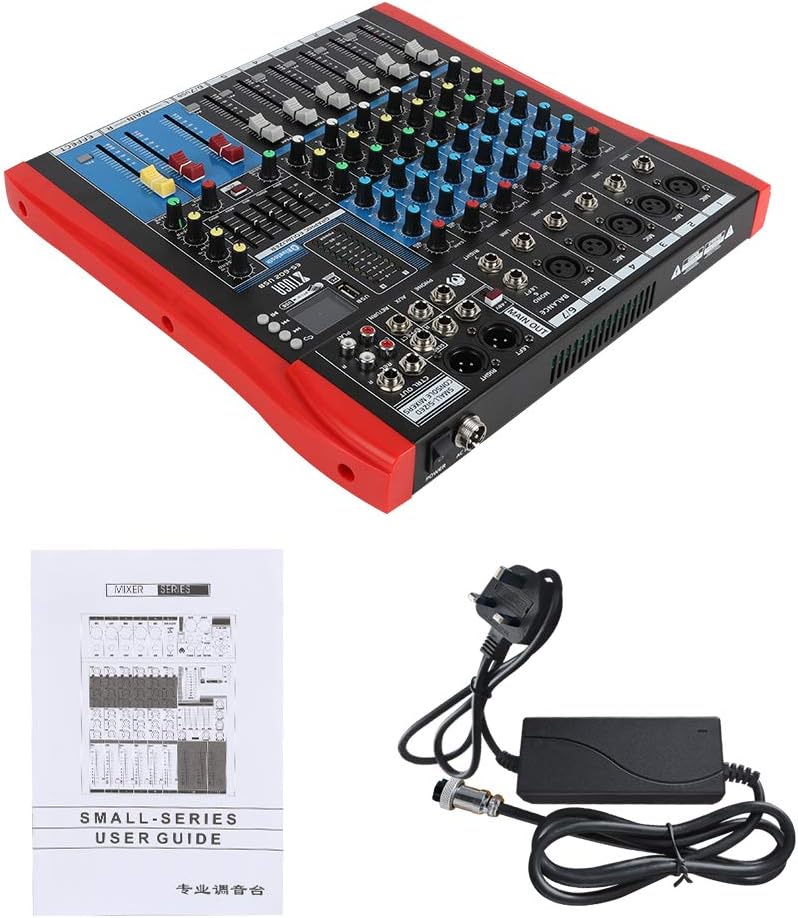
Figure 4: XTUGA ES602 mixer shown with its power adapter and user guide. This illustrates the components included for initial setup.
5.2 Падключэнне мікрафонаў і інструментаў
- For microphones, connect XLR cables to the Увод MIC jacks. If using condenser microphones, activate the +48V PHANTOM Power Switch for the respective channel.
- For line-level instruments (keyboards, guitars with preamps, etc.), connect 1/4" TS/TRS cables to the Увод лініі дамкратаў.
- Ensure all channel GAIN knobs are set to their minimum position before connecting.
5.3 Падключэнне выходных прылад
- Падключыце асноўныя дынамікі або ampпадсілкавальнік да MAIN OUT (XLR or 1/4") дамкратаў.
- For recording, connect an external recording device to the REC OUT (RCA) дамкратаў.
- Падключыце навушнікі да ТЭЛЕФОНЫ jack for monitoring.
5.4 Connecting to a Computer for Recording
- Connect a USB cable from the mixer's порт USB на свой кампутар.
- The mixer should be recognized as an audio device by your operating system.
- Select the mixer as the input device in your digital audio workstation (DAW) or recording software.
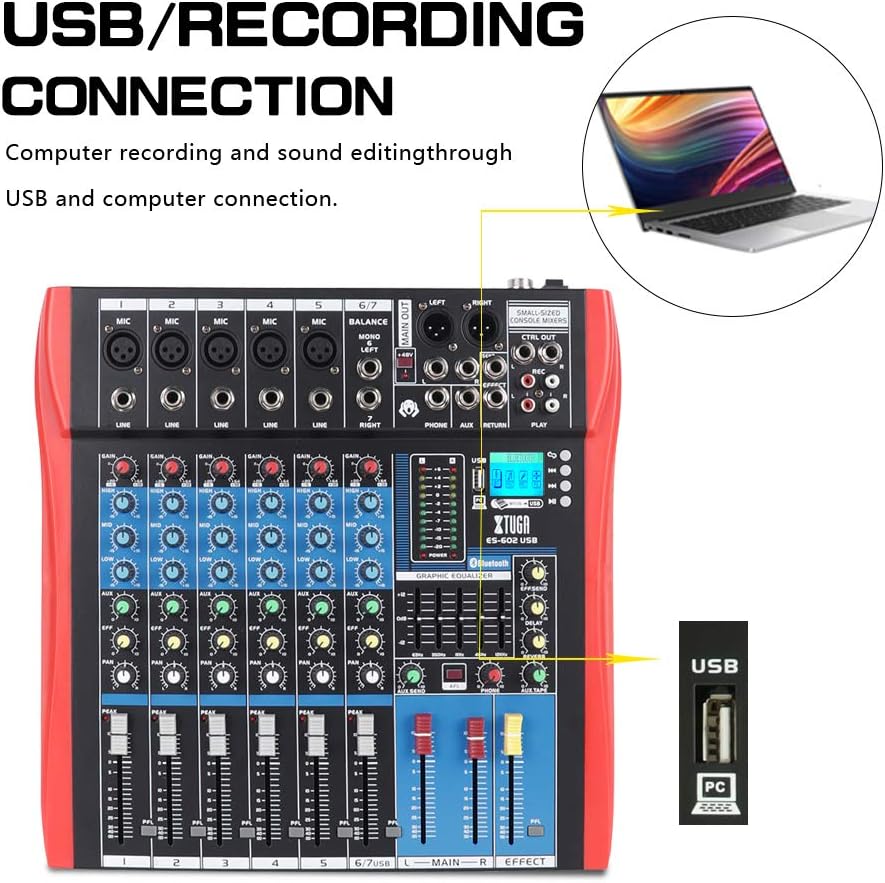
Figure 5: Illustration of the XTUGA ES602 mixer connected to a laptop via USB for recording and sound editing. This highlights the USB input port and its function.
6. Аперацыйная
This section covers the basic operation of your XTUGA ES602 mixer.
6.1 Powering On and Initial Level Setting
- After all connections are made, turn on your mixer's power switch.
- Павольна падніміце MAIN Faders да камфортнага ўзроўню праслухоўвання.
- For each active input channel, gradually increase the Ручка GAIN пакуль PEAK LED flashes only occasionally during the loudest parts of the signal.
- Adjust individual Фейдэры каналаў to balance the mix.
6.2 Выкарыстанне Bluetooth
- Націсніце Кнопка MODE on the USB/MP3/Bluetooth module until "Bluetooth" appears on the LCD display. The Bluetooth indicator will flash.
- On your mobile device, search for Bluetooth devices and select "XTUGA MIXER" (or similar).
- Once paired, the Bluetooth indicator will become solid. You can now play audio from your device through the mixer.
- Use the module's control buttons for Play/Pause, Next/Previous track.
6.3 USB/MP3 Playback
- Устаўце флэш-назапашвальнік USB з аўдыёфайлам у фармаце MP3 files у порт USB.
- The mixer should automatically switch to USB mode and begin playback. If not, press the Кнопка MODE каб выбраць USB.
- Use the control buttons to navigate tracks and control playback.
6.4 Запіс
- To USB Drive: In USB/MP3 mode, press the Кнопка REC on the module to start recording the main mix to the connected USB drive. Press again to stop.
- Да кампутара: Ensure the mixer is connected to your computer via USB. Open your recording software and select the mixer as the input device. Start recording within your software.
6.5 Using Effects
- Адрэгулюйце EFFECT knob on individual channels to send a portion of that channel's signal to the internal effect processor.
- Выкарыстоўвайце EFFECT Level knob in the master section to control the overall volume of the applied effect.
- Адрэгулюйце Паўтор і ЗАТРЫМКА knobs to fine-tune the characteristics of the digital effect.
7. Тэхнічнае абслугоўванне
Правільнае абслугоўванне забяспечвае даўгавечнасць і аптымальную працу вашага міксера.
- Уборка: Use a soft, dry cloth to clean the exterior of the mixer. Do not use abrasive cleaners, solvents, or waxes.
- Абарона ад пылу: Калі міксер не выкарыстоўваецца, накрыйце яго вечкам, каб абараніць ад пылу і смецця.
- захоўванне: Захоўвайце міксер у прахалодным, сухім месцы, удалечыні ад прамых сонечных прамянёў і экстрэмальных тэмператур.
- Кабельнае кіраванне: Пазбягайце празмернага згінання або абціскання кабеляў. Адключайце кабелі, цягнучы за вілку, а не за сам кабель.
8. Выпраўленне непаладак
If you encounter issues with your mixer, refer to the following common problems and solutions.
- Няма выхаду гуку:
- Праверце, ці ўключаны міксер.
- Забяспечыць усё MAIN Faders and individual Фейдэры каналаў are raised.
- Verify that output cables are securely connected to your amplifier/дынамікі.
- Праверце гучнасць на вашым amplifier/дынамікі.
- Няма ўваходнага сігналу:
- Ensure microphones/instruments are properly connected to the correct input jacks.
- Праверце, калі Ручка GAIN for the respective channel is sufficiently turned up.
- Калі выкарыстоўваецца кандэнсатарны мікрафон, пераканайцеся, ФАНТОМНАЕ сілкаванне +48В актывуецца.
- Test input sources (microphones, instruments) with another device to confirm they are working.
- Скажоны гук:
- Паменшыць Ручка GAIN for the offending channel if the PEAK LED пастаянна гарыць.
- Апусціць MAIN Faders if the output level meter is consistently in the red.
- Праверце на наяўнасць пашкоджаных кабеляў.
- Праблемы з падключэннем Bluetooth:
- Ensure the mixer is in Bluetooth mode (LCD shows "Bluetooth").
- Пераканайцеся, што Bluetooth вашай мабільнай прылады ўключаны і знаходзіцца ў зоне дзеяння.
- Паспрабуйце адлучыць прыладу і зноў падлучыць яе.
- Прайграванне з USB не працуе:
- Ensure the USB drive is properly inserted and contains compatible MP3 files.
- Націсніце Кнопка MODE to ensure the mixer is in USB mode.
- Паспрабуйце іншы USB-дыск.
9. Тэхнічныя характарыстыкі
| Асаблівасць | Спецыфікацыя |
|---|---|
| Нумар мадэлі | ES602 (also ES802/1202 series) |
| Колькасць каналаў | 7 |
| Тэхналогія падлучэння | Дапаможны, Bluetooth, USB |
| Аўдыё ўваход | Auxiliary, USB, XLR |
| Тып выхаднога раздыма | Дапаможны, XLR |
| Крыніца харчавання | Правадная электрычная |
| Вага прадмета | 3.59 кг |
| Памеры прадукту | 46 х 46 х 14 см |
| Вытворца | ХТУГА |
| UPC | 784124158754 |
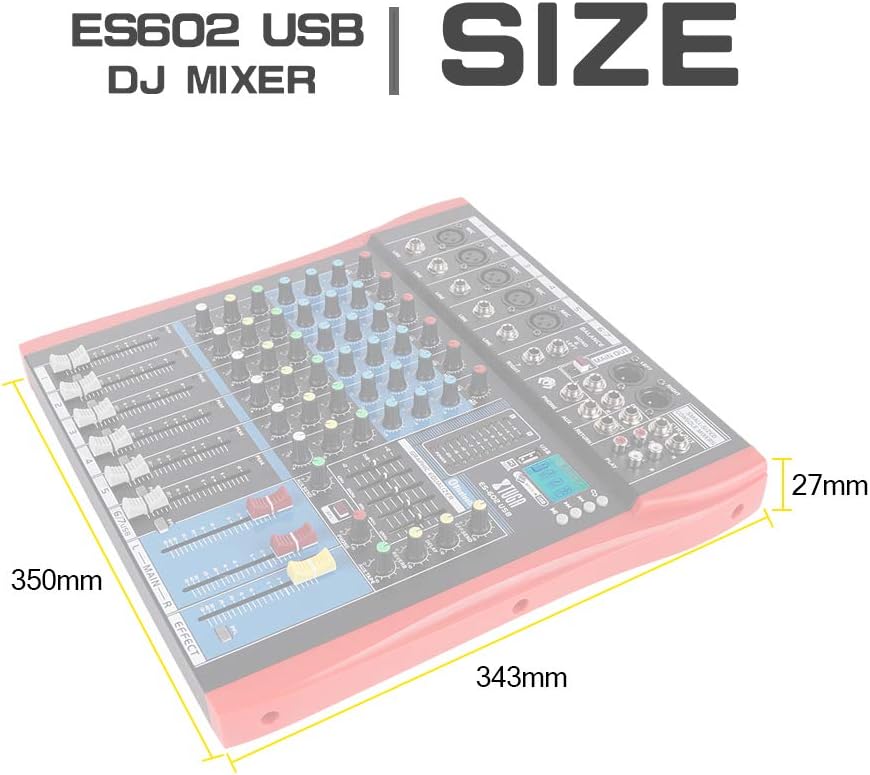
Figure 6: Dimensions of the XTUGA ES602 USB DJ Mixer, showing measurements of 350mm length, 343mm width, and 27mm height.
10. Гарантыя і падтрымка
XTUGA products are designed for reliability and performance. For warranty information and technical support, please refer to the warranty card included with your product or visit the official XTUGA webсайт. Захоўвайце чэк аб куплі як пацвярджэнне пакупкі ў выпадку любых гарантыйных прэтэнзій.