1. Уводзіны
This manual provides essential information for the safe and efficient operation of your iProda 2 in 1 Laptop, Model M1169YM. Please read this manual thoroughly before using the device and retain it for future reference. This convertible laptop features an 11.6-inch touchscreen, powered by an Intel N4100 processor, and runs on Windows 10 Pro.

Image: The iProda 2 in 1 Laptop can be used in multiple configurations, including traditional laptop, tent, stand, and tablet modes, showcasinг яго ўніверсальнасць.
2. Інфармацыя па бяспецы
Выконвайце наступныя меры бяспекі, каб пазбегнуць пашкоджання прылады або траўмаў:
- Не падвяргайце прыладу ўздзеянню экстрэмальных тэмператур, прамых сонечных прамянёў або высокай вільготнасці.
- Пазбягайце падзення прылады або моцных удараў.
- Use only the provided or approved power adapter for charging.
- Трымайце прыладу далей ад вады і іншых вадкасцей.
- Не спрабуйце разбіраць або рамантаваць прыладу самастойна. Звярніцеся да кваліфікаванага абслугоўваючага персаналу.
3. Змесціва ўпакоўкі
Праверце, ці ёсць усе прадметы ў вашай упакоўцы:
- iProda 2 in 1 Laptop (Model M1169YM)
- Адаптар сілкавання
- Кіраўніцтва карыстальніка (гэты дакумент)
4. Прадукт скончыўсяview
The iProda 2 in 1 Laptop is designed for versatility, offering multiple usage modes and essential connectivity options.
4.1. Асноўныя магчымасці
- 11.6-цалевы сэнсарны IPS-экран: A responsive 10-point precision touchscreen with 1920x1080 resolution for interactive use.
- Дызайн кабрыялета: 360-degree hinge allows seamless transition between laptop, tablet, tent, and stand modes.
- Працэсар Intel N4100: Provides efficient performance for daily tasks.
- Windows 10 Прафесійная: Pre-installed operating system for productivity and security.
- Пашыраная памяць: Supports M.2 2242 SSD for additional storage capacity.

Image: Key features of the iProda laptop, including its touchscreen, operating system, display specifications, and camera resolution.

Image: The laptop's 360-degree hinge allows it to convert into a tablet, enabling direct interaction via its precision touchscreen.
4.2. Порты і кнопкі
Familiarize yourself with the various ports and buttons on your laptop:
- Порт тыпу C: Used for power supply and data transfer.
- Micro HDMI: Для падлучэння да знешніх дысплеяў.
- Micro USB: Для падлучэння прылад USB.
- Слот TF карты: For expanding storage with a TF (MicroSD) card.
- Кнопка харчавання: Каб уключыць/выключыць прыладу або перавесці яе ў спячы рэжым.
- Кнопкі гучнасці: To adjust audio output.
- Раз'ём для навушнікаў: Для падлучэння навушнікаў або знешніх дынамікаў.

Выява: Падрабязны view of the laptop's side panels, indicating the location and function of each port and button for easy identification.
5. Настройка
5.1. Зарадка акумулятара
Before first use, fully charge the laptop's battery. Connect the provided power adapter to the Type-C port on the laptop and plug it into a power outlet. The charging indicator light will illuminate.
5.2. Першая загрузка і ўстаноўка Windows
- Press and hold the Power Button until the screen turns on.
- Выконвайце інструкцыі на экране, каб завяршыць пачатковую наладу Windows 10 Pro, у тым ліку выбар мовы, падключэнне да сеткі і стварэнне ўліковага запісу карыстальніка.
6. Кіраванне ноўтбукам
6.1. Выкарыстанне сэнсарнага экрана
The 10-point precision touchscreen allows for intuitive interaction with Windows 10 Pro. Use gestures such as tapping, swiping, pinching, and stretching to navigate, zoom, and interact with applications.
6.2. Клавіятура і сэнсарная панэль
Інтэграваная клавіятура і сэнсарная панэль забяспечваюць традыцыйныя метады ўводу. Сэнсарная панэль падтрымлівае мультытач-жэсты для пракруткі, маштабавання і пераключэння паміж праграмамі.

Image: The laptop's full-size American keyboard and responsive touchpad, designed for comfortable typing and navigation.
6.3. Канвертаваныя рэжымы
The 360-degree hinge allows you to switch between various modes:
- Рэжым ноўтбука: Стандартная канфігурацыя для набору тэксту і прадукцыйнасці.
- Рэжым планшэта: Fold the screen back completely for a tablet experience, ideal for browsing or drawing.
- Рэжым намёта: Position the laptop like a tent for media consumption or presentations.
- Рэжым падстаўкі: Flip the keyboard face down to use the screen as a display, suitable for watching videos.

Image: The laptop configured in tent mode, demonstrating its flexibility for viewing content without the keyboard in the way.
7. Пашырэнне сховішча
The laptop comes with 64GB eMMC storage. You can expand the storage capacity by installing an M.2 2242 SSD (128GB/256GB/512GB, not included).
7.1. Installing an M.2 2242 SSD
To install an M.2 2242 SSD:
- Power off the laptop and disconnect the power adapter.
- Carefully open the back cover of the laptop.
- Locate the M.2 slot.
- Insert the M.2 2242 SSD into the slot and secure it with the appropriate screw (if provided).
- Усталюйце заднюю крышку.
- Upon booting, you may need to initialize and format the new SSD through Windows Disk Management.
Note: If you are unsure about this procedure, it is recommended to seek professional assistance.

Image: Visual representation of the M.2 SSD slot, illustrating how additional storage can be integrated into the laptop.
8. Сувязь
8.1. Злучэнне Wi-Fi
The laptop supports dual-frequency 2.4GHz/5GHz Wi-Fi. To connect to a wireless network:
- Націсніце на значок Wi-Fi у сістэмным трэі.
- Выберыце патрэбную сетку са спісу.
- Увядзіце пароль сеткі, калі будзе прапанавана, і націсніце «Падключыцца».
8.2. External Display (Micro HDMI)
Connect an external monitor or TV using a Micro HDMI to HDMI cable. Once connected, you can configure display settings (duplicate, extend, second screen only) through Windows display settings.
8.3. USB-прылады
Use the Micro USB port or the Type-C port (with an appropriate adapter) to connect peripherals such as a mouse, keyboard, or external storage devices.
9. Тэхнічнае абслугоўванне
9.1. Уборка
To clean the laptop, power it off and disconnect the power adapter. Use a soft, lint-free cloth slightly dampened with water or a screen cleaner for the display. Avoid harsh chemicals or abrasive materials.
9.2. Сыход за батарэяй
Каб падоўжыць тэрмін службы батарэі:
- Пазбягайце частай поўнай разрадкі акумулятара.
- Do not expose the laptop to high temperatures.
- Калі вы захоўваеце ноўтбук працяглы час, пераканайцеся, што акумулятар зараджаны прыкладна на 50-70%.
10. Выпраўленне непаладак
Вось рашэнні распаўсюджаных праблем, з якімі вы можаце сутыкнуцца:
| праблема | Рашэнне |
|---|---|
| Ноўтбук не ўключаецца. | Ensure the battery is charged. Connect the power adapter and try again. If still unresponsive, perform a hard reset by holding the power button for 10-15 seconds. |
| Экран пусты або мігціць. | Restart the laptop. Check if an external display is connected and interfering. Update display drivers if possible. |
| Праблемы з падключэннем да Wi-Fi. | Пераканайцеся, што Wi-Fi уключаны. Перазагрузіце маршрутызатар і ноўтбук. Праверце сеткавыя налады ў Windows. |
| Сэнсарны экран не рэагуе. | Перазагрузіце ноўтбук. Пераканайцеся, што экран чысты. Праверце наяўнасць абнаўленняў Windows або драйвераў для сэнсарнага экрана. |
11. Тэхнічныя характарыстыкі
Technical specifications for the iProda 2 in 1 Laptop (Model M1169YM):
| Асаблівасць | Дэталь |
|---|---|
| Марка | iProda |
| Нумар мадэлі | M1169YM |
| Аперацыйная сістэма | Windows 10 Pro |
| Памер экрана | 11.6 цалі |
| Дазвол экрана | 1920 x 1080 пікселяў (1080p) |
| Працэсар | Intel N4100 (up to 2.4 GHz Burst Frequency) |
| АЗП | 4 ГБ DDR4 |
| Жорсткі дыск | 64 ГБ eMMC |
| Графічная карта | Integrated (UHD 600 Graphics) |
| Бесправадны тып | 2.4 GHz / 5 GHz Dual-frequency Wi-Fi |
| Сярэдні тэрмін службы батарэі | 8 Hours (3500mAh, 27Wh) |
| Вага прадмета | 3.63 фунта |
| Памеры прадукту | 11.99 х 11.6 х 0.5 цалі |
| Тэхналогія падлучэння | HDMI, USB Type-C, Micro USB |
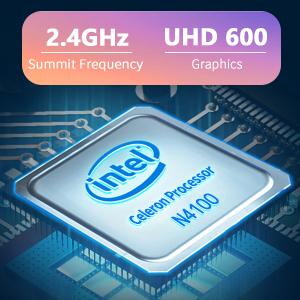
Image: The Intel Celeron N4100 processor, central to the laptop's performance, highlighting its clock speed and integrated graphics capabilities.

Image: The laptop's battery specifications, indicating its power capacity for extended use.
12. Гарантыя і падтрымка
For warranty information and technical support, please refer to the documentation included with your purchase or visit the official iProda website. Contact information for customer service can typically be found on the manufacturer's support page.