1. Уводзіны
This manual provides comprehensive instructions for the installation, operation, and maintenance of your PANOEAGLE DS-7608NI-I2/8P 8-Channel 4K Network Video Recorder (NVR). Please read this manual thoroughly before using the product to ensure proper setup and functionality. Retain this manual for future reference.
The PANOEAGLE DS-7608NI-I2/8P is an embedded Plug and Play 4K NVR designed for robust 24/7 surveillance recording. It supports up to 8 cameras simultaneously, offering high-resolution recording up to 12MP and utilizing H.264+/H.264/H.265 video compression for efficient storage. Its Power over Ethernet (PoE) capability simplifies camera installation by providing both power and data through a single cable.
2. Прадукт скончыўсяview
Familiarize yourself with the components and interfaces of your NVR.
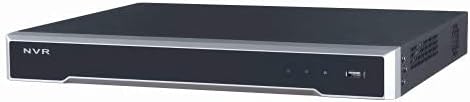
Малюнак 2.1: Пярэдняя панэль View
This image displays the front panel of the NVR, featuring the 'NVR' branding, status indicators, and a USB port for peripheral connections.

Малюнак 2.2: Задняя панэль View
This image shows the rear panel of the NVR, highlighting the power input, cooling fan, 8 PoE ports, network port, USB ports, audio input/output, VGA, and HDMI video outputs, and alarm/control terminals.

Малюнак 2.3: Нахіленая задняя частка View
An angled perspective of the NVR's rear panel, providing a clearer view of the various connectivity options and ventilation.
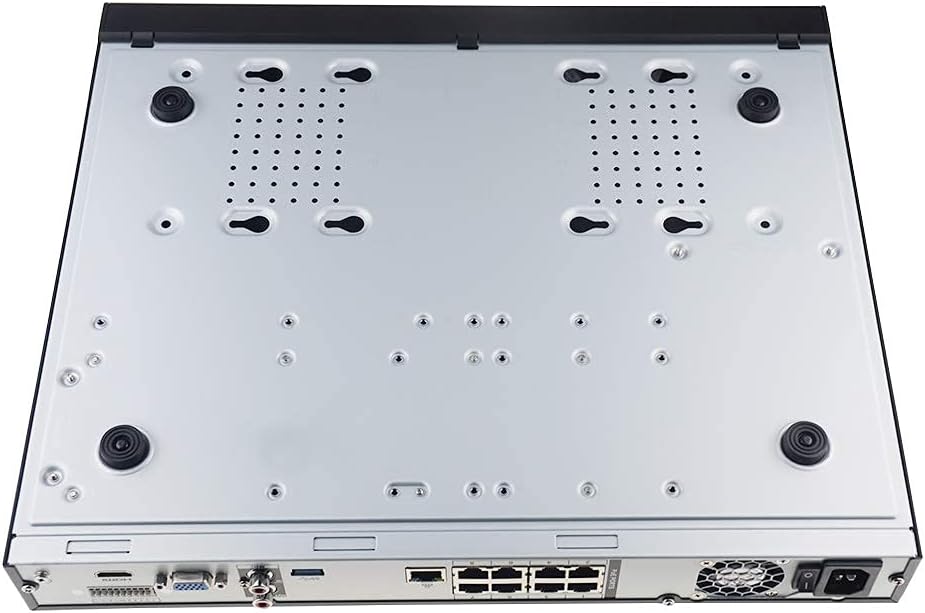
Figure 2.4: Bottom Panel View
This image displays the bottom of the NVR, showing mounting points and ventilation holes, along with rubber feet for stable placement.
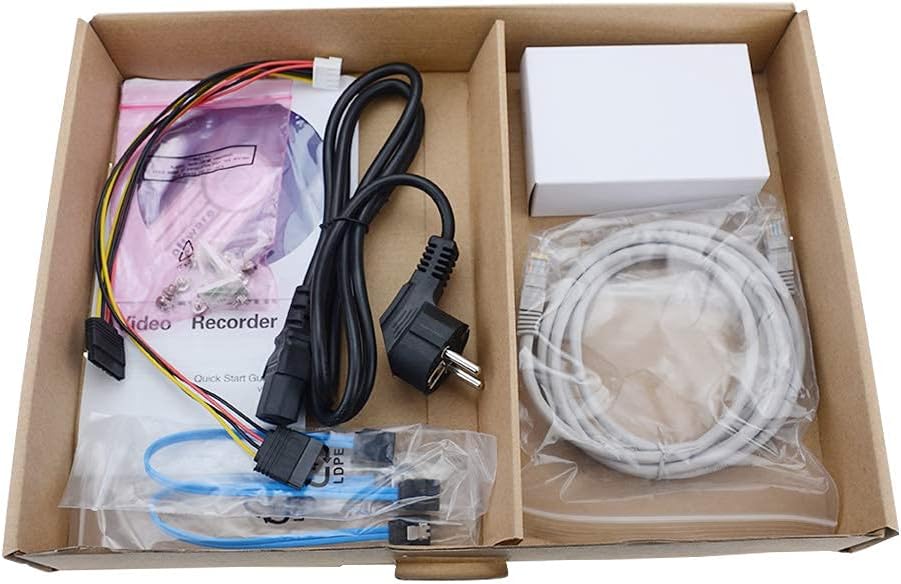
Малюнак 2.5: Змест пакета
A view of the accessories included with the NVR, typically comprising a power cable, network cable, USB mouse, SATA cables for hard drive installation, and a quick start guide.
3. Асноўныя магчымасці
- 8-канальны запіс: Supports simultaneous recording from up to 8 IP cameras.
- Падтрымка дазволу 4K: Capable of recording and displaying video resolutions up to 12MP.
- PoE Easy Setup: Integrated Power over Ethernet (PoE) ports for direct connection and power supply to IP cameras via a single Ethernet cable.
- Advanced Video Compression: Utilizes H.264+/H.264/H.265 codecs for efficient storage and bandwidth usage.
- Запіс 24/7: Designed for continuous, reliable surveillance monitoring.
- Выхад HDMI: High-definition video output for connecting to monitors or TVs.
- Падтрымка SATA: Features 2 SATA interfaces for internal hard drive installation (HDDs not included).
4. Кіраўніцтва па наладцы
4.1. Hard Drive Installation (Optional)
If your NVR did not come with a pre-installed hard drive, follow these steps:
- Выключыце відэарэгістратар і адлучыце ўсе кабелі.
- Адкруціце і зніміце верхнюю крышку шасі відэарэгістратара.
- Connect the SATA data cable and power cable from the NVR to the hard drive.
- Secure the hard drive to the NVR chassis using the provided screws.
- Устаўце верхнюю крышку на месца і замацуйце яе шрубамі.
4.2. Пачатковыя злучэнні
- Падключэнне манітора: Падключыце манітор да выхаднога порта HDMI або VGA відэарэгістратара.
- Падключэнне мышкі: Plug the USB mouse into one of the NVR's USB ports.
- Падключэнне да сеткі: Падключыце LAN-порт відэарэгістратара да маршрутызатара або сеткавага камутатара з дапамогай кабеля Ethernet.
- Падключэнне IP-камер: Connect your PoE IP cameras to the NVR's PoE ports using Ethernet cables. The NVR will provide power and data to the cameras.
- Уключэнне: Падключыце адаптар сілкавання да відэарэгістратара, а затым падключыце яго да разеткі. Відэарэгістратар уключыцца аўтаматычна.
4.3. Пачатковая канфігурацыя
Upon first boot, the NVR will guide you through an initial setup wizard. This typically includes:
- Устаноўка пароля адміністратара.
- Configuring network settings (DHCP is usually default).
- Initializing the hard drive (if newly installed).
- Searching for and adding connected IP cameras.
- Ўстаноўка даты і часу.
Выконвайце падказкі на экране, каб завяршыць наладку.
5. Інструкцыя па эксплуатацыі
5.1. Жыць View
After logging in, the NVR will typically display the live view усіх падлучаных камер. Вы можаце пераключацца паміж адной камерай view, шматкамерная сетка viewі наладзіць макеты дысплея.
5.2. Запіс
- Бесперапынная запіс: Records 24/7. Configure schedules in the NVR's menu.
- Запіс выяўлення руху: Records only when motion is detected. Sensitivity and detection zones can be adjusted.
- Запланаваны запіс: Усталюйце пэўны час для запісу.
Access recording settings via the NVR's main menu, usually under "Record" or "Storage" settings.
5.3. Прайграванне
Каб паўторнаview запісана footage:
- У галоўным меню абярыце «Прайграванне».
- Выберыце камеру(-ы) і дыяпазон даты/часу, якія вы хочаце запісацьview.
- Use the timeline to navigate through recorded events. Options for fast-forward, rewind, and pause are available.
5.4. Аддалены доступ
The NVR supports remote viewing via a mobile app or web browser. Refer to the NVR's network settings for details on enabling P2P (peer-to-peer) or port forwarding for remote access. Download the official PANOEAGLE mobile application from your device's app store.
6. Тэхнічнае абслугоўванне
- Рэгулярная ўборка: Keep the NVR free from dust. Use a soft, dry cloth for exterior cleaning. Ensure ventilation openings are clear.
- Абнаўленні прашыўкі: Periodically check the PANOEAGLE official website for firmware updates. Updates can improve performance, add features, and enhance security. Follow update instructions carefully.
- Стан жорсткага дыска: Monitor the health of your hard drive(s) through the NVR's system information. Replace failing drives promptly to avoid data loss.
- Бяспека паролем: Regularly change your administrator password and use strong, unique passwords.
7. Выпраўленне непаладак
| праблема | Магчымая прычына | Рашэнне |
|---|---|---|
| Няма відэавыхаду на манітор. | Loose cable connection, incorrect input source on monitor, NVR not powered on. | Check HDMI/VGA cable connections. Ensure monitor is set to correct input. Verify NVR power. |
| Камеры не адлюстроўваюць прамую трансляцыю view. | Camera not powered, network issue, camera not added to NVR, incorrect IP address. | Check camera power and Ethernet cables. Ensure cameras are connected to PoE ports. Use NVR's camera management to search and add cameras. Verify camera IP addresses. |
| No recording or missing footage. | Hard drive not installed/initialized, recording schedule not configured, hard drive full, hard drive failure. | Install and initialize HDD. Configure recording schedules. Check HDD status and capacity. Replace faulty HDD. |
| Немагчыма атрымаць доступ да відэарэгістратара дыстанцыйна. | Network configuration issues, P2P disabled, incorrect app settings, firewall blocking. | Ensure NVR has internet access. Enable P2P service. Verify app settings and NVR's network configuration. Check router firewall settings. |
8. Тэхнічныя характарыстыкі
| Асаблівасць | Дэталь |
|---|---|
| мадэль | DS-7608NI-I2/8P |
| Марка | PANOEAGLE (Compatible with Hi-k USA systems) |
| Колькасць каналаў | 8 |
| Максімальная дазвол | Да 12 Мп |
| Кампрэсія відэа | H.264+/H.264/H.265 |
| Відэавыхад | HDMI, VGA |
| Аўдыё ўваход | RCA |
| Інтэрфейсы SATA | 2 (for HDD) |
| Тэхналогія падлучэння | HDMI, Ethernet (PoE) |
| Дата першай даступнасці | 28 ліпеня 2021 г |
9. Гарантыя і падтрымка
For warranty information, please refer to the warranty card included with your product or visit the official PANOEAGLE webсайт. Тэхнічная падтрымка можа быць даступная праз сайт вытворцы webна сайце або звязаўшыся з іх аддзелам абслугоўвання кліентаў.
Always ensure you are using official channels for support and firmware downloads to maintain product integrity and security.