1. Уводзіны
This manual provides detailed instructions for the assembly, operation, and maintenance of your MUSETEX G05MN6-HW ATX Mid-Tower PC Gaming Case. Designed for optimal airflow and aesthetic appeal, this case features pre-installed ARGB fans, tempered glass panels, and efficient cable management solutions. Please read this manual thoroughly before beginning installation to ensure proper setup and safe operation.
2. Асноўныя магчымасці
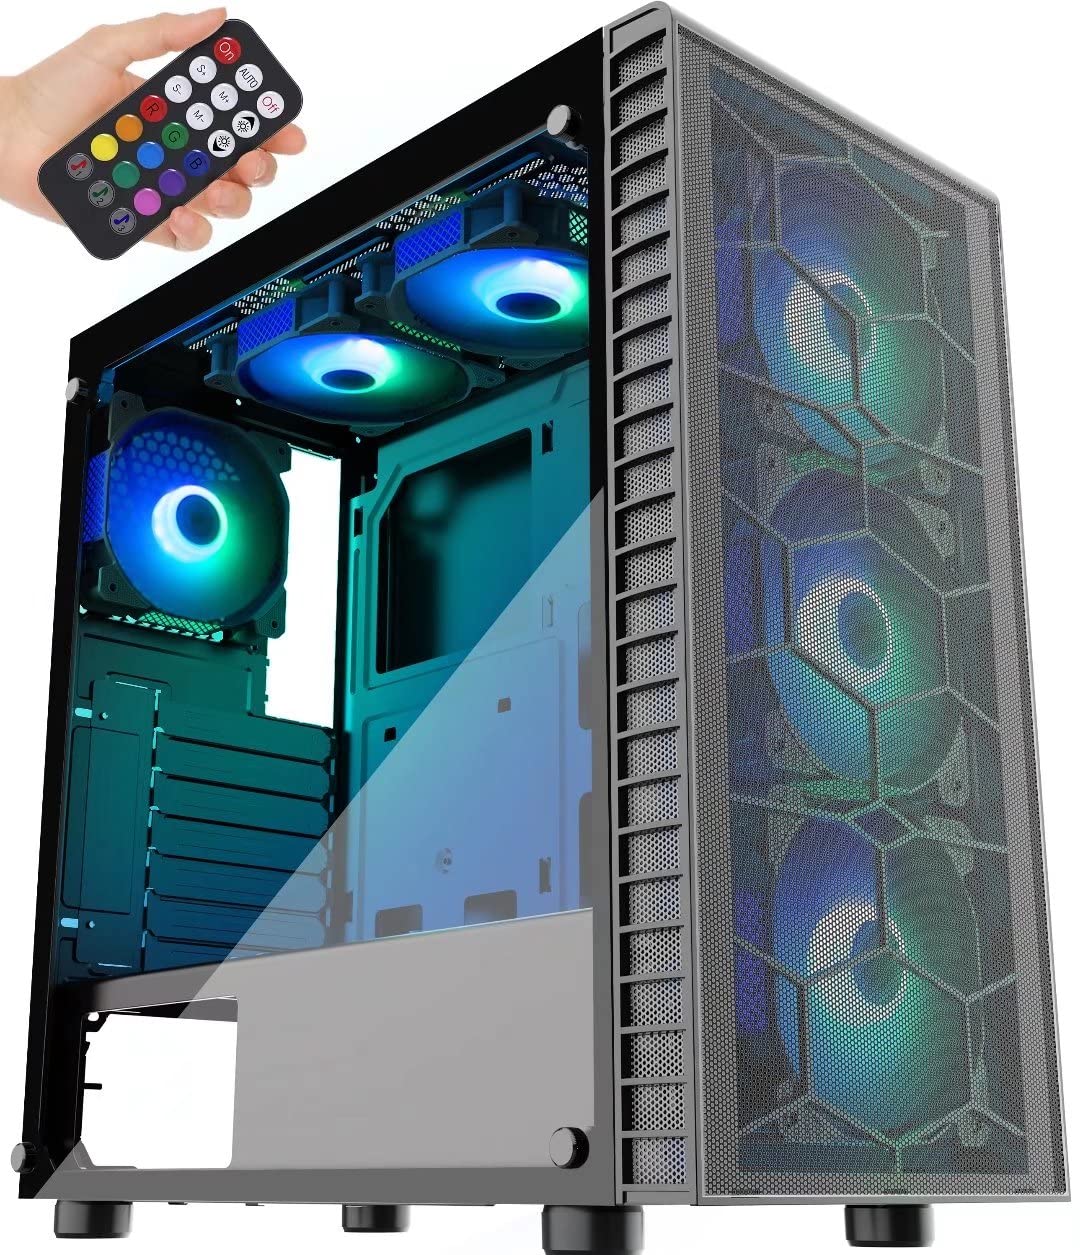
- Outstanding Airflow: Equipped with a large front panel metal mesh and 6 pre-installed 120mm ARGB fans to ensure efficient cooling and lighting.
- Multiple ARGB Modes: Features button control with 19 lighting modes. Supports motherboard control via a 5V 3-PIN header for expanded ARGB fan modes. Note: 12V 4-PIN motherboards are not compatible with motherboard control mode; use button control only.
- Прасторны інтэр'ер: Two 4mm-thick tempered glass full-view side panels. Supports ATX, Micro ATX, and ITX motherboards. Accommodates 120mm water cooling, GPUs up to 380mm, CPU air coolers up to 160mm, and PSUs up to 245mm (with removable hard disk holders).
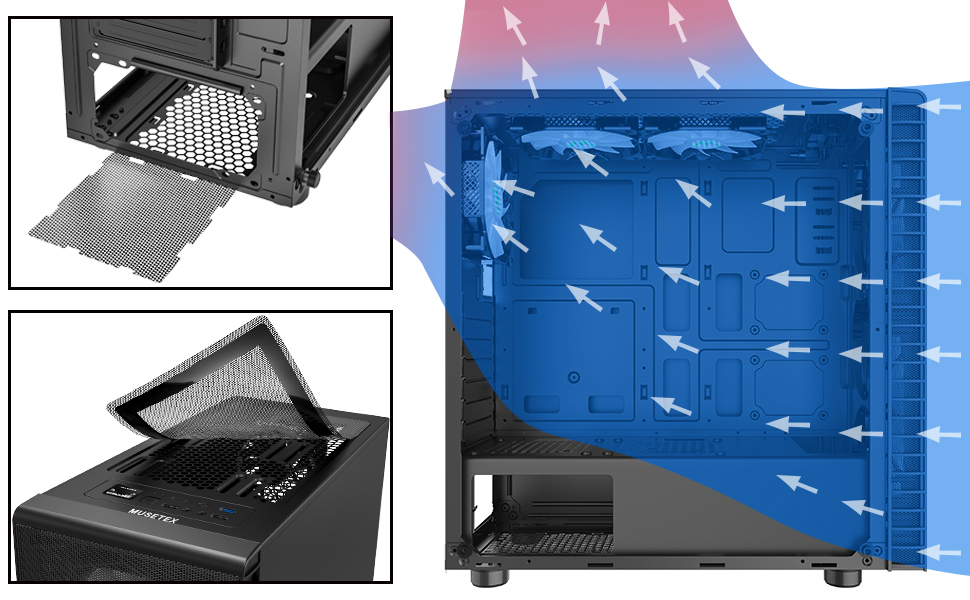
- Пыланепранікальны дызайн: Includes two dust filters; a top magnetic strip dust filter and a bottom PSU dust filter for easy installation and cleaning.
- Convenient Top I/O Panel: Features 1 x USB 3.0 Port, 2 x USB 2.0 Ports, 1 x HD Audio jack, LED Button, and Power/Reset buttons. The USB cable is shielded for interference-free data transmission.

3. Змесціва ўпакоўкі
Please verify that all components are present and undamaged upon opening the package. If any items are missing or damaged, contact MUSETEX customer support.
- MUSETEX G05MN6-HW ATX Mid-Tower PC Gaming Case
- 6 x 120mm ARGB Fans (pre-installed)
- 2 x Tempered Glass Side Panels (pre-installed)
- 1 x Remote Control for ARGB Lighting
- 1 x Accessory Box (containing screws, cable ties, and other small parts)
- 1 х Кіраўніцтва карыстальніка (гэты дакумент)

4. Усталёўка і налада
Before starting, ensure you have a clean, static-free workspace. Refer to your component manuals for specific installation instructions.
4.1 Падрыхтоўка справы
- Carefully remove the tempered glass side panels by unscrewing the thumb screws. Place them on a soft, flat surface to prevent scratches or damage.
- Identify the accessory box inside the case, which contains all necessary screws and mounting hardware.
4.2 Устаноўка мацярынскай платы
- Усталюйце шчыт уводу/вываду (калі ён не падключаны да матчынай платы) у заднюю адтуліну корпуса.
- Align your ATX, Micro ATX, or ITX motherboard with the standoffs inside the case. Ensure all standoffs match the screw holes on your motherboard.
- Замацуйце матчыну плату адпаведнымі шрубамі з скрынкі з аксэсуарамі.
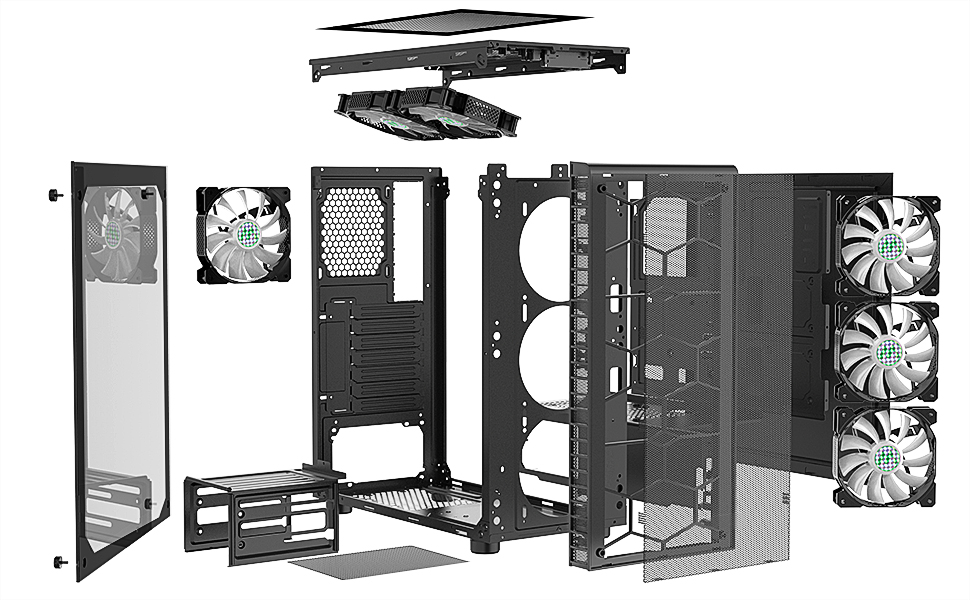
4.3 Устаноўка блока сілкавання (БП).
- Устаўце блок харчавання ў адведзены для яго адсек у ніжняй задняй частцы корпуса.
- Замацуеце блок харчавання шрубамі з задняй часткі корпуса.
- Пракладзеце кабелі блока харчавання праз адтуліны для кабеляў да матчынай платы і іншых кампанентаў.
4.4 Storage Drive Installation (SSDs/HDDs)
- 2.5-цалевыя SSD-назапашвальнікі: Mount SSDs to the dedicated SSD trays or mounting points as shown in Figure 4.
- 3.5-цалевыя жорсткія дыскі: Install HDDs into the removable hard disk holders located in the PSU shroud area. These holders can be removed to accommodate longer PSUs.
4.5 Усталёўка відэакарты (GPU)
- Зніміце неабходныя вечкі слотаў пашырэння на задняй панэлі корпуса.
- Insert your GPU into the appropriate PCIe slot on the motherboard.
- Замацуйце відэакарту шрубамі. Корпус падтрымлівае відэакарты даўжынёй да 380 мм.
4.6 Connecting Front Panel I/O and ARGB Fans
- Connect the front panel cables (Power SW, Reset SW, HDD LED, Power LED) to the corresponding pins on your motherboard. Refer to your motherboard manual for pin layout.
- Падключыце кабель USB 3.0 да раздыма USB 3.0 на матчынай плаце.
- Connect the USB 2.0 cables to the USB 2.0 headers on your motherboard.
- Connect the HD Audio cable to the audio header on your motherboard.
- The pre-installed ARGB fans are connected to a central controller. For motherboard ARGB control, connect the controller's 5V 3-PIN ARGB cable to your motherboard's 5V 3-PIN ARGB header. Do not connect to a 12V 4-PIN RGB header, as this can damage the fans.


4.7 Арганізацыя кабеляў
Выкарыстоўвайце адтуліны для пракладкі кабеляў і кропкі мацавання за паддонам матчынай платы, каб арганізаваць кабелі. Гэта паляпшае цыркуляцыю паветра і эстэтыку.

5. Аперацыя
5.1 Уключэнне
After all components are securely installed and cables connected, replace the side panels. Connect your power cable to the PSU and press the power button on the top I/O panel to start your system.
5.2 Кіраванне вентылятарам ARGB
- Кнопка кіравання: Use the dedicated LED button on the top I/O panel to cycle through 19 pre-set ARGB lighting modes.
- Motherboard Control: If the ARGB controller is connected to a 5V 3-PIN ARGB header on your motherboard, you can use your motherboard's RGB software (e.g., ASUS Aura Sync, MSI Mystic Light Sync, Gigabyte RGB Fusion) to customize fan lighting. This offers a wider range of lighting effects.
- Пульт дыстанцыйнага кіравання: The included remote control provides additional options for changing lighting modes, colors, and fan speed.
6. Тэхнічнае абслугоўванне
Рэгулярнае тэхнічнае абслугоўванне дапамагае забяспечыць аптымальную прадукцыйнасць і даўгавечнасць кампанентаў вашага ПК.
- Ачыстка пылавога фільтра: The case is equipped with a top magnetic dust filter and a bottom PSU dust filter. Regularly remove and clean these filters to prevent dust buildup inside the case, which can hinder airflow and component cooling.
- Уборка інтэр'еру: Periodically open the side panels and use compressed air to remove dust from internal components and fans. Ensure the system is powered off and unplugged before cleaning.
- Сыход за загартаваным шклом: Clean tempered glass panels with a soft, lint-free cloth and a mild glass cleaner. Avoid abrasive materials that could scratch the surface.
7. Выпраўленне непаладак
У гэтым раздзеле разглядаюцца распаўсюджаныя праблемы, з якімі вы можаце сутыкнуцца.
- Q: Fans are not lighting up or spinning.
- A: Check all fan power connections to the ARGB controller and ensure the controller is receiving power from the PSU. If using motherboard control, verify the 5V 3-PIN ARGB cable is correctly connected and your motherboard's RGB software is configured.
- Q: Front panel USB ports are not working.
- A: Ensure the USB 3.0 and USB 2.0 cables from the front panel are securely connected to the correct headers on your motherboard.
- Q: Audio jacks on the front panel are not working.
- A: Verify that the HD Audio cable from the front panel is correctly connected to the audio header on your motherboard.
- Q: System does not power on.
- A: Check that the PSU is switched on and properly connected to the wall outlet. Ensure the power button cable from the front panel is correctly connected to the motherboard's power switch pins. Verify all internal power connections (24-pin ATX, CPU, GPU, etc.) are secure.
- Q: ARGB lighting is not syncing with my motherboard.
- A: Confirm that your motherboard has a 5V 3-PIN ARGB header and that the controller is connected to it. This case is not compatible with 12V 4-PIN RGB headers for motherboard control. If connected correctly, ensure your motherboard's RGB software is installed and updated.
8. Тэхнічныя характарыстыкі
| Асаблівасць | Дэталь |
|---|---|
| Назва мадэлі | G05MN6-HW |
| Тып корпуса | Сярэдняя вежа |
| Сумяшчальнасць матчыных поплаткаў | ATX, Micro ATX, ITX |
| Памеры (ДхШхВ) | 17.7 х 17.6 х 8.3 цалі (449.58 х 447.04 х 210.82 мм) |
| Вага прадмета | 16.02 фунта (7.27 кг) |
| Матэрыял | Acrylonitrile Butadiene Styrene (ABS), Metal, Tempered Glass |
| Папярэдне ўсталяваныя вентылятары | 6 вентылятары 120 мм ARGB |
| Спосаб астуджэння | паветра |
| Максімальная даўжыня GPU | 380 мм |
| Максімальная вышыня працэсарнага кулера | 160 мм |
| Максімальная даўжыня БП | 245mm (with HDD cage removed) |
| Слоты пашырэння | 7 |
| Пярэднія парты I / O | 1 x USB 3.0, 2 x USB 2.0, 1 x HD Audio, LED Button, Power/Reset |

9. Гарантыя і падтрымка
MUSETEX products are designed and manufactured to the highest quality standards. For specific warranty information regarding your G05MN6-HW PC case, please refer to the warranty card included with your purchase or visit the official MUSETEX webсайт.
If you encounter any issues or have questions not covered in this manual, please contact MUSETEX customer support through their official website or the retailer where you purchased the product. Please have your model number (G05MN6-HW) and proof of purchase ready when contacting support.
Інтэрнэт-рэсурсы: For additional support, FAQs, and driver downloads (if applicable), please visit the MUSETEX official webсайт: MUSETEX Store on Amazon