1. Уводзіны
Дзякуй за пакупкуasing the Explore Scientific RDP1001CM3000 Radio Controlled Projection Clock. This device combines a digital clock with a radio-controlled time signal receiver, an alarm function, and a unique projection feature to display the time on your wall or ceiling. This manual provides detailed instructions for setup, operation, and maintenance to ensure optimal performance and longevity of your clock.
2. Інфармацыя па бяспецы
- Перад выкарыстаннем прылады ўважліва прачытайце ўсе інструкцыі.
- Захоўвайце гэта кіраўніцтва для выкарыстання ў будучыні.
- Не падвяргайце прыладу ўздзеянню экстрэмальных тэмператур, прамых сонечных прамянёў або высокай вільготнасці.
- Не кідайце прыладу і не падвяргайце яе моцным ударам.
- Не спрабуйце разбіраць або рамантаваць прыладу самастойна. Звяртайцеся па любыя паслугі па абслугоўванні да кваліфікаванага персаналу.
- Утылізуйце выкарыстаныя батарэі адказна ў адпаведнасці з мясцовымі правіламі.
3. Змесціва ўпакоўкі
Калі ласка, праверце змесціва пакета, каб пераканацца ў наяўнасці ўсіх прадметаў:
- Explore Scientific RDP1001CM3000 Projection Clock
- Батарэйкі (папярэдне ўсталяваныя або ўключаныя асобна)
- Кіраўніцтва карыстальніка (гэты дакумент)
- Дадаткова: AC Power Adapter (may be sold separately)
4. Прадукт скончыўсяview
The RDP1001CM3000 features a clear digital display and a rotatable projection head. It shows the time, day of the week, date, and indoor temperature. The blue backlight ensures readability in low light conditions.
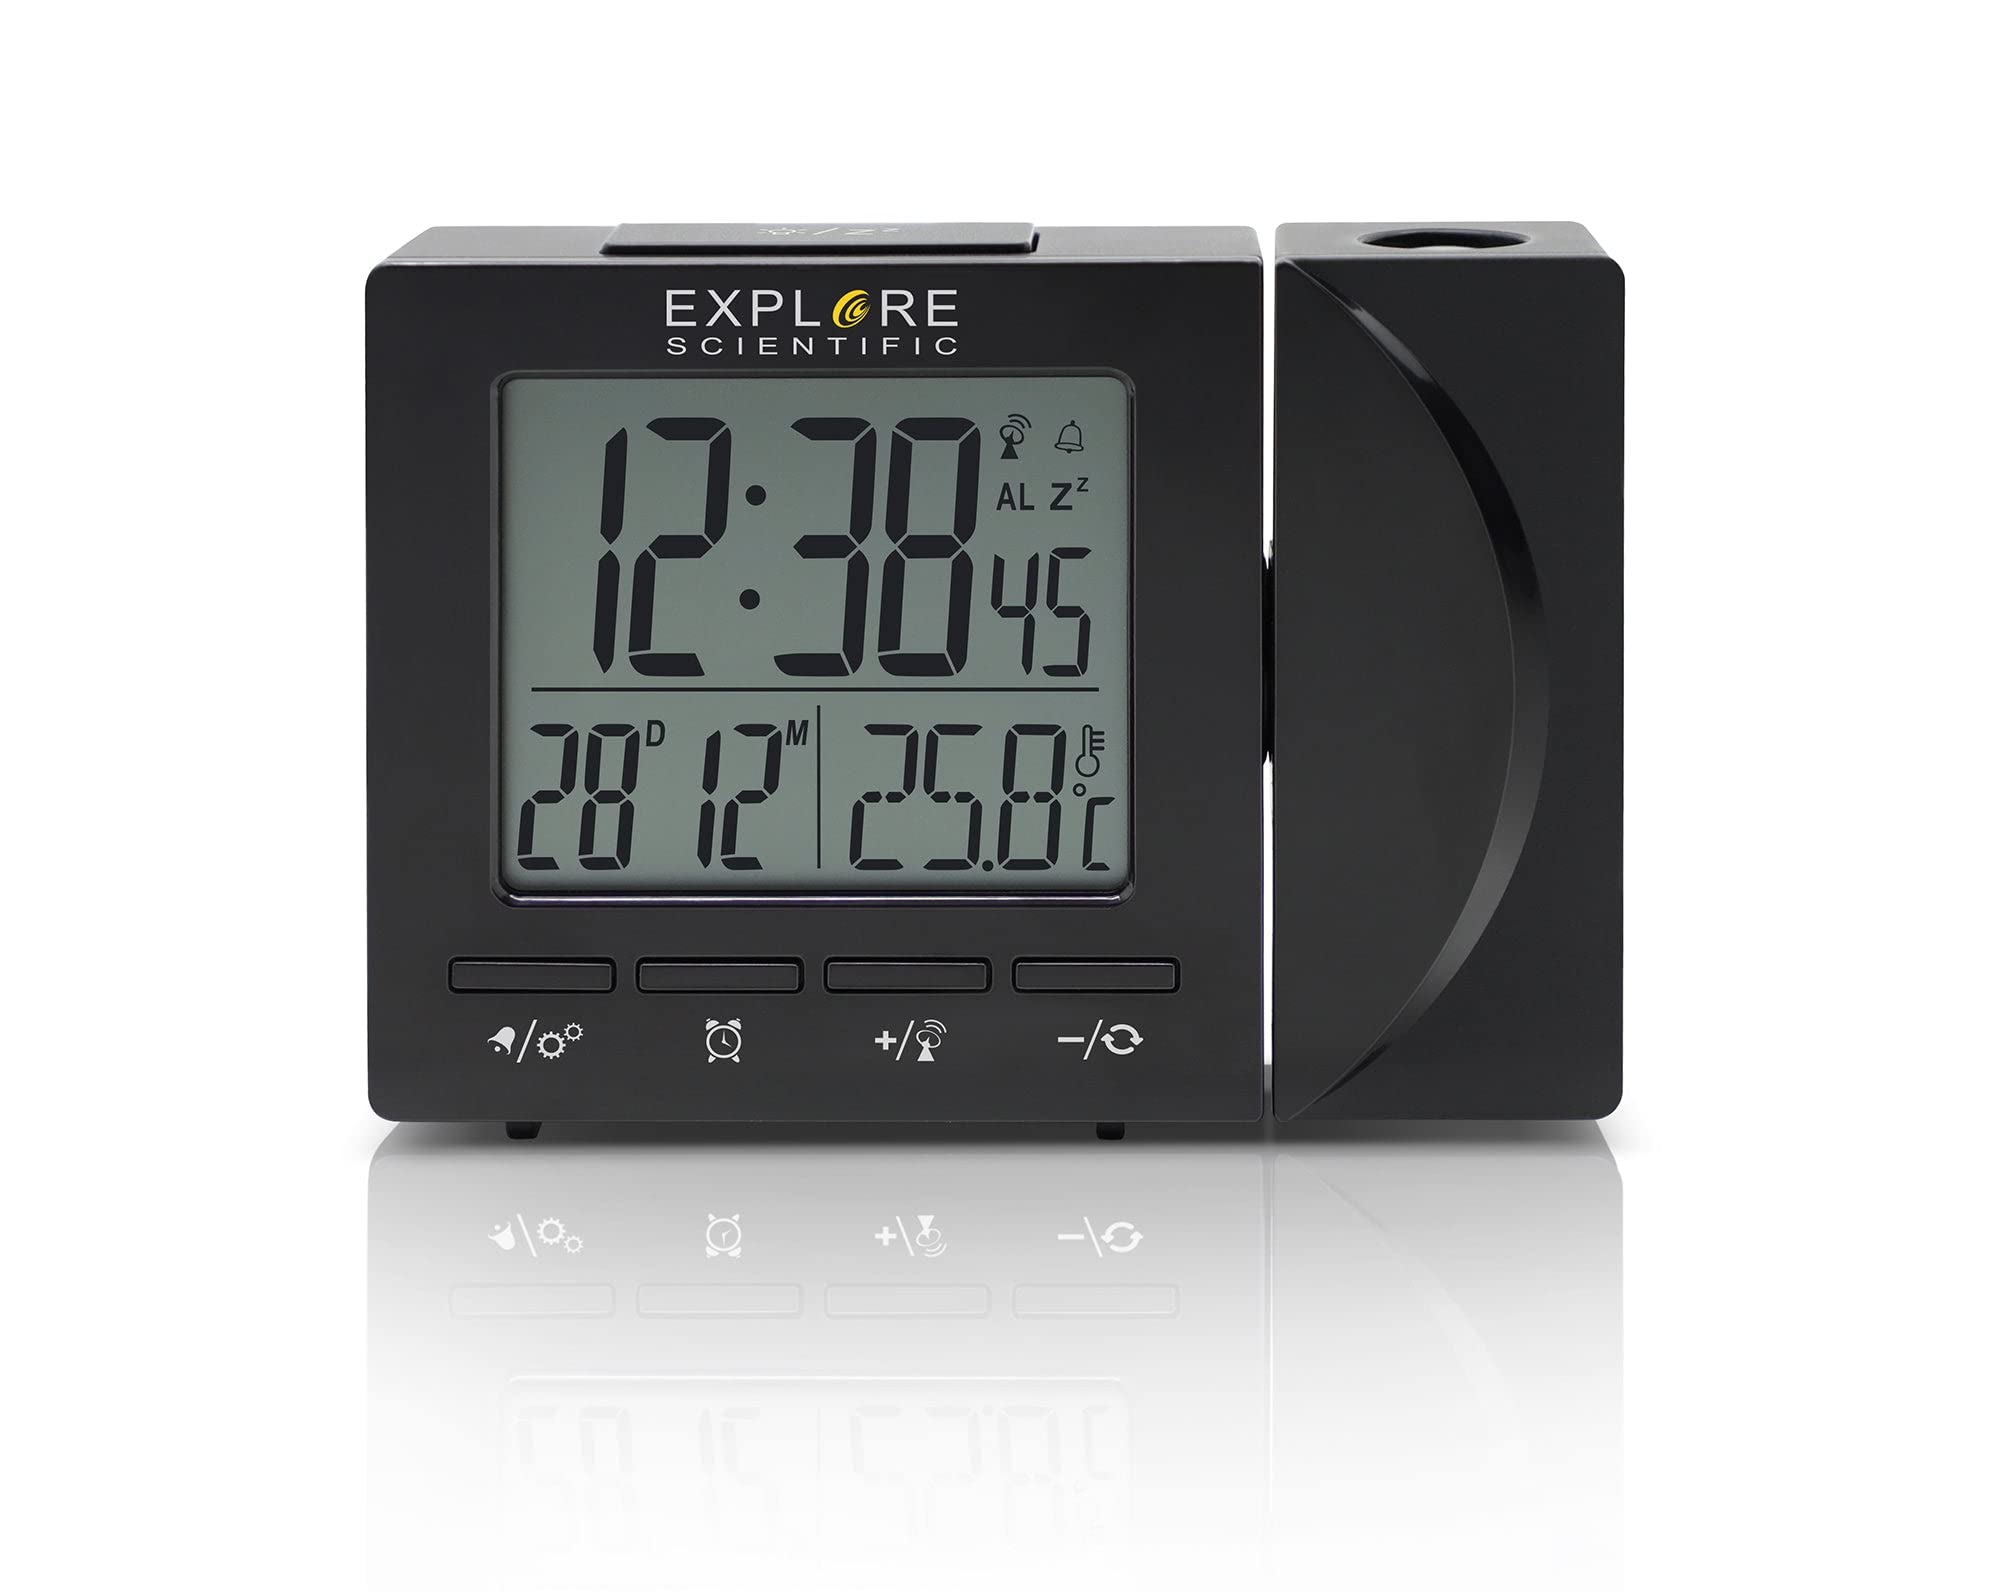
Малюнак 4.1: Фронт view of the Explore Scientific RDP1001CM3000 Projection Clock, displaying digital time, day, and date.
4.1 Асноўныя магчымасці
- Радыёкіраваны час: Automatically synchronizes with the NIST WWVB signal for accurate timekeeping.
- Праекцыя часу: Projects the time onto a wall or ceiling with a 180-degree rotatable head and flip function.
- Лічбавай дысплей: Shows time (12/24 hour selectable), weekday (five languages: GE, EN, FR, IT, DU), date, and indoor temperature (°F/°C selectable).
- Будзільнік з паўторам: Features a daily alarm with a convenient snooze function.
- Сіняя падсветка: Provides illumination for easy viewу цемры.

Малюнак 4.2: The projection feature of the clock, displaying the time on an adjacent surface.
5. Настройка
5.1 Устаноўка батарэі
- Locate the battery compartment cover on the back or bottom of the clock.
- Зніміце вечка.
- Insert the required batteries (typically AAA, refer to the compartment for polarity) ensuring correct polarity (+ and -).
- Замяніце крышку батарэйнага адсека.
5.2 Падключэнне да сеткі харчавання (неабавязкова)
For continuous projection and backlight, an optional AC power adapter can be used. If using the adapter:
- Connect the AC adapter to the DC input jack on the clock.
- Падключыце адаптар да стандартнай разеткі.
5.3 Initial Setup and Radio Control Synchronization
Upon initial power-up (after battery installation or connecting the AC adapter), the clock will automatically attempt to synchronize with the NIST WWVB radio signal. This process may take several minutes to several hours depending on your location and signal strength. During synchronization, a signal icon may flash on the display.
- Place the clock near a window for better signal reception.
- Пазбягайце размяшчэння яго побач з электроннымі прыладамі, якія могуць выклікаць перашкоды.
- Once synchronized, the time and date will be set automatically.
6. Інструкцыя па эксплуатацыі
6.1 Ручная ўстаноўка часу і даты
If the radio-controlled signal is unavailable or you prefer to set the time manually:
- Націсніце і ўтрымлівайце НАБОР button (or similar, refer to device buttons) to enter time setting mode.
- Выкарыстоўвайце UP or УНІЗ кнопкі для рэгулявання мігаючага значэння (напрыклад, гадзіны, хвіліны, год, месяц, дзень).
- Прэса НАБОР яшчэ раз, каб пацвердзіць і перайсці да наступнай налады.
- Repeat until all settings are complete, then press НАБОР да выхаду.
6.2 Setting the Alarm and Snooze Function
- Націсніце ТРЫВОГА адзін раз націсніце кнопку, каб адлюстраваць час будзільніка.
- Націсніце і ўтрымлівайце ТРЫВОГА кнопка для ўваходу ў рэжым налады будзільніка.
- Выкарыстоўвайце UP or УНІЗ buttons to adjust the alarm hour and minute.
- Прэса ТРЫВОГА для пацверджання кожнай налады.
- Каб уключыць/выключыць будзільнік, націсніце кнопку ТРЫВОГА button briefly when the alarm time is displayed. An alarm icon will appear/disappear.
- Калі прагучыць сігнал трывогі, націсніце СНАОЗ button to temporarily silence it. The alarm will sound again after a few minutes.
- To stop the alarm completely, press any other button (e.g., ТРЫВОГА or НАБОР).
6.3 Рэгуляванне праекцыі
- The projection head can be rotated 180 degrees to direct the time display onto your desired surface.
- Шукайце а ПЕРАКРЫЦЬ or КРУЦІЦЬ button/switch near the projection lens to invert the projected image if it appears upside down.
- Adjust the focus wheel (if present) on the projection lens for a clearer image.
6.4 Выбар адзінкі вымярэння тэмпературы
Націсніце ° C / ° F button (or similar) to switch between Celsius and Fahrenheit temperature display.
6.5 Time Format (12/24 Hour)
Націсніце 12/24 гадзіны button (or similar) to toggle between 12-hour and 24-hour time formats.
6.6 Weekday Language Display
The weekday display can be set to one of five languages: German (GE), English (EN), French (FR), Italian (IT), or Dutch (DU). Refer to your device's specific buttons (e.g., a dedicated МОВА button or a setting within the manual time setup) to cycle through these options.
7. Тэхнічнае абслугоўванне
- Працірайце гадзіннік мяккай сухой тканінай. Не выкарыстоўвайце абразіўныя ачышчальнікі або растваральнікі.
- Калі гадзіннік не будзе выкарыстоўвацца працяглы час, выміце батарэйкі, каб прадухіліць іх уцечку.
8. Выпраўленне непаладак
| праблема | Магчымая прычына | Рашэнне |
|---|---|---|
| Няма дысплея або дысплей цьмяны | Low or dead batteries; AC adapter not connected (if used) | Replace batteries; ensure AC adapter is securely connected. |
| Няправільны час або дата | Radio signal interference; manual setting error | Move clock to a location with better signal; perform manual time setting. |
| Праекцыя размытая | Па-за ўвагай | Adjust the focus wheel on the projection lens. |
| Projection is upside down | Projection flip function not activated | Націсніце ПЕРАКРЫЦЬ or КРУЦІЦЬ кнопка/пераключальнік. |
| Будзільнік не гучыць | Сігналізацыя не ўключана | Ensure the alarm icon is visible on the display. |
9. Тэхнічныя характарыстыкі
- Нумар мадэлі: RDP1001CM3000
- Тып дысплея: Лічбавы
- Крыніца харчавання: Battery Powered, Corded Electric (optional AC adapter)
- Асаблівасці: Alarm, Calendar Display, Temperature Display, Radio Controlled, Projection
- Адзінкі вымярэння тэмпературы: °F / °C selectable
- Фармат часу: 12 / 24 Hour selectable
- Weekday Display Languages: GE, EN, FR, IT, DU
- матэрыял: Акрыланітрыл бутадыен стырол
- колер: Чорны
- Вага прадмета: 8 унцыі
- Тып мацавання: Стальніца
10. Гарантыя і падтрымка
Explore Scientific products are designed for quality and reliability. For warranty information, technical support, or service inquiries, please refer to the warranty card included with your purchase or visit the official Explore Scientific website. Please have your model number (RDP1001CM3000) and purchase date available when contacting support.