AVENLI PSPOOLVAR
Кіраўніцтва карыстальніка надуўнога басейна AVENLI Family
Model: PSPOOLVAR
1. Уводзіны
Дзякуй за пакупкуasing the AVENLI Family Inflatable Swimming Pool. This manual provides important information regarding the setup, operation, maintenance, and safety of your new pool. Please read it thoroughly before use and retain it for future reference.

Image 1.1: The AVENLI Family Inflatable Swimming Pool, a large blue inflatable pool filled with water, designed for family use.
2. Важная інфармацыя па бяспецы
Заўсёды выконвайце гэтыя асноўныя меры бяспекі, каб знізіць рызыку траўмаў або пашкоджанняў:
- Патрабуецца нагляд дарослых: Ніколі не пакідайце дзяцей без нагляду ў басейне або каля яго.
- Раўная паверхня: Ensure the pool is set up on a completely flat and level surface to prevent collapse or water spillage.
- Чыстая зона: Keep the area around the pool clear of obstacles and hazards.
- Без дайвінга: Do not dive or jump into the pool. The water depth is not sufficient for safe diving.
- Электрабяспека: If using electrical equipment (e.g., filter pump), ensure it is properly grounded and connected to a GFCI outlet.
- Хімічныя рэчывы: Handle pool chemicals (if used) according to manufacturer's instructions and keep them out of reach of children.
- Дрэнаж: Plan for proper drainage of pool water away from structures and sensitive areas.
3. Інструкцыі па ўсталёўцы
Proper setup is crucial for the stability and longevity of your inflatable pool.
- Выбар сайта: Choose a firm, level surface free of sharp objects, debris, or excessive slopes. Ensure the ground can support the weight of the filled pool (approximately 2740 gallons or 10,372 liters for the 15ft x 36in model).
- Unpack and Spread: Carefully unpack the pool from its packaging. Spread the pool liner out completely on the chosen level ground. Ensure the bottom is as flat and wrinkle-free as possible.
- Надзьміце верхняе кольца: Locate the inflation valve on the top ring of the pool. Using an air pump (not included), inflate the top ring until it is firm to the touch but not over-inflated.
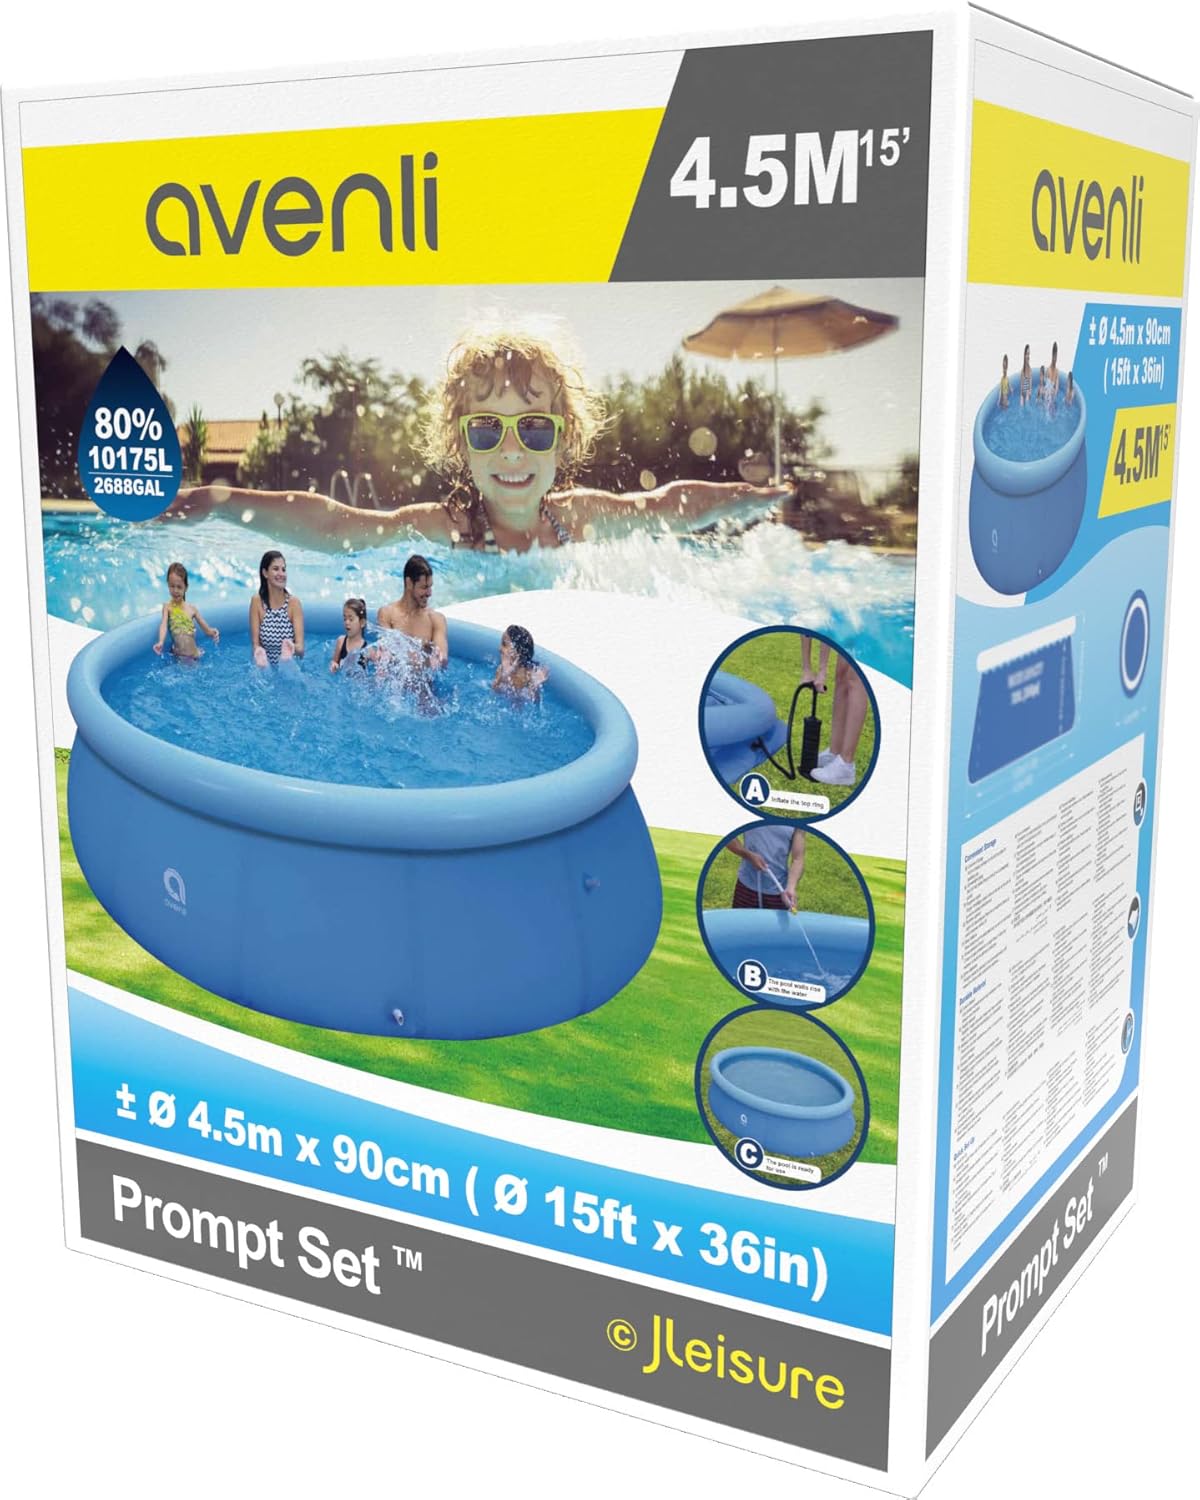
Image 3.1: The product packaging illustrates the simple setup process, including inflating the top ring (A) and filling the pool with water (B).
- Заліць вадой: Begin filling the pool with water. As the pool fills, the water pressure will cause the pool walls to rise. Continuously smooth out any wrinkles on the bottom of the pool as it fills to ensure an even base. Fill the pool to the recommended water line, typically just below the inflation valve of the top ring.
- Праверце ўцечкі: Once filled, inspect the pool for any leaks. If a leak is found, refer to the Troubleshooting section.
4. Эксплуатацыя басейна
Using your AVENLI inflatable pool is straightforward once set up.
- Узровень вады: Maintain the water level at the recommended height to ensure proper pool structure and filtration (if a pump is connected).
- Уваход і выхад: Use caution when entering and exiting the pool. Consider a small step stool or ladder if needed, ensuring it is stable and safe for pool use.
- Кантроль: Заўсёды забяспечвайце нагляд дарослых, асабліва калі дзеці знаходзяцца ў басейне або побач з ім.
- гуляць: Enjoy the pool responsibly. Avoid rough play that could damage the pool or cause injury.

Image 4.1: A family enjoying the spacious AVENLI inflatable pool, demonstrating its capacity for multiple users.
5. Тэхнічнае абслугоўванне
Regular maintenance will extend the life of your pool and ensure clean water.
- Якасць вады: Regularly test and balance pool water chemicals (pH, chlorine, etc.) according to local guidelines and chemical manufacturer instructions.
- Уборка: Remove debris (leaves, insects) from the water surface daily using a skimmer net. Periodically brush the pool walls and bottom to prevent algae growth.
- Падключэнне фільтруючага помпы: The pool is equipped with 32mm connections for a filter pump (not included). Connecting a filter pump will help maintain water clarity and hygiene.

Image 5.1: This diagram illustrates the drain valve and the 32mm connections for an optional filter pump, allowing for improved water circulation and cleanliness.
- Асушанне басейна: To drain the pool, locate the drain valve at the bottom of the pool wall. Remove the cap and attach a garden hose adapter (if desired) to direct the water away from your property.

Image 5.2: The drain valve with a garden hose adapter attached, facilitating controlled and efficient water drainage from the pool.

Image 5.3: The individual components of the drain valve system, including the cap, internal plug, and garden hose adapter.
- захоўванне: Before storing, ensure the pool is completely dry to prevent mold and mildew. Deflate the top ring and fold the pool neatly. Store in a cool, dry place away from direct sunlight and extreme temperatures.
6. Выпраўленне непаладак
Распаўсюджаныя праблемы і іх рашэнні.
- Pool Not Standing Upright / Uneven:
- Ensure the ground is perfectly level before filling.
- Smooth out all wrinkles on the bottom of the pool as it fills with water.
- Check if the top ring is sufficiently inflated.
- Уцечка вады:
- Inspect the pool liner for punctures or tears.
- Use the included repair patch to fix small holes. Clean the area around the hole thoroughly, apply the patch firmly, and allow it to cure for several hours before refilling.

Image 6.1: The included repair patch (blue rectangular sheets) and other accessories for pool maintenance.
- Check connections for filter pump (if installed) and drain valve for proper sealing.
- Top Ring Deflating:
- Пераканайцеся, што вечка клапана напаўнення шчыльна зачынена.
- Check for small punctures on the top ring and repair with the patch kit.
7. Тэхнічныя характарыстыкі
| Асаблівасць | Дэталь |
|---|---|
| Марка | AVENLI |
| Нумар мадэлі | PSPOOLVAR |
| Памеры прадукту | 120"L x 120"W x 30"H (305cm L x 305cm W x 76cm H) - Note: Product title states 15ft x 36in, but specifications list 120"x120"x30". Please verify your specific model. |
| Форма | Круглая |
| Колер | Сіні |
| Матэрыял | Полівінілхларыд (ПВХ) |
| Ёмістасць | 2740 галонаў (10,372 літраў) |
| Вага прадмета | 11 фунта (5 кілаграма) |
| Патрабуецца зборка | No (Self-erecting with water fill) |
| Асаблівасць | Inflatable Top Ring |
| Уключаныя кампаненты | Repair Patch, Instruction Manual |

Image 7.1: A technical diagram illustrating the pool's dimensions (4.5m/15ft diameter, 90cm/36in height) and water capacity (7820L/2065gal). Note: This image's capacity differs from the text specification (2740 gallons). Users should refer to their specific product packaging for exact figures.
8. Інфармацыя аб гарантыі
Specific warranty details for your AVENLI Inflatable Swimming Pool may vary by region and retailer. Please refer to the warranty card included with your product or contact the retailer where you purchased the pool for detailed information regarding warranty coverage, terms, and conditions.
Generally, warranties cover manufacturing defects. Damage resulting from improper setup, misuse, neglect, or natural disasters is typically not covered.
9. Падтрымка кліентаў
For further assistance, questions, or to report issues not covered in this manual, please contact AVENLI customer support. Contact information can usually be found on the product packaging, the manufacturer's official webсайце або праз вашага прадаўца.
When contacting support, please have your product model number (PSPOOLVAR) and purchase date available.