
PowMr ML2440
Кіраўніцтва карыстальніка кантролера сонечнай зарадкі PowMr 40A MPPT
Мадэль: ML2440
1. Уводзіны
This manual provides essential information for the safe and efficient operation of your PowMr 40A MPPT Solar Charge Controller, model ML2440. Please read this manual thoroughly before installation and use to ensure optimal performance and longevity of the product.
2. Інструкцыі па тэхніцы бяспекі
- Пераканайцеся, што ўся праводка правільна падключана і замацавана, каб пазбегнуць кароткага замыкання або пашкоджання.
- Always connect the battery to the charge controller first, then the solar panels, and finally the load. Disconnect in the reverse order.
- Do not attempt to repair or modify the controller yourself. Contact qualified personnel for service.
- Усталюйце кантролер у добра вентыляваным памяшканні, удалечыні ад лёгкаўзгаральных матэрыялаў і прамых сонечных прамянёў.
- Пры працы з электрычнымі сістэмамі выкарыстоўвайце адпаведныя сродкі індывідуальнай абароны (СІА).
- Пераканайцеся, што сістэма voltage matches the controller's specifications (12V/24V auto-detection).
3. Прадукт скончыўсяview
The PowMr 40A MPPT Solar Charge Controller is designed to efficiently manage power from your solar panels to charge various battery types, including Lithium, Sealed, Gel, and Flooded batteries. It features Maximum Power Point Tracking (MPPT) technology for optimized solar energy harvesting, automatic 12V/24V system voltage detection, and a clear LCD display for monitoring system status.
Малюнак 3.1: Фронт view of the PowMr 40A MPPT Solar Charge Controller.
This image shows the main unit of the PowMr 40A MPPT Solar Charge Controller, highlighting its compact design and integrated LCD screen.
The controller supports a maximum solar input voltage of 100V and a maximum input power of 1100W for a 24V system (550W for 12V). It also includes temperature compensation for accurate charging across varying environmental conditions.

Малюнак 3.2: Temperature compensation feature.
This image illustrates the temperature compensation capability of the controller, ensuring optimal battery charging performance in both hot and cold environments.
4. Мантаж і праводка
Proper installation is crucial for the safe and efficient operation of your solar charge controller. Follow these steps carefully.
4.1 Электрычная схема

Малюнак 4.1: Wiring diagram for the PowMr MPPT Solar Charge Controller.
This diagram illustrates the correct connection order for the battery, solar panels, DC load, and optional inverter. A temperature sensor is also shown.
4.2 Этапы падключэння
- Спачатку падключыце акумулятар: Connect the battery to the charge controller's battery terminals. Ensure correct polarity. The controller will auto-detect 12V or 24V system voltage.
- Падключэнне сонечных панэляў: Connect the solar panels to the PV input terminals. Ensure correct polarity. The controller will begin charging if sufficient sunlight is available.
- Падключэнне нагрузкі пастаяннага току (неабавязкова): Калі выкарыстоўваецца нагрузка пастаяннага току непасрэдна ад кантролера, падключыце яе да клем нагрузкі.
- Connect Inverter (Optional): If using an inverter, connect it to the battery terminals (not directly to the load terminals of the controller).
- Падключэнне датчыка тэмпературы: For accurate temperature compensation, connect the provided temperature sensor to the designated port on the controller and place the sensor near the battery.
Disconnection Order: To disconnect the system, always follow the reverse order: Disconnect load, then solar panels, then battery.
5. Інструкцыя па эксплуатацыі
This section details how to monitor and configure your charge controller using its integrated LCD display and the optional Bluetooth mobile application.
5.1 ВК-дысплей большview

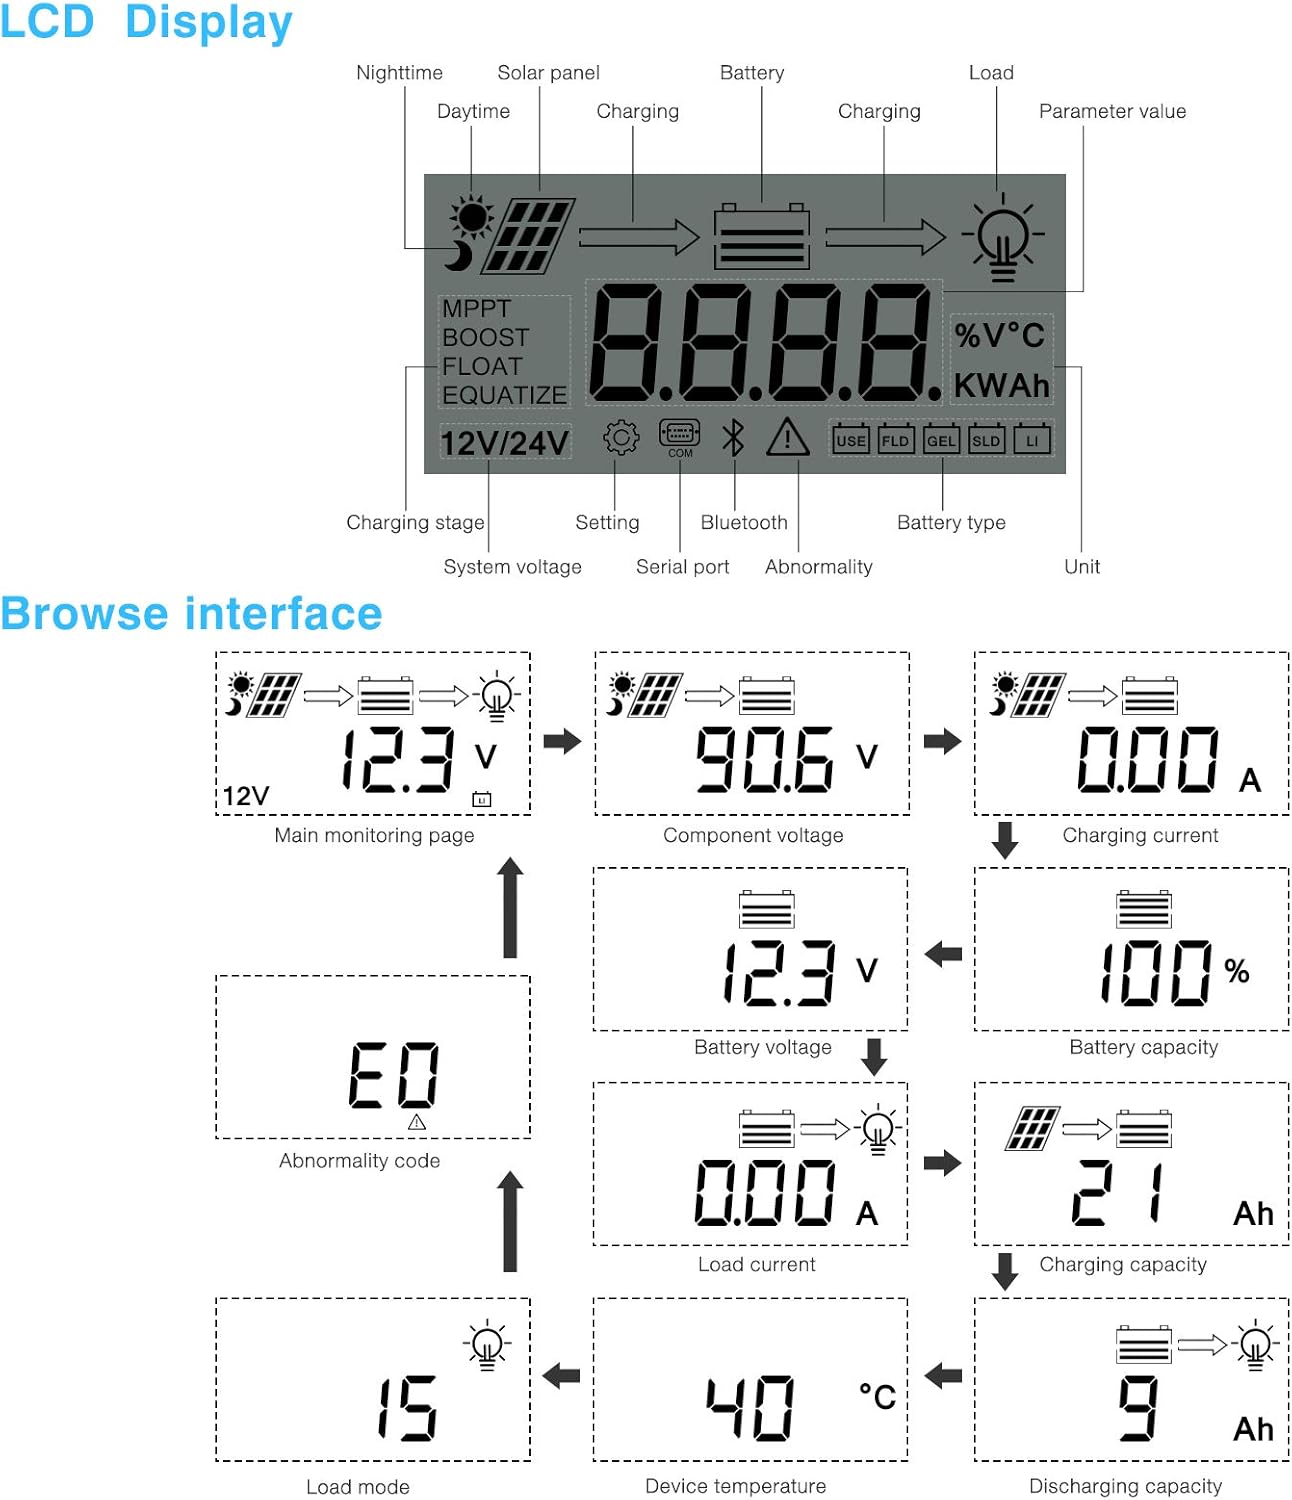
Малюнак 5.1: LCD Display and Browse Interface.
This image shows the various icons and parameters displayed on the LCD screen, along with the navigation flow through different monitoring pages.
The LCD provides real-time information about your solar system. Key indicators include:
- Зарадка Сtage: MPPT, Boost, Float, Equalize.
- Сістэма Voltage: 12V/24V auto-detected.
- Тып батарэі: Icons for Lithium (Li), Sealed (SLD), Gel (GEL), Flooded (FLD).
- Індыкатары стану: Solar panel activity, battery charging, load status, abnormality.
- Значэнне параметра: Адлюстроўвае тtage, current, capacity, temperature, etc.
Use the buttons below the LCD to navigate through different screens to view parameters such as main monitoring page, component voltage, зарадны ток, аб'ём батарэіtage, battery capacity, load current, charging capacity, device temperature, discharging capacity, abnormality codes, and load mode.
5.2 Bluetooth Mobile Application
The controller supports an optional Bluetooth module (BT-1) for remote monitoring and parameter adjustment via a mobile application (available for Apple iOS and Android devices). The Bluetooth module connects to the RS232 port on the controller.

Малюнак 5.2: Controller with optional Bluetooth module.
This image displays the PowMr MPPT Solar Charge Controller alongside its optional BT-1 Bluetooth communication module and connecting cable.

Малюнак 5.3: BT-1 Bluetooth module.
Падрабязны view of the BT-1 Bluetooth module, which enables wireless communication with the solar charge controller for remote monitoring and settings adjustments.

Малюнак 5.4: Bluetooth Mobile Interface Display.
This image shows various screens from the mobile application, including real-time monitoring, data records, energy records, and parameter settings.
The mobile application allows you to:
- Monitor real-time system data (voltage, current, power, temperature).
- View historical data and energy records.
- Adjust various charging parameters and battery settings.
- Аднавіць заводскія налады па змаўчанні.
6. Тэхнічнае абслугоўванне
Regular maintenance ensures the longevity and optimal performance of your charge controller.
- Уборка: Periodically clean the controller's exterior with a dry cloth to remove dust and debris. Ensure ventilation openings are clear.
- Сувязі: Annually check all wiring connections for tightness and corrosion. Loose connections can cause overheating and poor performance.
- Асяроддзе: Ensure the installation environment remains within the specified operating temperature range and is free from excessive moisture or dust.
7. Выпраўленне непаладак
This section provides guidance for common issues. Refer to the LCD display for abnormality codes.
- Няма дысплея/няма харчавання:
- Праверце падключэнні акумулятара і пераканайцеся ў яго наяўнасціtage знаходзіцца ў працоўным дыяпазоне.
- Verify that the battery fuse (if installed) is intact.
- Без зарадкі:
- Ensure solar panels are connected correctly and receiving sufficient sunlight.
- Праверце сонечную панэль voltagе і ток.
- Verify that the battery is not fully charged or in a protection state.
- Загрузка не працуе:
- Check load connections and ensure the load current does not exceed the controller's rating.
- Пераканайцеся, што батарэя voltage знаходзіцца вышэй нізкай гучнасціtage disconnect (LVD) setting.
- Check for any abnormality codes on the LCD related to load output.
- Abnormality Codes (e.g., "E0"):
- Refer to the specific abnormality code displayed on the LCD. Consult the full product manual or manufacturer's support for detailed explanations and solutions for each code.
8. Тэхнічныя характарыстыкі
Technical specifications for the PowMr 40A MPPT Solar Charge Controller (Model ML2440).

Малюнак 8.1: Product Specifications Table.
This table provides detailed technical parameters for the ML2420, ML2430, and ML2440 models. The ML2440 column is relevant for this 40A controller.
| Параметр | Value (ML2440) |
|---|---|
| мадэль | ML2440 |
| Сістэма выпtage | 12V / 24V Аўто |
| Страта без нагрузкі | Ад 0.7 Вт да 1.2 Вт |
| Акумулятар абtage | Ад 9 да 35 В |
| Макс. сонечнага ўваходу абtage | 100 В (25°C), 90 В (-25°C) |
| Макс. power point voltagе дыяпазон | Акумулятар абtage ад +2В да 75В |
| Намінальны зарадны ток | 40А |
| Намінальны ток нагрузкі | 20А |
| Макс. ёмістая грузападымальнасць | 10000 мкФ |
| Макс. ўваходная магутнасць фотаэлектрычнай сістэмы | 550W/ 12V, 1100W/ 24V |
| Эфектыўнасць пераўтварэння | ≤ 98% |
| Эфектыўнасць адсочвання MPPT | > 99% |
| Каэфіцыент тэмпературнай кампенсацыі | -3.0mv/ °C/ 2V (default) |
| Працоўная тэмпература | -35°C да +45°C |
| Ступень абароны | IP32 |
| Вага | 2 кг |
| Спосаб зносін | RS232 |
| Вышыня над узроўнем мора | ≤ 3000 м |
| Памеры вырабы | 238*173*72.5 мм |
9. Гарантыя і падтрымка
For warranty information, please refer to the documentation included with your product packaging or visit the official PowMr website. If you encounter any issues not covered in this manual or require further assistance, please contact PowMr customer support.
PowMr Official Webсайт: Visit the PowMr Store on Amazon
Ask a question about this manual
Ask about setup, troubleshooting, compatibility, parts, safety, or missing instructions. Manuals+ will review the question and use this page’s manual context to help answer it.