
1. Прадукт скончыўсяview
The QIACHIP 433MHz Universal Wireless RF Remote Control Switch is a compact and versatile 1-channel relay kit designed for secure wireless control of various DC loads. This kit includes a miniature receiver module and a remote control transmitter, offering convenient operation for a wide range of applications. Its robust design supports a broad operating voltage and multiple control modes.

Image 1.1: QIACHIP 433MHz Wireless RF Remote Control Switch Kit, showing the compact remote and receiver module.
Асноўныя характарыстыкі:
- Wide Operating Voltage: DC3.6V-DC24V.
- Максімальная нагрузка: 2A.
- Multiple Work Modes: Momentary, Toggle, Latched, and Delay Mode.
- Negative Side Switching: This controller switches the ground (negative) instead of positive power. The positive output wire maintains constant VCC voltagе пры любых умовах.
- Кампактны дызайн: Small form factor for easy integration into various projects.
2. Настройка і падключэнне
Proper wiring is crucial for the safe and effective operation of your QIACHIP remote control switch. Please follow the instructions below carefully.
2.1 Электрычная схема
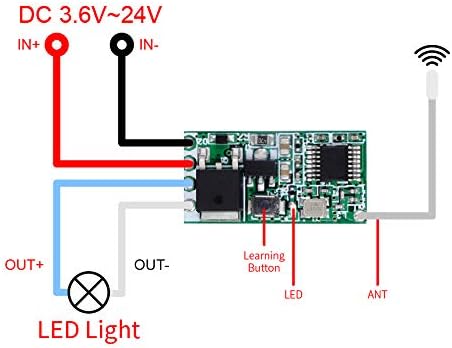
Image 2.1: Basic wiring diagram for connecting the receiver module to a DC load (e.g., LED light) and power supply.
The receiver module features four wires for connection:
- Input Positive (IN+): Connect to the positive terminal of your DC power supply.
- Input Negative (IN-): Connect to the negative terminal of your DC power supply.
- Output Positive (OUT+): Connect to the positive terminal of your DC load (e.g., LED light, motor).
- Output Negative (OUT-): Падключыце да адмоўнага вываду вашай нагрузкі пастаяннага току.
Важна: This device uses negative-side switching. The OUT+ wire will always have voltage. The switching action occurs on the negative (ground) side. Ensure proper polarity when connecting your load to avoid damage.
2.2 Connecting to a Light Source
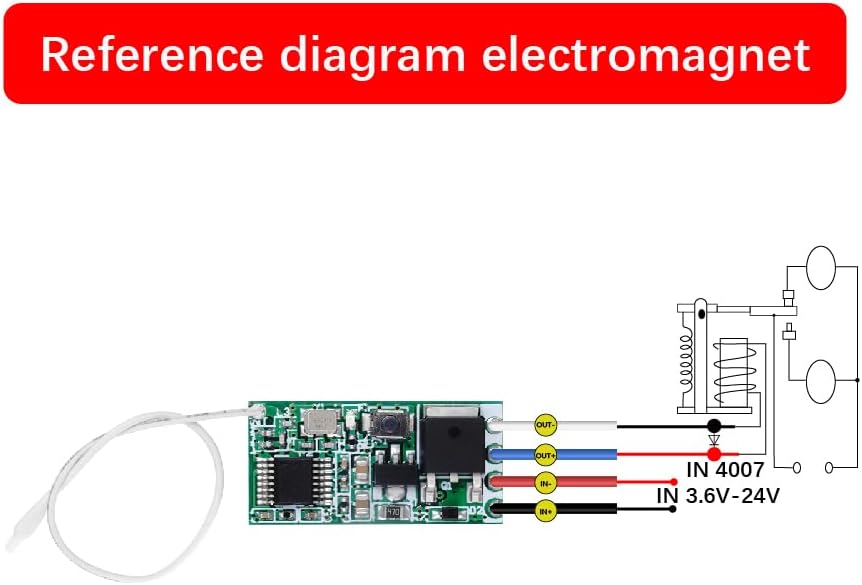
Image 2.2: Detailed wiring for controlling an LED light. The input wires connect to the power source, and the output wires connect to the LED light.
Connect the IN+ and IN- wires to your DC power source (3.6V-24V). Connect the OUT+ wire to the positive terminal of your LED light and the OUT- wire to the negative terminal of your LED light. Ensure all connections are secure.
2.3 Connecting to an Electromagnet

Image 2.3: Wiring for controlling an electromagnet. The module acts as an intermediary switch for the electromagnet's power supply.
For controlling an electromagnet, connect the IN+ and IN- wires to your DC power source. Connect the OUT+ wire to the positive terminal of the electromagnet and the OUT- wire to the negative terminal of the electromagnet. This setup allows the remote to activate/deactivate the electromagnet.
3. Operating Modes and Pairing
The receiver module supports four different operating modes, each suited for specific applications. The 'Learning Button' on the receiver module is used to pair the remote control and select the desired mode.

Image 3.1: Close-up of the receiver module, highlighting the 'Learning Button' for mode selection and pairing.
3.1 Clearing Existing Pairings (Reset)
Before setting a new mode or pairing a new remote, it is recommended to clear any existing pairings to prevent conflicts.
- Press the learning button on the receiver 8 XNUMX XNUMX разоў.
- The indicator light will flash and then turn off, indicating that all previously paired remotes are now inactive.
3.2 Momentary Mode
In Momentary Mode, the output is active only while the remote button is pressed. Releasing the button deactivates the output.
- Press the learning button on the receiver 1 раз. Загарыцца індыкатар.
- Press any button on your remote control 1 раз. The indicator light will flash and then turn off.
- The Momentary Mode is now set. Press and hold the paired remote button to activate the load; release to deactivate.
3.3 Рэжым пераключэння
In Toggle Mode, pressing the remote button once activates the output, and pressing the same button again deactivates it.
- Press the learning button on the receiver 2 XNUMX XNUMX разоў. Загарыцца індыкатар.
- Press any button on your remote control 1 раз. The indicator light will flash and then turn off.
- The Toggle Mode is now set. Press the paired remote button once to activate the load; press again to deactivate.
3.4 Latched Mode
In Latched Mode, one button activates the output, and another button deactivates it. This mode requires a remote with at least two distinct buttons (e.g., ON/OFF).
- Press the learning button on the receiver 3 XNUMX XNUMX разоў. Загарыцца індыкатар.
- Press the 'ON' button (or desired activation button) on your remote control 1 раз. The indicator light will flash.
- Then, press the 'OFF' button (or desired deactivation button) on the same remote control 1 раз. The indicator light will flash and then turn off.
- The Latched Mode is now set. Press the 'ON' button to activate the load; press the 'OFF' button to deactivate.
3.5 Delay Off Mode
In Delay Off Mode, the output activates when the remote button is pressed and automatically deactivates after a set delay period (5s, 10s, 15s, or 20s).
- Press the learning button on the receiver a specific number of times for the desired delay:
- 4 XNUMX XNUMX разоў for a 5-second delay.
- 5 XNUMX XNUMX разоў for a 10-second delay.
- 6 XNUMX XNUMX разоў for a 15-second delay.
- 7 XNUMX XNUMX разоў for a 20-second delay.
- After pressing the learning button the specified number of times, the indicator light will turn on.
- Press any button on your remote control 1 раз. The indicator light will flash and then turn off.
- The Delay Off Mode is now set. Press the paired remote button to activate the load; it will automatically turn off after the set delay.
Video 3.1: This video demonstrates the four function modes (Momentary, Toggle, Latched, Delay) and their pairing guides for the mini module QA-R-011.
4. Дадаткі
The QIACHIP 433MHz Wireless RF Remote Control Switch is suitable for a variety of low-power DC applications, including:
- Wireless control of LED lamp strings and Christmas tree lights.
- Light control switches for DIY projects.
- Integration into alarm systems.
- Controlling small DC motors (e.g., for electronic locks).
Video 4.1: This video showcases various application examples for the wireless mini module remote switch, including controlling LED strips, alarms, and electromagnetic locks.
5. Тэхнічныя характарыстыкі
| Асаблівасць | Дэталь |
|---|---|
| Фірмовае найменне | QIACHIP |
| мадэль | B083GRC5P7 (QA-R-011) |
| Аперацыйная Voltage | DC3.6V-DC24V |
| Максімальны ток пераключэння | 2 Amps |
| Тып кантакту | Звычайна адкрыты |
| Рэжым працы | Аўтаматычны |
| Тып раздыма | Шруба |
| Кантактны матэрыял | Серабро |
6. Выпраўленне непаладак
If you encounter issues with your QIACHIP remote control switch, refer to the following common problems and solutions:
- Пульт не адказвае: Ensure the receiver module is powered correctly (DC3.6V-DC24V). Clear all existing pairings (press learning button 8 times) and re-pair the remote in the desired mode.
- Output always on/off: Verify the wiring connections, especially polarity. Confirm the correct operating mode has been set. If using Latched mode, ensure both ON and OFF buttons were paired correctly.
- Device not turning on/off after power cycle: If the device defaults to an unexpected state after power loss, re-program the desired mode. Some modes may not retain state after power interruption.
- Абмежаваны дыяпазон: Ensure the antenna wire on the receiver module is extended and not obstructed. Avoid placing the receiver near large metal objects or other RF interference sources.
- Product not working as described: Double-check the wiring against the provided diagrams. Ensure the load current does not exceed 2A. For higher power applications, an external relay is recommended.
- Not for Common Ground Electronic Devices: This product is not designed for active electronic modules, circuit boards, or equipment that shares a common ground. It is intended for resistive loads (LED lights). Using it with incompatible devices may cause abnormal operation or damage.
7. Тэхнічнае абслугоўванне
The QIACHIP remote control switch is designed for durability and requires minimal maintenance. To ensure optimal performance and longevity:
- Keep the module dry and away from moisture or extreme temperatures.
- Avoid exposing the module to excessive dust or corrosive environments.
- Do not exceed the maximum rated current of 2A to prevent overheating or damage.
- Перыядычна правярайце злучэнні правадоў на наяўнасць няшчыльнасці або карозіі.
- If installing in an outdoor or harsh environment, consider enclosing the module in a waterproof casing.
8. Гарантыя і падтрымка
QIACHIP products are manufactured to high-quality standards. For any issues or questions regarding your product, please contact QIACHIP customer support.
- Гарантыя: Калі ласка, звярніцеся да дакументацыі па куплі, каб атрымаць падрабязную інфармацыю аб гарантыі.
- Падтрымка кліентаў: If you encounter any problems during use, please feel free to contact us by e-mail. We are committed to providing comprehensive support.


