1. Уводзіны
This manual provides detailed instructions for the installation, operation, and maintenance of your DCOLOR U8 HDMI TV Stick DVB-T2 HD Receiver. This device allows you to receive DVB-T2/DVB-C digital terrestrial and cable channels in Full HD 1080P, supporting H.265 HEVC 10-bit and Dolby Audio. It also features PVR recording and multimedia playback via USB.
Please read this manual carefully before using the product to ensure proper functionality and to maximize your viewвопыту.
2. Прадукт скончыўсяview
2.1 Асноўныя магчымасці
- Plug and Play: Compatible with all TV systems featuring an HDMI socket. Powered by TV USB port for a tidy setup.
- Full HD 1080P: Supports HEVC H.265 10-bit for DVB-T2/DVB-C HD channels.
- PVR Record & Playback: Connect a USB 2.0/3.0 (FAT32) disk to record TV shows and play back various multimedia formats (MP3, JPEG, BMP, AVI, DivX, VOB, MKV, AC3, etc.).
- Dolby Audio Support: Enjoy enhanced audio for a cinematic experience.
- 2-in-1 Programmable Remote Control: Control both the receiver and your TV.

Figure 1: DCOLOR U8 HDMI TV Stick Key Features
2.2 Змест пакета
Пасля адкрыцця ўпакоўкі пераканайцеся, што ўсе наступныя рэчы наяўныя:
- 1 x DVB-T2 HD Receiver (U8 HDMI TV Stick)
- 1 x 2-in-1 Programmable Remote Control (batteries not included)
- 1 х кабель HDMI
- 1 x Mini USB Infrared Sensor Receiver (1 meter)
- 1 x USB to DC Power Cable (1 meter)
- 1 x User Manual (English and Italian)

Малюнак 2: Змест пакета
2.3 Кампаненты прылады
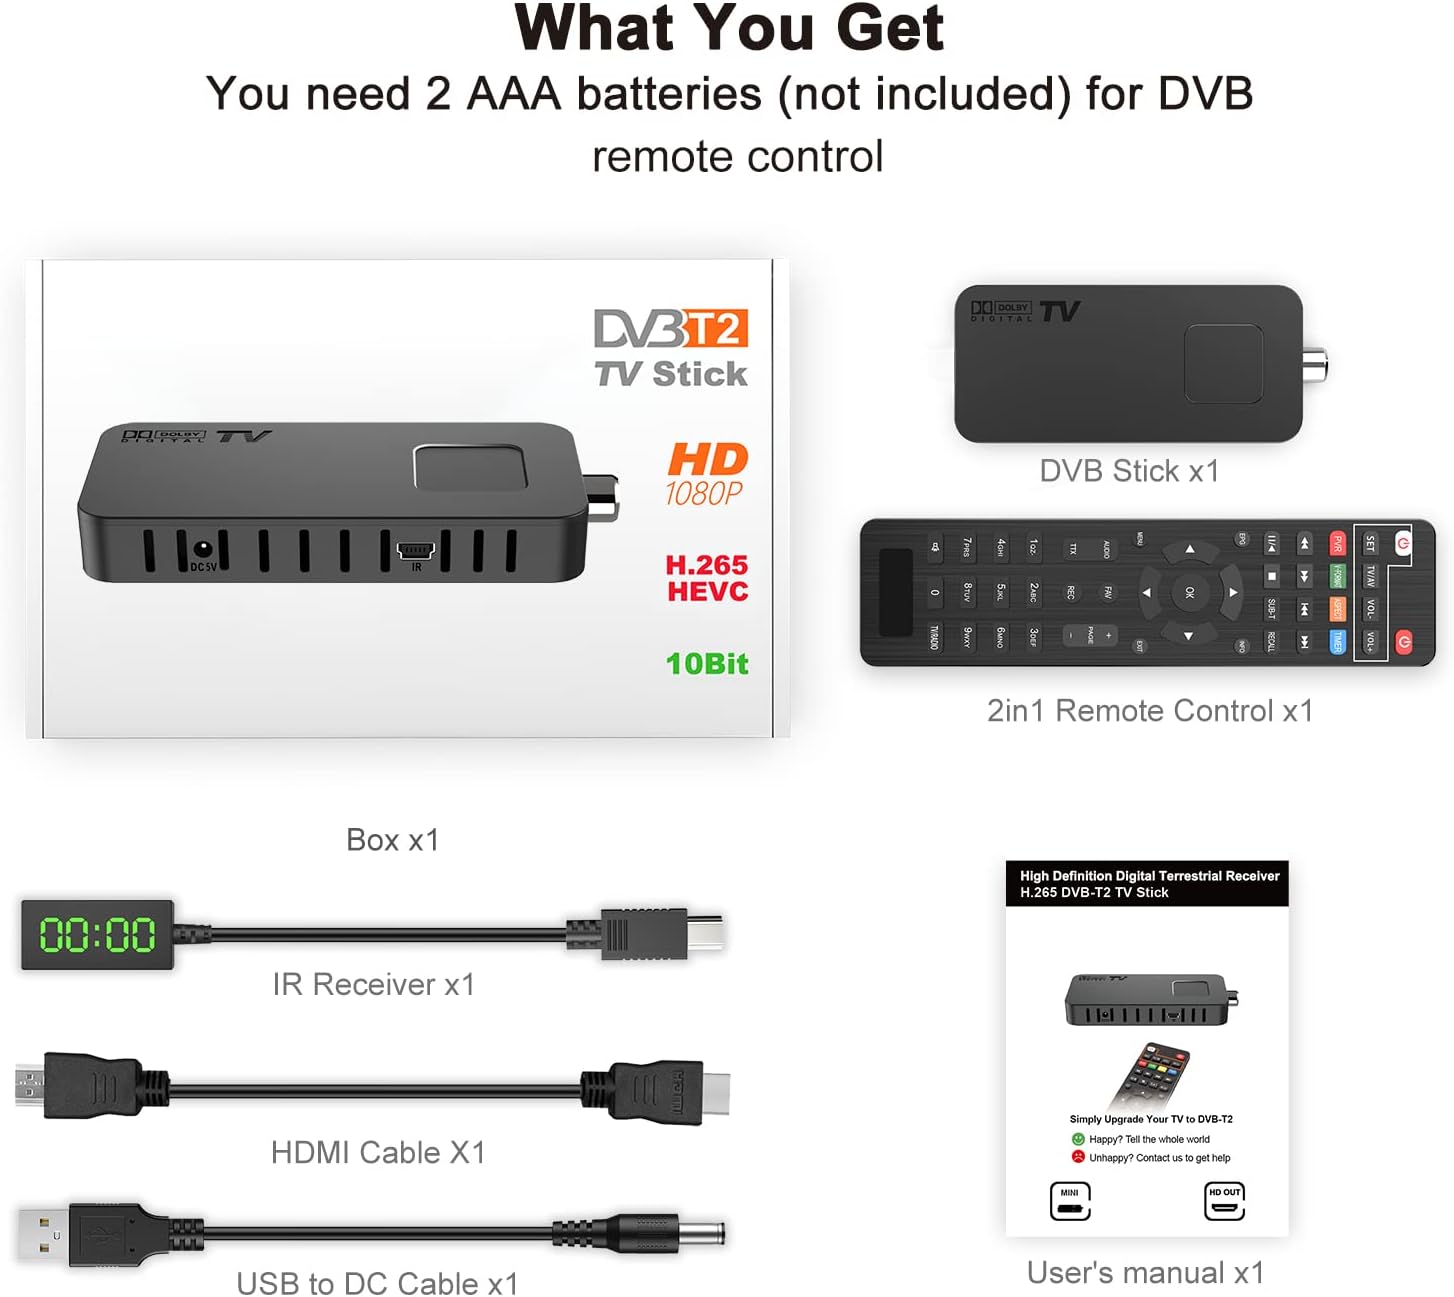
Figure 3: DVB-T2 HD Receiver Ports and Connections
- Падключэнне HDMI: 1080P Full HD output to your TV or projector.
- Порт USB: For storage devices (PVR) or USB WiFi Dongle (MT7601).
- DVB-T2/C Tuner (ANT IN): Падключыце эфірную або кабельную антэну.
- Уваходная магутнасць 5 В пастаяннага току: Power the device via TV USB port or a USB 5V wall adapter.
- ІЧ-уваход: Connect the infrared sensor receiver for remote control.
3. Інструкцыі па ўсталёўцы
Follow these steps to set up your DCOLOR U8 HDMI TV Stick:
- Connect to TV HDMI Port: Plug the DVB-T2 HD Receiver directly into an available HDMI port on your television. The included HDMI cable can be used if direct connection is not feasible or if an extension is needed.
- Падключыце харчаванне: Connect the USB to DC power cable to the receiver's DC 5V input. Plug the USB end into a TV USB port (5V, 1A minimum recommended) or a USB 5V wall adapter (not included).
- Падключэнне ІЧ-прыёмніка: Plug the mini USB infrared sensor receiver into the IR input port on the DVB-T2 HD Receiver. Position the IR sensor in a location where it has a clear line of sight to your remote control.
- Падключэнне антэны: Connect your DVB-T2/C antenna to the ANT IN port on the receiver. For optimal reception, ensure you are using a suitable antenna for your region.

Figure 4: Simple Setup Guide

Figure 5: Receiver Hidden Behind TV for a Tidy Setup

Figure 6: Complete Connection Diagram
4. Інструкцыя па эксплуатацыі
4.1 Пачатковае ўключэнне і сканаванне каналаў
After connecting all components and powering on your TV, switch your TV's input source to the HDMI port where the DVB-T2 HD Receiver is connected. The device will typically boot up and initiate an automatic channel scan upon first use. This process may take a few minutes. Ensure your antenna is properly connected for successful channel detection.
4.2 Функцыі дыстанцыйнага кіравання
The included 2-in-1 remote control allows you to operate both the receiver and your TV. Insert 2 AAA batteries (not included) into the remote control.

Figure 7: Remote Control Layout and Functions
Programmable TV Buttons: The top section of the remote (POWER, TV/AV, VOL-, VOL+) can be programmed to control your TV. Refer to the manual's specific section on remote programming for detailed steps.

Figure 8: Programmable TV Control Buttons
- Магутнасць: Уключае/выключае прыёмнік.
- CH+/CH-: Мяняе каналы.
- ГУЧНОСТЬ+/ГУЧНОСТЬ-: Рэгулюе гучнасць.
- OK: Confirms selections in menus or displays channel information.
- МЕНЮ: Доступ да галоўнага меню для налад і функцый.
- ВЫХОД: Выхад з бягучага меню або экрана.
- EPG: Displays the Electronic Program Guide (if available).
- PVR: Initiates recording (with USB storage connected).
- Мультымедыя USB: Use the USB port for playing media files.
4.3 PVR Recording and Multimedia Playback
To use the PVR function or play multimedia files, connect a USB 2.0 or 3.0 storage device (formatted to FAT32) to the USB port on the receiver. You can then access recording options via the remote's PVR button or navigate to the multimedia player through the main menu.
4.4 Dolby Audio Experience
The receiver supports Dolby Audio, providing enhanced sound quality for your viewing experience. Ensure your TV's audio settings are configured to output Dolby Digital if supported.

Figure 9: Enjoying Enhanced Dolby Audio
4.5 Projector Compatibility
The DCOLOR U8 HDMI TV Stick can also be connected to a projector via its HDMI output, allowing you to watch free TV channels on a larger screen.

Figure 10: HDMI 1080P Output for Projectors
5. Тэхнічнае абслугоўванне
To ensure the longevity and optimal performance of your DCOLOR U8 HDMI TV Stick, follow these maintenance guidelines:
- Уборка: Для чысткі прылады выкарыстоўвайце мяккую сухую тканіну. Не выкарыстоўвайце вадкія ачышчальнікі або абразіўныя матэрыялы.
- Вентыляцыя: Ensure the device has adequate ventilation. Do not cover the ventilation slots.
- крыніца харчавання: Always use the recommended 5V, 1A (or higher) power supply. Inadequate power can lead to operational issues.
- Абнаўленні праграмнага забеспячэння: Хоць гэта і не часта патрабуецца, праверце інструкцыю вытворцы website or contact support for any available firmware updates that may improve performance or add features.
6. Выпраўленне непаладак
If you encounter issues with your DCOLOR U8 HDMI TV Stick, refer to the following common problems and solutions:
| праблема | Магчымая прычына | Рашэнне |
|---|---|---|
| Device displays "booting" continuously. | Insufficient power supply. Older TV USB ports (USB1) may only provide 500mA, while the receiver requires at least 1A. | Connect the receiver to a USB 5V wall adapter (e.g., a smartphone charger) that provides at least 1 Ampэра. |
| No signal or "No Channel" message. | Antenna not connected, poor antenna signal, or incorrect input source on TV. | Ensure the antenna is securely connected. Check antenna positioning. Verify your TV is on the correct HDMI input. Perform a channel scan. |
| Channels disappear or cannot be found. | Signal fluctuations or an issue with the channel list. | Perform a new channel scan. If the issue persists, try a factory reset and then rescan. |
| Пульт дыстанцыйнага кіравання не рэагуе. | Batteries are dead or incorrectly inserted, IR sensor blocked, or remote not paired/programmed. | Replace batteries. Ensure the IR sensor has a clear line of sight to the remote. Check remote programming for TV control functions. |
| Няма гуку або якасць гуку нізкая. | TV audio settings, incorrect audio output selected, or cable issue. | Check TV volume and mute settings. Ensure the correct audio output is selected on the receiver (if applicable). Verify HDMI cable connection. |
Калі праблема не знікне пасля выкарыстання гэтых рашэнняў, звярніцеся ў службу падтрымкі кліентаў.
7. Тэхнічныя характарыстыкі
| Асаблівасць | Дэталь |
|---|---|
| Марка | КОЛЕР |
| Нумар мадэлі | U8 HDMI TV Stick |
| Тэхналогія падлучэння | HDMI, USB |
| Тып раздыма | HDMI, USB 3.0 |
| Усяго партоў HDMI | 1 |
| Вага | 200 грам |
| Энергаспажыванне | 5 ват |
| Каналы | 4 |
| Дазвол відэа | Full HD 1080P |
| Падтрымка відэакодэкаў | H.265 HEVC 10-bit |
| Падтрымка аўдыё | Dolby Audio |
| Функцыянальнасць PVR | Yes, via USB 2.0/3.0 (FAT32) |
| Прайграванне мультымедыя | MP3, JPEG, BMP, AVI, DivX, VOB, MKV, AC3, etc. |
8. Гарантыя і падтрымка
DCOLOR provides customer support for this product. If you have any questions or require assistance, please do not hesitate to contact us.
- Інтэрнэт-сэрвіс: We offer 24-hour online service for inquiries.
- Кантакты: Refer to the contact information provided in your product packaging or the included user manual for specific support channels (e.g., email address).
Information regarding spare parts availability and guaranteed software updates is not available at this time. Please contact customer support for the most current information.