1. Уводзіны
Thank you for choosing the Marantz Model 40n Integrated Stereo Ampліфікатар. Гэта amplifier is designed to deliver exceptional audio performance with modern connectivity options, including HEOS Built-in for seamless music streaming. This manual provides essential information for setting up, operating, and maintaining your Model 40n to ensure optimal performance and longevity.
2. Важныя інструкцыі па бяспецы
Please read these safety instructions carefully before using your Marantz Model 40n. Keep this manual for future reference.
- Крыніца харчавання: Падключайце прыладу толькі да разеткі пераменнага токуtage паказана на задняй панэлі.
- Вентыляцыя: Ensure adequate ventilation. Do not block ventilation openings. Maintain a minimum distance of 10 cm (4 inches) from other objects.
- Вада і вільгаць: Не падвяргайце прыладу ўздзеянню дажджу, вільгаці або празмернай вільготнасці. Не стаўце на прыладу прадметы, напоўненыя вадкасцямі, такія як вазы.
- Цяпло: Пазбягайце размяшчэння прылады побач з крыніцамі цяпла, такімі як радыятары, абагравальнікі, пліты або іншыя прыборы, якія выпрацоўваюць цяпло.
- Уборка: Перад чысткай адключыце прыладу ад разеткі. Выкарыстоўвайце толькі сухую тканіну.
- Абслугоўванне: Не спрабуйце самастойна абслугоўваць гэты прадукт. Звярніцеся да ўсіх абслугоўванняў кваліфікаванага абслуговага персаналу.
- Кабелі: Абараняйце шнуры харчавання ад наступання на іх або іх заціскання, асабліва каля вілак, разетак і месца іх выхаду з прылады.
3. Змесціва ўпакоўкі
Праверце наяўнасць усіх прадметаў у камплекце:
- Marantz Model 40n Integrated Stereo Ampзадымнік
- Пульт дыстанцыйнага кіравання
- Шнур харчавання
- FM/AM Antennas (if applicable to region)
- Кароткае кіраўніцтва
- Інструкцыі па тэхніцы бяспекі
4. Прадукт скончыўсяview
4.1 Пярэдняя панэль

The front panel provides access to essential controls and indicators:
- Кнопка харчавання (⑂): Уключае або выключае прыладу.
- Селектар ўваходу: Rotates to choose the desired audio input source.
- Source Direct: Bypasses tone controls for the purest audio signal.
- Bass/Treble/Balance Controls: Adjusts audio characteristics.
- Рэгулятар гучнасці: Кантралюе агульную гучнасць выхаду.
- Дысплей: Паказвае бягучы ўваходны сігнал, узровень гучнасці і іншую інфармацыю аб стане.
- Раз'ём для навушнікаў: Для прыватнага праслухоўвання з навушнікамі.
4.2 Задняя панэль
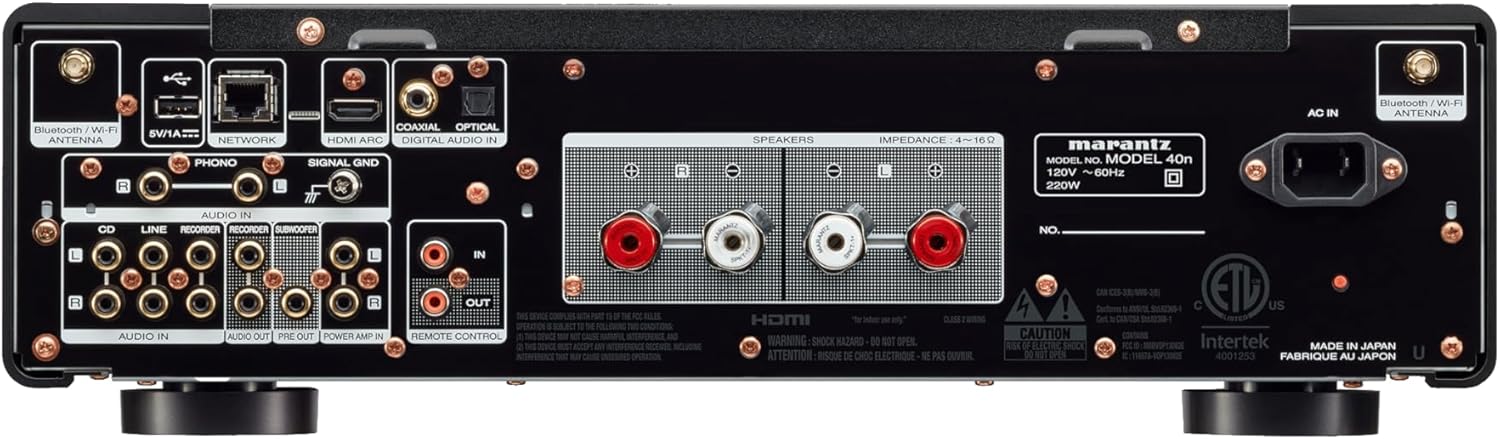
The rear panel houses all connectivity options:
- Калонкі: Connect your passive loudspeakers.
- Analog Audio Inputs (CD, LINE, RECORDER IN): For connecting external analog audio sources.
- PHONO Input (MM): For connecting a turntable with a moving magnet cartridge. Includes a ground terminal.
- Digital Audio Inputs (COAXIAL, OPTICAL): For connecting digital audio sources like CD players or TVs.
- Уваход HDMI ARC: For connecting to a TV to receive audio.
- NETWORK Port (Ethernet): Для падлучэння да правадной сеткі.
- Порт USB-A: Для падключэння USB-назапашвальнікаў.
- Bluetooth/Wi-Fi Antenna Terminals: Для бесправаднога падключэння.
- ПРАДВЫХОД: Для падлучэння да знешняга сілкавання ampзадымнік.
- УЛАДА AMP У: Allows the Model 40n to function as a power ampзадымнік.
- ВЫХОД НА САБВУФЕР: Для падлучэння актыўнага сабвуфера.
- REMOTE CONTROL IN/OUT: For integration into a custom control system.
- AC IN: Падключэнне шнура харчавання.
5. Настройка
5.1 Размяшчэнне
Place the Model 40n on a stable, level surface with adequate ventilation. Avoid direct sunlight, heat sources, and areas with high humidity or dust. Ensure there is sufficient space around the unit for proper airflow.
5.2 Падключэнне дынамікаў
The Model 40n supports a speaker impedance range of 4-16 ohms. Use high-quality speaker cables for optimal sound.
- Turn off the Model 40n and unplug the power cord.
- Connect the positive (+) terminal (red) of the left speaker to the L+ terminal on the ampзадымнік.
- Connect the negative (-) terminal (black) of the left speaker to the L- terminal on the ampзадымнік.
- Repeat for the right speaker, connecting to the R+ and R- terminals.
- Ensure all connections are secure and there are no stray wire strands touching other terminals.

5.3 Падключэнне аўдыёкрыніц
Connect your audio components to the appropriate input terminals on the rear panel.
- Прайгравальнік кампакт-дыскаў: Use RCA cables to connect the CD player's analog output to the CD ўваходныя клемы.
- Other Analog Sources (e.g., Tuner, Cassette Deck): Выкарыстоўвайце кабелі RCA для падлучэння да ЛІНІЯ or RECORDER IN тэрміналы.
- Табліца: Connect your turntable's RCA outputs to the Тэлефон input terminals. If your turntable has a ground wire, connect it to the СІГНАЛ GND terminal. Ensure your turntable has a Moving Magnet (MM) cartridge, as the Model 40n's phono input is designed for MM.
- Digital Sources (e.g., TV, Blu-ray Player): Use an optical or coaxial digital cable to connect to the АПТЫЧНЫ or COAXIAL DIGITAL IN тэрміналы.
- TV (HDMI ARC): Connect an HDMI cable from your TV's HDMI ARC port to the HDMI ARC input on the Model 40n. This allows your TV to send audio to the ampзадымнік.
- USB-назапашвальнік: Устаўце USB-назапашвальнік у USB-A port for playing audio files.
5.4 Сеткавае падключэнне
The Model 40n supports both wired and wireless network connections for streaming services and firmware updates.
- Правадное злучэнне: Падключыце кабель Ethernet ад маршрутызатара да СЕТКА порт.
- Бесправадное падключэнне (Wi-Fi): Screw the supplied Wi-Fi/Bluetooth antennas onto the corresponding terminals. Follow the on-screen instructions or use the HEOS app for initial Wi-Fi setup.
5.5 Падключэнне харчавання
Once all audio and network connections are made, connect the supplied power cord to the AC IN terminal on the rear panel and then to a wall outlet.
6. Інструкцыя па эксплуатацыі
6.1 Асноўныя аперацыі
- Уключэнне: Націсніце кнопку харчавання на пярэдняй панэлі або на пульце дыстанцыйнага кіравання.
- Выберыце ўвод: Rotate the Input Selector knob or use the remote control to choose your desired audio source (e.g., CD, PHONO, HDMI ARC, HEOS).
- Наладзіць гучнасць: Rotate the Volume knob or use the Volume +/- buttons on the remote control to set the listening level.
6.2 Tone Controls and Source Direct
- Bass/Treble/Balance: Use the corresponding knobs on the front panel to fine-tune the audio output to your preference.
- Source Direct: Engage the Source Direct switch to bypass the bass, treble, and balance circuits. This provides a purer, uncolored audio signal, ideal for audiophile listening.
6.3 Music Streaming with HEOS Built-in
The Model 40n features HEOS Built-in, allowing access to a wide range of streaming services and multi-room audio capabilities.


- Download HEOS App: Download the free HEOS app to your smartphone or tablet from the App Store or Google Play.
- Setup HEOS: Follow the in-app instructions to connect your Model 40n to your home network and set up your streaming accounts (e.g., Spotify, Apple Music, Tidal).
- Stream Music: Use the HEOS app to browse and play music from various online services, your local music library, or other HEOS-enabled devices.
6.4 AirPlay 2 and Bluetooth
- AirPlay 2: From an Apple device, select the Model 40n as an AirPlay speaker to stream audio.
- Bluetooth: Enable Bluetooth on your mobile device, search for 'Marantz Model 40n', and pair.
6.5 Галасавое кіраванне
The Model 40n supports voice control via Amazon Alexa, Google Assistant, and Apple Siri when integrated with compatible devices.

- Уключыць навык/дзеянне: Enable the Marantz HEOS skill/action in your Amazon Alexa or Google Home app.
- Прывязаць уліковы запіс: Link your HEOS account within the respective voice assistant app.
- Выкарыстоўвайце каманды: You can now use voice commands to control playback, volume, and input selection. For Siri, use AirPlay 2 from your Apple device.
7. Тэхнічнае абслугоўванне
To ensure the longevity and optimal performance of your Model 40n, follow these maintenance guidelines:
- Уборка: Disconnect the power cord before cleaning. Use a soft, dry cloth to wipe the exterior surfaces. Do not use abrasive cleaners, solvents, or chemical sprays, as they may damage the finish.
- Вентыляцыя: Regularly check that the ventilation openings are not blocked by dust or debris. Use a soft brush or vacuum cleaner with a brush attachment to gently clear any obstructions.
- Сувязі: Periodically check all cable connections to ensure they are secure. Loose connections can lead to signal degradation or intermittent issues.
- захоўванне: If storing the unit for an extended period, unplug it from the power outlet and cover it to protect against dust.
8. Выпраўленне непаладак
If you encounter issues with your Model 40n, refer to the following common problems and solutions:
| праблема | Магчымая прычына | Рашэнне |
|---|---|---|
| Няма ўлады | Шнур сілкавання адключаны; няспраўная разетка | Пераканайцеся, што шнур харчавання надзейна падключаны; паспрабуйце іншую разетку. |
| Няма гуку | Няправільны ўваходны сігнал; Аслабленыя кабелі дынамікаў; Занадта нізкая гучнасць; Уключаны гук без гуку | Select correct input; Check speaker connections; Increase volume; Deactivate mute. |
| Дрэнная якасць гуку | Poor cable connections; Source Direct enabled; Speaker phase incorrect | Check all audio cable connections; Disable Source Direct to use tone controls; Verify speaker polarity (+ to + and - to -). |
| Cannot connect to network/HEOS | Wi-Fi antennas not connected; Incorrect Wi-Fi password; Router issue | Ensure antennas are attached; Re-enter Wi-Fi password in HEOS app; Restart your router and the Model 40n. |
| Пульт дыстанцыйнага кіравання не працуе | Батарэі разраджаныя; Перашкода паміж пультам і прыладай | Replace batteries; Remove any obstructions; Ensure remote is pointed at the unit's IR sensor. |
Калі праблема не знікне пасля спробы гэтых рашэнняў, звярніцеся ў службу падтрымкі кліентаў Marantz.
9. Тэхнічныя характарыстыкі
Key technical specifications for the Marantz Model 40n Integrated Stereo Ampпадпітка:
- Марка: Маранц
- Нумар мадэлі: MODEL40N
- Колькасць каналаў: 2
- Выходная магутнасць: 70 watts per channel (8 ohms, 20 Hz - 20 kHz, 0.07% THD)
- Тып інтэрфейсу: USB
- матэрыял: SECC, Aluminum
- Памеры прадукту: 17 х 17.4 х 5.1 цалі (43.18 х 44.2 х 12.95 см)
- Вага прадмета: 36.8 фунта (16.7 кг)
- UPC: 747192135959
- Падключэнне: HDMI ARC, Phono (MM), Analog RCA, Optical, Coaxial, USB-A, Ethernet, Wi-Fi, Bluetooth, HEOS Built-in
- Галасавое кіраванне: Works with Amazon Alexa, Google Assistant, Apple Siri
- Дата першай даступнасці: 24 лютага 2022 г
10. Гарантыя і падтрымка
Marantz products are designed for reliability and performance. For warranty information, please refer to the warranty card included with your product or visit the official Marantz webсайт.
For technical support, product registration, or service inquiries, please visit the Marantz support page:
You can also find frequently asked questions and additional resources on their webсайт.