1. Уводзіны
This manual provides essential instructions for the safe installation, operation, and maintenance of your OOYCYOO 100A MPPT Solar Charge Controller. Please read this manual thoroughly before installation and use to ensure optimal performance and longevity of the product. Keep this manual for future reference.
Тэхніка бяспекі
- Пераканайцеся, што ўся праводка правільна падключана і замацавана, каб пазбегнуць кароткага замыкання або пашкоджання.
- Заўсёды спачатку падключайце акумулятар, потым сонечную панэль і, нарэшце, нагрузку. Адключайце ў зваротным парадку.
- Do not attempt to repair or modify the controller yourself. Contact qualified personnel for service.
- Усталюйце кантролер у добра вентыляваным памяшканні, удалечыні ад лёгкаўзгаральных матэрыялаў і прамых сонечных прамянёў.
- Wear appropriate personal protective equipment (PPE) during installation, including eye protection and insulated gloves.
2. Прадукт скончыўсяview
The OOYCYOO 100A MPPT Solar Charge Controller is designed to efficiently manage power from your solar panels to charge various battery types, including 12V, 24V, 36V, and 48V systems. It features advanced Maximum Power Point Tracking (MPPT) technology for high conversion efficiency.
Асноўныя характарыстыкі:
- Automatic identification of 12V/24V/36V/48V DC system voltage.
- High maximum power tracking rate (≥99%) and conversion rate (>99%).
- Compatible with multiple battery types: USER (customizable), Flooded, Sealed, Gel, and Lithium (LiFePO4, Li(NiCoMn)O2).
- Programmable settings for absorption voltagе, плывучы абtagе, і нізкі абtagе адключыцца.
- Integrated LCD display showing charge amount (KWH) and other operational data.
- Comprehensive protection functions: PV over current/power, PV short circuit, PV reverse polarity, night reverse charging, battery reverse polarity, battery over voltage, battery over discharge, battery overheating, controller overheating, lithium battery low temperature, load short circuit, load overload, TVS high voltagэлектронныя пераходныя працэсы.
- Built-in cooling fan for efficient heat dissipation, activating when temperature >45℃ and deactivating when <40℃.
- USB 5V 2A charging ports.
Ідэнтыфікацыя кампанента:

Малюнак 1: Спераду і ззаду view of the OOYCYOO 100A MPPT Solar Charge Controller, showing the LCD display and connection terminals.

Малюнак 2: Падрабязны view of the controller's connection terminals, including Solar Panel, Battery, Load, Remote Temp Sensor, and USB ports.
3. Тэхнічныя характарыстыкі
| Параметр | Каштоўнасць |
|---|---|
| Намінальны ток зарада | 100А |
| System Nominal Voltage | 12V/24V/36V/48V DC Auto Identifying |
| Макс. PV Open Circuit Voltage | 150 В пастаяннага току |
| 12V System Max. PV Input Power | 1300W (Voc ≤96V) |
| 24V System Max. PV Input Power | 2600W (Voc ≤112V) |
| 36V System Max. PV Input Power | 3800 Вт |
| 48V System Max. PV Input Power | 5000W (Voc ≤150V) |
| MPPT Best Working VoltagДыяпазон (12 В) | DC18V-DC96V |
| MPPT Best Working VoltagДыяпазон (24 В) | DC36V-DC112V |
| MPPT Best Working VoltagДыяпазон (48 В) | DC72V-DC150V |
| Maximum DC/DC Transfer Efficiency | 98.7% |
| Power Terminal Wire Gauge | 10 AWG |
| Памеры (Д х Ш х У) | 12 цалі х 7.8 цалі х 3.2 цалі (30.5 см х 19.8 см х 8.1 см) |
| Вага | 9.5 фунтаў (4.3 кг) |
| Працоўная тэмпература | Up to 40℃ (Fan operates above 45℃) |
| Матэрыял | Метал |
| Тып дысплея | ВК |
| USB выхад | 5В 2А |
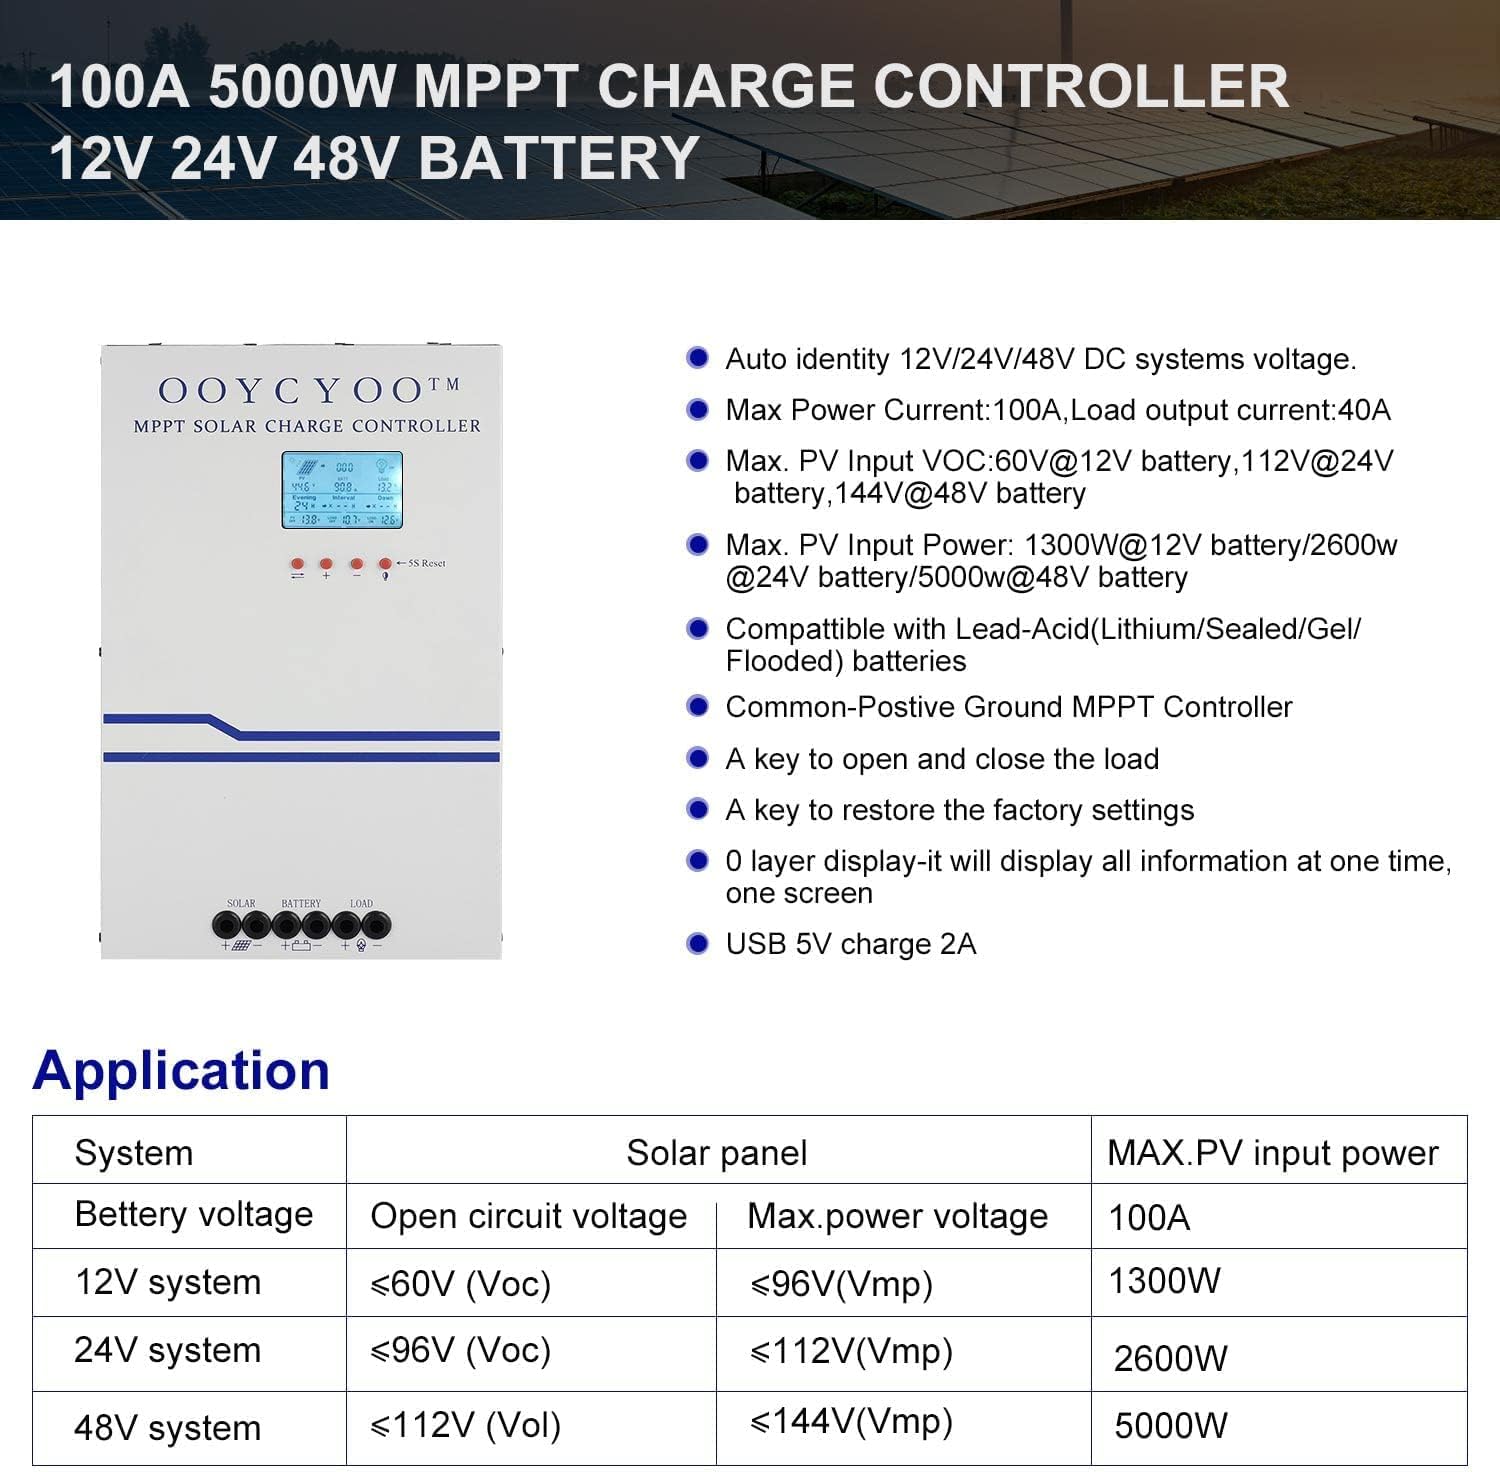
Малюнак 3: Application table detailing solar panel input requirements for different system voltagэс.
4. Настройка і ўстаноўка
Proper installation is crucial for the safe and efficient operation of your solar charge controller. Refer to Figure 2 for terminal identification.
Этапы ўстаноўкі:
- Мантаж: Choose a dry, well-ventilated location, protected from direct sunlight, high temperatures, and moisture. Ensure adequate clearance around the controller for air circulation, especially for the cooling fan. Use the mounting holes provided to secure the controller to a stable surface.
- Падключэнне батарэі: Connect the battery cables to the battery terminals on the controller (marked with '+' and '-'). Ensure correct polarity. Connect the other end of the cables to your battery bank. Always connect the battery first.
- Падключэнне панэлі сонечных батарэй: Connect the solar panel cables to the PV terminals on the controller (marked with '+' and '-'). Ensure correct polarity. Connect the other end of the cables to your solar panel array.
- Падключэнне нагрузкі (неабавязкова): If you are connecting a DC load directly to the controller, connect the load cables to the load terminals (marked with '+' and '-'). Ensure correct polarity.
- Падключэнне датчыка тэмпературы: Connect the included temperature sensor to the designated 'TEMP SENSOR' port. Place the sensor near the battery to ensure accurate temperature compensation for charging.
- Уключэнне: Once all connections are secure and verified for correct polarity, the controller will power on and display information on the LCD screen.
Сумяшчальныя тыпы батарэй:
The controller supports various battery types. Ensure you select the correct battery type in the controller settings for proper charging and protection.

Малюнак 4: The controller is compatible with AGM, Sealed, Gel, Flooded, and Lithium-Iron Phosphate batteries.
5. Інструкцыя па эксплуатацыі
LCD Display and Navigation:
The backlit LCD display provides real-time operational data. It directly shows the amount of charge in KWH, eliminating the need for external measuring instruments. Use the buttons below the display to navigate through menus and adjust settings.
- Кнопкі навігацыі: Typically, there are buttons for 'Up', 'Down', 'Enter', and 'Escape' or similar functions to browse and confirm settings.
- 5S Reset: A dedicated button or combination of buttons may be available for a 5-second reset, which can be used to restart the controller or clear certain errors.
Налады параметраў:
The controller allows user-programmable settings for various parameters, especially for the 'USER' battery type. Consult the on-screen menu for specific options.
- Выбар тыпу батарэі: It is critical to select the correct battery type (AGM, Sealed, Gel, Flooded, or Lithium) to ensure proper charging algorithms and prevent battery damage. For Lithium batteries, specific voltage parameters may need to be set.
- Зарадка Voltages: For 'USER' battery types, you can customize absorption voltagе, паплавок абtagе, і нізкі абtage disconnect (LVD) thresholds. Refer to your battery manufacturer's specifications for recommended values.
- Load Timer: If a DC load is connected, you may be able to set a timer for its operation.
- Завадскія налады: A key is available to restore the factory settings if needed.
6. Тэхнічнае абслугоўванне
Regular maintenance ensures the long-term reliability and performance of your solar charge controller.
- Уборка: Periodically clean the exterior of the controller with a dry cloth. Ensure the ventilation openings are free from dust and debris to maintain proper airflow for cooling.
- Праверкі злучэння: Annually, inspect all wiring connections for tightness and corrosion. Loose connections can cause overheating and power loss.
- Экалагічная інспекцыя: Ensure the installation environment remains dry and free from excessive dust or extreme temperatures.
- Абнаўленні прашыўкі: Праверце вытворцы website periodically for any available firmware updates, though this controller may not support user updates.
7. Выпраўленне непаладак
У гэтым раздзеле разглядаюцца распаўсюджаныя праблемы, з якімі вы можаце сутыкнуцца. Калі ў вас праблемы, якія не пералічаны тут, звярніцеся ў службу падтрымкі кліентаў.
| праблема | Магчымая прычына | Рашэнне |
|---|---|---|
| Controller not powering on / No display | Battery not connected or reverse polarity; Battery voltage too low; Loose battery connection. | Check battery connections and polarity. Ensure battery voltage is above the minimum operating threshold. Tighten connections. |
| Няма зарадкі ад сонечных панэляў | PV panels not connected or reverse polarity; PV voltage too low/high; Shading on panels; PV short circuit. | Check PV connections and polarity. Ensure PV voltage is within the controller's operating range. Remove shading. Check for PV short circuit. |
| Акумулятар зараджаны не цалкам | Incorrect battery type setting; Insufficient solar input; Battery degradation. | Verify battery type setting. Increase solar panel capacity or reduce load. Test battery health. |
| Загрузка не працуе | Load not connected or reverse polarity; Load short circuit; Load overload; Battery low voltage disconnect (LVD) activated. | Check load connections and polarity. Check for short circuits or overloads. Charge battery. |
| Перагрэў кантролера | Poor ventilation; Excessive ambient temperature; Overload. | Ensure adequate airflow around the controller. Reduce load if possible. Relocate to a cooler environment. |
8. Гарантыя і падтрымка
OOYCYOO products are manufactured to high-quality standards. Specific warranty terms and conditions are typically provided with your purchase documentation or can be found on the official OOYCYOO webсайт.
For technical support, troubleshooting assistance, or warranty claims, please contact OOYCYOO customer service through the retailer where you purchased the product or visit the official OOYCYOO webсайт для кантактнай інфармацыі.
Please have your product model number (100A 12V 24V 36V 48V) and purchase date available when contacting support.