1. Уводзіны
This manual provides essential information for the safe and efficient operation of your TechniSat DIGITRADIO 370 IR. Please read these instructions carefully before using the device and retain them for future reference.
2. Інструкцыі па тэхніцы бяспекі
- Не падвяргайце прыладу ўздзеянню дажджу або вільгаці, каб пазбегнуць пажару або паражэння электрычным токам.
- Do not block ventilation openings. Ensure adequate space around the device for proper airflow.
- Выкарыстоўвайце толькі адаптар сілкавання, які пастаўляецца з прыладай.
- Пазбягайце размяшчэння прылады побач з крыніцамі цяпла, такімі як радыятары, абагравальнікі, пліты або іншыя прыборы (у тым ліку ampLifiers), якія вырабляюць цяпло.
- Абараняйце сеткавы шнур ад наступання або заціскання, асабліва ў месцах вілкі, разеткі і месца выхаду з прылады.
- Адключайце гэты прыбор ад сеткі падчас навальніцы або калі ён не выкарыстоўваецца на працягу доўгага часу.
- Звяртайцеся да кваліфікаванага абслугоўваючага персаналу. Тэхнічнае абслугоўванне патрабуецца, калі прылада была пашкоджана якім-небудзь чынам, напрыклад, пашкоджаны шнур сілкавання або вілка, была праліта вадкасць або ў прыладу ўпалі прадметы, прылада падвяргалася ўздзеянню дажджу або вільгаці, не працуе належным чынам , або быў адкінуты.
3. Змесціва ўпакоўкі
Праверце наяўнасць усіх прадметаў у камплекце:
- TechniSat DIGITRADIO 370 IR (Black)
- Пульт дыстанцыйнага кіравання
- Адаптар сілкавання
- Кіраўніцтва карыстальніка (гэты дакумент)
4. Элементы кіравання і сувязі

Малюнак 4.1: Пярэдняя панэль зверхуview
The image above displays the front panel of the DIGITRADIO 370 IR, featuring the central display, volume and tuning/OK rotary knobs, and various control buttons such as Power, Mode, Preset, Scan, and Back.
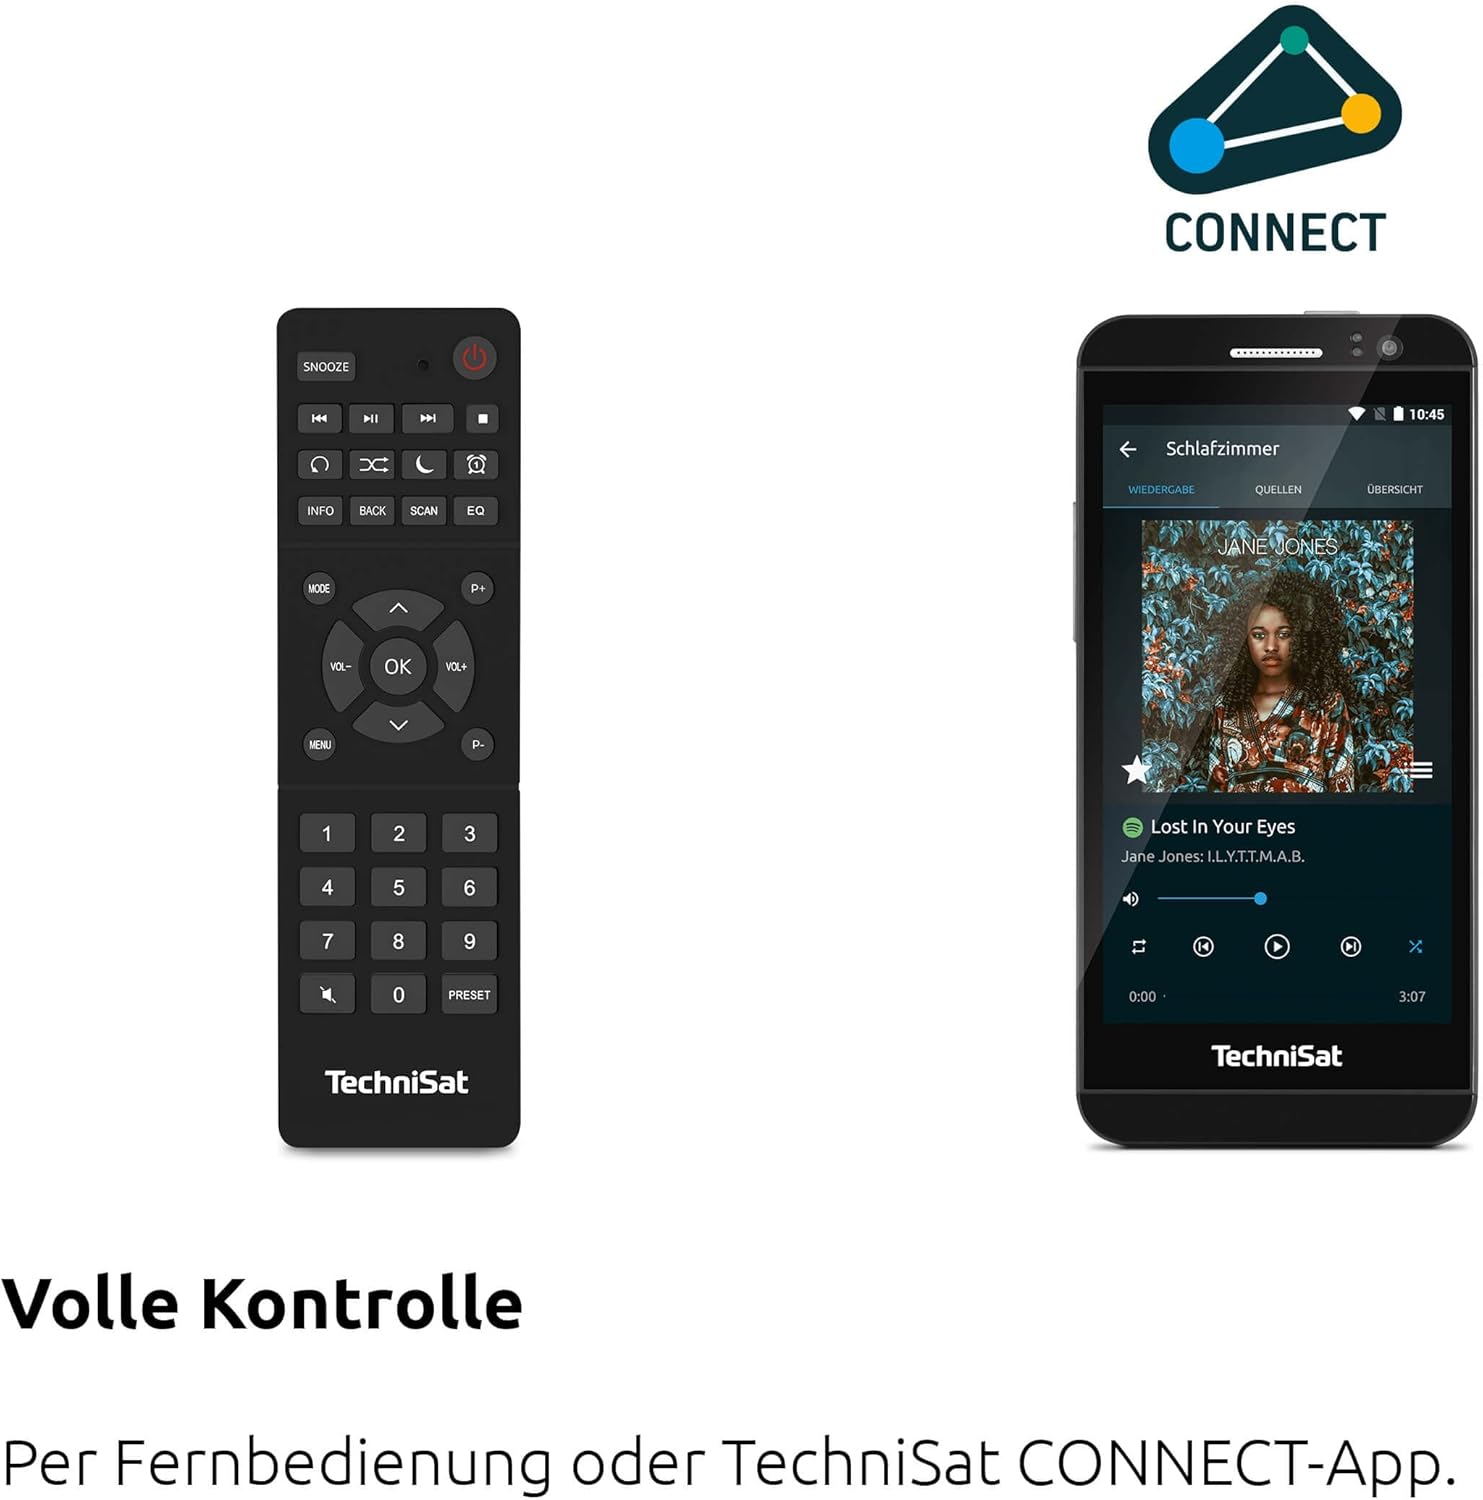
Малюнак 4.2: Дыстанцыйнае кіраванне і інтэрфейс праграмы
This image shows the included remote control with buttons for power, snooze, mode, info, scan, EQ, preset numbers, volume, and navigation. It also illustrates the TechniSat CONNECT app interface on a smartphone, providing an alternative control method.
Элементы кіравання на пярэдняй панэлі:
- Кнопка харчавання: Уключае/выключае прыладу.
- Кнопка рэжыму: Switches between DAB+, FM, Internet Radio, Bluetooth, AUX, and USB modes.
- Кнопка перадусталёўкі: Доступ да захаваных загадзя налад радыёстанцый.
- Рэгулятар гучнасці: Рэгулюе ўзровень выхаднога гуку.
- Tuning/OK Knob: Навігацыя па меню і пацвярджэнне выбару.
- Кнопка сканавання: Initiates station scanning in radio modes.
- Кнопка "Назад": Вяртанне да папярэдняга меню або экрана.
- Дысплей: 2.4-inch TFT color display for information and menu navigation.
Злучэнне задняй панэлі:
- Спажываная магутнасць: Падключыце адаптар харчавання, які ўваходзіць у камплект пастаўкі.
- AUX IN: 3.5-мм раз'ём для падлучэння знешніх аўдыёпрылад.
- Раз'ём для навушнікаў: 3.5-мм раз'ём для праслухоўвання ў прыватным парадку.
- Порт USB: For MP3 playback from USB drives and charging external devices.
5. Настройка
5.1 Першапачатковае ўключэнне
- Place the DIGITRADIO 370 IR on a stable, flat surface.
- Extend the telescopic antenna for optimal DAB+ and FM reception.
- Connect the power adapter to the DC IN port on the rear of the radio and then to a wall outlet.
- Press the Power button on the front panel or remote control to turn on the device.
- Выконвайце падказкі на экране для пачатковай налады, у тым ліку выбару мовы і канфігурацыі сеткі.
5.2 Network Configuration (WLAN)
To access Internet Radio and app control, the device must be connected to a Wi-Fi network.
- Navigate to the 'Settings' menu using the Tuning/OK knob.
- Select 'Network' and then 'Wi-Fi Setup'.
- The radio will scan for available networks. Select your desired network from the list.
- Enter the Wi-Fi password using the on-screen keyboard and the Tuning/OK knob.
- Confirm the connection. Once connected, the Wi-Fi icon will appear on the display.
6. Інструкцыя па эксплуатацыі

Figure 6.1: Radio Diversity
This image highlights the multiple radio reception options available: DAB+ Digital Radio, Internet Radio via WLAN, and UKW/FM analog radio.
6.1 DAB+ радыё
- Press the 'Mode' button until 'DAB+' is selected.
- The radio will automatically scan for available DAB+ stations during the first use. To initiate a scan manually, press the 'Scan' button.
- Use the Tuning/OK knob to scroll through the list of available stations. Press the knob to select a station.
- To save a station as a preset, press and hold the 'Preset' button, then select a preset number and confirm.
6.2 FM -радыё
- Press the 'Mode' button until 'FM' is selected.
- Press the 'Scan' button to automatically search for and store FM stations.
- Alternatively, use the Tuning/OK knob to manually tune to a frequency.
- To save a station as a preset, press and hold the 'Preset' button, then select a preset number and confirm.
6.3 Інтэрнэт-радыё
Пераканайцеся, што радыё падключана да сеткі Wi-Fi (гл. раздзел 5.2).
- Press the 'Mode' button until 'Internet Radio' is selected.
- Вы можаце праглядаць станцыі па месцазнаходжанні, жанры або шукаць пэўныя станцыі.
- Use the Tuning/OK knob to navigate and select stations.
- To save a station as a preset, press and hold the 'Preset' button, then select a preset number and confirm.
6.4 Струменевая перадача аўдыё праз Bluetooth

Малюнак 6.2: Струменевая перадача аўдыё праз Bluetooth
This image demonstrates a smartphone wirelessly streaming music to the radio via Bluetooth, indicating the device's capability for wireless music enjoyment.
- Press the 'Mode' button until 'Bluetooth' is selected. The radio will enter pairing mode.
- На вашым смартфоне або іншай прыладзе Bluetooth уключыце Bluetooth і знайдзіце даступныя прылады.
- Select 'DIGITRADIO 370 IR' from the list to pair.
- Пасля спалучэння вы можаце прайграваць аўдыё з прылады праз радыё.
6.5 USB Playback and Charging

Figure 6.3: USB Playback and Charging Function
This image illustrates the dual functionality of the USB port: connecting USB storage devices for MP3 playback and using the port to charge compatible devices like smartphones.
- Устаўце USB-назапашвальнік з MP3 fileу порт USB на задняй панэлі радыё.
- Press the 'Mode' button until 'USB' is selected.
- Use the Tuning/OK knob to navigate through folders and select tracks for playback.
- The USB port can also be used to charge compatible smartphones and other devices. Connect your device's charging cable to the USB port.
6.6 Бесправадная зарадка

Figure 6.4: Wireless Charging Function
This image shows a hand placing a smartphone on the top surface of the radio, demonstrating the wireless charging capability for compatible smartphones.
The DIGITRADIO 370 IR features a wireless charging surface on its top panel.
- Ensure your smartphone or device supports Qi wireless charging.
- Place your compatible device centrally on the designated wireless charging area on top of the radio.
- The device should indicate that charging has begun.
6.7 Alarm Clock, Sleep Timer, and Snooze
The radio includes an alarm clock, sleep timer, and snooze function.
- Будзільнік: Set up to two independent alarms with customizable sources (buzzer, DAB+, FM, Internet Radio) and volume. Access via the 'Settings' menu.
- Таймер сну: Allows the radio to turn off automatically after a set period (e.g., 15, 30, 60 minutes). Access via the 'Settings' menu.
- Адклад: When an alarm sounds, press the 'Snooze' button on the remote control to temporarily pause the alarm.
6.8 App Control (UNDOK App)
The DIGITRADIO 370 IR can be controlled via the UNDOK app on your smartphone or tablet.
- Download the 'UNDOK' app from your device's app store.
- Пераканайцеся, што ваш смартфон/планшэт і радыё падключаны да адной сеткі Wi-Fi.
- Open the UNDOK app; it should automatically detect your DIGITRADIO 370 IR.
- You can now control all major functions of the radio, including mode selection, station tuning, volume, and presets, directly from the app.
7. Тэхнічнае абслугоўванне
7.1 Ачыстка
- Перад чысткай заўсёды адключайце прыладу ад электрычнай разеткі.
- Выкарыстоўвайце мяккую, сухую тканіну для працірання вонкавых паверхняў.
- Do not use liquid cleaners, aerosol cleaners, or strong chemical solvents, as these may damage the finish.
7.2 Захоўванне
If storing the device for an extended period, unplug it from the power source and store it in a cool, dry place, away from direct sunlight and extreme temperatures.
8. Выпраўленне непаладак
| праблема | Магчымая прычына | Рашэнне |
|---|---|---|
| Няма ўлады | Сеткавы кабель не падключаны; разетка няспраўная | Праверце падключэнне кабеля харчавання; паспрабуйце іншую разетку. |
| Няма гуку | Volume too low; Mute activated; Incorrect source selected | Increase volume; Check if mute is active; Select the correct input source (DAB+, FM, Internet, Bluetooth, USB, AUX). |
| Слабы прыём радыё (DAB+/FM) | Антэна не высунута; Слабы сігнал; Перашкоды | Fully extend the telescopic antenna; Reposition the radio; Avoid placing near other electronic devices. |
| Internet Radio not working | No Wi-Fi connection; Incorrect Wi-Fi password; Router issue | Check Wi-Fi connection in settings; Re-enter Wi-Fi password; Restart your Wi-Fi router. |
| Спалучэнне Bluetooth не атрымалася | Radio not in pairing mode; Device too far; Bluetooth off on source device | Ensure radio is in Bluetooth mode; Move devices closer; Enable Bluetooth on your source device. |
| Бесправадная зарадка не працуе | Device not Qi-compatible; Device not placed correctly; Phone case too thick | Verify device supports Qi charging; Adjust device position on charging pad; Remove thick phone cases. |
9. Тэхнічныя характарыстыкі
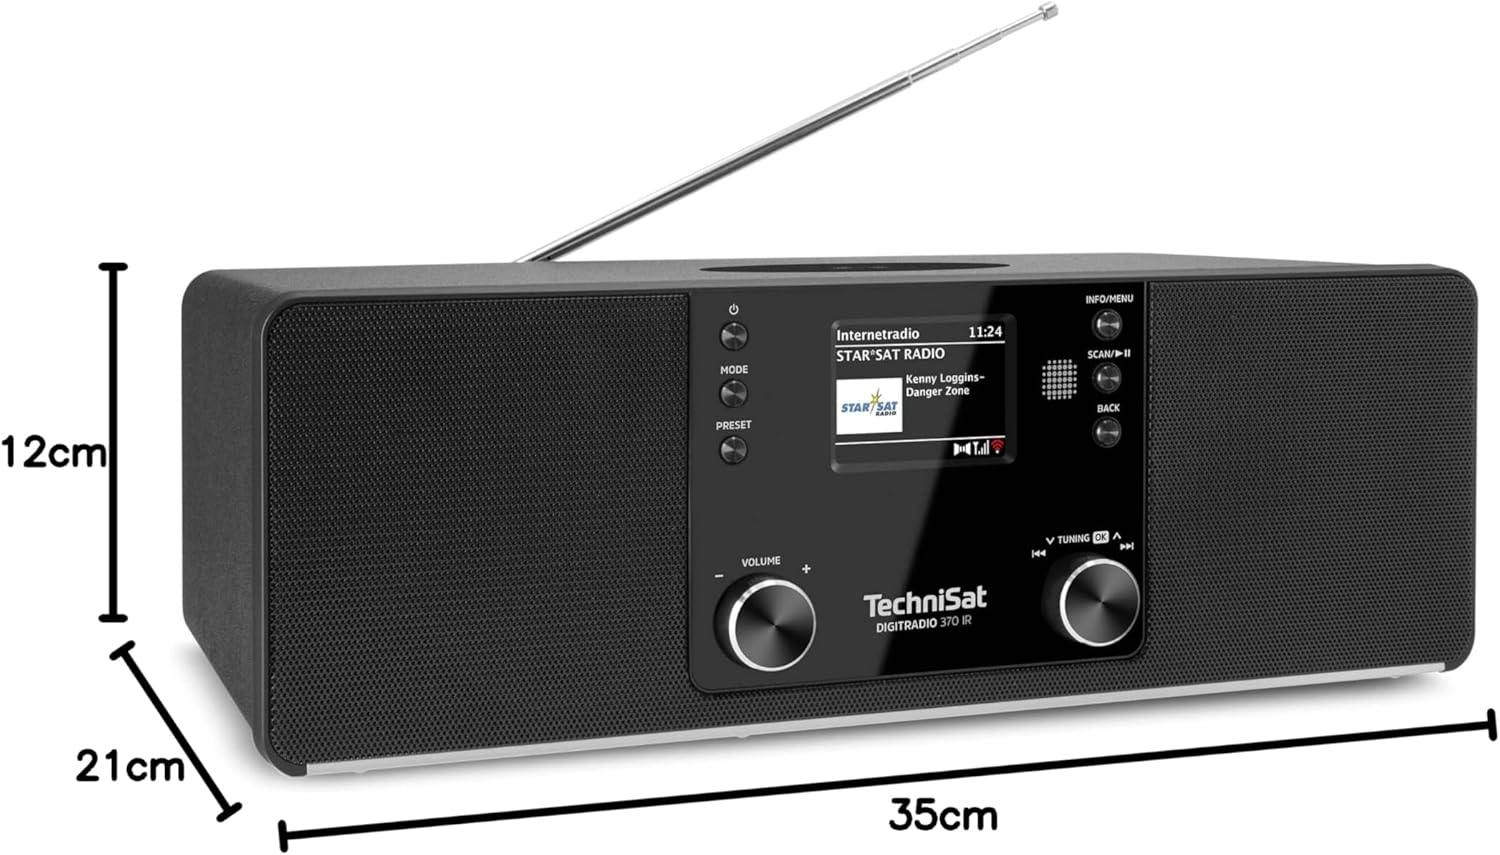
Малюнак 9.1: Памеры вырабу
This image provides a visual representation of the radio's dimensions: 35 cm (length), 12 cm (height), and 21 cm (depth).
| Асаблівасць | Дэталь |
|---|---|
| Нумар мадэлі | 0000/3971 |
| Марка | TechniSat |
| Падтрымліваюцца радыёдыяпазоны | DAB+, FM, інтэрнэт-радыё |
| Тэхналогія падлучэння | Bluetooth, USB, Wireless-Charging, WLAN (2.4 GHz & 5 GHz) |
| Асаблівасці | Wireless Charging, Bluetooth Audio Streaming, USB Playback & Charging, Alarm Clock, Sleep Timer, Snooze, App Control (UNDOK) |
| Рэжым выхаду гуку | Стэрэа |
| Выходная магутнасць дынаміка | 2 x 5 Watts RMS (10 Watts total) |
| Тып дысплея | 2.4-цалевы TFT каляровы LCD |
| Крыніца харчавання | Electric Cord (230 Volts, 60 Hz) |
| Памеры (Д х Ш х У) | 35 х 21 х 12 см |
| Вага | 2.7 кілаграма |
| Матэрыял корпуса | Вуд |
| Сумяшчальныя прылады | Smartphone, MP3 player, tablet, laptop, headphones |
| Інтэрфейсы | 3.5 mm Audio (AUX-IN), USB 2.0, 3.5 mm Headphone |
10. Гарантыя і падтрымка
10.1 Інфармацыя аб гарантыі
This product comes with a 2-year warranty (Gewährleistung) from the date of purchase. Please retain your proof of purchase for any warranty claims. The warranty covers manufacturing defects and malfunctions under normal use. It does not cover damage caused by misuse, accidents, unauthorized modifications, or normal wear and tear.
10.2 Падтрымка кліентаў
For technical assistance, troubleshooting beyond this manual, or warranty inquiries, please contact TechniSat customer support. Refer to the TechniSat official webсайт для атрымання кантактнай інфармацыі, якая адпавядае вашаму рэгіёну.
Інтэрнэт-рэсурсы: Visit the official TechniSat website for updated manuals, FAQs, and support information.