1. Уводзіны
Thank you for choosing the Qubo B-209 Senior Mobile Phone. This manual provides essential information for setting up, operating, and maintaining your device. Please read it carefully to ensure proper use and to maximize the phone's features.
Змест пакета
- Qubo B-209 Mobile Phone
- Літый-іённы акумулятар
- Док-станцыя для зарадкі
- Кабель USB
- Адаптар сілкавання
- Кіраўніцтва карыстальніка (гэты дакумент)
2. Прадукт скончыўсяview
The Qubo B-209 is designed for ease of use, featuring large buttons, a clear display, and essential functions for communication. Its key features include a dedicated SOS button for emergencies, a convenient charging dock, and a built-in flashlight.
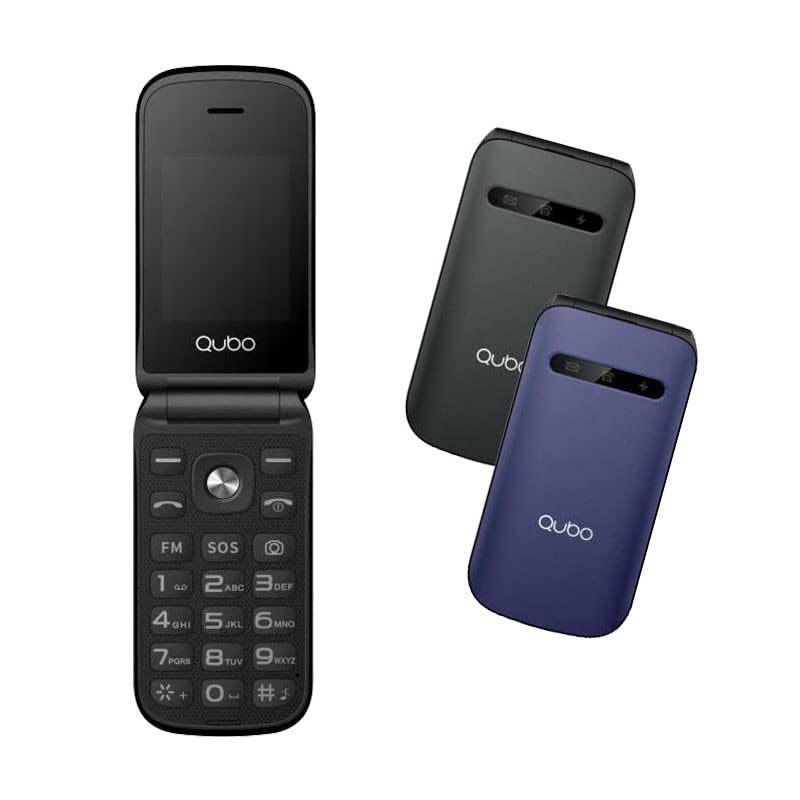
Малюнак 1: Qubo B-209 Senior Mobile Phone with its charging dock. The phone features a blue casing, a large keypad, and a color display.
Асноўныя характарыстыкі
- 2.4-inch QVGA TFT LCD Display: Выразны і зручны для чытання экран.
- Вялікая клавіятура: Ergonomic buttons for comfortable dialing and texting.
- Кнопка SOS: Dedicated emergency button for quick contact with pre-set numbers.
- Док-станцыя для зарадкі: Convenient desktop charger for easy power replenishment.
- Падтрымка двух SIM-карт: Use two SIM cards simultaneously.
- FM-радыё: Слухайце свае любімыя радыёстанцыі.
- Ліхтарык: Built-in LED light for convenience.
- 0.3-мегапіксельная камера: Basic camera functionality.
- Bluetooth 3.0: Для бесправаднога падключэння да сумяшчальных прылад.
3. Настройка
3.1 Устаноўка батарэі
- Акуратна зніміце заднюю крышку тэлефона.
- Знайдзіце батарэйны адсек.
- Insert the provided Li-Ion battery, ensuring the gold contacts align with the phone's terminals.
- Зачыніце заднюю крышку, пакуль яна надзейна не зашчоўкнецца.
3.2 SIM Card(s) Installation
- With the back cover and battery removed, locate the SIM card slots. The Qubo B-209 supports Dual SIM.
- Carefully insert your SIM card(s) into the designated slot(s) with the gold contacts facing down and the cut corner aligned as shown in the diagram (refer to phone's internal markings).
- Ensure the SIM card(s) are fully seated.
- Зноў усталюйце акумулятар і заднюю крышку.
3.3 Зарадка тэлефона
Перад першым выкарыстаннем цалкам зарадзіце акумулятар тэлефона.
- Выкарыстанне зараднай док-станцыі:
- Connect the USB cable to the power adapter, then plug the adapter into a wall outlet.
- Connect the other end of the USB cable to the charging dock.
- Place the phone into the charging dock, ensuring the charging contacts on the phone align with those on the dock. The phone will indicate charging status on its screen.
- Прамая зарадка праз USB:
- Connect the USB cable to the power adapter, then plug the adapter into a wall outlet.
- Connect the micro USB end of the cable directly to the micro USB port on the side or bottom of the phone.
A full charge typically takes approximately 2-3 hours. The battery indicator on the screen will show the charging progress.
4. Інструкцыя па эксплуатацыі
4.1 Уключэнне/выключэнне сілкавання
- Каб уключыць: Націсніце і ўтрымлівайце Уключэнне/выключэнне выкліку button (usually red) until the screen lights up.
- Каб выключыць: Націсніце і ўтрымлівайце Уключэнне/выключэнне выкліку button until the power-off options appear, then select "Power off" or confirm.
4.2 Здзяйсненне і прыём выклікаў
- Каб зрабіць званок:
- Увядзіце нумар тэлефона з дапамогай клавіятуры.
- Націсніце Тэлефануйце button (usually green) to initiate the call.
- Каб адказаць на званок: Калі тэлефон звоніць, націсніце кнопку Тэлефануйце кнопка.
- Каб завяршыць выклік: Націсніце Уключэнне/выключэнне выкліку кнопка.
4.3 Sending and Receiving Messages (SMS)
- Перайдзіце ў меню «Паведамленні» з галоўнага экрана.
- Выберыце «Напісаць паведамленне» або «Новае SMS».
- Увядзіце нумар тэлефона атрымальніка або выберыце з кантактаў.
- Набярыце паведамленне з дапамогай клавіятуры.
- Націсніце кнопку «Адправіць», каб адправіць паведамленне.
4.4 Кнопка экстранага выкліку SOS
The SOS button is located on the back of the phone. It allows you to quickly contact pre-set emergency numbers.
- Setting up SOS Numbers:
- Go to "Settings" > "SOS Settings" or "Emergency Settings".
- Add up to 5 emergency contact numbers. These numbers will be called in sequence when the SOS button is activated.
- Вы таксама можаце ўключыць адпраўку SOS-паведамленняў гэтым кантактам.
- Выкарыстанне функцыі SOS:
- У надзвычайнай сітуацыі націсніце і ўтрымлівайце Кнопка SOS на некалькі секунд.
- The phone will automatically call the pre-set emergency numbers one by one until an answer is received.
- If enabled, an emergency SMS message will also be sent.
Важна: Ensure your SOS contacts are aware they are listed as emergency contacts and that their numbers are up-to-date.
4.5 FM -радыё
- Перайдзіце ў праграму «FM-радыё» з галоўнага меню.
- Выкарыстоўвайце клавішы навігацыі для пошуку станцый або ручной налады на частату.
- Adjust the volume using the side volume buttons (if available) or menu options.
4.6 Ліхтарык
The flashlight can be activated quickly.
- Locate the dedicated flashlight button on the side of the phone (if present) or access it via the menu.
- Press the button once to turn the flashlight on, and again to turn it off.
4.7 Камера
- Access the "Camera" application from the main menu.
- Скампануйце здымак, выкарыстоўваючы экран у якасці viewшукальнік.
- Press the designated "Capture" or "OK" button to take a photo.
- Photos are saved to the phone's internal memory or an inserted T-Flash card.
5. Тэхнічнае абслугоўванне
5.1 Ачыстка
- Выкарыстоўвайце мяккую, сухую тканіну без ворса для чысткі экрана і корпуса тэлефона.
- Avoid using liquid cleaners, aerosols, or harsh chemicals, as these can damage the phone.
- Ensure no moisture enters the charging port or other openings.
5.2 Сыход за акумулятарам
- Не падвяргайце акумулятар уздзеянню экстрэмальных тэмператур (высокіх або нізкіх).
- Avoid fully discharging the battery frequently. Charge it regularly.
- If the phone will not be used for an extended period, charge the battery to about 50% and store it in a cool, dry place.
5.3 Захоўванне
- Store the phone in a dry environment, away from direct sunlight and excessive humidity.
- Keep the phone out of reach of children and pets.
6. Выпраўленне непаладак
| праблема | Магчымая прычына | Рашэнне |
|---|---|---|
| Тэлефон не ўключаецца. | Батарэя разраджана або ўсталявана няправільна. | Пераканайцеся, што акумулятар усталяваны правільна і цалкам зараджаны. |
| Нельга рабіць або прымаць званкі. | No network signal; SIM card not installed or activated; incorrect network settings. | Check signal strength. Ensure SIM card is properly inserted and activated. Contact your network provider if issues persist. |
| Тэлефон не зараджаецца. | Charging cable/adapter faulty; charging port/dock dirty or damaged; battery issue. | Check connections. Try a different outlet or charging method (dock vs. direct USB). Clean charging contacts. |
| Не працуе кнопка SOS. | SOS numbers not set up; no network signal. | Verify SOS numbers are correctly configured in settings. Ensure the phone has network coverage. |
| Дысплей пусты або завісае. | Праграмны збой; нізкі зарад батарэі. | Restart the phone by holding the Power/End Call button. Charge the battery. |
7. Тэхнічныя характарыстыкі
| Асаблівасць | Дэталь |
|---|---|
| Нумар мадэлі | Б-209 |
| Дысплей | 2.4-inch QVGA TFT LCD |
| Набор мікрасхем | M76261DA, ARM7 CPU, 260MHz |
| Памяць (RAM/ROM) | 32MB RAM, 32MB ROM |
| Сувязь | 2G GSM 850/900/1800 (GSM/GPRS), Bluetooth 3.0 |
| акумулятар | 800 мАг Li-Ion |
| Камера | 0.3 MP (Rear) |
| Падтрымка SIM | Дзве SIM |
| Знешні назапашвальнік | T-Flash (up to 32MB) |
| Асаблівасці | FM Radio, Flashlight, SOS Button, External Indicator (Messages, Calls, Charge) |
| Сувязі | Micro USB, раздым 3.5 мм |
| Памеры (пакет) | 15.3 х 8.1 х 6.9 см; 230 г |
| Аперацыйная сістэма | Symbian 9.1 |
8. Гарантыя і падтрымка
8.1 Гарантыя вытворцы
The Qubo B-209 Senior Mobile Phone comes with a трохгадовая гарантыя вытворцы з даты пакупкі. Гэтая гарантыя распаўсюджваецца на дэфекты матэрыялаў і вырабу пры нармальным выкарыстанні. Яна не распаўсюджваецца на пашкоджанні, выкліканыя няправільным выкарыстаннем, аварыямі, несанкцыянаванымі мадыфікацыямі або нармальным зносам. Калі ласка, захавайце пацвярджэнне пакупкі для прэтэнзій па гарантыі.
8.2 Падтрымка кліентаў
For technical assistance, troubleshooting beyond this manual, or warranty inquiries, please contact Qubo customer support. Refer to the packaging or the official Qubo webсайт для атрымання самай актуальнай кантактнай інфармацыі.