1. Уводзіны
This manual provides detailed instructions for the installation, operation, and maintenance of your Fractal Design Define 7 Nano Black Solid Mini ITX PC Case. Please read this manual thoroughly before beginning assembly to ensure proper installation and to maximize the performance and longevity of your system.
The Define 7 Nano is a compact Mini ITX case designed for silent operation and flexible component support, offering a balance of size and functionality for small form factor builds.

Малюнак 1: Пярэдняя частка view of the Fractal Design Define 7 Nano Black Solid Mini ITX PC Case.
2. Інфармацыя па бяспецы
Падчас усталёўкі і эксплуатацыі выконвайце наступныя меры бяспекі:
- Заўсёды адключайце блок харчавання ад разеткі перад усталёўкай або зняццем якіх-небудзь кампанентаў.
- Насіце антыстатычны бранзалет, каб прадухіліць пашкоджанне адчувальных кампанентаў электрастатычным разрадам (ESD).
- Асцярожна звяртайцеся з кампанентамі, каб пазбегнуць фізічных пашкоджанняў.
- Забяспечце належную вентыляцыю вакол корпуса ПК, каб прадухіліць перагрэў.
- Keep the case away from liquids and excessive humidity.
- Do not attempt to modify the case structure, as this may void your warranty and pose safety risks.
3. Змесціва ўпакоўкі
Праверце наяўнасць усіх кампанентаў у камплекце:
- Fractal Design Define 7 Nano PC Case
- Accessory Box (screws, zip ties, standoffs, cleaning cloth)
- Кіраўніцтва карыстальніка (гэты дакумент)
- Pre-installed fans (Dynamic X2 GP-12/GP-14, quantity may vary)

Малюнак 2: Разарваны view showing the various removable components of the Define 7 Nano case.
4. Усталёўка і ўстаноўка кампанентаў
4.1. Падрыхтоўка
- Распакуйце корпус: Асцярожна выміце чахол з упакоўкі.
- Зняць бакавыя панэлі: The side panels are secured with captive thumbscrews. Loosen the thumbscrews and slide the panels backward to remove them.
- Remove Top Panel (Optional): The top panel can be removed for easier access during installation or for enhanced airflow. Press the release button at the rear of the top panel and lift it off.
- Remove Front Panel (Optional): The front panel can be carefully pulled off from the bottom for access to front fan mounts and dust filters.
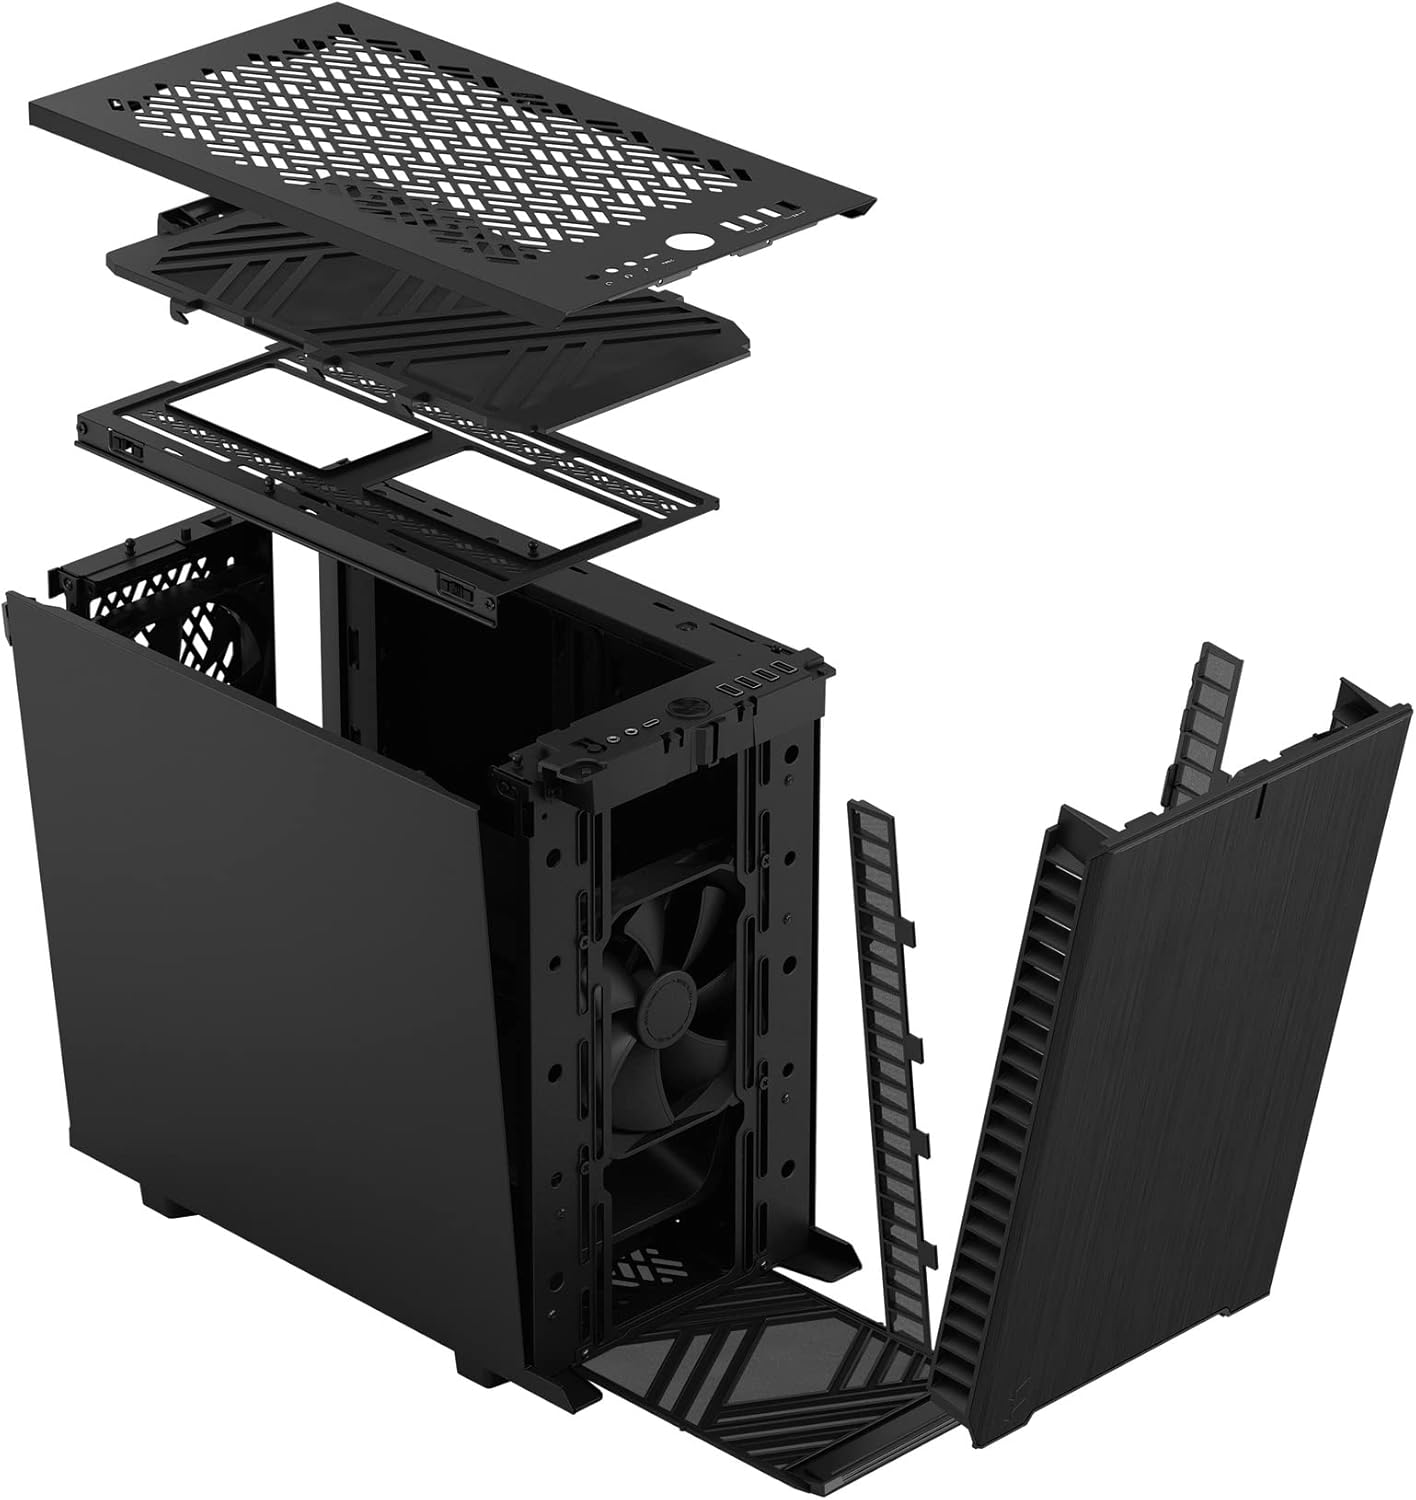
Малюнак 3: Разарваны view illustrating the removal process for the front and top panels.
4.2. Устаноўка мацярынскай платы
The Define 7 Nano supports Mini ITX motherboards.
- Усталюйце экран уводу/вываду: If your motherboard requires an I/O shield, install it into the rear opening of the case before mounting the motherboard.
- Пазіцыя матчынай платы: Align your Mini ITX motherboard with the pre-installed standoffs inside the case.
- Бяспечная матчыная плата: Use the provided screws from the accessory box to secure the motherboard to the standoffs.
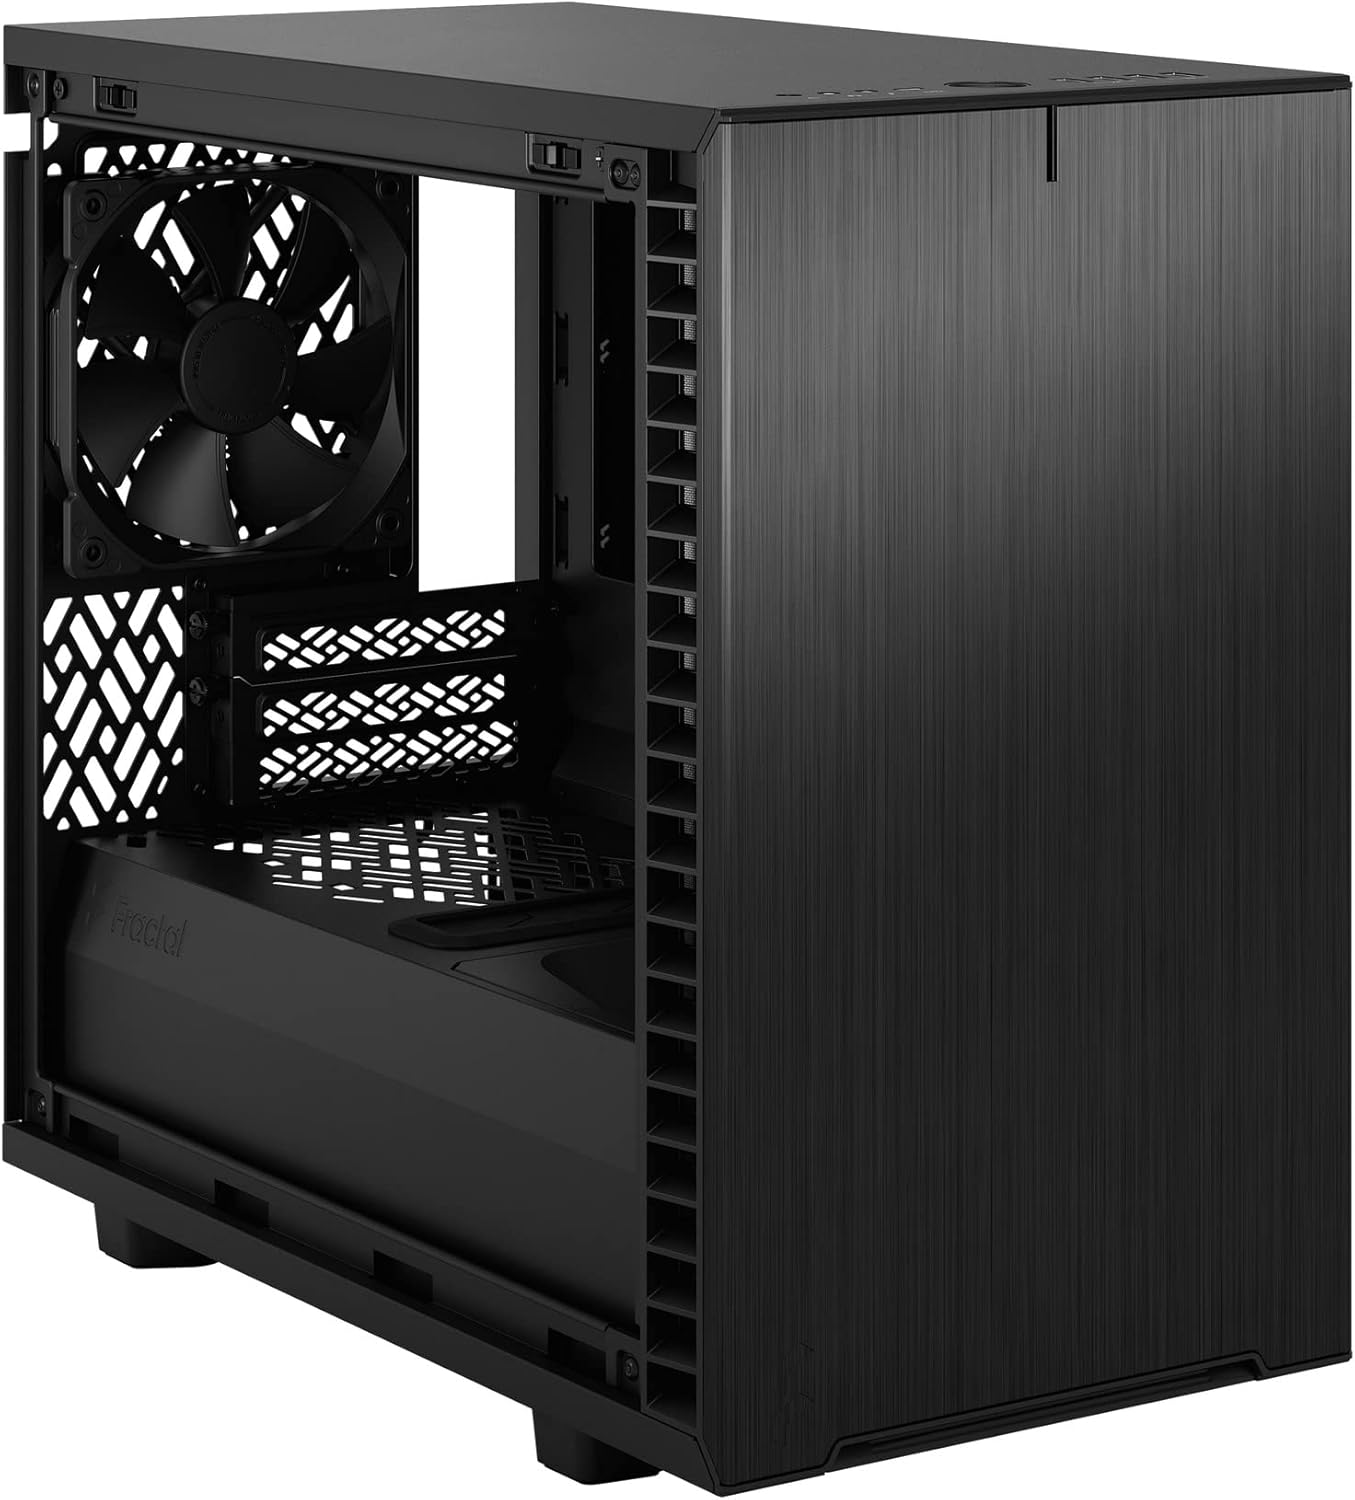
Малюнак 4: Інтэр'ер view of the case, highlighting the motherboard mounting area and fan locations.
4.3. Усталёўка блока сілкавання (БС)
The Define 7 Nano supports ATX PSUs.
- Mount PSU Bracket: Attach the PSU mounting bracket to your power supply using the screws provided with the PSU.
- Slide PSU into Case: Slide the PSU with the attached bracket into the rear of the case.
- Бяспечны блок харчавання: Secure the PSU bracket to the case using the thumbscrews.
4.4. Усталёўка назапашвальніка
The case supports 2.5" SSDs and 3.5" HDDs.
- 2.5-цалевыя дыскі: Mount 2.5" drives to the dedicated SSD brackets located behind the motherboard tray or on the PSU shroud. Secure with screws.
- 3.5-цалевыя дыскі: Install 3.5" drives into the drive cage located beneath the PSU shroud. Secure with screws.
4.5. Усталёўка відэакарты (GPU)
- Зніміце вечкі слотаў PCIe: Зніміце неабходныя вечкі слотаў PCIe з задняй панэлі корпуса.
- Уставіць графічны працэсар: Carefully insert your graphics card into the primary PCIe slot on the motherboard.
- Бяспечны графічны працэсар: Secure the graphics card to the case using the thumbscrews or standard screws.
4.6. Cooling System Installation (Fans/Radiators)
The Define 7 Nano offers flexible cooling options.
- Пярэднія вентылятары: Up to two 120/140mm fans or a 240/280mm radiator can be installed at the front.
- Лепшыя фанаты: Up to two 120/140mm fans or a 240mm radiator can be installed at the top (requires removing the solid top panel and installing the ventilated top panel).
- Задні вентылятар: One 120mm fan can be installed at the rear.
- Bottom Fan: One 120mm fan can be installed at the bottom.
Пераканайцеся, што вентылятары правільна арыентаваны для аптымальнага патоку паветра (ўваходнага або выцяжнога).
4.7. Кіраванне кабелем
The case features routing channels and Velcro straps behind the motherboard tray for organized cable management.
- Маршрутныя кабелі: Pass power and data cables through the rubber grommets to the back of the motherboard tray.
- Бяспечныя кабелі: Use the pre-installed Velcro straps and included zip ties to bundle and secure cables.

Малюнак 5: Задняя частка салона view demonstrating the cable management system with Velcro straps.
4.8. Падключэнні пярэдняй панэлі
Connect the front panel cables to the corresponding headers on your motherboard:
- Power Button (PWR SW)
- Reset Button (RESET SW)
- Power LED (PWR LED)
- HDD Activity LED (HDD LED)
- Загаловак USB 3.0
- USB Type-C Header (if applicable)
- Загаловак HD Audio
Refer to your motherboard manual for exact header locations.
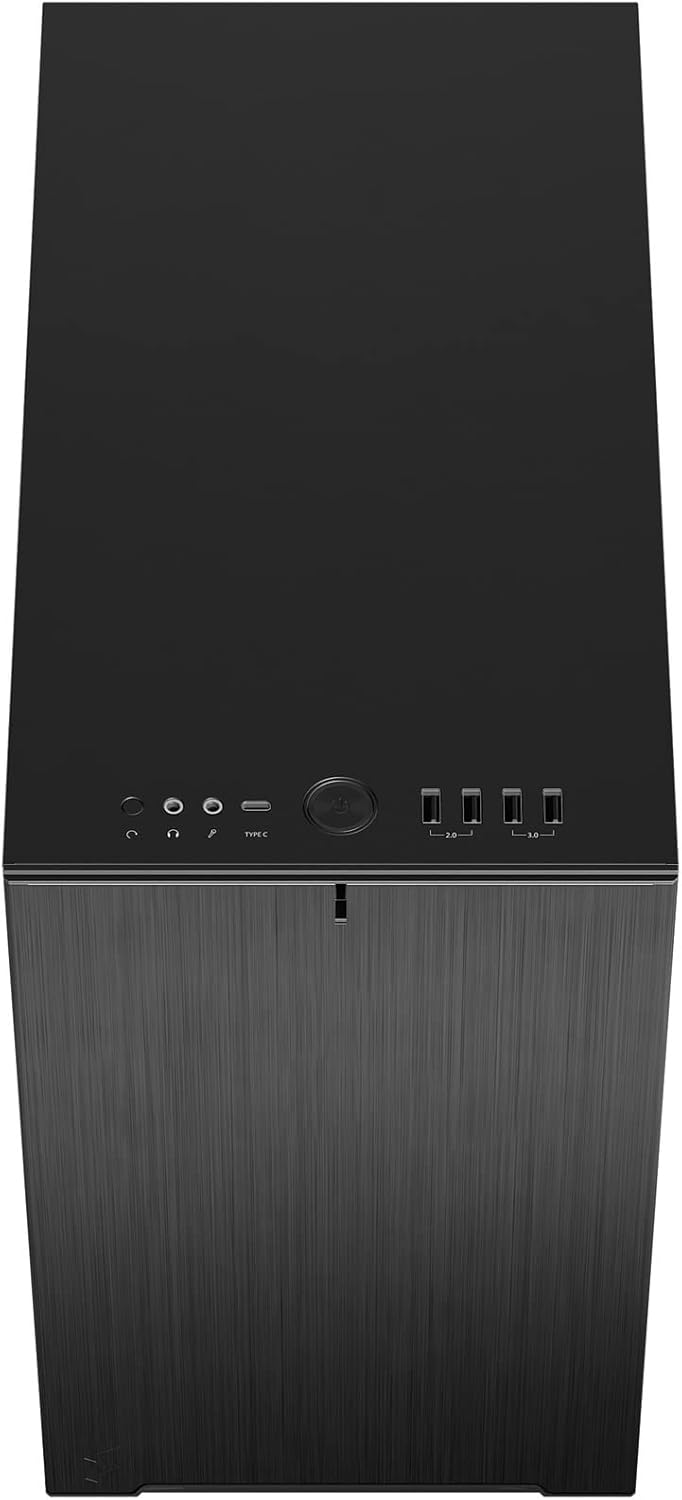
Малюнак 6: Верхні бок view displaying the front I/O panel with USB ports, audio jacks, and power button.
5. Інструкцыя па эксплуатацыі
5.1. Уключэнне / выключэнне харчавання
- Уключэнне: Press the power button located on the front I/O panel.
- Выключэнне: Initiate a shutdown from your operating system. Alternatively, press and hold the power button for 5 seconds for a forced shutdown.
5.2. Using Front Panel Ports
Пярэдняя панэль уводу/вываду забяспечвае зручны доступ да:
- Порты USB 3.0: Для хуткаснай перадачы дадзеных з сумяшчальнымі прыладамі.
- Порт USB Type-C: For modern devices requiring a Type-C connection.
- Аўдыёраздымы: Для падлучэння навушнікаў і мікрафонаў.
6. Тэхнічнае абслугоўванне
Рэгулярнае тэхнічнае абслугоўванне дапамагае забяспечыць аптымальную прадукцыйнасць і даўгавечнасць кампанентаў вашага ПК.
6.1. Ачыстка пылавога фільтра
The Define 7 Nano is equipped with easily removable dust filters to prevent dust buildup inside the case.
- Пярэдні фільтр: Can be accessed by removing the front panel.
- Верхні фільтр: Located beneath the ventilated top panel (if installed).
- Ніжні фільтр: Slides out from the front of the case.
Clean filters regularly (e.g., monthly) by rinsing them with water and allowing them to dry completely, or by using a soft brush or compressed air.
6.2. Генеральная ўборка
- Выкарыстоўвайце мяккі, damp cloth to wipe down the exterior surfaces of the case.
- Пазбягайце выкарыстання агрэсіўных хімікатаў або абразіўных матэрыялаў, якія могуць пашкодзіць пакрыццё.
- For interior cleaning, use compressed air to remove dust from components. Ensure the system is powered off and unplugged.
7. Выпраўленне непаладак
У гэтым раздзеле разглядаюцца распаўсюджаныя праблемы, з якімі вы можаце сутыкнуцца.
7.1. Няма харчавання / сістэма не запускаецца
- Праверце злучэнне харчавання: Ensure the PSU is properly connected to the wall outlet and the power switch on the PSU is in the 'ON' position. Verify all internal power cables (24-pin ATX, 8-pin CPU, PCIe, SATA) are securely connected.
- Раз'ёмы пярэдняй панэлі: Double-check that the power button header (PWR SW) is correctly connected to the motherboard.
- Motherboard/CPU: Пераканайцеся, што працэсар і аператыўная памяць правільна ўсталяваны.
7.2. Празмерны шум
- Шум вентылятара: Check if any fan cables are obstructing fan blades. Ensure fans are securely mounted. Consider adjusting fan speeds in your motherboard's BIOS/UEFI or operating system.
- Вібрацыя: Ensure all components (PSU, drives, GPU) are securely fastened to prevent rattling.
7.3. Перагрэў
- Паток паветра: Verify that fans are oriented correctly (intake/exhaust) and that there is adequate airflow.
- Пылавыя фільтры: Clean dust filters regularly to prevent restricted airflow.
- Тэрмапаста: Ensure CPU cooler has proper thermal paste application.
8. Тэхнічныя характарыстыкі
| Асаблівасць | Спецыфікацыя |
|---|---|
| Назва мадэлі | Define 7 Nano |
| Нумар мадэлі | FD-C-DEF7N-01 |
| Тып корпуса | Міні-вежа |
| Сумяшчальнасць матчыных поплаткаў | Mini ITX |
| Памеры (Д х Ш х У) | Прыблізна 18.74 х 11.38 х 17.91 цалі (упакоўка) |
| Вага | Прыбл. 18.37 фунта |
| Матэрыял | Алюміній |
| Колер | Чорны суцэльны |
| Пярэднія парты I / O | 5x USB 3.0, Audio In/Out, Power Button |
| Прывадныя адсекі | 2.5" SSD, 3.5" HDD (specific quantities vary by configuration) |
| Спосаб астуджэння | паветра |
| Папярэдне ўсталяваныя вентылятары | Dynamic X2 GP-12 (rear), Dynamic X2 GP-14 (front) |
9. Гарантыя і падтрымка
Fractal Design products are manufactured to the highest quality standards and come with a limited warranty. For detailed warranty information, please refer to the official Fractal Design webсайт або гарантыйны талон, які ўваходзіць у камплект пастаўкі вашага прадукту.
For technical support, troubleshooting assistance, or to inquire about replacement parts, please visit the official Fractal Design support page:
www.fractal-design.com/support/
Please have your product model number (FD-C-DEF7N-01) and proof of purchase ready when contacting support.