1. Уводзіны
This manual provides essential instructions for the proper setup, operation, and maintenance of your Greenvelly 2.5 Cubic Foot Depository Safe. Please read this manual thoroughly before using the safe to ensure correct usage and to maximize the security features of your product. Keep this manual for future reference.
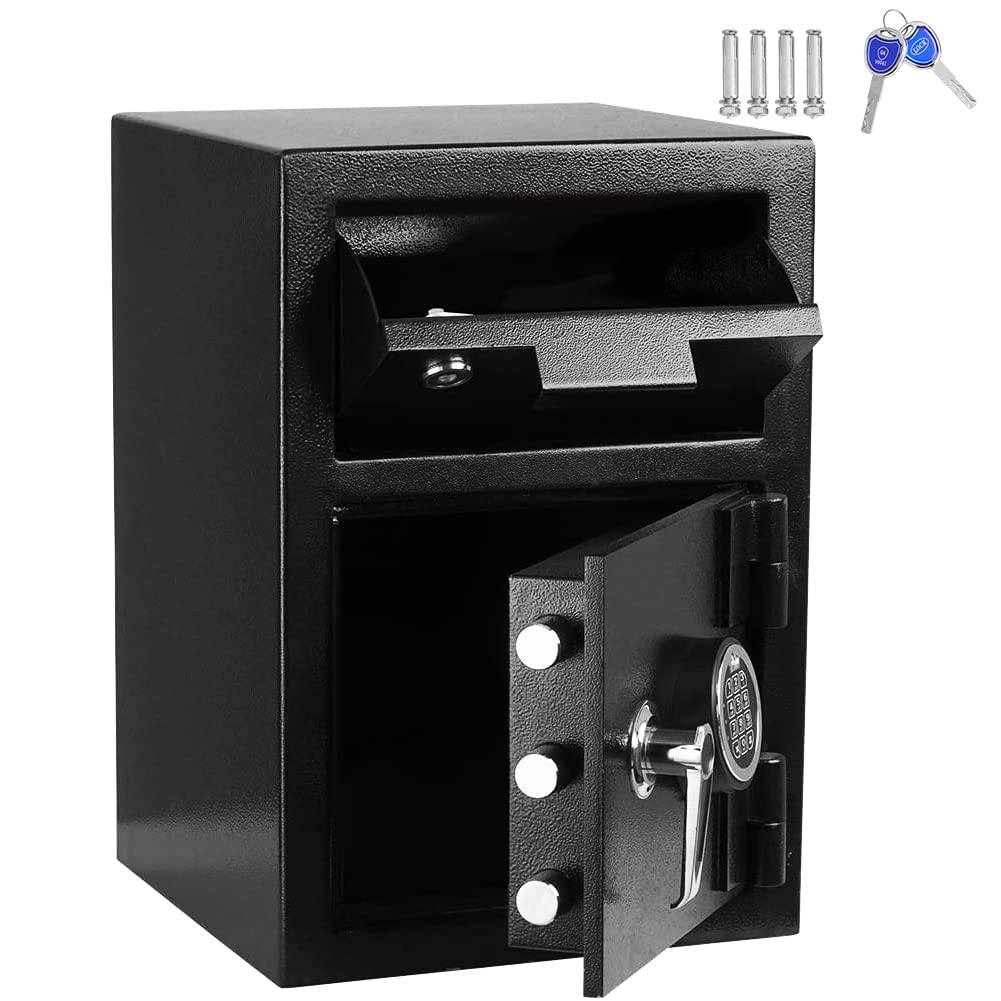
Выява 1.1: Спераду view of the Greenvelly 2.5 Cubic Foot Depository Safe, showing the drop slot and the main door open, revealing the interior.
2. Інфармацыя па бяспецы
- Always store emergency keys in a secure location away from the safe. Never store them inside the safe.
- Do not store the user manual or any record of your electronic code inside the safe.
- Пераканайцеся, што сейф надзейна прымацаваны да сцяны або падлогі, каб прадухіліць яго несанкцыянаванае зняцце.
- Keep children and unauthorized individuals away from the safe and its access codes.
- Неадкладна замяняйце батарэйкі, калі з'яўляецца індыкатар нізкага ўзроўню зарада батарэй, каб пазбегнуць блакавання.
3. Змесціва ўпакоўкі
Verify that all components are present before installation and use:
- Greenvelly 2.5 Cubic Foot Depository Safe
- Аварыйныя ключы (2)
- Mounting Hardware (bolts, washers)
- Кіраўніцтва карыстальніка (гэты дакумент)
- AA Batteries (4, typically included)
4. Асаблівасці прадукту
The Greenvelly Depository Safe is designed for secure storage with multiple access options and robust construction.
- Двайны механізм блакавання: Features both an electronic keypad lock and a dual key lock for versatile access and backup security.
- Depository Slot: A convenient top drop slot allows for secure deposits without opening the main door.
- Надзейная канструкцыя: Made from solid cold-rolled alloy steel with multiple protective layers including frosted environmental protection spray, zinc alloy die casting, internal primer, anti-rust galvanized, encrypted steel plate, external primer, and high gloss spray.
- Палепшаная бяспека: Equipped with 1-inch solid steel locking bolts and pry-resistant concealed hinges.
- Dual Warning System: An alarm system activates upon violent vibration or three consecutive incorrect code entries.

Image 4.1: Diagram illustrating the multi-layered construction of the safe, highlighting materials like cold-rolled steel, anti-rust galvanization, and protective coatings.

Image 4.2: Visual representation of the safe's dual warning system, showing an alarm light activated on top of the safe.
5. Настройка і ўстаноўка
5.1 Першапачатковае адкрыццё
Upon receiving your safe, it will be locked. Use one of the emergency keys to open it for the first time.
- Locate the emergency keyhole, typically concealed behind the keypad or a small cover.
- Insert the emergency key and turn it clockwise while simultaneously turning the handle to open the door.

Малюнак 5.1: Крупны план view of the keyhole, indicating where to insert the emergency key.
5.2 Устаноўка батарэі
The electronic lock requires four AA batteries (not included, or included depending on package). Install them inside the safe door.
- Open the safe door using the emergency key.
- Знайдзіце батарэйны адсек на ўнутраным боку дзвярэй.
- Устаўце чатыры батарэйкі тыпу АА, сачыце за правільнай палярнасцю (+/-).
- Зачыніце крышку батарэйнага адсека.
5.3 Setting the Electronic Code
After installing batteries, you can set your personal electronic code.
- With the safe door open, press the red reset button located on the inside of the door, near the hinge. A beep will sound, and the indicator light on the keypad will flash.
- On the keypad, enter a new 3-8 digit code.
- Press the '#' button to confirm. The safe will beep twice, indicating the code has been successfully set.
- Праверце новы код з адчыненымі дзвярыма, перш чым зачыніць іх.
5.4 Мантаж сейфа
For optimal security, it is recommended to mount the safe to a wall or floor.
- Choose a suitable location, ensuring there are no electrical wires or pipes behind the drilling area.
- Mark the desired drilling points through the pre-drilled holes inside the safe.
- Прасвідруйце адтуліны ў сцяне або падлозе з дапамогай адпаведнага свердзела.
- Align the safe with the drilled holes and secure it using the provided mounting bolts and washers. Tighten firmly.
6. Інструкцыя па эксплуатацыі
6.1 Opening with Electronic Code
- Увядзіце свой асабісты код з 3-8 лічбаў на клавіятуры.
- Press the '#' button. The indicator light will turn green, and you will hear a beep.
- На працягу 5 секунд павярніце ручку па гадзіннікавай стрэлцы, каб адкрыць дзверы сейфа.

Малюнак 6.1: Крупны план view of the electronic keypad for code entry.
6.2 Opening with Emergency Key
Use the emergency key if you forget your code, the batteries are dead, or the electronic system malfunctions.
- Locate the emergency keyhole.
- Устаўце аварыйны ключ і павярніце яго па гадзіннікавай стрэлцы.
- Simultaneously turn the handle to open the safe door.
6.3 Using the Depository Slot
The drop slot allows for secure deposits without needing to open the main safe door.
- Lift the cover of the depository slot located on the top front of the safe.
- Place items such as cash, envelopes, or small documents into the slot.
- Close the cover. The items will drop into the main compartment of the safe.

Малюнак 6.2: Крупны план view of the depository drop slot, showing the mechanism for depositing items.
7. Тэхнічнае абслугоўванне
- Уборка: Працярыце вонкавую паверхню сейфа мяккай губкайamp тканінай. Пазбягайце абразіўных ачышчальнікаў або растваральнікаў.
- Замена батарэі: When the low battery indicator lights up (usually a red light or specific keypad sequence), replace all four AA batteries promptly. Use only new, high-quality alkaline batteries.
- Сыход за ключамі: Keep emergency keys clean and dry. Do not force keys into the lock.
8. Выпраўленне непаладак
| праблема | Магчымая прычына | Рашэнне |
|---|---|---|
| Safe does not open with electronic code. | Incorrect code entered. Dead batteries. Electronic malfunction. | Re-enter code carefully. Replace batteries. Use emergency key. |
| Клавіятура не рэагуе. | Разраджаныя або няправільна ўсталяваныя батарэі. | Праверце палярнасць батарэек. Заменіце батарэйкі. |
| Emergency key does not work. | Key is bent or damaged. Lock mechanism jammed. | Ensure key is straight. Do not force. Contact customer support if issue persists. |
| Нечакана гучыць сігнал трывогі. | Violent vibration detected. Three incorrect code entries. | Ensure safe is stable. Enter correct code to disarm. |
9. Тэхнічныя характарыстыкі

Image 9.1: Detailed diagram illustrating the external dimensions of the safe.
| Асаблівасць | Дэталь |
|---|---|
| Марка | Грынвеллі |
| мадэль | 2.5 Cubic Foot Depository Safe |
| Памеры прадукту (Д х Ш х У) | 9.84" Г x 11" Ш x 20.2" У |
| Тып замка | Электронны ключ |
| Колер | Чорны |
| Ёмістасць (вага) | 80 фунта |
| Матэрыял | Легаваная сталь |
| Асаблівасць | Вогнетрывалы |
| Тып мацавання | Насценнае мацаванне |
| Вага прадмета | 79.2 фунта |
| Узровень воданепранікальнасці | Не воданепранікальны |
| UPC | 749782404575 |
| ASIN | B0BD7KD229 |
10. Гарантыя і падтрымка
For warranty information or technical assistance, please refer to the contact details provided at the point of purchase or visit the official Greenvelly webсайт. Захоўвайце чэк аб куплі як пацверджанне пакупкі.