1. Уводзіны
Дзякуй за пакупкуasing the Ysametp 5G WiFi Bluetooth Projector. This device is designed to provide a high-quality home theater experience with its native 1080p Full HD resolution, 4K support, and integrated Android system. Please read this manual thoroughly before using the projector to ensure proper operation and to maximize its lifespan.
2. Інфармацыя па бяспецы
Please observe the following safety precautions to prevent damage to the projector and ensure user safety:
- крыніца харчавання: Выкарыстоўвайце толькі пазначаны адаптар сілкавання. Пераканайцеся, што разетка мае напружаннеtagадпавядае патрабаванням праектара.
- Вентыляцыя: Не блакуйце вентыляцыйныя адтуліны. Забяспечце дастатковую цыркуляцыю паветра вакол праектара, каб пазбегнуць перагрэву.
- Размяшчэнне: Размясціце праектар на ўстойлівай, роўнай паверхні. Пазбягайце яго знаходжання пад прамымі сонечнымі прамянямі, побач з крыніцамі цяпла або ў месцах з высокай вільготнасцю або пылам.
- Уборка: Адключыце сілкаванне перад чысткай. Выкарыстоўвайце мяккую сухую тканіну. Не выкарыстоўвайце вадкія або аэразольныя ачышчальнікі.
- Абарона вачэй: Не глядзіце непасрэдна ў аб'ектыў праектара, калі ён уключаны.amp уключаны, бо яркае святло можа пашкодзіць вочы.
- Рамонт: Не спрабуйце рамантаваць праектар самастойна. Звяртайцеся па любыя паслугі па абслугоўванні да кваліфікаванага персаналу.
3. Змесціва ўпакоўкі
Праверце наяўнасць усіх прадметаў у камплекце:
- Ysametp 5G WiFi Bluetooth Projector (Model DE-M8-E-An)
- Пульт дыстанцыйнага кіравання
- Power Cable (AC 220V with Schuko plug)
- Кабель HDMI
- Кіраўніцтва карыстальніка
4. Прадукт скончыўсяview
Азнаёмцеся з кампанентамі і інтэрфейсамі праектара.
4.1 фронт View

Выява: спераду view of the Ysametp Projector, highlighting the projection lens and side ventilation grilles.
4.2 Rear and Side Interfaces
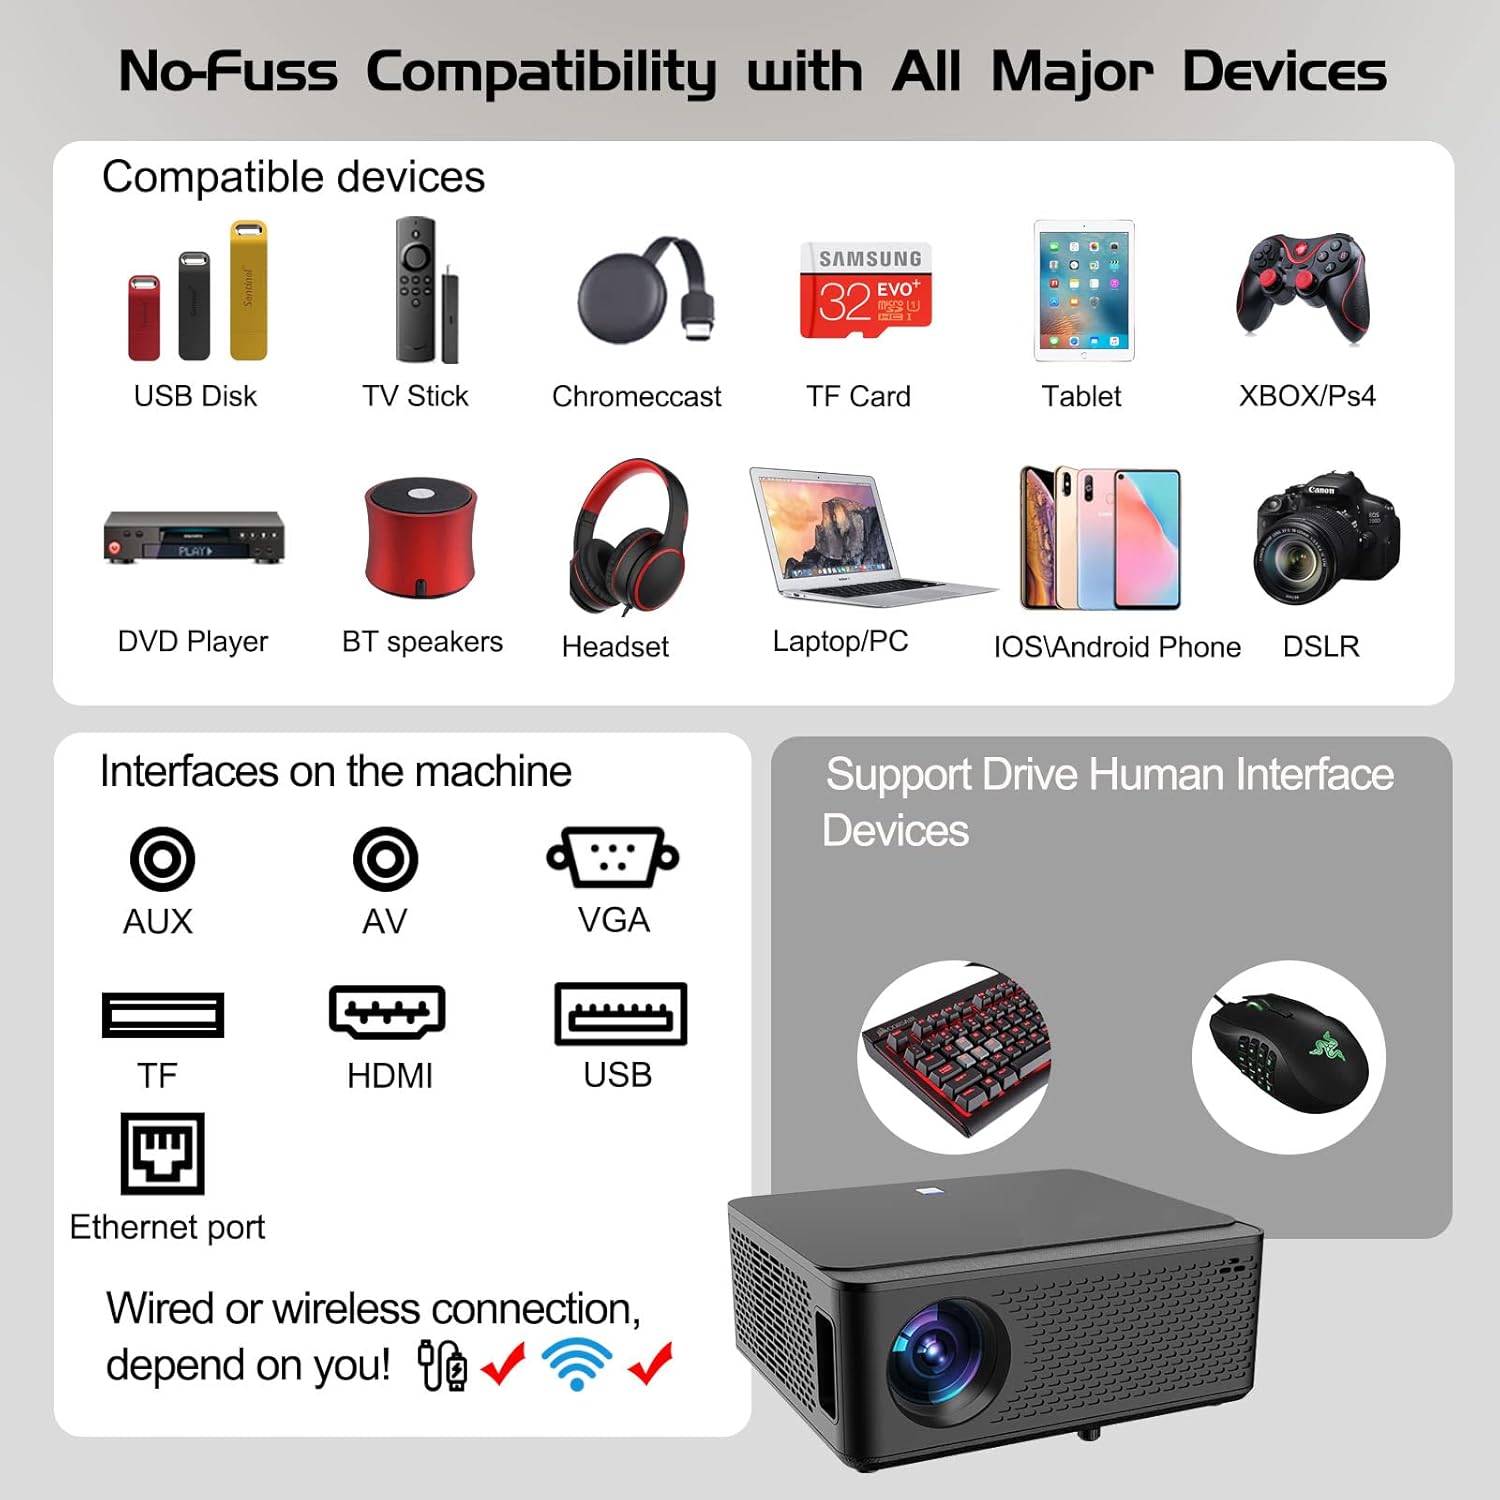
Image: Diagram illustrating the various input and output ports available on the Ysametp Projector, including USB, HDMI, AV, VGA, TF card slot, and Ethernet port.
The projector features a comprehensive set of ports for versatile connectivity:
- Ethernet порт: Для праваднога падключэння да Інтэрнэту.
- Порт VGA: For connecting to older computers.
- Порт USB-A: For connecting USB flash drives or external devices.
- Порт HDMI: For high-definition audio and video input from various sources.
- AV-уваход: For connecting analog audio/video devices.
- Аўдыёвыхад 3.5 мм: Для падлучэння знешніх дынамікаў або навушнікаў.
- Слот TF карты: For reading media from Micro SD cards.
- Спажываная магутнасць: Для падлучэння кабеля харчавання пераменнага току.
4.3 Верхнія элементы кіравання
The top of the projector includes a power button for basic on/off functionality. Further controls are available via the remote control and the on-screen display.
4.4 Рэгуляванне фокусу
A mechanical focus adjustment screw is located on the side of the lens for manual image clarity control.
5. Настройка
5.1 Размяшчэнне
Position the projector on a stable surface. The projection distance will determine the screen size. For optimal viewing, ensure the projector is perpendicular to the projection surface.
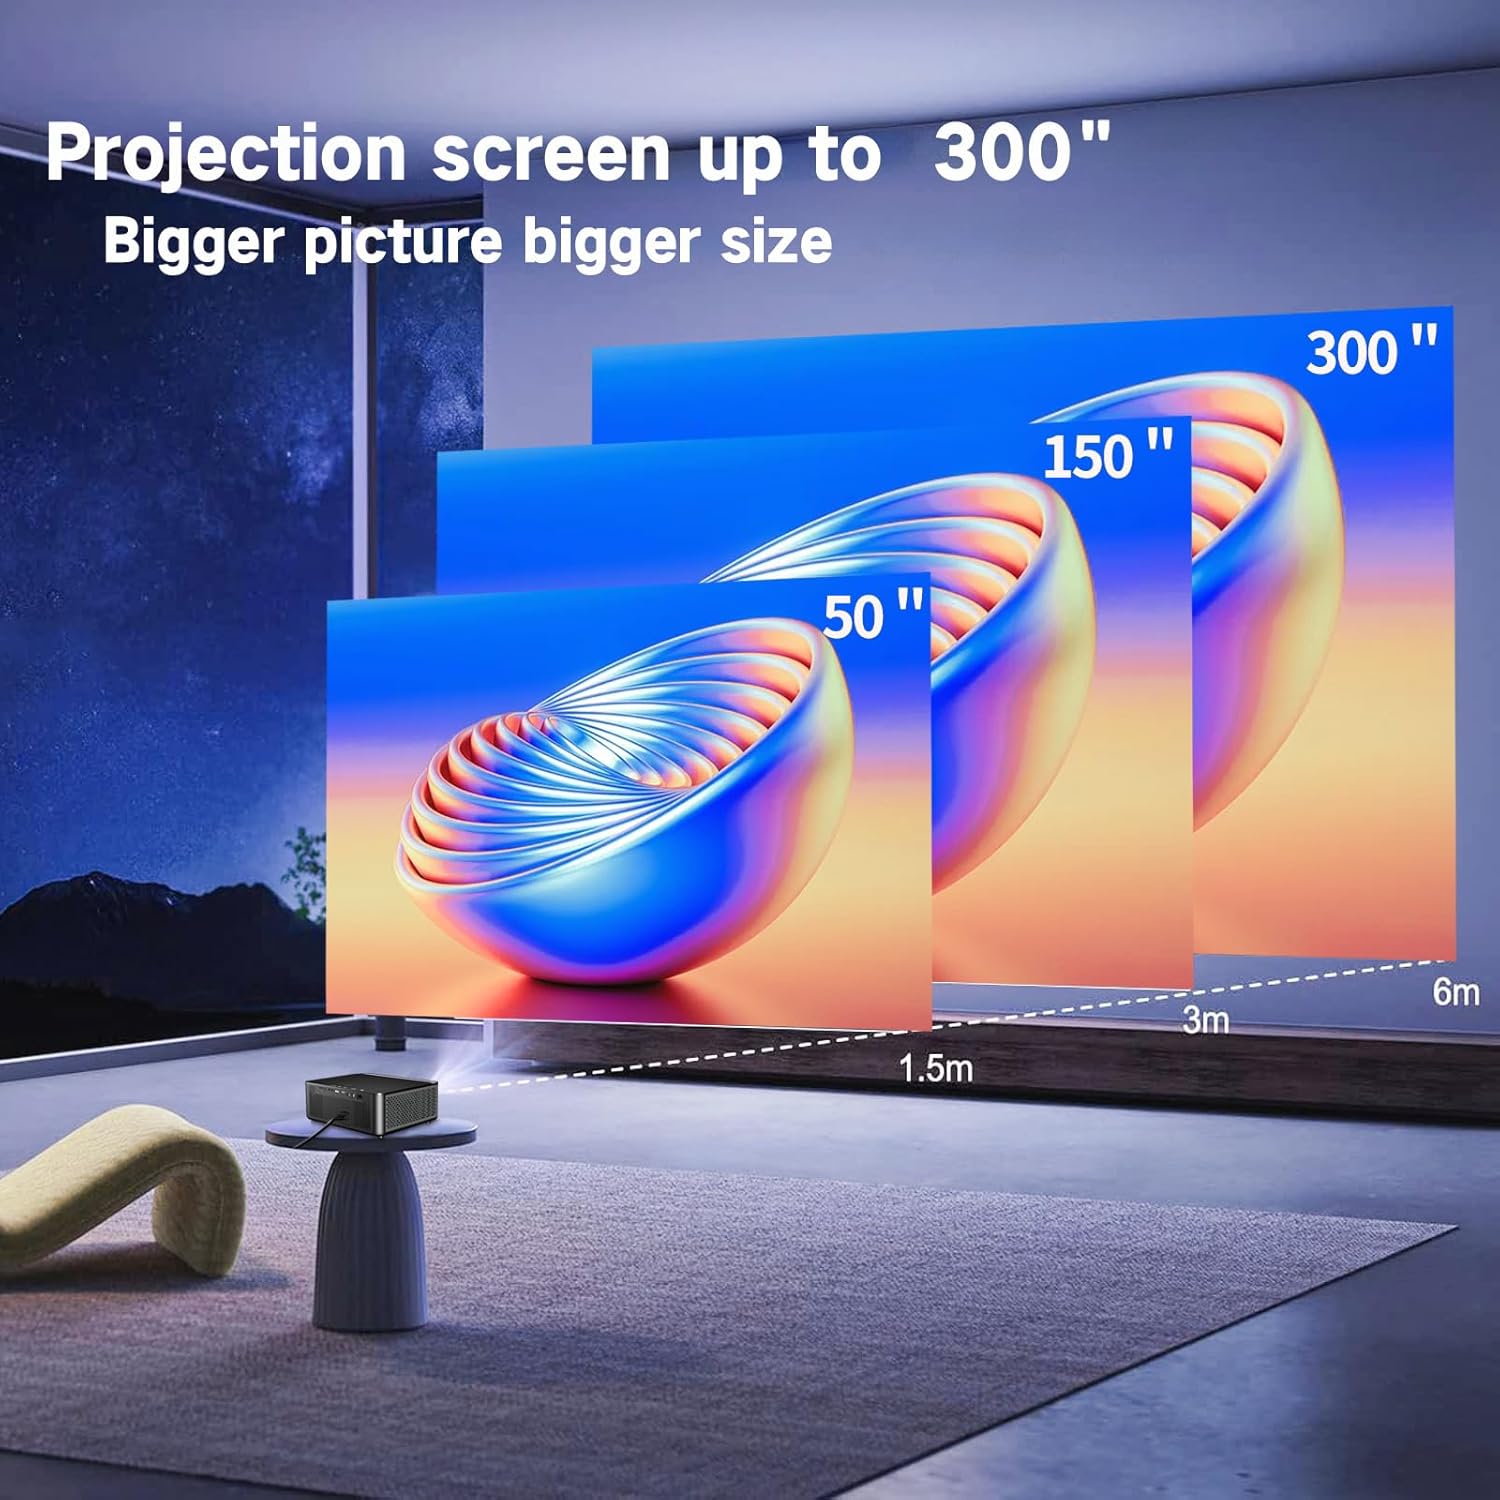
Image: Illustration demonstrating recommended projection distances for achieving screen sizes of 50, 150, and 300 inches.
5.2 Падключэнне харчавання
- Падключыце кабель харчавання да ўваходу харчавання праектара.
- Падключыце другі канец кабеля харчавання да адпаведнай электрычнай разеткі.
5.3 Першапачатковае ўключэнне
- Націсніце кнопку харчавання на праектары або пульце дыстанцыйнага кіравання, каб уключыць прыладу.
- Пачакайце некалькі хвілін, пакуль праектар загрузіцца.
5.4 Фокус і карэкцыя трапецападобнага скажэння
After powering on, adjust the image for clarity and proper geometry:
- Фокус: Rotate the mechanical focus adjustment screw near the lens until the image appears sharp and clear.
- Карэкцыя трапецеідальных скажэнняў: If the projected image is trapezoidal (wider at the top or bottom), use the 4D keystone correction feature via the on-screen menu to adjust the image corners until it forms a perfect rectangle.

Image: Diagram showing how 4P/4D keystone correction can be used to adjust the corners of a projected image to achieve a rectangular shape.
6. Інструкцыя па эксплуатацыі
6.1 Падключэнне знешніх прылад
The projector supports various connection methods:
- HDMI: Connect gaming consoles (PS4, Xbox), laptops, or other HDMI-enabled devices using an HDMI cable.
- USB: Insert a USB flash drive into the USB-A port to play media files непасрэдна.
- TF карта: Insert a Micro SD (TF) card into the TF card slot to access media.
- VGA/AV: Use these ports for older devices requiring analog connections.
- Bluetooth: Pair Bluetooth speakers or headphones for enhanced audio.

Image: The projector shown with various compatible devices, including laptops, smartphones, gaming consoles, USB drives, and external speakers, demonstrating its versatile connectivity.
6.2 Using the Integrated Android System
The projector comes with an integrated Android system, allowing access to a wide range of applications.

Image: The projector displaying its Android interface, featuring icons for popular streaming services and apps such as Netflix, YouTube, Prime Video, Hulu, Spotify, and TikTok.
- Падключэнне да сеткі: Connect the projector to your home Wi-Fi network via the settings menu or use an Ethernet cable for a wired connection.
- Доступ да праграмы: Navigate the Android interface using the remote control. You can download and install applications from the Google Play Store.
- Паток: Enjoy content from pre-installed or downloaded streaming services.
6.3 5G WiFi Screen Mirroring
Mirror your smartphone, tablet, or PC screen wirelessly to the projector.

Image: A family enjoying content mirrored from a smartphone onto the large projected screen, illustrating the 5G WiFi Screen Mirroring feature for iOS, Android, and Windows devices.
- Ensure both the projector and your device are connected to the same 5G WiFi network.
- Select the "Screen Mirroring" option on the projector's menu.
- On your smartphone/tablet/PC, activate its screen mirroring function (e.g., "Smart View" for Android, "AirPlay" for iOS, "Cast" for Windows).
- Выберыце праектар са спісу даступных прылад, каб усталяваць злучэнне.
7. Тэхнічнае абслугоўванне
7.1 Ачыстка аб'ектыва
Акуратна працярыце аб'ектыў праектара мяккай тканінай без ворса, спецыяльна распрацаванай для аптычных паверхняў. Не выкарыстоўвайце абразіўныя ачышчальнікі і не прыкладвайце празмерных намаганняў.
7.2 Ачыстка корпуса праектара
Для чысткі знешніх паверхняў праектара выкарыстоўвайце мяккую сухую тканіну. Пазбягайце выкарыстання агрэсіўных хімічных рэчываў або растваральнікаў.
7.3 Optical Engine Protection
The projector features a full-sealed optical engine designed to prevent dust from entering the internal components, reducing the need for frequent internal cleaning and extending the device's lifespan.

Выява: Унутраная view diagram of the projector's full-sealed optical engine, highlighting its design to prevent dust from entering and affecting performance.
7.4 лamp жыццё
The projector utilizes advanced SmarEco technology to minimize energy consumption and extend the lamp's lifespan up to 60,000 hours, providing long-term reliability.

Выява: Падрабязная дыяграмаasing the projector's lamp technology, indicating a lifespan of over 30,000 hours.
8. Выпраўленне непаладак
Калі ў вас узніклі праблемы з праектарам, звярніцеся да наступных распаўсюджаных праблем і рашэнняў:
| праблема | Магчымая прычына | Рашэнне |
|---|---|---|
| Няма выявы на экране. | Сілавы кабель не падключаны; няправільная крыніца ўваходнага сігналу; прылада не падключана. | Check power connections. Select correct input source (HDMI, AV, etc.). Ensure external device is powered on and connected properly. |
| Выява размытая. | Focus not adjusted; projector too far/close. | Adjust the focus ring on the lens. Ensure projector is within optimal projection distance. |
| Выява мае форму трапецыі. | Праектар не перпендыкулярны экрану. | Use the 4D keystone correction feature in the settings menu to adjust the image shape. |
| Няма гуку. | Volume too low; external audio device not connected; incorrect audio output selected. | Increase volume. Check external speaker/headphone connection. Ensure correct audio output is selected in settings. |
| Немагчыма падключыцца да Wi-Fi. | Incorrect password; out of range; network issue. | Verify WiFi password. Move projector closer to router. Restart router and projector. |
9. Тэхнічныя характарыстыкі
Key technical specifications for the Ysametp 5G WiFi Bluetooth Projector (Model DE-M8-E-An):
- Марка: Ісаметп
- Нумар мадэлі: DE-M8-E-An
- колер: Чорны
- Тып прадукту: Партатыўны праектар
- Тэхналогія падключэння: HDMI, USB, Wi-Fi (5G), Bluetooth
- Асаблівасці: Integrated WiFi, Android System, 4D Keystone Correction
- Сумяшчальныя прылады: Game Consoles, Speakers, Laptops, Smartphones, Tablets
- Раздзяленне дысплея: Уласнае разрозненне 1920 x 1080 (Full HD)
- Максімальнае раздзяленне дысплея: 4096 x 2160 (4K Support)
- Тып дысплея: DLP
- Памеры прадукту: 26 Д х 23 Ш х 11 У сантыметраў
- Формаў-фактар: Партатыўны
- Тып мацавання: Настольнае мацаванне
- Lamp Працягласць жыцця: Да 60,000 гадзін

Image: A visual comparison highlighting the projector's 20,000 Lumens brightness, Native 1080P resolution, and 4K support, contrasting it with a lower specification projector.
10. Гарантыя і падтрымка
The Ysametp Projector comes with a 3-year service warranty. For technical support or warranty claims, please contact Ysametp customer service through your purchase platform or the official Ysametp webсайт.