
1. Прадукт скончыўсяview
The Kaleinavi Smart 4-Channel Wireless Relay Remote Control Switch Receiver is designed for versatile control applications. It features a wide voltage input range (DC 12V-36V) and utilizes 433MHz RF technology for stable and reliable wireless communication. The system includes a receiver module and a 4-button remote control, pre-paired for immediate use. Its compact size and high receiving sensitivity make it suitable for various industrial control and security systems.
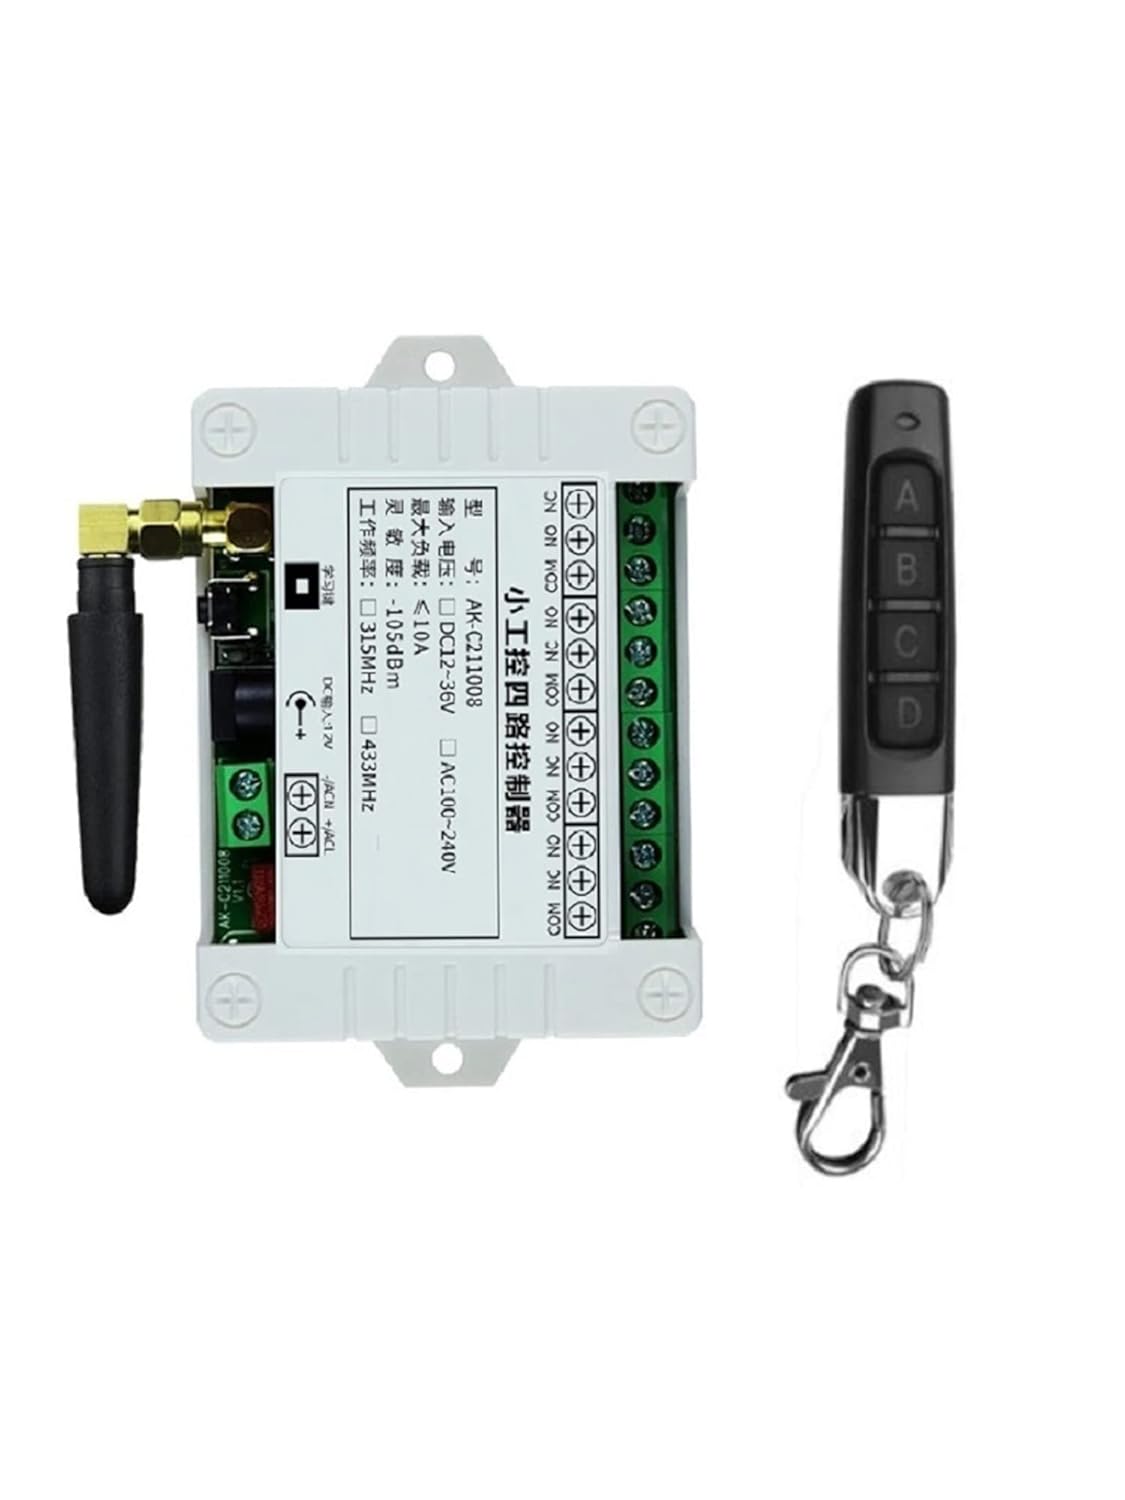
Image 1: Kaleinavi 4-Channel Wireless Relay Receiver and Remote Control.

Image 2: Internal components of the Kaleinavi 4-Channel Wireless Relay Receiver, highlighting the output port, brand relays, DC power connector, learning button, and antenna interface.
2. Змесціва ўпакоўкі
- 1 x Wireless Relay Receiver (with protective cover)
- 1 x Remote Control (with pre-installed battery)
3. Тэхнічныя характарыстыкі
| Асаблівасць | Спецыфікацыя |
|---|---|
| Рабочы выпtage | Пастаянны ток 12 В - 36 В |
| Ток у рэжыме чакання | < 10 мА |
| Працоўны ток | < 128 мА |
| Працоўная тэмпература | -10°C да +60°C |
| Частата прыёмніка | 433.92 МГц |
| Прыёмная адчувальнасць | -105 дБ |
| Стан вываду | Switching Value (Dry Contact Signal: NO, NC, COM) |
| Max Load (Resistive) | 10A Relay, < 8A |
| Max Load (Inductive) | <3А |
| Памер корпуса | 96 х 80 х 29 мм |
| Тып кадавання | Код навучання |
| Аддаленае адлегласць | 30-100m (open air, line of sight) |
| Матэрыял | PC flame-retardant self-extinguishing material |
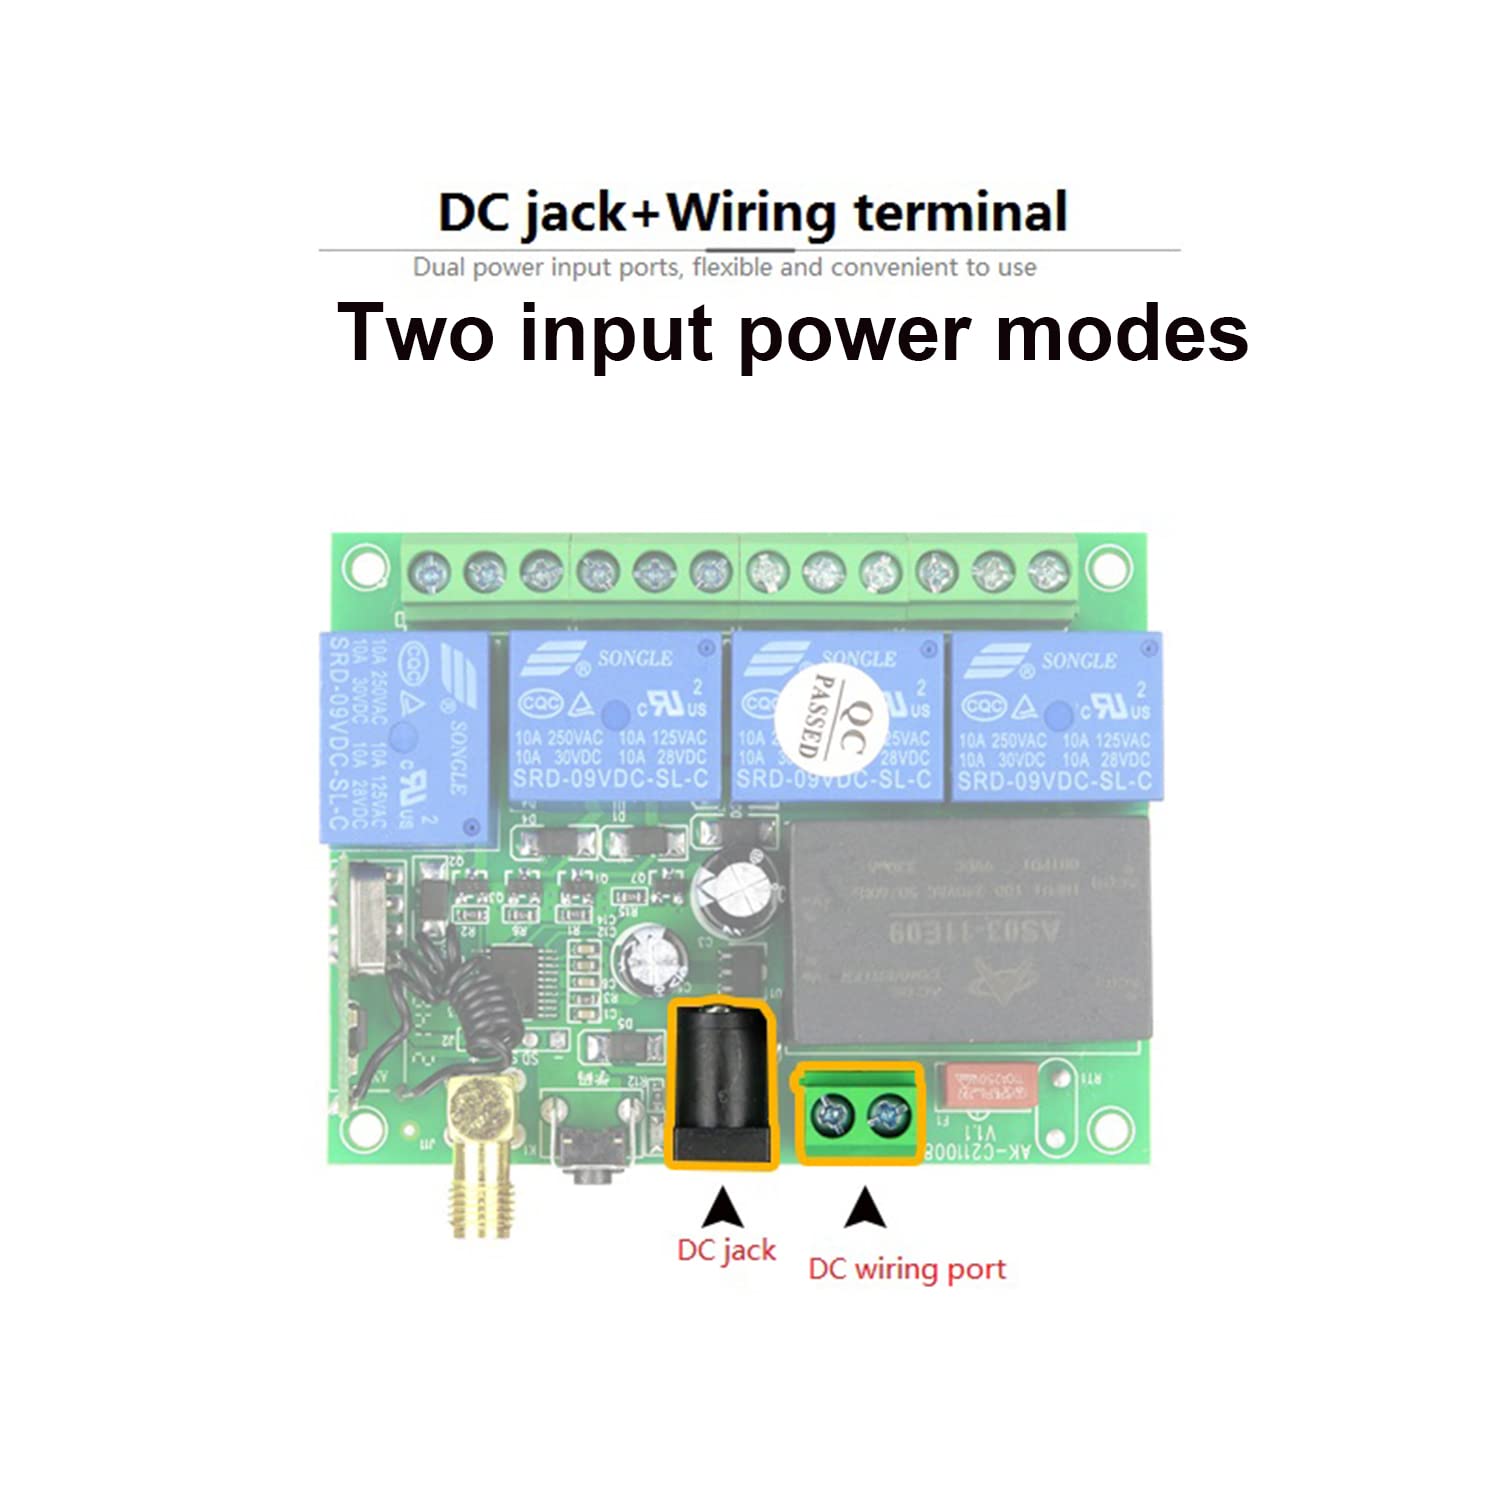
Image 3: The receiver casing is made from PC flame-retardant self-extinguishing material for enhanced safety.
4. Настройка і падключэнне
The receiver and remote control are pre-paired at the factory. Installation primarily involves connecting the receiver to your power source and the device you wish to control. The receiver supports dual power input modes: a DC jack and a wiring terminal.

Image 4: The receiver offers two input power modes: a DC jack and a wiring port for flexible connection.
4.1 Wiring for DC Output Control
To control a DC load, connect the positive (+) and negative (-) terminals of your DC power supply to the corresponding input terminals on the receiver. Then, connect your DC load to the output terminals (NO, NC, COM) as shown in the diagram. The output is a dry contact signal.

Image 5: Wiring diagram illustrating how to connect the receiver for controlling a DC output device.
4.2 Wiring for AC Output Control
For controlling an AC load, connect the DC 12V-36V working voltage to the receiver's input. Then, connect the AC load and AC power supply (L and N) to the output terminals (NO, NC, COM) of the receiver. Ensure the load voltage не перавышае 240В.

Image 6: Wiring diagram illustrating how to connect the receiver for controlling an AC output device.
4.3 Wiring for DC Motor Control
To control DC motors, connect the 12V-36V input to the receiver. Then, connect the DC motor(s) to the output terminals, utilizing the NO, NC, and COM connections to manage motor direction or on/off states.

Image 7: Wiring diagram illustrating how to connect the receiver for controlling a DC motor.
5. Рэжымы працы
The receiver supports six different working modes, which can be set using the learning button. The remote control has four buttons (A, B, C, D).
5.1 Momentary Mode (Jog Mode)
- функцыя: Press and hold a remote button to turn the corresponding relay ON. Release the button to turn the relay OFF.
- Налада: Press the Learning Button on the receiver 1 раз.
5.2 Toggle Mode (Self-Locking Mode)
- функцыя: Press a remote button once to turn the corresponding relay ON. Press the same button again to turn the relay OFF.
- Налада: Press the Learning Button on the receiver 2 XNUMX XNUMX разоў.
5.3 Latched Mode (Interlock Mode)
- функцыя: Press a remote button (e.g., A) to turn its corresponding relay ON and simultaneously turn all other relays (B, C, D) OFF. Only one relay can be ON at a time.
- Налада: Press the Learning Button on the receiver 3 XNUMX XNUMX разоў.
5.4 2-Channel Momentary + 2-Channel Latched Mode
- функцыя: Typically, two channels operate in Momentary mode, and the other two operate in Latched mode. Specific channel assignment depends on the receiver's internal configuration.
- Налада: Press the Learning Button on the receiver 4 XNUMX XNUMX разоў.
5.5 2-Channel Momentary + 2-Channel Toggle Mode
- функцыя: Two channels operate in Momentary mode, and the other two operate in Toggle mode.
- Налада: Press the Learning Button on the receiver 5 XNUMX XNUMX разоў.
5.6 2-Channel Toggle + 2-Channel Latched Mode
- функцыя: Two channels operate in Toggle mode, and the other two operate in Latched mode.
- Налада: Press the Learning Button on the receiver 6 XNUMX XNUMX разоў.
6. Метад навучання і ачысткі
6.1 Навучанне працы з пультам дыстанцыйнага кіравання
- Determine the desired working mode (e.g., Momentary, Toggle, Latched).
- Press the Learning Button on the receiver the corresponding number of times for your chosen mode (e.g., 1 time for Momentary, 2 times for Toggle, 3 times for Latched, etc.). The indicator light on the receiver will flash and then turn OFF.
- Адпусціце палец з кнопкі навучання.
- Immediately press any button on the remote transmitter you wish to pair. The indicator light will flash three times, signifying successful learning.
You can pair multiple remote controls to one receiver. Multiple remotes can control the same receiver without interference due to digital coding.
6.2 Clearing Paired Remote Controls
To clear all paired remote controls from the receiver's memory:
- Націсніце і ўтрымлівайце кнопку навучання на прыёмніку прыблізна 8 секунд.
- Індыкатар міргне некалькі разоў, а затым выключыцца.
- After clearing, if you press a button on a previously paired remote, the relay will not respond, confirming that the code has been successfully cleared.
7. Дадаткі
This wireless relay system is highly versatile and can be used in various scenarios, including:
- Controlling lamps and lighting systems
- Operating electric doors and gates (e.g., garage doors, electronic rolling gates, retractable doors)
- Managing winches, motors, and lifters
- Integrating with car alarm products
- Converting wired door and window control systems to wireless
- General industrial control and security applications
8. Выпраўленне непаладак
- Issue: Receiver does not respond to remote control.
рашэнне: Ensure the remote control battery is functional. Verify that the remote is correctly paired to the receiver by following the 'Learning a Remote Control' steps. Check power supply to the receiver. - Issue: Receiver only operates in Momentary mode, cannot switch to Toggle or Latched.
рашэнне: Ensure you are pressing the Learning Button the correct number of times for the desired mode (e.g., 2 times for Toggle, 3 times for Latched) before pressing the remote button. If issues persist, try clearing all codes and re-pairing. - Issue: Remote control range is shorter than expected.
рашэнне: The stated range is for open-air, line-of-sight conditions. Obstacles such as walls, trees, and other structures can significantly reduce the effective range. Ensure the receiver's antenna is unobstructed and extended. Avoid placing the receiver near large metal objects or sources of electromagnetic interference. - Issue: Relay clicks but connected device does not operate.
рашэнне: Verify the wiring connections to your device are correct (NO, NC, COM terminals). Ensure the load's current and voltage are within the receiver's maximum load specifications (10A relay, resistive load < 8A, inductive load < 3A).
9. Тэхнічнае абслугоўванне
The Kaleinavi wireless relay system requires minimal maintenance. Keep the receiver and remote control clean and dry. Avoid exposing them to extreme temperatures, humidity, or corrosive environments. Replace the remote control battery as needed.
10. Гарантыя і падтрымка
This product comes with a 1-year warranty. If you encounter any issues or require technical assistance, please contact Kaleinavi customer support. Our team is available to provide guidance and resolve any concerns you may have.


