
1. Уводзіны
This manual provides detailed instructions for the assembly, operation, and maintenance of your Sharkoon SHA-VS4-WBK Mid-Tower PC Case. Please read this manual thoroughly before beginning installation to ensure proper setup and to maximize the lifespan of your components.
2. Прадукт скончыўсяview
The Sharkoon SHA-VS4-WBK is a mid-tower PC case designed for ATX and Micro-ATX motherboards, featuring a full black aesthetic and an acrylic side window panel. It offers ample space for various components and efficient cable management.
Асноўныя характарыстыкі:
- Acrylic side window panel for component visibility.
- Three 5.25-inch drive bays (two with tool-less mounting).
- Three 3.5-inch drive bays.
- Four 2.5-inch drive bays.
- Two external USB 3.0 ports on the front panel.
- Expansion card clearance up to 385mm (with 2.5-inch drive cage removed).
- CPU cooler height support up to 160mm.
- Convex side panel design for improved cable management space.
Візуальная даведка:

Малюнак 2.1: Пярэдняя частка view of the Sharkoon SHA-VS4-WBK Mid-Tower PC Case, showcasing the acrylic side panel and front I/O ports.
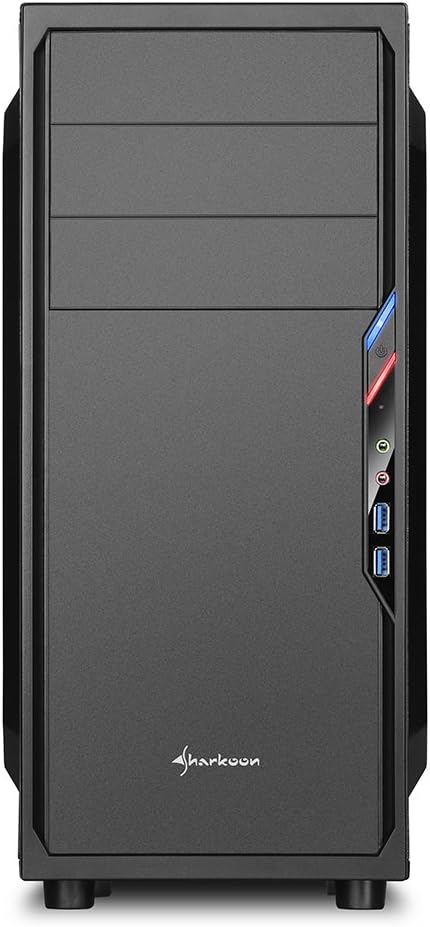
Малюнак 2.2: Спераду view of the PC case, highlighting the drive bays and front panel design.

Малюнак 2.3: бок view of the PC case, clearly showing the acrylic window panel.

Малюнак 2.4: Задняя частка view of the PC case, showing expansion slots and power supply mounting area.

Малюнак 2.5: Інтэр'ер view of the PC case, illustrating the motherboard tray, drive bays, and cable routing options.
3. Настройка і ўстаноўка
Follow these steps for proper installation of your PC components into the SHA-VS4-WBK case.
3.1 Падрыхтоўка справы
- Акуратна распакуйце скрынку і выдаліце ўсе пакавальныя матэрыялы.
- Remove the side panels by unscrewing the thumbscrews at the rear of the case.
3.2 Устаноўка мацярынскай платы
- Install the necessary standoffs onto the motherboard tray according to your motherboard's form factor (ATX or Micro-ATX).
- Place the I/O shield into the rear opening of the case.
- Carefully align your motherboard with the standoffs and I/O shield, then secure it with screws.
3.3 Усталёўка прывада
- 5.25-inch Drives: For the two tool-less bays, simply slide the drive in until it clicks into place. For the third bay, secure with screws.
- 3.5-inch Drives: Mount 3.5-inch HDDs into the designated drive cages.
- 2.5-inch Drives: Mount 2.5-inch SSDs/HDDs into the designated drive cages. The 2.5-inch drive cage can be removed to accommodate longer expansion cards.
3.4 Усталёўка платы пашырэння
- Зніміце неабходныя вечкі слотаў пашырэння з задняй панэлі корпуса.
- Устаўце карту пашырэння (напрыклад, відэакарту) у адпаведны слот PCIe на матчынай плаце.
- Secure the expansion card with the provided screws. Note the maximum clearance of 310mm, or 385mm if the 2.5-inch drive cage is removed.
3.5 Устаноўка блока харчавання
- Install your power supply unit into the rear-mount power supply bay at the bottom of the case.
- Secure it with screws from the outside of the case. Ensure the power supply's fan faces the correct direction for optimal airflow.
3.6 Арганізацыя кабеляў
Utilize the space behind the motherboard tray and the convex design of the side panel to route cables neatly. This improves airflow and the overall aesthetic of your build.
3.7 Connecting Front I/O Ports
Connect the front panel cables (USB 3.0, audio, power, reset, LED indicators) to the corresponding headers on your motherboard. Refer to your motherboard manual for specific header locations.
4. Эксплуатацыйныя меркаванні
Once all components are installed, ensure all cables are securely connected and the side panels are reattached. Power on your system and verify all components are functioning correctly. Monitor temperatures to ensure adequate cooling.
5. Тэхнічнае абслугоўванне
Рэгулярнае тэхнічнае абслугоўванне дапамагае забяспечыць аптымальную прадукцыйнасць і даўгавечнасць кампанентаў вашага ПК.
- Ачыстка ад пылу: Periodically clean dust from the interior of the case, especially from fans and heatsinks, using compressed air or a soft brush.
- Знешняя ачыстка: Працярыце вонкавыя паверхні мяккай, damp тканіна. Пазбягайце абразіўных ачышчальнікаў.
- Acrylic Panel Care: Clean the acrylic side panel with a soft, lint-free cloth and a mild plastic cleaner to prevent scratches.
6. Выпраўленне непаладак
Калі ў вас узніклі праблемы, разгледзьце наступныя распаўсюджаныя дзеянні па ліквідацыі непаладак:
- Няма харчавання: Check all power connections, including the power supply to the wall outlet, the 24-pin ATX connector, and the 8-pin CPU power connector on the motherboard. Ensure the power button cable is correctly connected to the motherboard.
- Components Not Fitting: Double-check component dimensions against the case specifications. For long graphics cards, ensure the 2.5-inch drive cage is removed if necessary.
- Слабы паток паветра/перагрэў: Verify all fans are spinning correctly and are oriented for optimal airflow. Ensure cables are neatly managed to avoid obstructing airflow.
- Front Panel I/O Issues: Confirm that all front panel connectors (USB, audio) are correctly plugged into the motherboard headers.
7. Тэхнічныя характарыстыкі
| Асаблівасць | Спецыфікацыя |
|---|---|
| Марка | Шаркун |
| Нумар мадэлі | SHA-VS4-WBK |
| Тып корпуса | Сярэдняя вежа |
| Сумяшчальнасць матчыных поплаткаў | ATX, Micro-ATX |
| Памеры (Д х Ш х У) | 44.5 х 20 х 43 см |
| Вага | 3.5 кг |
| Матэрыял | Acrylic (Side Panel) |
| 5.25-цалевыя адсекі для дыскаў | 3 (2 tool-less) |
| 3.5-цалевыя адсекі для дыскаў | 3 |
| 2.5-цалевыя адсекі для дыскаў | 4 |
| Пярэднія парты I / O | 2 х USB 3.0 |
| Expansion Card Clearance | Max 310mm (385mm with 2.5-inch drive cage removed) |
| Максімальная вышыня ахаладжальніка працэсара | 160mm (Note: May be 155mm depending on motherboard/cooler) |
| Power Supply Max Depth | 250 мм |
| Спосаб астуджэння | Паветранае астуджэнне |
8. Гарантыя і падтрымка
For warranty information and technical support, please refer to the official Sharkoon webсайт або звярніцеся да мясцовага дыстрыбутара. Захоўвайце пацвярджэнне пакупкі для прэтэнзій па гарантыі.