1. Інфармацыя па бяспецы
Read all instructions carefully before beginning installation. If you are unfamiliar with electrical wiring, consult a qualified electrician. This product is ETL Listed, ensuring compliance with safety standards.
- Перад устаноўкай або тэхнічным абслугоўваннем пераканайцеся, што электраэнергія адключана з дапамогай аўтаматычнага выключальніка.
- Уся праводка павінна адпавядаць нацыянальным і мясцовым электрычным нормам.
- The mounting structure must be capable of supporting the weight of the fan (approximately 7.83 kg).
- Не выкарыстоўвайце вентылятар з пашкоджанымі лапаткамі.
- Пазбягайце размяшчэння прадметаў на шляху лопасцей вентылятара.
2. Змесціва ўпакоўкі і кампаненты
Перад тым, як працягнуць усталёўку, пераканайцеся, што ўсе кампаненты наяўныя.

Малюнак 2.1: Выбухнуў view showing key components like the fast installation terminal, sloped ceiling mounting bracket, acrylic lampshade, and integrated LED light module.
Тыповыя кампаненты:
- Корпус рухавіка ў зборы
- Лопасці вентылятара (5 рэверсіўныя лопасці)
- Даўжная штанга і навес
- Мантажны кранштэйн
- Інтэграваны камплект святлодыёдных лямпаў
- Акрыл Лampадценне
- Пульт дыстанцыйнага кіравання і прыёмнік
- Набор фурнітуры (шрубы, шайбы, гайкі)
3. Ўстаноўка і налада
3.1 Варыянты мантажу
This fan supports both standard downrod mounting and angled (sloped) ceiling mounting up to 15 degrees.
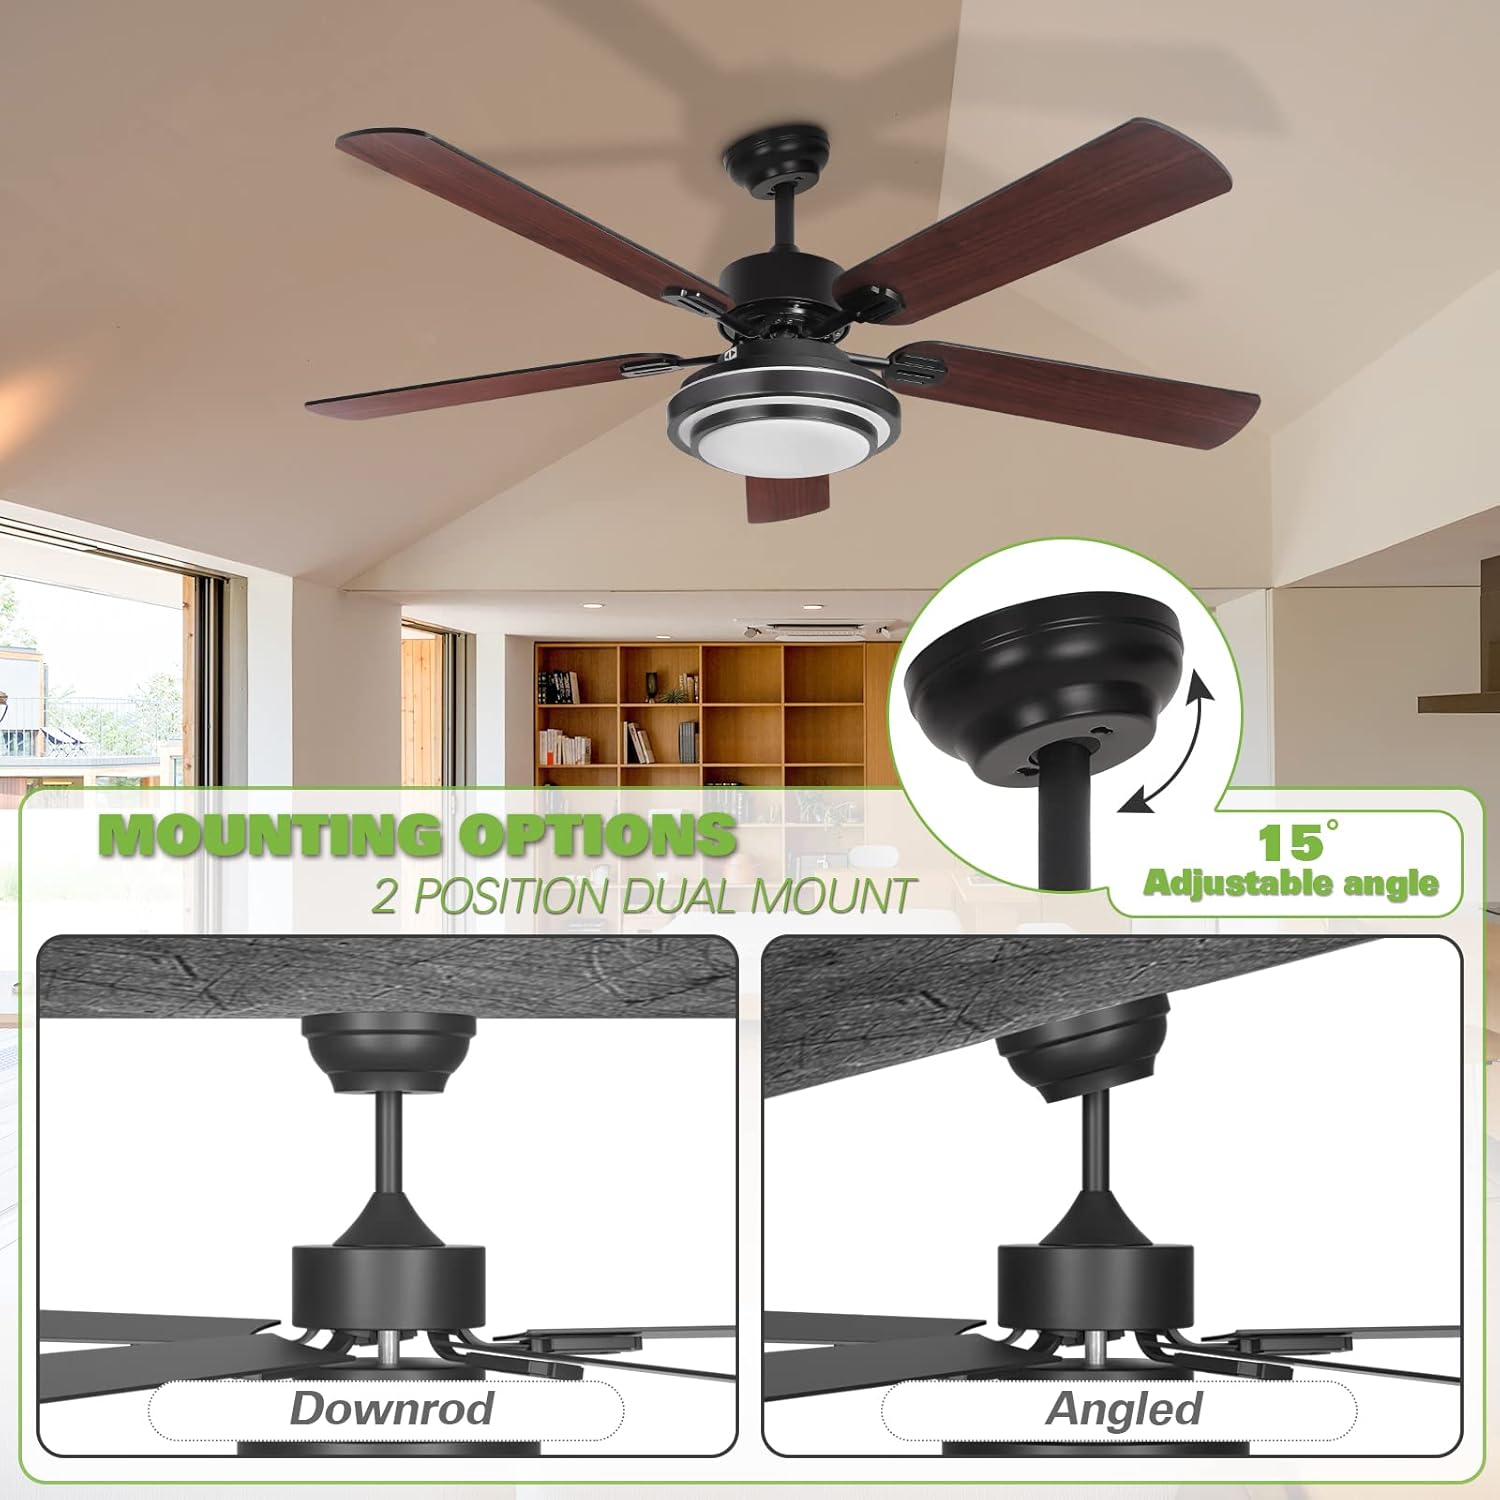
Малюнак 3.1: Illustration of downrod and angled mounting configurations. The fan can accommodate sloped ceilings up to 15 degrees.
- Бяспечны мантажны кранштэйн: Attach the mounting bracket to the ceiling junction box. Ensure the bracket is securely fastened and can support the fan's weight.
- Збярыце ніжнюю штангу: Insert the downrod through the canopy and connect it to the motor housing.
- Павесіць вентылятар: Асцярожна падніміце вентылятарны блок і павесьце яго на мантажны кранштэйн.
3.2 Электрычная праводка
Connect the fan's electrical wires to the household wiring using the provided fast installation terminals and wire nuts. Ensure all connections are secure.
- Connect the ground wire (green or bare copper) from the fan to the ground wire from the outlet box.
- Connect the neutral wire (white) from the fan to the neutral wire from the outlet box.
- Connect the live wire (black) from the fan to the live wire from the outlet box.
- Install the remote receiver into the canopy.
3.3 Устаноўка блейда
The fan includes 5 reversible blades, with one side in dark wood color and the other in black. Choose your preferred finish before installation.

Малюнак 3.2: Reversible fan blades, offering a choice between dark wood and black finishes.
- Attach each blade to the blade arm using the provided screws.
- Secure the blade arms to the motor housing.
3.4 Light Kit Assembly
Connect the integrated LED light kit to the fan's wiring and secure the acrylic lampадценне.
- Connect the LED light kit wires to the corresponding wires from the fan.
- Mount the LED light kit to the bottom of the fan motor housing.
- Attach the acrylic lampshade by twisting or securing it into place.
4. Інструкцыя па эксплуатацыі
The Hykolity ceiling fan is operated using the included remote control.
4.1 Функцыі дыстанцыйнага кіравання

Малюнак 4.1: Remote control functionality for light dimming and color temperature adjustment (3000K, 4000K, 5000K).
- Уключэнне/выключэнне вентылятара: Націсніце кнопку вентылятара, каб уключыць або выключыць вентылятар.
- Хуткасць вентылятара: Use the speed buttons (1, 2, 3) to adjust the fan's rotation speed.
- Уключэнне/выключэнне святла: Націсніце кнопку падсветкі, каб уключыць або выключыць убудаваную святлодыёдную лямпу.
- Рэгуляванне яркасці: Use the dimming buttons (+/-) to adjust the brightness of the LED light.
- Рэгуляванне каляровай тэмпературы: The LED light offers three color temperatures: Warm White (3000K), Natural Light (4000K), and Daylight (5000K). Cycle through these options using the dedicated button on the remote or by quickly toggling the light switch.
4.2 Рэверсіўная функцыя рухавіка
The fan features a reversible motor for year-round comfort. A slide switch on the fan's motor housing controls the direction of airflow.

Малюнак 4.2: Reversible motor switch for seasonal airflow adjustment.
- Summer Mode (Left Position): Set the switch to the LEFT position for downward airflow, creating a cooling effect.
- Winter Mode (Right Position): Set the switch to the RIGHT position for upward airflow, circulating warm air trapped near the ceiling.
- Важна: Ensure the fan is OFF before changing the direction of the motor. The fan will not operate if the reverse switch is in the middle position.
5. Тэхнічнае абслугоўванне
Рэгулярнае тэхнічнае абслугоўванне забяспечвае аптымальную прадукцыйнасць і даўгавечнасць вашага потолочного вентылятара.
- Уборка: Перыядычна чысціце лопасці вентылятара і корпус рухавіка мяккай губкайamp тканіна. Не выкарыстоўвайце абразіўныя ачышчальнікі або растваральнікі.
- Баланс ляза: Калі вентылятар хістаецца, праверце, ці ўсе шрубы лапатак зацягнуты, а лапаткі збалансаваныя. Пры неабходнасці даступныя камплекты для балансавання.
- Электрычныя злучэнні: Annually inspect all electrical connections for tightness. Ensure power is off at the circuit breaker before inspection.
- Камплект святла: The integrated LED light is designed for long life and typically does not require replacement. If issues occur, contact support.
6. Выпраўленне непаладак
Звярніцеся да наступнай табліцы, каб азнаёміцца з распаўсюджанымі праблемамі і іх рашэннямі.
| праблема | Магчымая прычына | Рашэнне |
|---|---|---|
| Вентылятар не запускаецца | No power to the fan; Loose wire connections; Remote control battery low; Reverse switch in middle position. | Check circuit breaker; Verify all wire connections are secure; Replace remote battery; Ensure reverse switch is fully engaged left or right. |
| Святло не працуе | Loose wire connection to light kit; LED driver failure; Remote control battery low. | Check light kit wiring; Contact support for LED driver replacement; Replace remote battery. |
| Веер хістаецца | Аслабленыя шрубы ляза; незбалансаваныя ляза; аслаблены мантажны кранштэйн. | Зацягніце ўсе шрубы ляза; выкарыстоўвайце камплект для балансавання ляза; пераканайцеся, што мантажны кранштэйн надзейна замацаваны. |
| Пульт дыстанцыйнага кіравання не працуе | Battery depleted; Remote not paired with receiver. | Replace battery; Refer to remote pairing instructions (usually involves pressing a button within a few seconds of turning on power). |
| Празмерны шум | Аслабленыя шрубы; трэнне корпуса рухавіка; лопасці сутыкаюцца з перашкодай. | Check and tighten all screws; Ensure no parts are rubbing; Clear any obstructions from blade path. |
7. Тэхнічныя характарыстыкі
Detailed technical specifications for the Hykolity 52 Inch Ceiling Fan.

Малюнак 7.1: Key dimensions of the 52-inch ceiling fan.
| Асаблівасць | Дэталь |
|---|---|
| Марка | Хіколіты |
| мадэль | 52-цалевы потолочный вентылятар |
| Дыяметр | 52 цаляў |
| Height (Ceiling to Fan Bottom) | 15.7 inches (optional) |
| Крыніца святла | Integrated 24-watt LED |
| Каляровая тэмпература | 3000K (Warm White), 4000K (Natural Light), 5000K (Daylight) |
| Узровень шуму рухавіка | Менш за 35 дБ |
| Колькасць лязоў | 5 (Reversible: Dark Wood / Black) |
| Тып мацавання | Dual-Mount (Downrod, Angled up to 15°) |
| Тып кіравання | Пульт дыстанцыйнага кіравання |
| Магутнасць/Ватtage | 24 Вт (для асвятлення) |
| Вага прадмета | 7.83 кг |
| Матэрыял | Polycarbonate (blades), Metal (housing) |
| ETL уключаны ў спіс | так |
8. Гарантыя і падтрымка
Hykolity provides the following warranty for this product:
- Матор: Пажыццёвая гарантыя.
- Light Accessories: 3 гадоў гарантыі.
For any product problems or warranty claims, please contact the Hykolity after-sales support team. Keep your purchase receipt as proof of purchase.
Contact information is typically provided on the product packaging or official webсайт.