1. Уводзіны
This manual provides detailed instructions for the installation, operation, and maintenance of your Gravity Audio 1200W 12" Premium Car Subwoofer Kit. This comprehensive package includes a Gravity 12-inch subwoofer, an Audiobank 3000W Class D amplifier, an Audiotek single 12-inch vented subwoofer enclosure, and a complete amplifier installation kit. Please read this manual thoroughly before attempting installation or operation to ensure proper use and maximum performance.

Малюнак 1.1: Закончанаview of the Gravity Audio 1200W 12" Premium Car Subwoofer Kit components.
2. Інфармацыя па бяспецы
Заўсёды выконвайце наступныя меры бяспекі падчас усталёўкі і эксплуатацыі:
- Рэкамендуецца прафесійная ўстаноўка: If you are unsure about any aspect of installation, consult a qualified car audio technician.
- Адключыце акумулятар: Always disconnect the vehicle's negative battery terminal before starting any electrical work to prevent short circuits and electrical shock.
- Правільная электраправодка: Use appropriate gauge wiring as specified in this manual and ensure all connections are secure and insulated to prevent shorts.
- Вентыляцыя: Забяспечце amplifier is mounted in a location with adequate airflow to prevent overheating.
- Пазбягайце перашкод: Do not mount components in locations that obstruct airbags, driver visibility, or vehicle controls.
- Абарона слыху: Працяглае ўздзеянне высокіх узроўняў гучнасці можа прывесці да незваротнага пашкоджання слыху. Будзьце асцярожныя пры рэгуляванні гучнасці.
3. Змесціва ўпакоўкі
Праверце, ці ёсць усе прадметы ў вашай упакоўцы:
- Gravity 12" 1200W Peak Power Subwoofer (GR-12PW)
- Audiobank 3000W Class D Monoblock Amplifier (P3001)
- Audiotek Single 12 Inch Vented Subwoofer Enclosure (CA-12SP)
- Поўнае Amplifier Installation Kit (Power Cable, Ground Cable, Remote Turn-On Wire, RCA Interconnects, Speaker Wire, Fuse Holder, Fuse, Terminals, Zip Ties)

Figure 3.1: Contents of the amplifier installation kit, including various cables, fuse, and terminals.
4. Настройка і ўстаноўка
Follow these steps for proper installation of your car audio system. Ensure the vehicle's battery is disconnected before proceeding.
4.1 Subwoofer Installation into Enclosure
- Carefully place the Gravity 12" subwoofer into the opening of the Audiotek vented enclosure. Ensure the mounting holes align.
- Secure the subwoofer using appropriate screws (not included, typically self-tapping wood screws) through the mounting holes into the enclosure. Do not overtighten.
- Connect speaker wire from the subwoofer's terminals to the enclosure's internal terminals. Observe polarity: positive (+) to positive, negative (-) to negative.

Малюнак 4.1: Спераду view of the Gravity 12-inch subwoofer, showing the cone and surround.

Малюнак 4.2: Спераду view of the Audiotek single 12-inch vented subwoofer enclosure.
4.2 Amplifier Мацаванне
Choose a secure, well-ventilated location for the Audiobank amplifier, such as the trunk or under a seat. Ensure it is away from moisture and direct sunlight.
- Mark the mounting holes on the chosen surface.
- Drill pilot holes if necessary, taking care not to damage any vehicle components.
- Забяспечце ampпадмацоўвальнік з дапамогай адпаведных шруб.

Малюнак 4.3: Верх view of the Audiobank 3000W Class D Monoblock Ampзадымнік.
4.3 Правадныя злучэнні
Звярніцеся да amplifier's rear panel for terminal locations. Use the provided ampкамплект для ўстаноўкі lifier.
- Power Cable (+12V): Run the thick red power cable from the vehicle's positive battery terminal to the amplifier's +12V terminal. Install the fuse holder within 18 inches of the battery and insert the fuse.
- Ground Cable (GND): Connect the thick black ground cable from the ampПадключыце клему GND зараднай прылады да чыстай неафарбаванай металічнай паверхні шасі аўтамабіля. Забяспечце надзейнае злучэнне з нізкім супраціўленнем.
- Провад дыстанцыйнага ўключэння (REM): Connect the blue remote wire from your head unit's remote output to the ampтэрмінал REM выратавальніка. Гэта ўключае amplifier on/off with your head unit.
- RCA Interconnects: Падключыце кабелі RCA ад сабвуфера або поўнадыяпазонных выхадаў папярэдняга гуку галаўнога блока да ampуваходныя раздымы RCA прылады Liferier.
- Выхад на дынамік: Connect the speaker wire from the enclosure's external terminals to the amplifier's speaker output terminals. Ensure correct polarity.

Figure 4.4: Rear panel of the Audiobank ampіндыкатар, які паказвае раздымы харчавання, зазямлення, пульта дыстанцыйнага кіравання і выхаду на дынамік.

Figure 4.5: Speaker terminal on the Audiotek subwoofer enclosure for connecting to the ampзадымнік.
5. Інструкцыя па эксплуатацыі
Once all connections are made and verified, reconnect the vehicle's negative battery terminal.
5.1 Пачатковае ўключэнне і асноўныя налады
- Уключыце запальванне аўтамабіля і галоўную прыладу. ampПавінен загарэцца індыкатар харчавання прыбора.
- Пачніце з ampРэгулятар GAIN на павярхоўвальніку ўстаноўлены на мінімум (цалкам супраць гадзіннікавай стрэлкі).
- Усталюйце гучнасць галаўной прылады прыкладна на 75% ад яе максімуму.
- Павольна павялічвайце amplifier's GAIN control until you hear distortion, then back it off slightly. This sets the maximum clean output.
5.2 AmpLifier Controls
The Audiobank P3001 amplifier features several controls for fine-tuning your subwoofer's performance:
- УЗБЕГАЦЬ: Adjusts the input sensitivity to match the output of your head unit. (See 5.1)
- ФНЧ (фільтр нізкіх частот): This control sets the upper frequency limit for the subwoofer. Typically set between 80Hz and 120Hz. Frequencies above this setting will be filtered out.
- УЗмацненне баса: Provides an increase in bass output at a specific frequency. Use sparingly to avoid distortion and potential damage.
- ФАЗА: Allows you to adjust the phase of the subwoofer output (0 or 180 degrees) to ensure it blends seamlessly with your main speakers. Experiment with both settings to find the best sound.
6. Тэхнічнае абслугоўванне
Your Gravity Audio Subwoofer Kit requires minimal maintenance to ensure long-term performance.
- Уборка: Перыядычна працірайце amplifier and subwoofer enclosure with a soft, dry cloth. Avoid using harsh chemicals or abrasive cleaners.
- Праверкі злучэння: Annually, inspect all wiring connections for tightness and corrosion. Re-tighten any loose connections.
- Вентыляцыя: Забяспечце amplifier's cooling fins remain free of dust and debris to maintain proper heat dissipation.
7. Выпраўленне непаладак
If you experience issues with your subwoofer kit, consult the following table before seeking professional assistance:
| праблема | Магчымая прычына | Рашэнне |
|---|---|---|
| Няма гуку з сабвуфера |
|
|
| Скажоны гук |
|
|
| AmpПерагрэў запальніка |
|
|
8. Тэхнічныя характарыстыкі
Gravity 12" Subwoofer (GR-12PW)
- Тып дынаміка: Сабвуфер
- Дыяметр сабвуфера: 12 цалі
- Voice Coil Configuration: Двайны 4 Ом
- Пік магутнасці: 1200 Вт кожны
- Магутнасць RMS: 600 Вт кожны
- АЧХ: 30 - 2.5kHz
- Адчувальнасць: 90 дБ
- Матэрыял конусу: Competition Grade Pressed Paper Cone
- Акружэнне: Высокапракатная пенапластавая абалонка
- Сістэма астуджэння: Advanced Air Flow Cooling System
Audiobank 3000W Class D Amplifier (P3001)
- Тып: Манаблок класа D Ampзадымнік
- Пік магутнасці: 3000 Watts (Total Package)
- элементы кіравання: Gain, LPF, Bass Boost, Phase
Audiotek Single 12 Inch Vented Enclosure (CA-12SP)
- дызайн: Vented (Ported)
- матэрыял: High Quality Gray Carpet
- Памеры: Approximately 18"W x 16"D x 14"H (External)
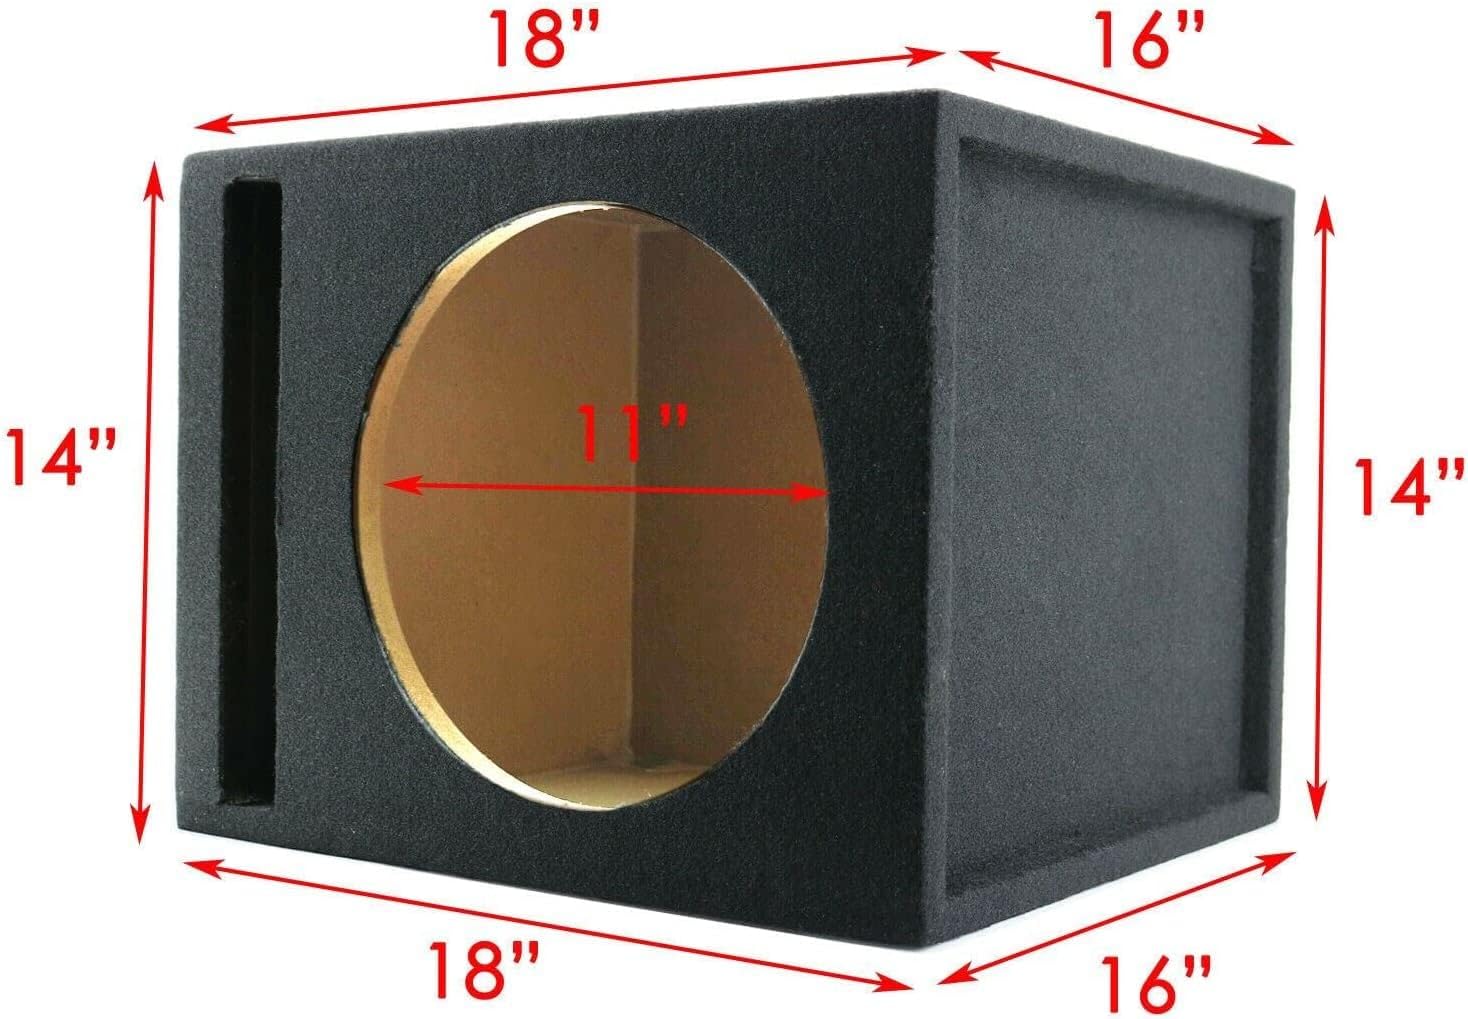
Figure 8.1: Dimensions of the Audiotek single 12-inch vented subwoofer enclosure.
9. Гарантыя і падтрымка
This product comes with a Limited Warranty. For specific details regarding warranty coverage, duration, and terms, please refer to the warranty card included with your purchase or contact Gravity Audio customer support directly.
Падтрымка кліентаў
For technical assistance, troubleshooting not covered in this manual, or warranty claims, please contact your retailer or Gravity Audio customer service. Have your product model number (GR-12PW + P3001 + CA-12SP + Kit) and purchase date available when contacting support.