1. Уводзіны
This manual provides comprehensive instructions for the setup, operation, and maintenance of your Tibuta 15.6 Inch WiFi Digital Photo Frame. Please read this manual thoroughly before using the device to ensure proper functionality and to maximize your user experience.

Image 1.1: Tibuta 15.6 Inch WiFi Digital Photo Frame in use, showing its touchscreen capabilities and companion app integration.
2. Інфармацыя па бяспецы
Выконвайце наступныя меры бяспекі, каб пазбегнуць пашкоджання прылады або траўмаў:
- Не падвяргайце прыладу ўздзеянню вады або празмернай вільгаці.
- Пазбягайце размяшчэння прылады паблізу крыніц цяпла або пад прамымі сонечнымі прамянямі на працягу доўгага часу.
- Выкарыстоўвайце толькі адаптар сілкавання, які ўваходзіць у камплект.
- Не спрабуйце самастойна разабраць або адрамантаваць прыладу. Звярніцеся ў службу падтрымкі па дапамогу.
- Захоўвайце прыладу далей ад дзяцей і хатніх жывёл.
3. Змесціва ўпакоўкі
Праверце наяўнасць усіх прадметаў у камплекце:
- Tibuta 15.6 Inch WiFi Digital Photo Frame
- Адаптар сілкавання
- Кіраўніцтва карыстальніка (гэты дакумент)
- Стаяць
4. Прадукт скончыўсяview
Азнаёмцеся з кампанентамі вашай лічбавай фотарамкі.
4.1 фронт View

Выява 4.1: Спераду view and key features of the Tibuta 15.6 Inch Digital Photo Frame.
- 15.6 Inch HD Touch Screen: High-definition display with 1280x800 resolution and IPS technology for wide viewныя вуглы.
- Інтэрфейс сэнсарнага экрана: Allows for direct interaction with the frame's menus and settings.
4.2 Ззаду View і парты

Малюнак 4.2: ззаду view of the Tibuta Digital Photo Frame with labeled ports and features.
- Выключальнік сілкавання: Уключае або выключае прыладу.
- Насценны: Mounting points for wall installation.
- Ampліфёры: Integrated speakers for audio playback.
- Слот для карты Micro SD: Падтрымка карт Micro SD да 128 ГБ для пашырэння памяці.
- Раз'ём для навушнікаў: Для падлучэння знешніх аўдыёпрылад.
- Type-A USB Port: For connecting USB drives or other peripherals.
- Порт Mini USB: For data transfer (if applicable).
- Порт харчавання пастаяннага току: Падключаецца да адаптара сілкавання.
- Стэнд: Attachable stand for desktop placement.
5. Настройка
5.1 Першапачатковае ўключэнне
- Attach the stand to the back of the photo frame for stable placement on a flat surface.
- Connect the power adapter to the DC Power Port on the back of the frame.
- Падключыце адаптар сілкавання да насценнай разеткі.
- Press the Power Switch to turn on the device.
- Follow the on-screen prompts to select your language, time zone, and connect to a Wi-Fi network.
5.2 Падключэнне да Wi-Fi
- From the main menu, navigate to "Settings" and then "Wi-Fi".
- Выберыце патрэбную сетку Wi-Fi са спісу.
- Увядзіце пароль Wi-Fi з дапамогай экраннай клавіятуры.
- Tap "Connect". Once connected, a Wi-Fi icon will appear on the screen.
5.3 Усталёўка дапаможнага прыкладання
To share photos and videos remotely, download the dedicated companion app.

Image 5.1: Download the Uhale App from Google Play or the App Store.
- On your smartphone or tablet, open the Крама Google Play (для прылад Android) або Apple App Store (для прылад iOS).
- Пошук "Uhale App" (or the specified app name in your frame's instructions).
- Спампуйце і ўсталюйце праграму.
- Follow the in-app instructions to pair your device with the digital photo frame. This typically involves entering a unique code displayed on your photo frame.
6. Інструкцыя па эксплуатацыі
6.1 Sharing Photos and Videos via App
Once the frame is connected to Wi-Fi and paired with the app:
- Адкрыйце спадарожную праграму на вашым смартфоне.
- Select the photos or videos you wish to share.
- Tap the "Send" or "Share" button within the app.
- The selected media will be transferred to your digital photo frame and displayed.
The frame supports various display modes, including timing, zooming, and cropping, which can often be adjusted via the app or directly on the frame's settings.
6.2 Using External Storage (Micro SD Card)
The frame has 16GB of built-in storage and supports Micro SD cards up to 128GB.
- Insert a Micro SD card into the designated slot on the back of the frame.
- The frame will automatically detect the card.
- Navigate to the "Gallery" or "Files" section on the frame to access content from the Micro SD card.
- Вы можаце скапіяваць files from the Micro SD card to the internal storage or play them directly.
6.3 Automatic Rotation (Gravity Sensing)
The frame features gravity sensing for automatic rotation, adjusting the display orientation based on how the frame is positioned (landscape or portrait).
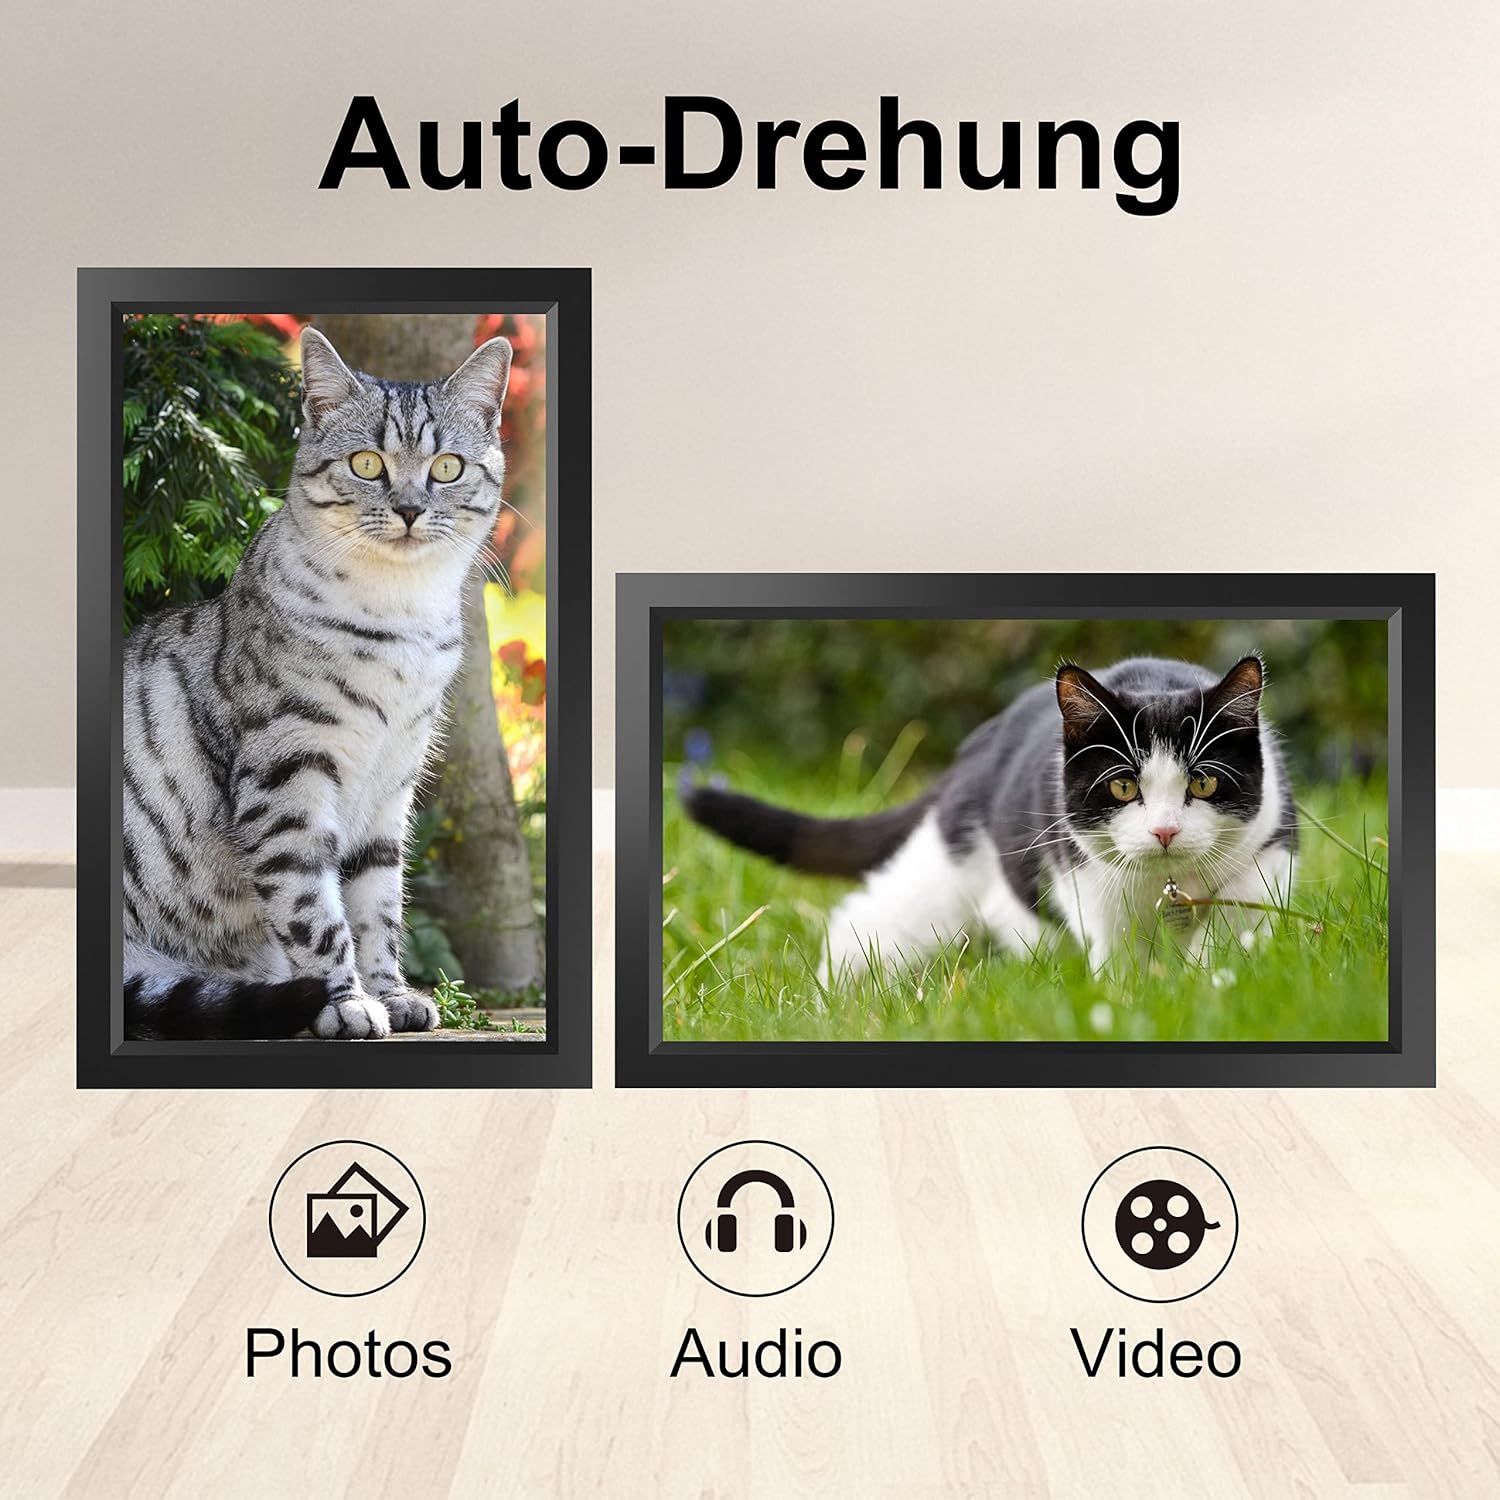
Image 6.1: Automatic display rotation based on frame orientation.
Ensure the gravity sensing feature is enabled in the frame's settings if you wish to utilize this functionality.
6.4 Налады дысплея
Наладзьце свой viewing experience through the frame's settings menu:
- Інтэрвал слайд-шоў: Adjust how long each photo is displayed.
- Эфекты пераходу: Choose different effects between photos.
- Яркасць: Адрэгулюйце яркасць экрана.
- Sleep Mode/Timer: Set schedules for the frame to turn on/off automatically.
- Маштаб/Абрэзка: Options to adjust how photos fit the screen.
7. Тэхнічнае абслугоўванне
7.1 Ачыстка экрана
Каб ачысціць сэнсарны экран, акуратна працярыце яго мяккай тканінай без ворса. Для выдалення ўстойлівых плям злёгкуampПрацярыце тканіну вадой або растворам для чысткі экрана. Пазбягайце выкарыстання агрэсіўных хімічных рэчываў або абразіўных матэрыялаў.
7.2 Агульны догляд
- Keep the frame in a dry environment.
- Protect it from dust by occasionally wiping the frame's body with a soft cloth.
- Не кідайце прыладу і не падвяргайце яе моцным ударам.
8. Выпраўленне непаладак
| праблема | Магчымая прычына | Рашэнне |
|---|---|---|
| Рамка не ўключаецца. | Адаптар харчавання не падключаны або няспраўны. | Пераканайцеся, што адаптар сілкавання надзейна падключаны як да рамы, так і да спраўнай разеткі. Паспрабуйце іншую разетку. |
| Немагчыма падключыцца да Wi-Fi. | Няправільны пароль, па-за зонай дзеяння сеткі або праблема з сеткай. | Verify the Wi-Fi password. Move the frame closer to the router. Restart your router. |
| Photos/videos not appearing. | App not paired, incorrect file format, or storage issue. | Ensure the app is correctly paired. Check if the media files are in a supported format. Verify sufficient storage space on the frame or SD card. |
| Сэнсарны экран не рэагуе. | Часовы збой праграмнага забеспячэння. | Restart the frame by holding the power button or unplugging and replugging the power adapter. |
| Automatic rotation not working. | Feature disabled or sensor issue. | Check the frame's settings to ensure gravity sensing/auto-rotation is enabled. |
9. Тэхнічныя характарыстыкі
| Асаблівасць | Дэталь |
|---|---|
| Нумар мадэлі | TID15.6 |
| Памер экрана | 15.6 цалі |
| Тып дысплея | IPS сэнсарны экран |
| дазвол | 1280x800 |
| Унутраная памяць | 16 ГБ (прыблізна 80 000 фотаздымкаў) |
| Знешні назапашвальнік | Micro карта SD аб'ёмам да 128 Гб |
| Сувязь | Wi-Fi |
| Асаблівасці | Gravity Sensing Automatic Rotation, Touchscreen |
| Памеры (Д х Ш х У) | 39.12 х 24.64 х 2.51 см |
| Вага | 1.48 кг |
| Крыніца харчавання | Battery Powered (includes 1 Lithium Ion battery) |
Заўвага: тэхнічныя характарыстыкі могуць быць зменены без папярэдняга паведамлення.
10. Гарантыя і падтрымка
10.1 Гарантыя на выраб
The Tibuta Digital Photo Frame comes with a one-year product warranty. This warranty covers manufacturing defects and operational issues arising from normal use. If any issues arise during this period, please contact our after-sales support team for assistance.
10.2 Падтрымка кліентаў
For technical support, warranty claims, or any other inquiries, please refer to the contact information provided on the Tibuta official website or your purchase documentation. When contacting support, please have your model number (TID15.6) and purchase date available.