1. Уводзіны
This manual provides detailed instructions for the setup, operation, maintenance, and troubleshooting of your Volcora 80mm Thermal Receipt Printer. This printer is designed for Point-of-Sale (POS) applications, offering fast and efficient thermal printing with an auto-cutter. It supports USB and Ethernet connectivity and is compatible with Android, Windows, and Linux operating systems.
2. Інфармацыя па бяспецы
- Пераканайцеся, што прынтар падключаны да заземленай разеткі.
- Не падвяргайце прынтар уздзеянню вады або празмернай вільготнасці.
- Пазбягайце размяшчэння прынтара пад прамымі сонечнымі прамянямі або побач з крыніцамі цяпла.
- Use only the power adapter provided with the printer.
- Трымайце прынтар далей ад дзяцей.
- Не спрабуйце разбіраць або рамантаваць прынтар самастойна. Звярніцеся па дапамогу ў службу падтрымкі кліентаў.
3. Змесціва ўпакоўкі
Праверце наяўнасць усіх прадметаў у камплекце:
- Volcora 80mm Thermal Receipt Printer
- Шнур харчавання
- Кабель USB
- Рулон тэставай паперы
- Інсталяцыйны кампакт-дыск

Figure 3.1: Package Contents. The image displays the Volcora Thermal Receipt Printer along with its accessories: a power cord, a USB cable, a roll of test paper, and an installation CD.
4. Прадукт скончыўсяview
4.1. Порты і кнопкі
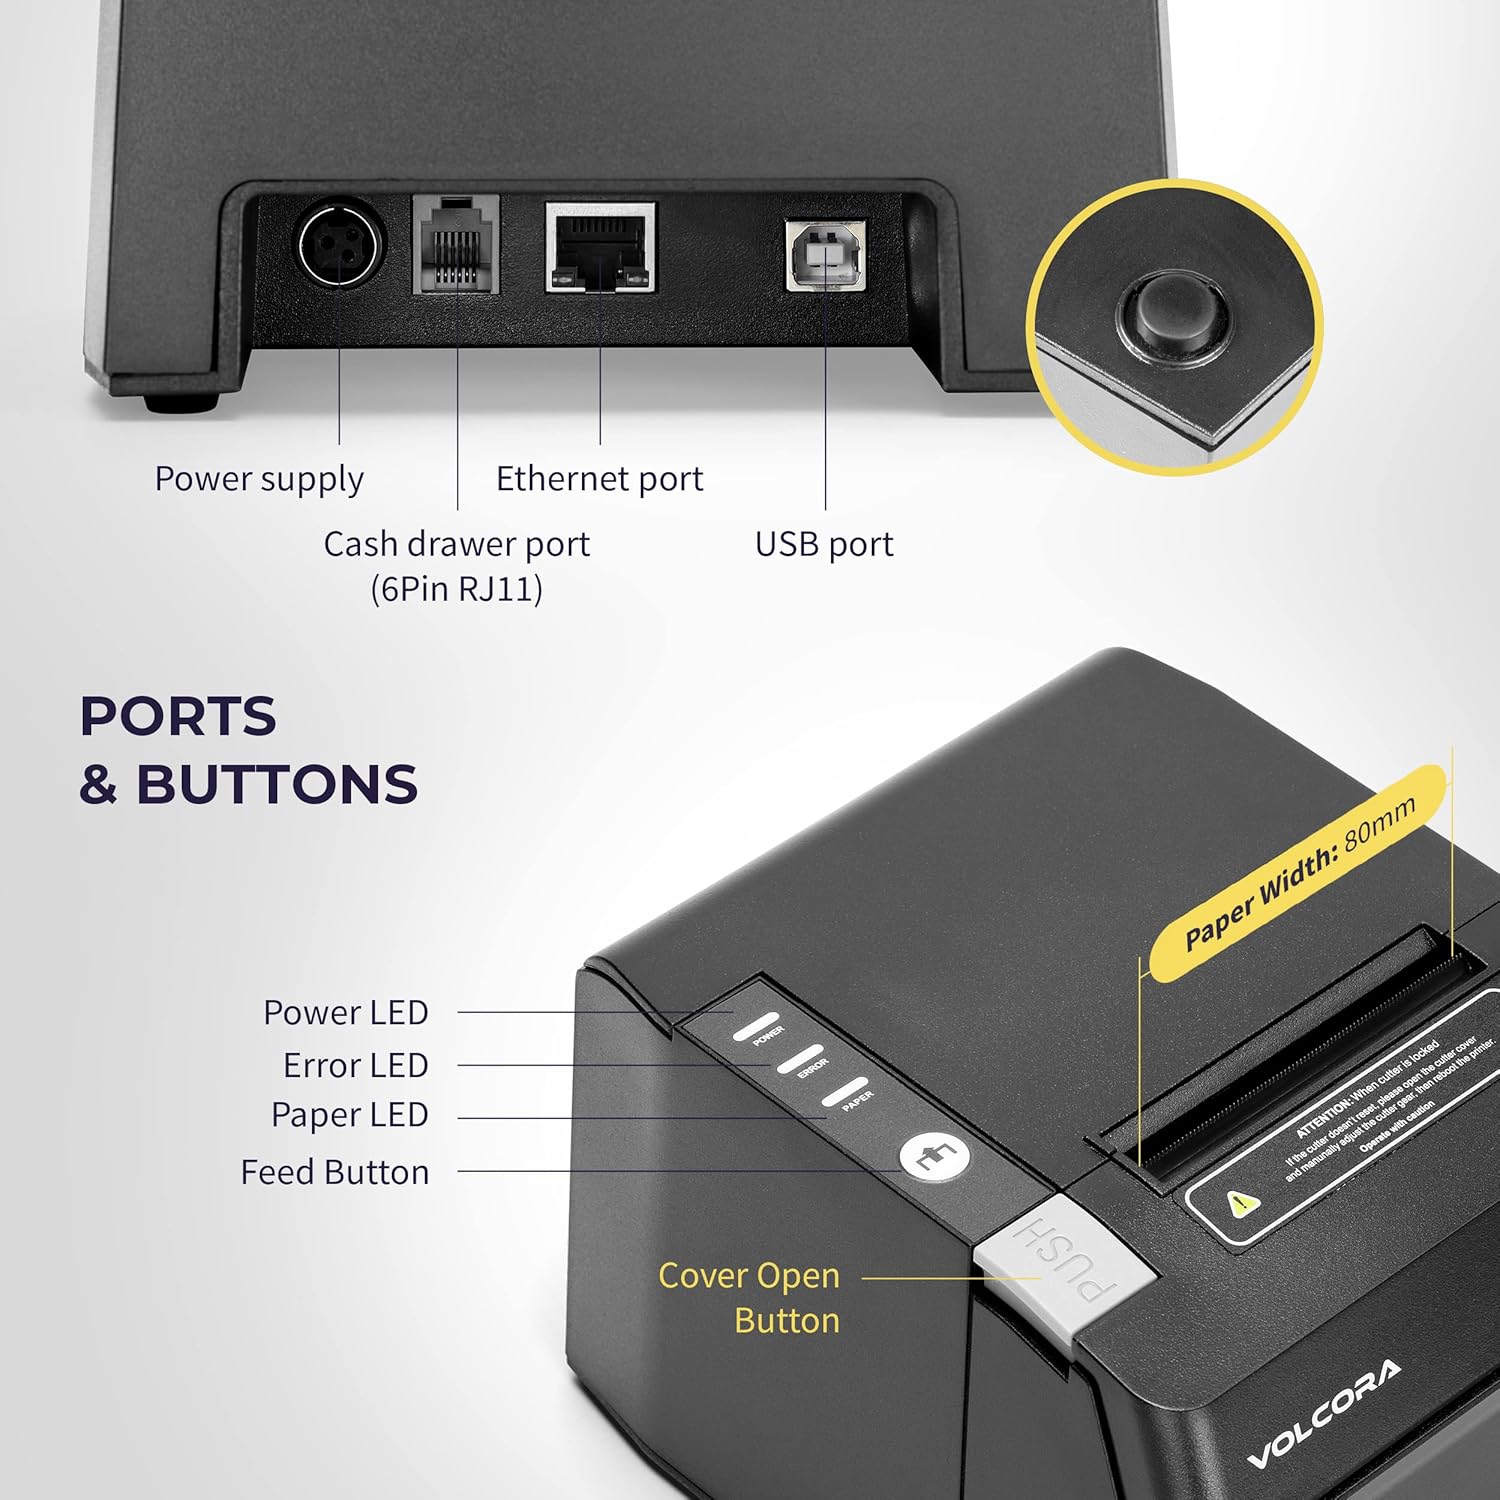
Figure 4.1: Printer Ports and Buttons. This image illustrates the rear ports including Power Supply, Ethernet Port, Cash Drawer Port (6Pin RJ11), and USB Port. It also shows the front panel with Power LED, Error LED, Paper LED, Feed Button, and Cover Open Button.
- Порт сілкавання: Падключаецца да адаптара сілкавання.
- Ethernet порт: For network connectivity (LAN).
- Cash Drawer Port (6Pin RJ11): Connects to a cash drawer.
- Порт USB: Для непасрэднага падключэння да кампутара.
- Святлодыёд харчавання: Паказвае стан харчавання.
- Святлодыёд памылак: Indicates printer errors.
- Paper LED: Indicates paper status (e.g., low paper).
- Кнопка падачы: Manually feeds paper.
- Cover Open Button: Releases the printer cover to access the paper roll.

Малюнак 4.2: Множныя views of the Volcora Thermal Receipt Printer, showing its compact design and various connection points.
5. Настройка
5.1. Unboxing and Connecting
- Распакуйце прынтар і выдаліце ўсе ўпаковачныя матэрыялы.
- Connect the power adapter to the printer and then to a power outlet.
- Connect the printer to your Windows PC using the provided USB cable.
Video 5.1: Getting Started with Volcora Thermal Receipt Printer. This video demonstrates the unboxing, connecting the printer to power and a Windows PC via USB, and performing a self-test.
5.2. Усталёўка рулона паперы
- Press the Cover Open Button to open the printer cover.
- Insert the thermal paper roll with the printing side facing up.
- Выцягніце невялікі кавалак паперы з-за разака.
- Шчыльна зачыніце вечка прынтара, пакуль яно не зафіксуецца на месцы.
5.3. Усталёўка драйвера (Windows)
- Download the latest driver for Windows from the Volcora support webсайт: volcora.com/support.
- Разархіваваць спампаванае file і запусціце праграму ўстаноўкі драйвераў.
- Follow the on-screen prompts, agreeing to the license and selecting your printer model (e.g., 500108).
- Ensure the printer is connected via USB during installation.
- After successful installation, the printer should be recognized in your computer's "Printers & scanners" settings.

Figure 5.2: Easy Installation Steps. This diagram outlines the four main steps: Download drivers, Install drivers, Connect the printer, and Test print.
5.4. Network Configuration (Ethernet)
If you are using the Ethernet connection, you may need to configure the printer's IP address to match your network's subnet. This can be done using the Setting Tool software.
- First, identify your PC's IP address and subnet mask.
- Perform a printer self-test (see Section 6.2) to get the printer's current IP address.
- If the printer's IP is not in the same subnet as your PC, you will need to adjust either the PC's IP or the printer's IP.
- Open the Setting Tool software (available from volcora.com/support).
- Select the printer model and choose 'NET' for the port type.
- Enter the printer's current IP address and click 'Get Param' to retrieve its network settings.
- Modify the IP address, subnet mask, and gateway to align with your network configuration.
- Click 'Set' to apply the new settings to the printer.
- Perform another self-test to confirm the IP address has been updated.
Video 5.2: How to Modify LAN IP Address of Volcora Receipt Printer. This video guides you through identifying current IP addresses, changing PC host IP, and using the Setting Tool to configure the printer's IP address for Ethernet connectivity.
5.5. Варыянты размяшчэння

Figure 5.3: Multiple Use & Placement. The printer can be wall-mounted for kitchen use or placed on a counter for receipt printing.
6. Інструкцыя па эксплуатацыі
6.1. Асноўны друк
Once the printer is connected and drivers are installed, you can print receipts from your POS software or any application that supports printing. The printer features a 203 dpi resolution for clear prints and an auto-cutter for efficient receipt handling.

Figure 6.1: Efficient Printing. This image highlights the printer's fast print speed, low noise operation, and clear 203 dpi output, showing a receipt with a QR code and a barcode.
The printer supports various barcode types including UPC-A, UPC-E, EAN13, EAN8, CODE39, ITF25, CODABAR, CODE93, CODE128, QRCODE, PDF417, and Data matrix.
6.2. Printer Self-Test
A self-test prints the printer's configuration, including its IP address (if connected via Ethernet), and confirms basic functionality.
- Пераканайцеся, што прынтар выключаны.
- Press and hold the "Feed" button.
- While holding the "Feed" button, power on the printer.
- Continue holding the "Feed" button for approximately 5 seconds until the self-test page begins to print.
6.3. Сумяшчальнасць
The Volcora Thermal Receipt Printer is compatible with various POS systems and operating environments. It supports ESC/POS commands.

Figure 6.2: Printer Compatibility. This chart lists compatible POS systems such as Loyverse, SumUp, Gloria Food, FoodZaps, TabShop POS, POSAPP.vn POS, Olsera POS, and KaHero POS. It also lists systems that are not compatible, including Square, Toast, Ubereats, Grubhub, Doordash, Postmates, Clover, and Shopify.
Сумяшчальныя аперацыйныя сістэмы: Android, Windows, Linux. (Note: A software development kit (SDK) is required for custom application development on Ethernet-supported systems, including Windows, Linux, and MAC.)
Не сумяшчальны з: Delivery platforms or POS applications such as Ubereats, Grubhub, Doordash, Postmates, Square, Clover, or Shopify. Does not offer Bluetooth or WiFi printing options.

Figure 6.3: Detailed Compatibility Table. This table shows compatibility for USB and Serial connections across various operating systems (Windows, Mac OS, Linux, Android, iOS) and notes about SDK and ESC/POS commands.
7. Тэхнічнае абслугоўванне
7.1. Уборка
- Regularly clean the printer's exterior with a soft, damp тканіна.
- To clean the thermal print head, use an alcohol swab. Ensure the printer is off and cool before cleaning.
- Remove any paper dust or debris from the paper path.
8. Выпраўленне непаладак
8.1. Распаўсюджаныя праблемы і рашэнні
| праблема | Магчымая прычына | Рашэнне |
|---|---|---|
| Прынтар не адказвае | Праблемы з харчаваннем, няшчыльны кабель, не ўсталяваны драйвер. | Check power connection. Ensure USB/Ethernet cable is securely connected. Verify driver installation (Section 5.3). |
| Blank pages or faint print | Thermal paper loaded incorrectly, print head dirty. | Reload paper with the thermal side facing up. Clean the thermal print head (Section 7.1). |
| Замяцце паперы | Няправільная загрузка паперы, старонні прадмет. | Open the cover, remove jammed paper, and ensure proper loading. Remove any obstructions. |
| Праблемы з падключэннем да Ethernet | Incorrect IP address configuration. | Perform a self-test to check the printer's IP. Use the Setting Tool to configure the IP address to match your network (Section 5.4). |
| Printer not compatible with POS software | Software not supported. | Refer to the compatibility list (Section 6.3). Contact your POS software provider for compatibility information. |
For further assistance, refer to the Volcora support center or contact customer service.
9. Тэхнічныя характарыстыкі
| Асаблівасць | Дэталь |
|---|---|
| Марка | Волькора |
| Нумар мадэлі | 500108 |
| Тэхналогія друку | Цеплавы |
| Хуткасць друку | Да 220 мм/с |
| Раздзяленне друку | 203 dpi |
| Шырыня паперы | 80 мм (3 1/8 цалі) |
| Шырыня друку | 72 мм |
| Інтэрфейс | USB, Ethernet (LAN), Cash Drawer (RJ11) |
| Тэрмін службы аўтаматычнага разака | 1.5 мільёна парэзаў |
| Уваходная магутнасць | Пераменны ток 110/240 В, 50-60 Гц |
| Выходная магутнасць | Пастаянны ток 24 В/2 А |
| Памеры прадукту | 7"D x 6"W x 4.5"H (approx. 16 x 4 x 16 inches as per some specs) |
| Вага прадмета | 3.76 фунта |
| Падтрымліваюцца штрых-коды | UPC-A, UPC-E, EAN13, EAN8, CODE39, ITF25, CODABAR, CODE93, CODE128, QRCODE, PDF417, Data matrix |
| Каманда друкаркі | ESC/POS |
10. Гарантыя
This Volcora Thermal Receipt Printer comes with a Абмежаваная гарантыя. Please refer to the warranty card included in your package or visit the Volcora support webсайт для падрабязных умоў.
11. Падтрымка кліентаў
For additional assistance, troubleshooting, or to download drivers and tools, please use the following resources:
- Volcora Help Portal: https://help.volcora.com
- Download Support Center: https://volcora.com/support
- Адрас падтрымкі кліентаў: support@volcora.com
Our U.S. based customer support team is available to assist with any integration issues.