EZFIX DVR: EF-D08E4B2-1L Camera
EZFIX Wired Security Camera System User Manual
Марка: EZFIX
мадэль: DVR: EF-D08E4B2-1L Camera
Уводзіны
This manual provides comprehensive instructions for the installation, operation, and maintenance of your EZFIX Wired Security Camera System. This system is designed to provide reliable 24/7 surveillance with 1080P HD full-color night vision, advanced motion detection, and remote access capabilities. Please read this manual thoroughly before using the product to ensure proper setup and optimal performance.
Што ў скрынцы
Пасля распакавання пераканайцеся, што ўсе пералічаныя ніжэй кампаненты наяўныя і знаходзяцца ў добрым стане.
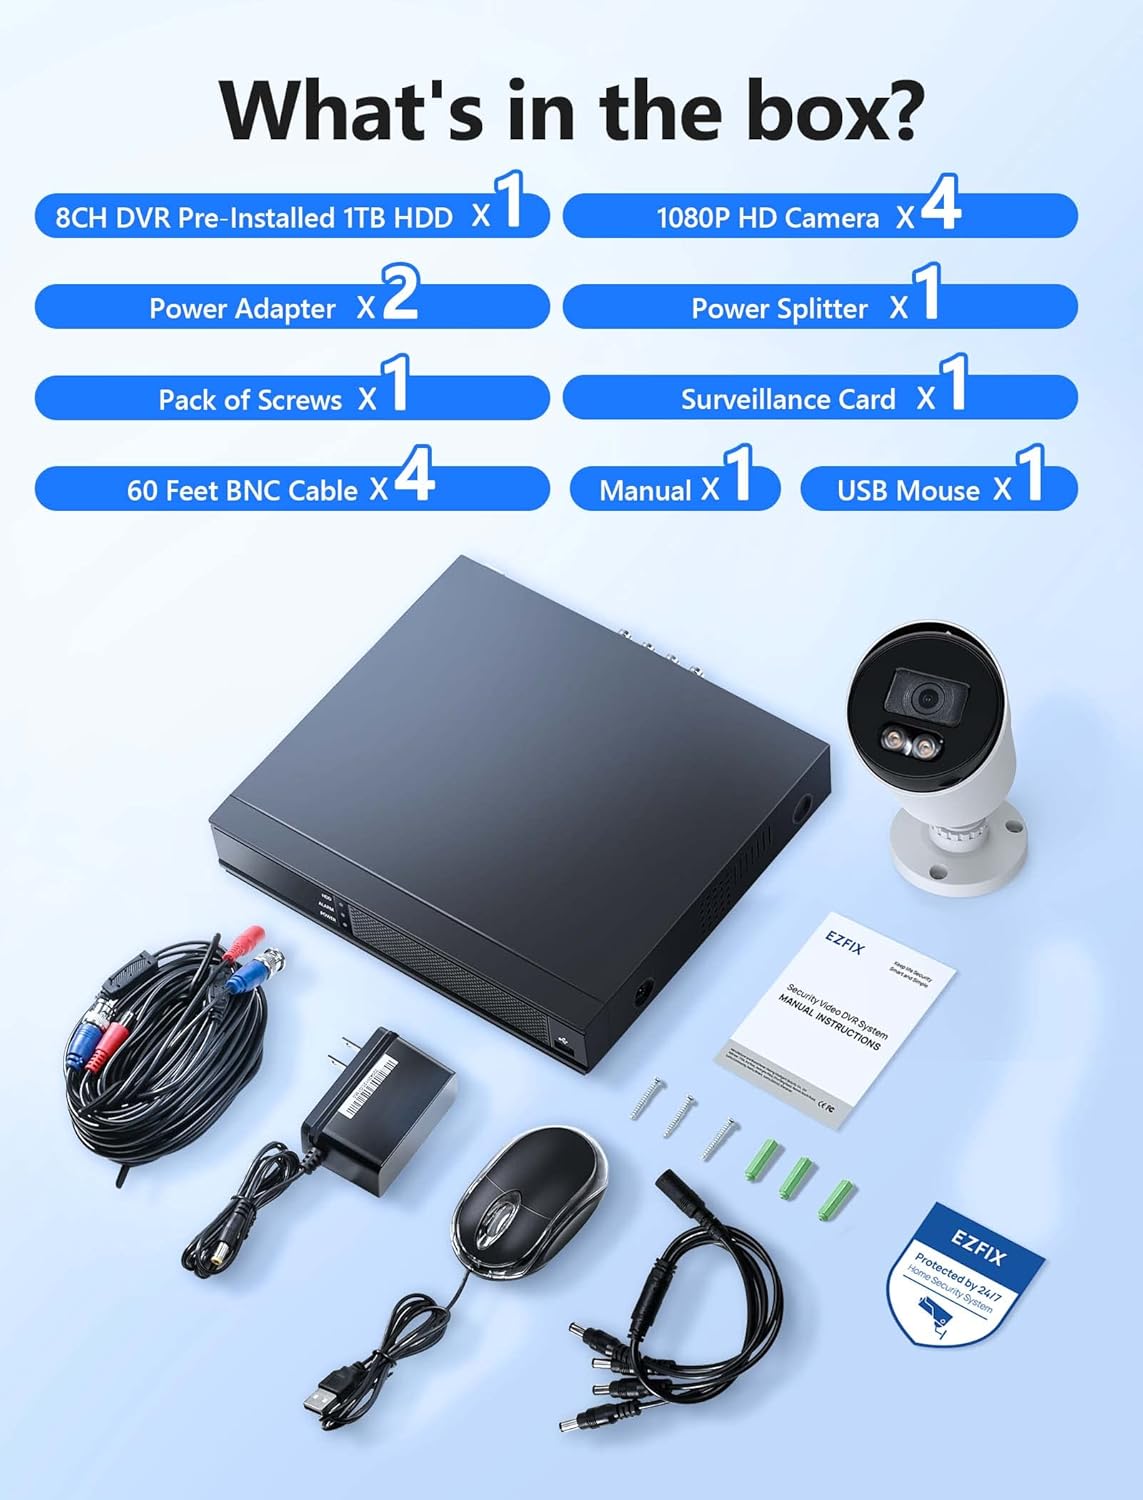
Image: All components included in the EZFIX Security Camera System package.
- 1 x 8CH DVR with Pre-installed 1TB HDD
- 4 x EZFIX 1080P HD Security Cameras
- 2 х адаптары сілкавання
- 1 х раздзяляльнік харчавання
- 4 кабеля BNC даўжынёй 60 футаў
- 1 пакет шруб
- 1 х USB-мыш
- 1 х Кіраўніцтва карыстальніка (гэты дакумент)
- 1 x Surveillance Card
Кіраўніцтва па ўстаноўцы
Follow these steps to set up your EZFIX security camera system.
1. DVR and Camera Placement
- Choose a secure, well-ventilated location for the DVR, away from direct sunlight and moisture.
- Plan the camera locations to cover desired areas, ensuring clear lines of sight and access to power. The cameras are IP66 waterproof, suitable for both indoor and outdoor use.

Image: EZFIX camera demonstrating IP66 waterproof rating for indoor and outdoor use.
2. Падключэнне сістэмы
- Падключэнне камер да відэарэгістратара: Use the provided BNC cables to connect each camera to the corresponding video input port on the back of the DVR.
- Connect Power to Cameras: Use the power adapters and power splitter to provide power to all cameras.
- Падключэнне відэарэгістратара да манітора: Connect the DVR to a monitor or TV using an HDMI or VGA cable (not included) to view the live feed and access settings.
- Падключэнне USB-мышы: Plug the included USB mouse into a USB port on the DVR for navigation.
- Падключэнне да сеткі (неабавязкова, але рэкамендуецца): For remote access and online features, connect the DVR to your router using an Ethernet cable (not included).
- Уключэнне: Connect the DVR's power adapter to the DVR and then to a power outlet. The system will boot up.

Image: Connection diagram for the EZFIX DVR and cameras.
3. Пачатковая канфігурацыя сістэмы
- Follow the on-screen prompts to complete the initial setup, including setting the date/time, creating a password, and configuring network settings if connected.
- Ensure the 1TB HDD is recognized and formatted for recording.
Інструкцыя па эксплуатацыі
жыць View і дысплей
Once powered on, the DVR will display the live video feed from all connected cameras on your monitor. You can switch between single-camera view і шматкамерная сетка view using the DVR interface.

Image: 24/7 Supervision System displaying multiple camera feeds.
1080P HD Full-Color Night Vision
The EZFIX cameras feature 1080P Full HD resolution for clear daytime and nighttime viewing. With built-in infrared LEDs, the cameras provide up to 100ft of night vision in dark conditions, capturing details even in low light.

Image: Day and night vision comparison showcasing 1080P FHD and Full-Color Night Vision.
Advanced Motion Detection & Instant Alerts
Configure motion detection zones and sensitivity through the DVR settings. When motion is detected, the system can send instant alerts via email and push notifications to your authorized mobile application, ensuring you are immediately aware of any activity.

Image: Motion detection and alert features with notification options.
24/7 Continuous Recording & Playback
The DVR, equipped with a 1TB hard drive, supports continuous 24/7 recording. The system utilizes advanced H.265+ video compression technology, which maintains high video quality while maximizing storage space and reducing file size by up to 50% compared to H.264. Older recordings are automatically overwritten as the HDD fills up.

Image: Benefits of H.265+ Video Compression.
Каб паўторнаview запісана footage, access the playback function on the DVR. You can search for specific recordings by time, event, or image. The system supports intelligent playback, allowing you to quickly find relevant moments.

Image: Intelligent Playback interface on monitor and mobile device.
Аддалены доступ
Access your security system remotely from your smartphone, tablet, or computer. Download the authorized application (e.g., Rview Pro App) from the App Store or Google Play. After installing, add your DVR device using its unique ID or QR code to view live feeds, playback recordings, and receive alerts from anywhere with an internet connection.
Image: Remote access via mobile app and computer interface.
Тэхнічнае абслугоўванне
- Чыстка камеры: Перыядычна чысціце аб'ектывы камеры мяккай губкайamp тканінай, каб забяспечыць выразную якасць выявы. Пазбягайце абразіўных ачышчальнікаў.
- Праверка кабеля: Regularly check all cables for wear, damage, or loose connections, especially for outdoor cameras.
- Абнаўленні праграмнага забеспячэння: Check the DVR's system settings for available firmware updates to ensure optimal performance and security.
- Стан жорсткага дыска: Monitor the health of the 1TB HDD through the DVR's system information to prevent data loss.
Ліквідацыю непаладак
| праблема | Магчымая прычына | Рашэнне |
|---|---|---|
| Няма відэа на маніторы. | Loose cable connection, incorrect input source on monitor, DVR not powered on. | Праверце падключэнне кабеляў HDMI/VGA. Пераканайцеся, што манітор падключаны да правільнага ўваходу. Праверце сілкаванне відэарэгістратара. |
| Няма папярэджанняў аб выяўленні руху. | Motion detection not enabled, sensitivity too low, incorrect detection zone. | Enable motion detection in DVR settings. Adjust sensitivity and detection zones. Ensure network connection for alerts. |
| Аддалены доступ не працуе. | DVR not connected to internet, incorrect app settings, firewall issues. | Verify DVR's network connection. Check app settings (device ID, password). Ensure router firewall is not blocking access. |
| Recording issues (no recording, incomplete). | HDD full, HDD error, recording schedule not set. | Check HDD status and ensure it's formatted. Verify recording schedule. If HDD is faulty, consider replacement. |
Тэхнічныя характарыстыкі
| Асаблівасць | Дэталь |
|---|---|
| Марка | EZFIX |
| Тэхналогія падлучэння | Правадная |
| Дазвол відэазахопу | 1080p |
| Асаблівасці | 1080P HD Full-Color Night Vision, Compatible System, Easy Installation, Motion Sensor, IP66 Waterproof |
| Колькасць каналаў | 8 |
| Ёмістасць памяці | 1 TB (expandable up to 6TB) |
| Колер | White Wired Home Security Cameras System |
| Крыніца харчавання | AC/DC |
| Памеры прадмета (Д х Ш х У) | 14.76 х 11.61 х 11.82 цалі |
| Рэкамендуемае выкарыстанне | Surveillance (home, office, warehouse, shopping mall, garden) |
| Сумяшчальныя прылады | Smartphones, Personal Computers, TV, Tablets, Cameras, Laptops |
| Тэхналогія нізкай асветленасці | Начны колер |
| Дыяпазон начнога бачання | 82 футы (прыблізна 25 метраў) |
| Частата кадраў | 30 кадраў у секунду |
| Рэжым запісу | Continuous Motion Detection |
| Усяго партоў USB | 2 |
| Абсталяванне інтэрфейсу | Ethernet |
| Тып аб'ектыва | Шырокі кут |
| Відэа ўваход | BNC, CVBS |
| Viewing кут | 82.2 градусаў |
Гарантыя і падтрымка
Your EZFIX Security Camera System comes with a Гарантыя 1 год from the date of purchase. This warranty covers manufacturing defects and ensures replacement availability within 12 months.
EZFIX is committed to providing excellent customer service. We offer:
- Quick replies to inquiries within 24 hours.
- Lifetime service and technical support.
For technical assistance, troubleshooting, or warranty claims, please refer to the contact information provided on the product packaging or the official EZFIX webсайт. Калі ласка, падрыхтуйце нумар мадэлі і інфармацыю пра пакупку, калі звярняцеся ў службу падтрымкі.
Ask a question about this manual
Ask about setup, troubleshooting, compatibility, parts, safety, or missing instructions. Manuals+ will review the question and use this page’s manual context to help answer it.