1. Уводзіны
This manual provides essential information for the safe and efficient operation of your Acekool Portable Air Conditioner. This 3-in-1 unit offers cooling, fan, and dehumidification functions, designed to provide comfort in various indoor environments. Please read this manual thoroughly before installation and use, and retain it for future reference.
2. Інфармацыя па бяспецы
Каб прадухіліць траўміраванне карыстальніка або іншых людзей і пашкоджанне маёмасці, неабходна выконваць наступныя інструкцыі. Няправільная праца з -за ігнаравання інструкцый можа нанесці шкоду.
- Электрабяспека: Ensure the power supply matches the unit's requirements (220 Volts). Do not operate with a damaged power cord or plug. Do not share the electrical outlet with other appliances. Always unplug the unit before cleaning or servicing.
- Хладагент (R290): This appliance contains R290 refrigerant, which is flammable. Keep the unit away from open flames, heat sources, and ignition sources. Do not puncture or burn the refrigerant circuit.
- Размяшчэнне: Place the unit on a flat, stable surface. Maintain a minimum distance of 20 cm from walls or other objects to ensure proper airflow. Do not block air inlets or outlets.
- Дзеці і хатнія жывёлы: Keep children and pets away from the unit. Do not allow children to play with the appliance or its controls.
- Адвод вады: Ensure proper drainage of condensed water, especially during dehumidification mode, to prevent water overflow and damage.
- Тэхнічнае абслугоўванне: Выконвайце тэхнічнае абслугоўванне толькі так, як апісана ў гэтым кіраўніцтве. Для рамонту звярніцеся да кваліфікаванага абслугоўваючага персаналу.
3. Што ў скрынцы
Carefully unpack the box and ensure all items are present and undamaged. If any items are missing or damaged, contact customer support.
- Portable Air Conditioner Unit (x1)
- Пульт дыстанцыйнага кіравання (x1)
- Exhaust Hose (x1)
- Window Sealing Kit (x1)
- Drain Hose (x1)
- Кіраўніцтва карыстальніка (x1)

Image: All components included in the product package, clearly labeled with numbers for identification.
4. Настройка
Выканайце наступныя дзеянні, каб наладзіць партатыўны кандыцыянер для аптымальнай прадукцыйнасці.
4.1 Размяшчэнне адзінак
- Размясціце прыладу на цвёрдай, роўнай паверхні ў патрэбным пакоі.
- Ensure there is at least 20 cm of space around the unit for proper air circulation.
- Для ўстаноўкі выхлапнога шланга размясціце прыладу побач з акном або дзвярыма.
4.2 Усталёўка выхлапнога шланга
- Attach the exhaust hose connector to the back of the air conditioner unit.
- Падоўжыце выхлапны шланг і прымацуйце адаптар аконнага камплекта да другога канца.
- Adjust the window sealing plate to fit your window opening. Secure it in place.
- Insert the window kit adapter into the opening of the window sealing plate.
- Для максімальнай эфектыўнасці пераканайцеся, што выхлапны шланг максімальна прамы і кароткі. Пазбягайце перагібаў або рэзкіх выгібаў.

Image: Visual instructions demonstrating the process of connecting the exhaust hose to the unit and installing it in a window.

Выява: Падрабязная view of the exhaust hose connection points, highlighting the ease of installation.
4.3 Падключэнне харчавання
Plug the power cord into a grounded electrical outlet (220V). Do not use extension cords or adapters.
5. Інструкцыя па эксплуатацыі
Your Acekool Portable Air Conditioner can be operated using the control panel on the unit or the included remote control.
5.1 Панэль кіравання скончанаview
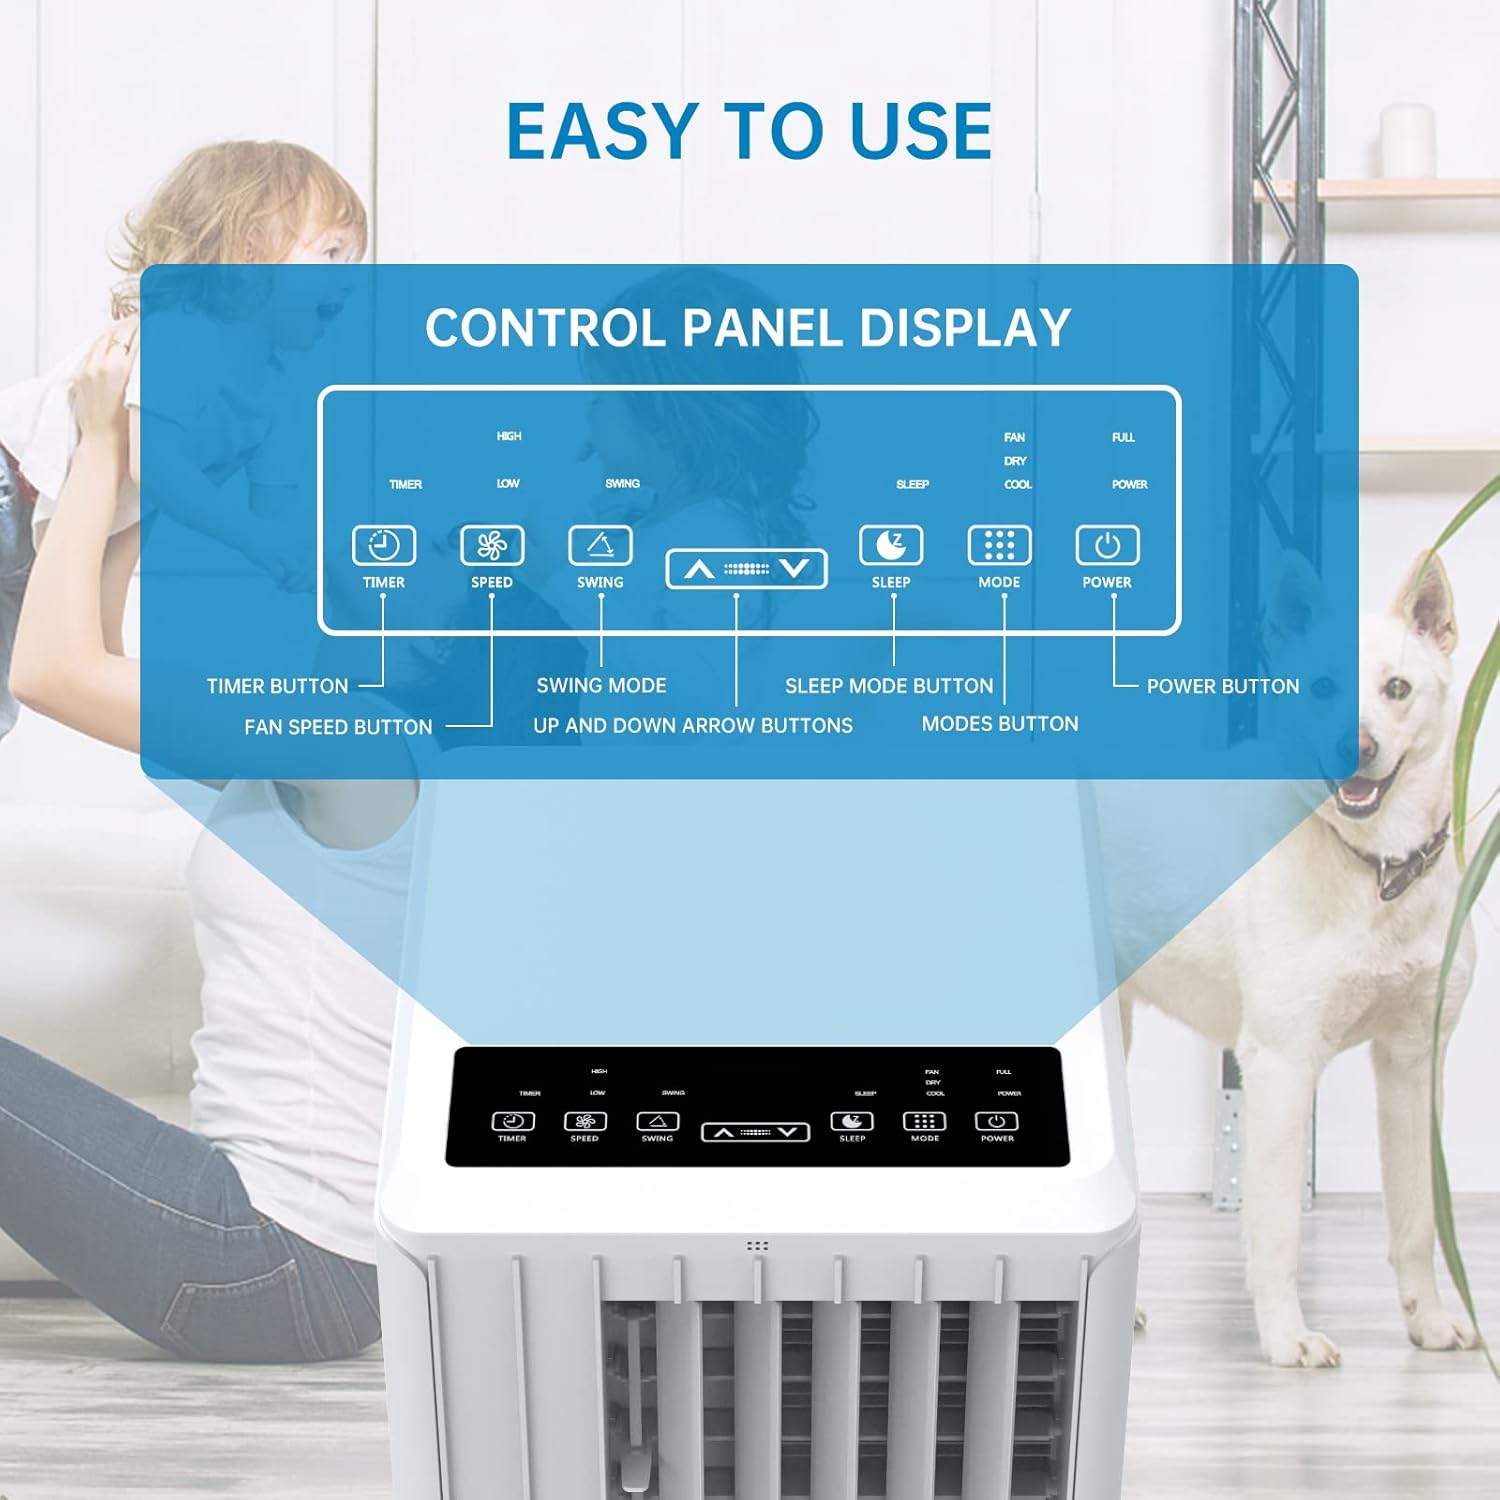
Image: A detailed diagram illustrating the control panel buttons and their functions, including Timer, Speed, Swing, Sleep, Mode, and Power.

Image: A user interacting with the touch-sensitive control panel, demonstrating its intuitive design.
- Кнопка харчавання: Уключае або выключае прыладу.
- Кнопка рэжыму: Цыклічна пераключаецца паміж рэжымамі астуджэння, вентыляцыі і асушэння.
- Кнопка хуткасці: Рэгулюе хуткасць вентылятара (нізкая, сярэдняя, высокая).
- Кнопка таймера: Sets the auto ON/OFF timer (up to 24 hours).
- Кнопка павароту: Уключае або адключае аўтаматычнае паваротанне жалюзі для больш шырокага размеркавання паветра.
- Стрэлкі ўверх/уніз: Adjusts temperature settings or timer duration.
- Кнопка сну: Activates Sleep Mode for quiet operation and energy saving during sleep.
5.2 Пульт дыстанцыйнага кіравання
The remote control provides convenient operation from a distance. Ensure there are no obstructions between the remote and the unit's receiver.

Image: The portable air conditioner unit alongside its remote control, demonstrating the convenience of remote operation and the air swing feature.
Рэжымы працы 5.3
The unit offers three primary operating modes:

Image: A graphic illustrating the three distinct modes of operation: Cooling, Dehumidifying, and Fan, with their respective visual effects.
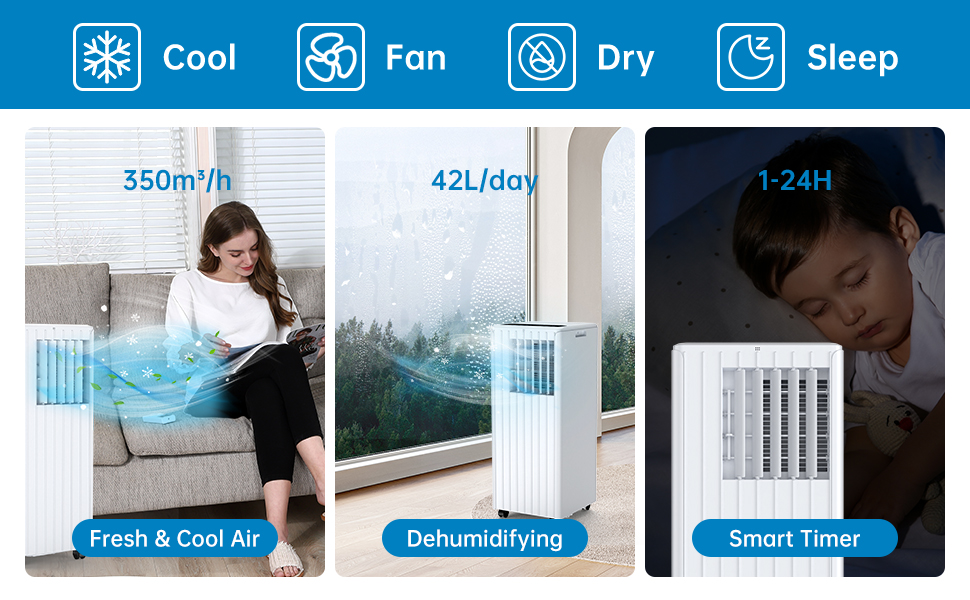
Image: A comprehensive display of the unit's modes, including cooling, fan, dry (dehumidifying), and sleep, along with performance metrics.
- Рэжым астуджэння: Provides powerful cooling. Set your desired temperature using the Up/Down arrows. The unit will cool until the room reaches the set temperature.
- Рэжым вентылятара: Цыркулюе паветра без астуджэння. Выберыце нізкую, сярэднюю або высокую хуткасць вентылятара.
- Рэжым асушэння: Removes excess moisture from the air. The unit will operate at a low fan speed. Ensure the continuous drainage hose is connected for prolonged use in this mode.
5.4 Рэжым сну
Activate Sleep Mode for quiet operation and energy efficiency during nighttime. In this mode, the fan speed is reduced, and the temperature may gradually increase to ensure comfortable sleep.

Image: The portable air conditioner in a bedroom setting, illustrating its quiet operation and features like automatic shut-off and 24-hour smart timer for undisturbed sleep.

Image: A graph depicting the temperature adjustment curve in Sleep Mode, showing how the temperature gradually rises over several hours to maintain comfort.
6. Тэхнічнае абслугоўванне
Рэгулярнае тэхнічнае абслугоўванне забяспечвае даўгавечнасць і эфектыўную працу вашага кандыцыянера.
6.1 Ачыстка паветранага фільтра
Паветраны фільтр варта чысціць кожныя два тыдні або часцей у залежнасці ад выкарыстання і якасці паветра. Забруджаны фільтр можа знізіць эфектыўнасць астуджэння і паветраны паток.
- Адключыце прыладу ад электрычнай разеткі.
- Знайдзіце і зніміце паветраны фільтр з задняй або бакавой часткі прылады.
- Wash the filter under running water (warm, not hot) or use a vacuum cleaner to remove dust.
- Дайце фільтру цалкам высахнуць, перш чым усталёўваць яго назад у прыладу. Не падвяргайце яго ўздзеянню прамых сонечных прамянёў.

Выява: буйны план view of the washable filter being easily removed from the unit for maintenance.
6.2 Сцёк вады
The unit has an internal water collection tank. When the tank is full, the unit will stop operating and display an indicator. You will need to drain the water manually.
- Адключыце прыладу ад сеткі.
- Place a shallow pan or bucket under the drainage outlet at the bottom rear of the unit.
- Remove the drainage plug and allow the water to drain completely.
- Replace the drainage plug firmly.
For continuous drainage in dehumidification mode, connect the provided drain hose to the continuous drainage outlet.
6.3 Генеральная ўборка
Працярыце вонкавую частку прылады мяккай, damp тканіна. Не выкарыстоўвайце агрэсіўныя хімікаты, абразіўныя рэчывы або растваральнікі.
6.4 Захоўванне
Перш чым захоўваць прыладу на працяглы перыяд:
- Drain all condensed water.
- Ачысціце паветраны фільтр.
- Адключыце шнур харчавання і акуратна згарніце яго.
- Захоўвайце прыладу ў сухім, прахалодным месцы, удалечыні ад прамых сонечных прамянёў і экстрэмальных тэмператур.
7. Выпраўленне непаладак
Калі ў вас узніклі праблемы з кандыцыянерам, звярніцеся да табліцы ніжэй, каб знайсці распаўсюджаныя праблемы і рашэнні.
| праблема | Магчымая прычына | Рашэнне |
|---|---|---|
| Прылада не ўключаецца | Няма крыніцы харчавання Бак для вады поўны Уключана абарона ад перагрэву | Check power plug and outlet Зліце рэзервуар для вады Allow unit to cool down for 30 minutes |
| Недастатковае астуджэнне | Паветраны фільтр брудны Exhaust hose blocked or kinked Памер пакоя занадта вялікі Вокны/дзверы адчынены Занадта высокая тэмпература | Чысты паветраны фільтр Check and clear exhaust hose Ensure unit is suitable for room size Зачыніце ўсе вокны і дзверы Знізьце зададзеную тэмпературу |
| Уцечка вады | Аслаблена зліўная пробка Прылада не на ўзроўні Continuous drain hose improperly connected | Надзейная зліўная корак Пастаўце прыладу на роўную паверхню Ensure drain hose is properly attached and sloped downwards |
| Блок шумны | Прылада не на роўнай паверхні Вібрацыя ўнутраных кампанентаў | Размясціце прыладу на роўнай, устойлівай паверхні This may be normal operation noise, especially at high fan speeds. Ensure no obstructions. |
| Пульт дыстанцыйнага кіравання не працуе | Батарэі разраджаны або ўстаўлены няправільна Перашкода паміж пультам і прыладай | Замяніце батарэйкі, праверце палярнасць Remove any obstructions, ensure direct line of sight |
8. Тэхнічныя характарыстыкі
Technical specifications for the Acekool Portable Air Conditioner Model PAC-M09.
| Асаблівасць | Спецыфікацыя |
|---|---|
| Нумар мадэлі | PAC-M09 |
| Марка | Acekool |
| Магутнасць астуджэння | 9000 BTU |
| Хладагент | R290 |
| Электразабеспячэнне | 220 вольт |
| Максімальны ўзровень шуму | 55 дБ(А) |
| Памеры прадукту (Д х Ш х У) | 38.2 х 35 х 88.5 см |
| Вага прадукту | 26 кг |
| Ёмістасць абязводжвання | 42 л / дзень |
| Рэйтынг энергаэфектыўнасці | Клас А |
| ПРАЗВІЦЦА | 2.8 |
| Рэкамендаваная зона пакрыцця | 30-40 м² |
9. Гарантыя і падтрымка
For warranty information, technical support, or service inquiries, please refer to the warranty card included with your product or contact Acekool customer service through their official website or the retailer where the product was purchased. Please have your model number (PAC-M09) and purchase date ready when contacting support.