Auronic AU3129 12L
Auronic Electric Air Dehumidifier
Model: AU3129 12L
Уводзіны
Thank you for choosing the Auronic Electric Air Dehumidifier. This appliance is designed to effectively remove excess moisture from the air, creating a more comfortable and healthier indoor environment. It is ideal for use in various spaces such as bathrooms, basements, and living areas, helping to prevent issues like mold, mildew, and dampness. Please read this manual thoroughly before operation to ensure proper use, maintenance, and safety.

Figure 1: Auronic Electric Air Dehumidifier (Model AU3129 12L)
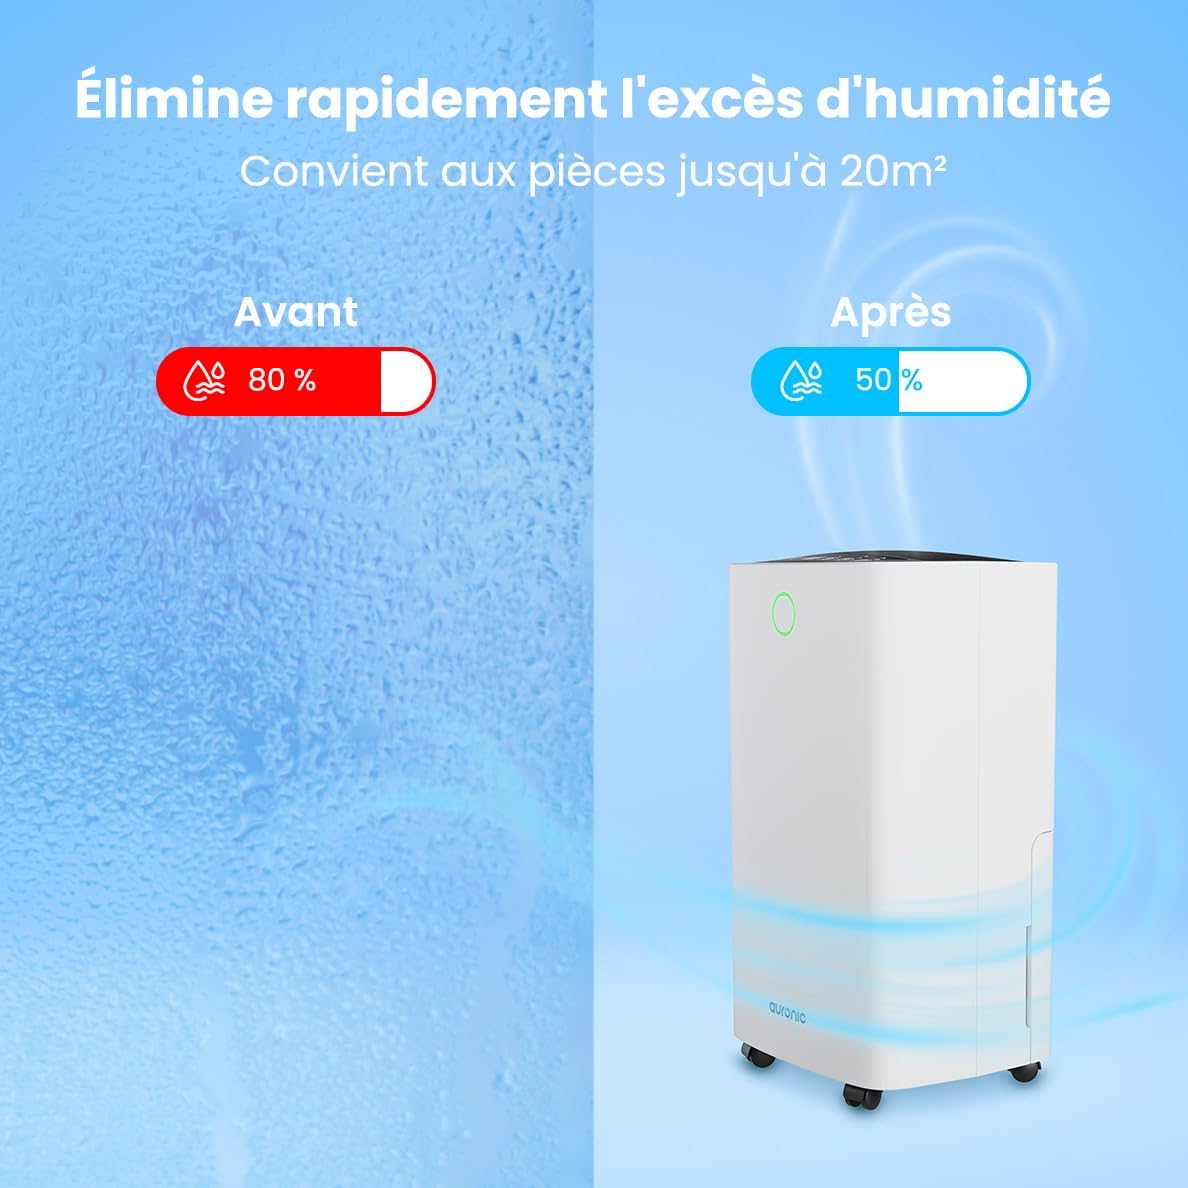
Figure 2: Humidity Reduction Effectiveness
Інфармацыя па бяспецы
Каб знізіць рызыку пажару, паражэння электрычным токам або траўмаў, заўсёды выконвайце наступныя асноўныя меры бяспекі:
- Прачытайце ўсе інструкцыі перад выкарыстаннем прыбора.
- Пераканайцеся, што крыніца харчавання адпавядае аб'ёмуtage, указаны на этыкетцы з ацэнкай.
- Не выкарыстоўвайце асушальнік паветра, калі пашкоджаны шнур харчавання або вілка.
- Заўсёды стаўце прыладу на ўстойлівую, роўную паверхню.
- Keep the appliance at least 20 cm away from walls or other objects to ensure proper airflow.
- Не ўстаўляйце пальцы або староннія прадметы ў адтуліну для ўваходу або выхаду паветра.
- Адключыце асушальнік паветра ад сеткі перад чысткай, перамяшчэннем або любым тэхнічным абслугоўваннем.
- Не выкарыстоўвайце прыладу ў вільготным або г.дamp environments where water may splash.
- Захоўваць у месцах, недаступных дзецям.
- If the unit has been tilted, allow it to stand upright for at least 24 hours before plugging it in.
Прадукт скончаныview
Familiarize yourself with the components of your Auronic Dehumidifier.

Figure 3: Dehumidifier Dimensions and Included Accessories

Figure 4: Easy Portability with Wheels and Handle
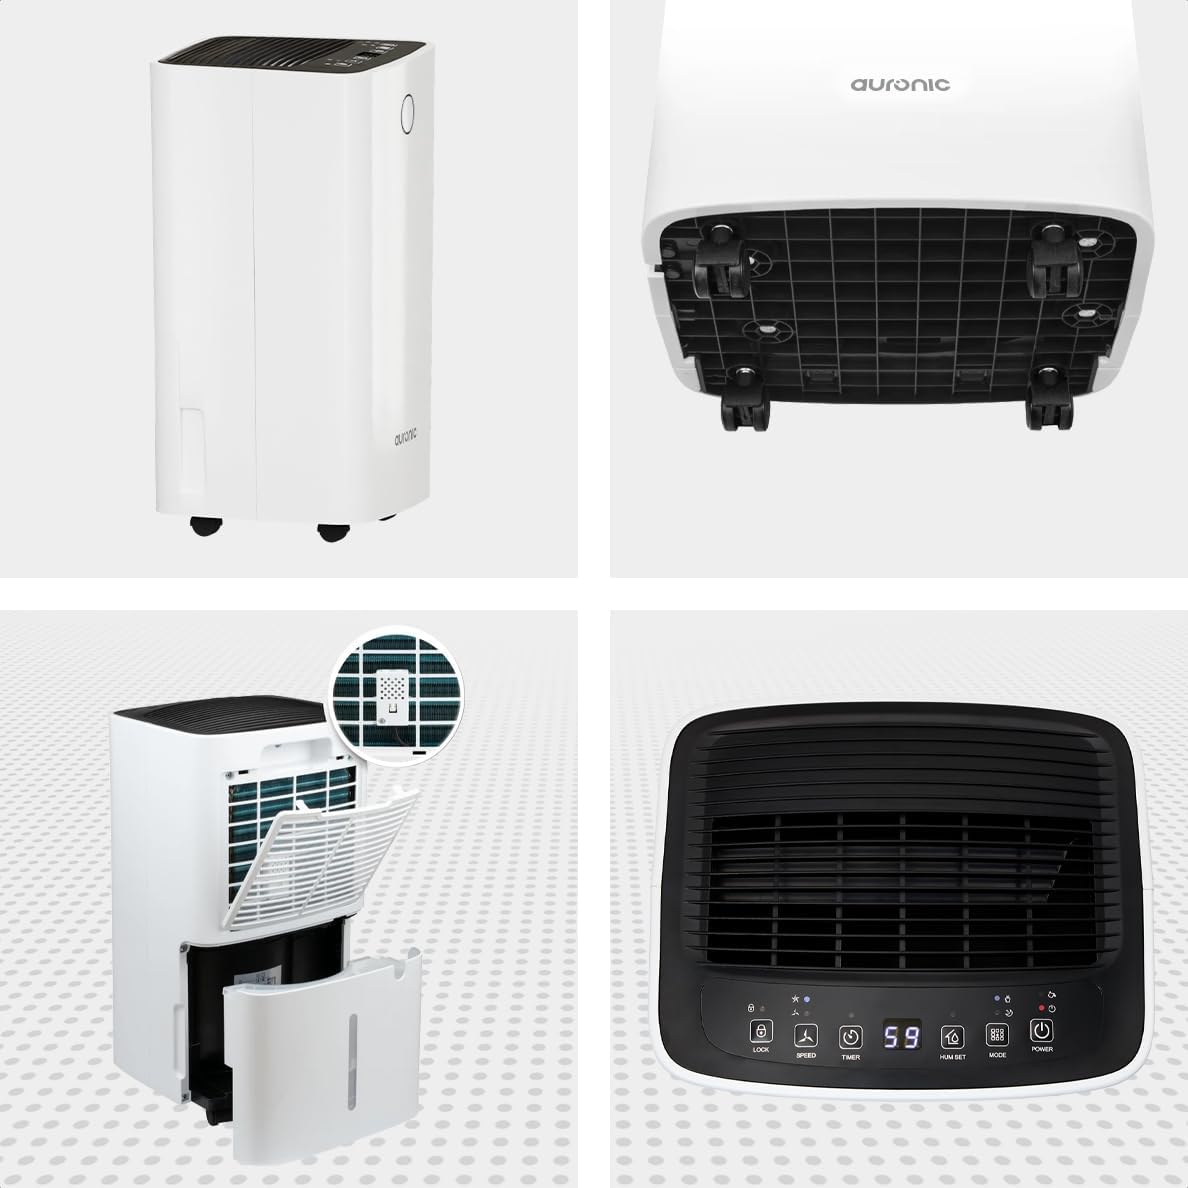
Малюнак 5: Шматвугольны View of the Dehumidifier

Малюнак 6: Панэль кіравання зверхуview
Ключавыя кампаненты:
- Панэль кіравання: Intuitive interface for setting modes, humidity levels, and timer.
- Уваход/выхад паветра: Where air enters and exits the unit. Ensure these are not obstructed.
- Рэзервуар для вады: Removable 2-liter tank for collecting condensed water.
- Выпуск бесперапыннага дрэнажу: Port for attaching a hose for continuous drainage.
- Колы і ручка: Для зручнасці пераноскі.
- Паветраны фільтр: Located at the back, helps filter dust from the air.
Настройка
- Распакаванне: Асцярожна дастаньце асушальнік паветра з упакоўкі. Захавайце ўпакоўку для наступнага захоўвання або транспарціроўкі.
- Размяшчэнне: Place the unit upright on a firm, level surface in the desired location. Ensure there is at least 20 cm of clear space around all sides for proper air circulation.
- Пачатковы рэжым чакання: If the unit was tilted during transport, let it stand upright for a minimum of 24 hours before plugging it in. This allows the refrigerant to settle.
- Падключэнне сілкавання: Падключыце шнур сілкавання да заземленай электрычнай разеткі.
- Рэзервуар для вады: Ensure the water tank is correctly inserted into the unit. The dehumidifier will not operate if the tank is full or improperly seated.
Інструкцыя па эксплуатацыі
Функцыі панэлі кіравання:
| Кнопка/індыкатар | Функцыя |
|---|---|
| Кнопка харчавання | Уключае або выключае прыладу. |
| Кнопка рэжыму | Cycles through operating modes (e.g., Dehumidify, Laundry Drying, Sleep). |
| Hum Set Button | Adjusts the desired humidity level (e.g., 40% - 80% RH). |
| Кнопка таймера | Усталёўвае таймер аўтаматычнага ўключэння або аўтаматычнага выключэння (да 12 гадзін). |
| Кнопка хуткасці | Adjusts fan speed (e.g., High, Low). |
| Кнопка блакіроўкі | Блакуе панэль кіравання, каб прадухіліць выпадковыя змены. |
| Humidity Indicator LED | Changes color based on current humidity level (e.g., Blue: <45%, Green: 45-65%, Red: >65%). Figure 7: Humidity Indicator LED Explained |
Агульныя аперацыі:
- Уключыць: Націсніце Магутнасць button. The display will show the current room humidity.
- Устанавіць патрэбную вільготнасць: Націсніце Hum Set button repeatedly to select your desired humidity level. The unit will operate until this level is reached, then cycle on and off to maintain it.
- Выберыце рэжым: Націсніце Рэжым button to choose between different operating modes.
- Рэжым асушэння: Standard operation to reduce ambient humidity.
- Рэжым сушкі бялізны: Increases fan speed and continuous operation to assist in drying clothes.

Figure 8: Using the Dehumidifier for Laundry Drying
- Рэжым сну: Operates at a lower fan speed and reduced noise level for quiet nighttime use.

Figure 9: Silent Operation for Nighttime Use
- Устанавіць таймер: Націсніце Таймер button to set an auto-off time (when the unit is on) or an auto-on time (when the unit is off).

Figure 10: Integrated Timer Function
- Хуткасць вентылятара: Выкарыстоўвайце хуткасць button to adjust the fan speed as desired.
- Блакіроўка ад дзяцей: Націсніце і ўтрымлівайце Замак button for 3 seconds to activate/deactivate the child lock function.
Бесперапынны дрэнаж:
For continuous operation without emptying the water tank, you can connect the included drain hose to the continuous drain outlet. Ensure the hose is sloped downwards to allow gravity drainage into a suitable receptacle or drain.

Figure 11: Continuous Drainage Setup
Тэхнічнае абслугоўванне
Рэгулярнае тэхнічнае абслугоўванне забяспечвае аптымальную прадукцыйнасць і падаўжае тэрмін службы вашага асушальніка паветра.
Апаражненне рэзервуара для вады:
When the water tank is full, the unit will automatically stop operating and an indicator light will illuminate. Carefully remove the tank, empty the collected water, and reinsert it firmly until it clicks into place.

Figure 12: Removing the 2-Liter Water Tank
Ачыстка паветранага фільтра:
Паветраны фільтр варта чысціць кожныя два тыдні або часцей у залежнасці ад выкарыстання і якасці паветра.
- Выключыце і адключыце асушальнік ад сеткі.
- Знайдзіце і зніміце паветраны фільтр з задняй панэлі прылады.
- Ачысціце фільтр цёплай вадой з мылам або выкарыстоўвайце пыласос для выдалення пылу.
- Старанна прамыйце фільтр і дайце яму цалкам высахнуць, перш чым усталяваць яго назад.
Ачыстка вонкавых паверхняў прылады:
Працярыце знешнюю частку асушальніка мяккім, damp тканіна. Не выкарыстоўвайце агрэсіўныя хімікаты або абразіўныя ачышчальнікі.
Ліквідацыю непаладак
Перш чым звяртацца ў службу падтрымкі кліентаў, азнаёмцеся з наступнымі распаўсюджанымі праблемамі і іх рашэннямі:
| праблема | Магчымая прычына | Рашэнне |
|---|---|---|
| Асушальнік паветра не ўключаецца. | No power, power cord loose, water tank full or improperly seated. | Праверце падключэнне да электрычнасці, апаражніце і правільна ўстаўце рэзервуар для вады. |
| Вада не сабраная. | Room humidity too low, temperature too low, air filter clogged, continuous drain hose connected. | Check room humidity/temperature, clean air filter, ensure continuous drain hose is not connected if tank collection is desired. |
| Агрэгат шумны. | Unit not on a level surface, air filter clogged, internal component issue. | Place on a level surface, clean air filter. If noise persists, contact support. |
| Dehumidification is slow or ineffective. | Room size too large, doors/windows open, air inlets/outlets blocked, air filter dirty. | Ensure room is sealed, clear obstructions, clean air filter. |
Тэхнічныя характарыстыкі
| Асаблівасць | Дэталь |
|---|---|
| Марка | Аўронавы |
| Назва мадэлі | Auronic Silent Low Consumption Dehumidifier |
| Памеры прадукту (Д х Ш х У) | 21.5 х 47 х 25.5 см |
| Вага прадмета | 11 кілаграма |
| Capacity (Dehumidification) | 12 літраў у дзень |
| Аб'ём бака для вады | 2 літра |
| Магутнасць | 185 ват |
| Колер | Белы |
| Асаблівасці | Easy to use, Laundry Drying function, Prevents and effectively eliminates humidity, 2-liter tank, Automatic shut-off. |
| Рэкамендуемае выкарыстанне | Айчынныя |
Гарантыя і падтрымка
Auronic products are manufactured to the highest quality standards. For warranty information, technical support, or service inquiries, please refer to the contact details provided on your purchase receipt or visit the official Auronic website. Please have your model number (AU3129 12L) and purchase date ready when contacting support.
Ask a question about this manual
Ask about setup, troubleshooting, compatibility, parts, safety, or missing instructions. Manuals+ will review the question and use this page’s manual context to help answer it.